Beiv class="text-justify">
Hi friends, welcome to my blog for the 4th week in the SLC classes. It was a hands-on demonstration, and this took a longer time this time to decipher, but it was good the job was well delivered. I hope this presentation serves the purpose for which it was meant. Let's read through.
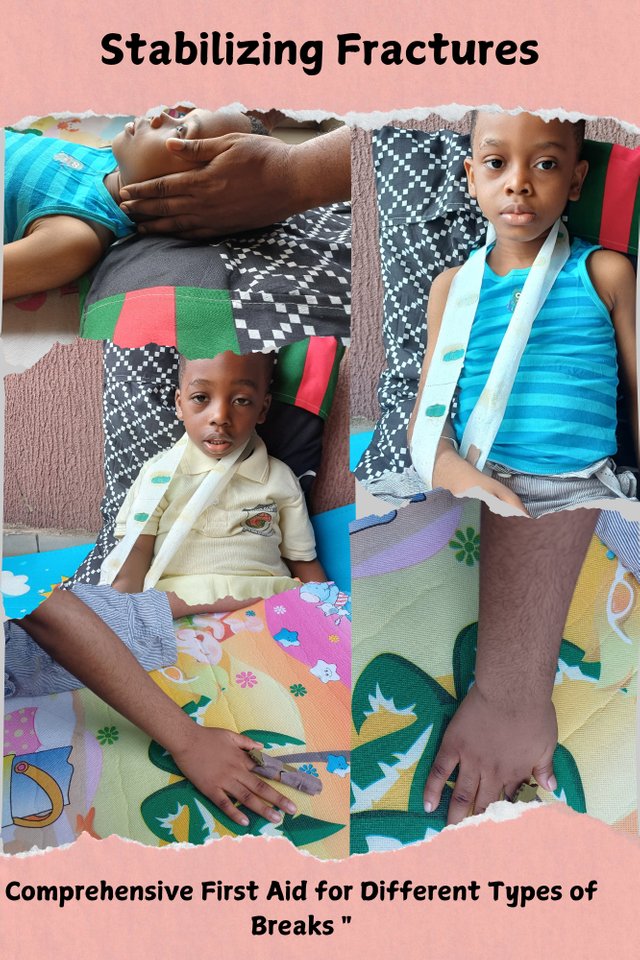
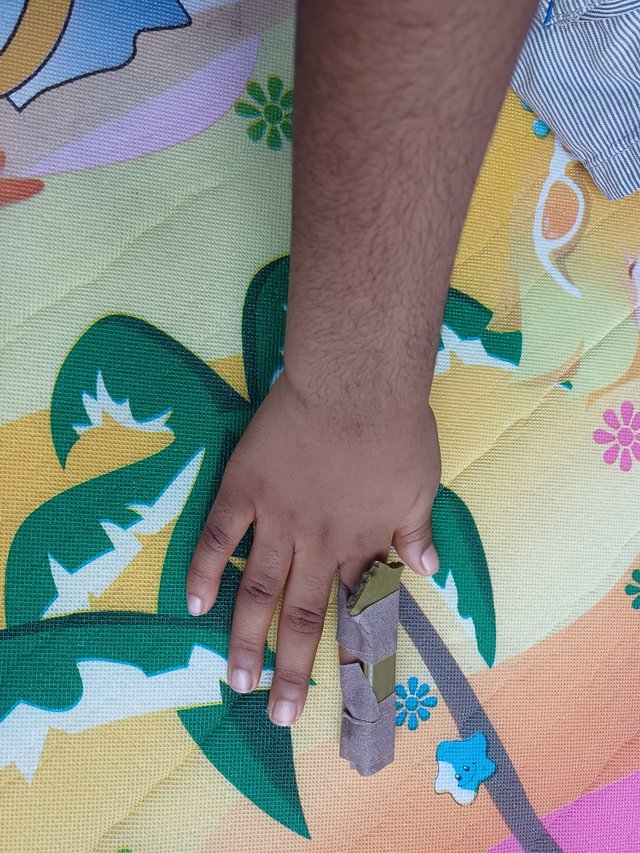
Q1: Apply a sling on the arm and a splint on the finger of a sibling, child, or peer. Attach a picture of the application and explain the procedure in detail, highlighting key points for immobilization and stabilization. |
|---|
A. Applying a Sling on the Arm (Using Rolled-Up Clothing)
Since I would be using the rolled-up clothing option, then let's find the different steps available as needed.
I will be using my piece of clothes and probably a safety pin for tagging at the end of folding to help give a stop to the rolled-up clothing.
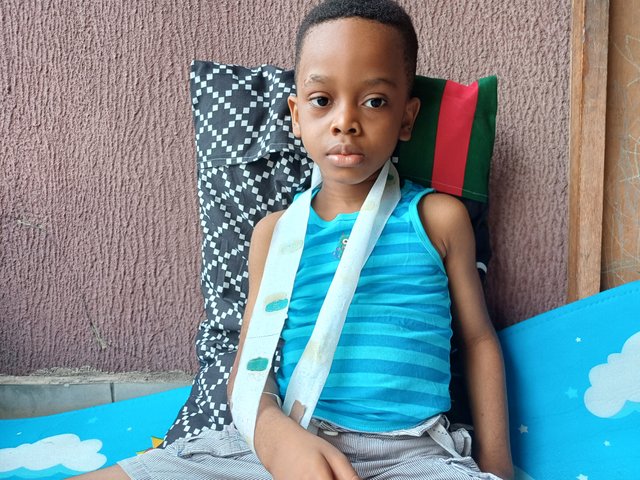
Since DRABC is confirmed standard (Ceteris paribus), I will keep my patient in a comfortably seated position. The arm should be well supported enough and in a position of an angle of 90º.
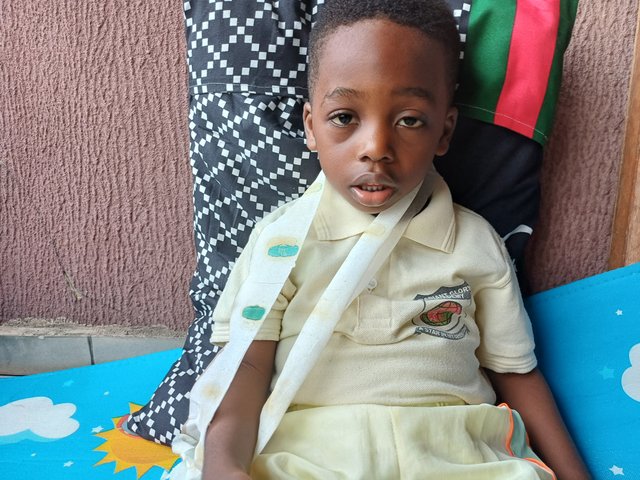
I will take the rolled-up clothing and place the victim's neck, with the two other sides ready to be tied, under the injured arm but placed in a 90º angle position.
I will secure the sling by fixing together the ends tightly but not in a discomforting position. The arm should be well supported to avoid swelling and pains in the fractured area.
Immobilization & Stabilization (While Applying Sling on the Arm)
Supporting the Injury - the tied arm sling should be well-positioned in such a manner that it is close to the body enough to limit unnecessary dangling and movement.
The arm should be well elevated to reduce swelling and discomfort from pains. Usually bending the arm from the elbow to form a 90⁰ is ideal.
Check for responses or symptoms. This would enable the amelioration of non-circulation issues and uneven reactions around the injured area.
B. Applying a Splint on the Finger
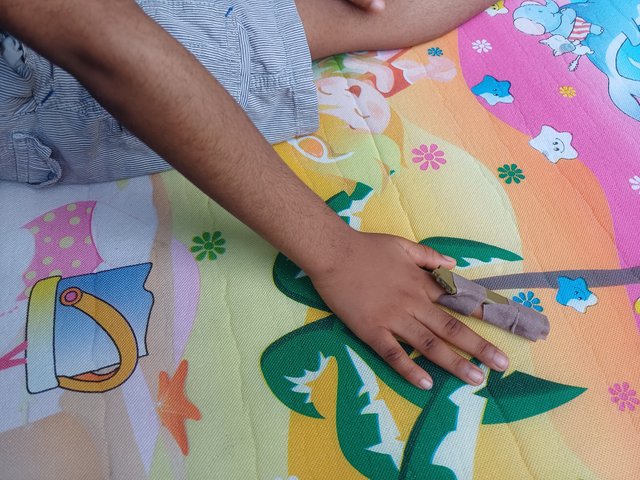
I will be using what I have which is a flat popsicle stick. However, I should be quickly checking the degree of injury caused. Dislocated or fractured injuries should be handled differently, but we need to know when to call support especially when severe.
In using the popsicles, they should be cleaned and placed on the injury spot while covering a little above it as well. I will be using gauze or cotton wool to avoid direct pressure on the area.
I should be able to place my finger in a well-aligned manner without trying to adjust fingers, especially in situations where deformity is observed.
I can now use my wrapping tape to hold the popsicle to my finger to avoid falling off. This should not be too tight enough to allow for circulation within the area.
Immobilization & Stabilization (While Applying Splint on the finger)
Proper alignment of the finger should be ensured to avoid further deformity or injuries.
The splint should be well fixed to the finger to avoid movements that cause more damage. Also, it should be tied in a manner that allows for circulation
Adequate monitoring should be done to look out for discoloration and circulation.
 |  |
|---|
 |  |
|---|
Research the process of helmet extraction in the context of head and neck injuries, and explain why it is important to avoid removing the helmet immediately in the case of suspected spinal injuries. Include the steps for safe helmet removal if necessary. |
|---|
This is one sensitive procedure we have to be intentional about to avoid more damage and life-threatening results. As a first responder or aiders, we have to be cautious when handling neck and head injuries. This is why we should avoid removing the helmet during neck and head accidents.
Important to avoid removing the helmet
Stability of the Spine Moment: the helmet helps in creating nonmovement of the head and neck at the moment, which is one way to support the spine against further injury.
For Better Assessment: not removing the helmet helps for better injury assessments. Removing the helmet immediately may complicate injury through unprecedented bleeding, hence a distorted injury assessment procedure.
Prevents Additional Injuries - trying to forcefully remove the helmet does not only aggregate existing injuries but also creates new ones. So, as a first responder or aiders, we have to apply caution and always wait for paramedics.
Steps for Safe Helmet Removal if Necessary
There are always exceptions in every case. We have already said helmet removal shouldn't be done; however, in a case where the airway is obstructed with breathing difficulty, we can safely consider safe removal. We have to wear our hand gloves for safety purposes as well as an assistant to help.
We have to fully apply the DRABC protocol where airway obstruction is checked.
Help stabilize the head and neck by holding both sides of the helmet to reduce movement.
Gently remove the strap-lock without any form of adjustment to limit neck and head movement. Check for any other strap to avoid having a jam during final removal.
Tilt the helmet backward with slight head upward movement without necessarily having to twist or turn the head and neck. The helmet should be removed without much upward adjustment.
Check for any symptoms and monitor for consciousness.
We should have called an emergency before starting this process to expect their arrival just when we were done.
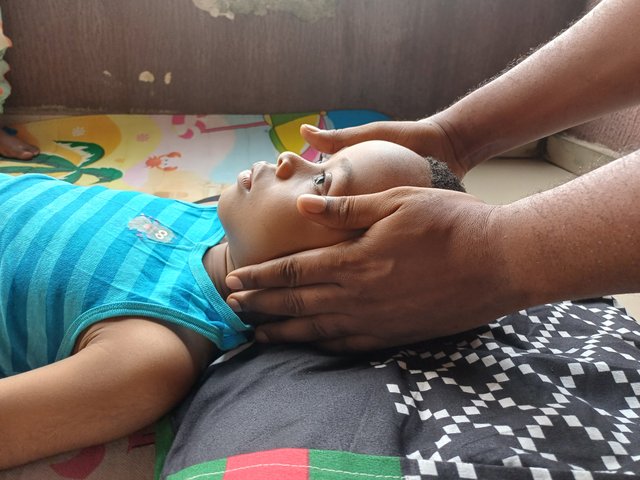
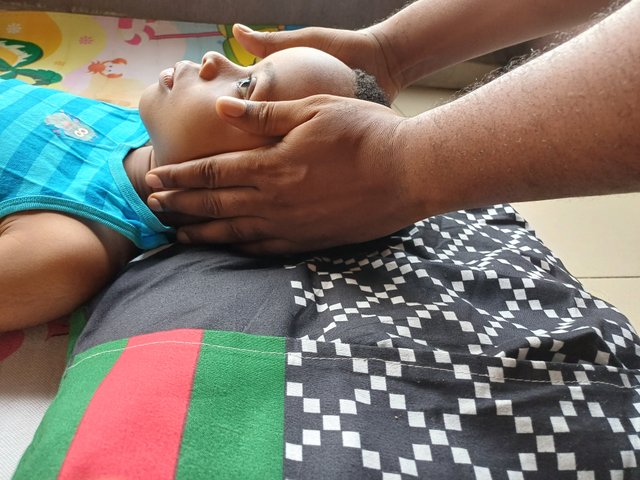
Q3: How is C-spine stabilization done? Explain the procedure in detail, ensuring you include when and how to use headblocks or manual stabilization. Attach a photo or video of yourself demonstrating proper C-spine stabilization techniques. |
|---|
How C-spine stabilization is done
This is a procedure done when we envisage that the victim is likely to have spinal injuries from the accident. A delicate issue we must treat with all carefulness.
We have to fully apply the DRABC protocol where airway obstruction is checked.
We should most likely call emergency considering the condition at hand.
Manual Stabilization is needed at this stage, where the head is guided using the hand on both sides. This would help remove head or neck movements. This should be maintained until we get help around from paramedics.
If we can also get a "head block", that would help in stabilizing the nec and head further to avoid movements. This should complement the manual stabilization by placing it on either side of the head. It should be firm enough to serve a purpose but not too tight enough to cause discomfort to the victim. This can be maintained with a tape to fasten it.
If the patient is lying down with the back on the ground, it should be in the supine position, but if seated, this is not sustainable. Hence, the patient should be laid with their back on the ground while maintaining neck and head stabilization. This would make it a lot easier for transportation after the arrival of help.
The patient should be monitored and assessed for any developing symptoms.
 |  |
|---|
Q4: Consider you encounter an unconscious person with a compound fracture on the arm, massive bleeding, no pulse at the distal radius, and restricted breathing. How will you prioritize and manage the situation? Describe each step in detail, including how you would control bleeding, stabilize the fracture, and address the breathing issue. |
|---|
Step 1: Ensuring Safety
Full application of the DRABC protocol. Firstly, we have to ensure that the area is safe for everyone. All threats should be removed before trying to render help.
It is already a life-threatening situation. I should be able to put a call through to the emergency unit for a quick response.
Step 2: Checking for Liveness
This time, we have to check for responsiveness to ascertain the liveness of the victim. The best way here is to tap the shoulders and talk loudly to the ear to see if they respond in any form.
At this point, I should be observant by assessing the victim through their Airways, Breathing, and Circulation. This ABC protocol should be well assessed before going to the next step.
Step 3: Controlling Bleeding
Bleeding can be controlled here without having to apply direct pressure on the fractured area but rather the use of sterile dressing should be used on injury. We do not need to remove soaked dressing but rather add more clothing to it.
If possible, we should raise the arm above the heart level to reduce blood flow. The use of a tourniquet above the elbow area could be used to stop bleeding. However, we must immobilize the arm without trying to fix the fractured bone.
We can apply a splint as the case may be.
Step 4: Stabilizing the Fracture
The best method for this procedure since we aren't prepared to have the standardized tools is to use a make-shift splint (rolled-up material)
The rolled-up clothing should be placed on either side of the arm and fastened to the neck. This is done to help avoid movement of the fractured arm from further injury.
Addressing Breathing issue
The victim should be well-positioned. Positioning is vital in allowing conscious and unconscious victims to have clearer airways. Placing victims by their sides help open the airways. But when there is still difficulty in breathing, CPR could be performed.
The head and chin can be slightly lifted above to open the airways.
Step 5: Monitor for Symptoms & Reassurance
We have to be attentive and monitor for all symptoms as we stabilize victim. Example, breathing...
We have to be hopeful on the survival of our victim and hence we should reassure victim thatvall would be fine until emergency service arrives.
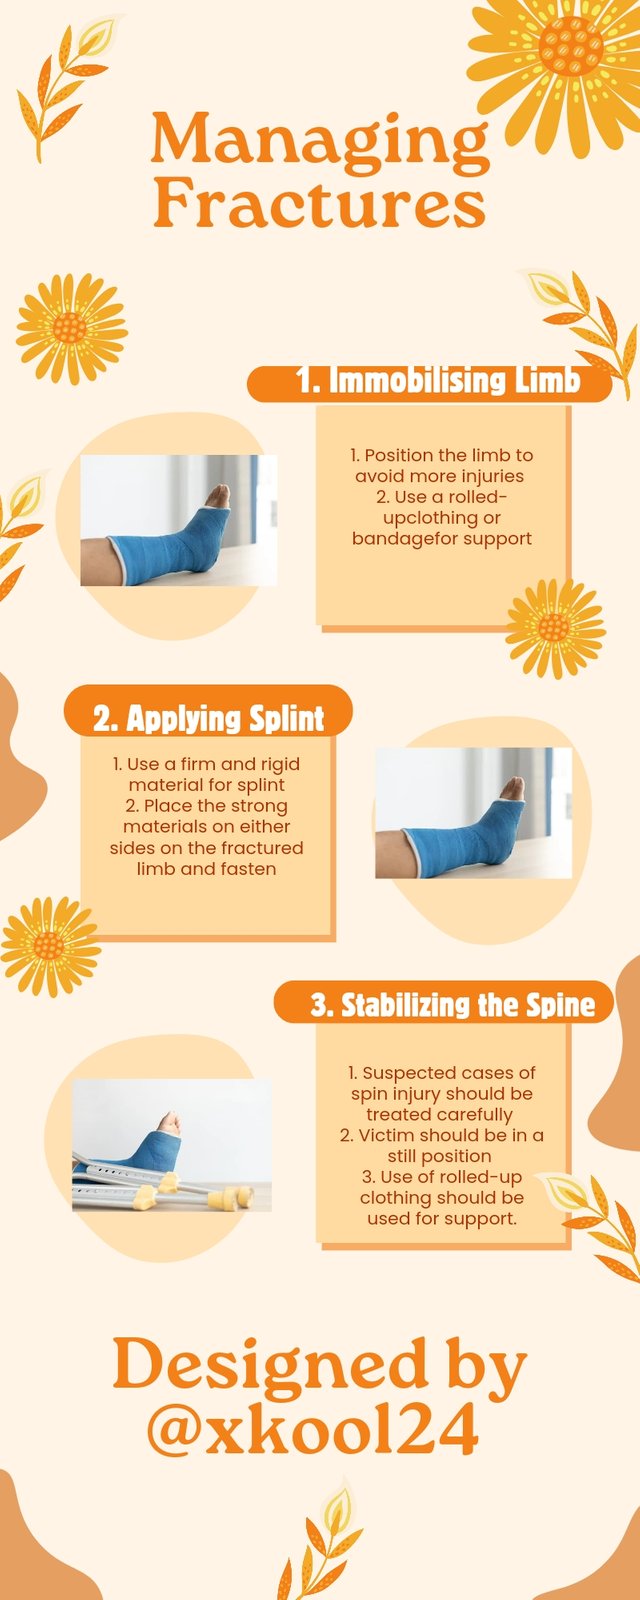
Create an infographic (visual illustration) on managing fractures. Your design should highlight key steps such as how to immobilize the injured limb, apply a splint, and stabilize the spine. Ensure the infographic is easy to understand and visually guides users through the process. |
|---|
 |
|---|
This was indulging. Practicing classes of this nature is far beyond the scores and grading but the insight, knowledge, and experience gained from it. I am impressed to have learned a lot from the different topics shared.
Thank you
I invite #eveetim. @woka-happiness, @chilaw
Greetings sir 🫡
Thank you for inviting me, I think you made a mistake with someone's username, @eveetim.
Downvoting a post can decrease pending rewards and make it less visible. Common reasons:
Submit
👍 that's true
Downvoting a post can decrease pending rewards and make it less visible. Common reasons:
Submit
🥰🫂
Downvoting a post can decrease pending rewards and make it less visible. Common reasons:
Submit
Student Name: @xkool24
Overall grade: 9
Plagiarism Check: Pass
AI Use: No
General Feedback: The student has shown good understanding of the course and has come up with a satisfactory explanation on how to manage fractures. Good job. Please focus on the points that could be approved. You have an overall good approach towards our course.
Thank you.
Regards,
@huzaifanaveed1
Downvoting a post can decrease pending rewards and make it less visible. Common reasons:
Submit
https://x.com/xkool24/status/1860056332310839521?t=gwXQFJQxfqOGqI3JyRk7wA&s=19
Downvoting a post can decrease pending rewards and make it less visible. Common reasons:
Submit