Papercraft : A butterfly is made from colored paper

in hive-141434 •  2 years ago 

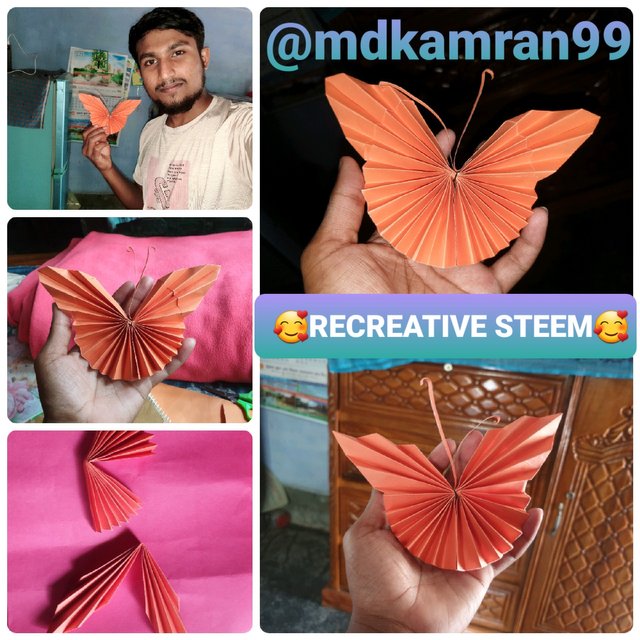
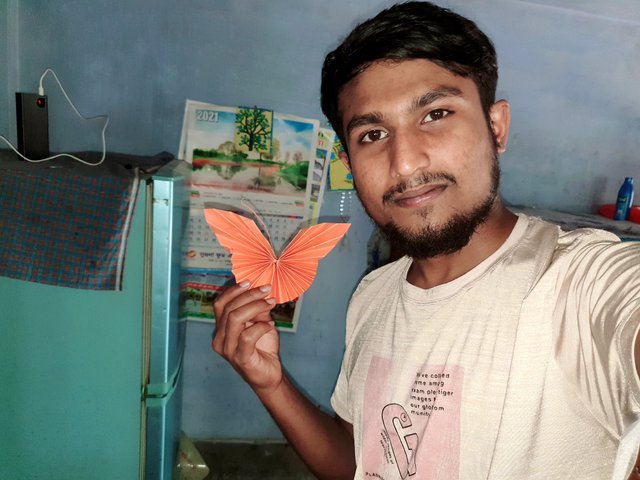
Assalamualaikum all of my friends. How are you all? I hope you are all well. I'm fine too. I am Mohammad Kamran Hossain. Like every other day, today I am here with another wonderful papercraft post and today I am here with you by making a beautiful butterfly out of colored paper. This morning I made this butterfly with orange colored paper and I am going to show you step by step.

20230316_143258.jpg

Materials needed to make craft
  • Ruler.
  • Scissors.
  • Paper gulu.
  • Orange colour paper.
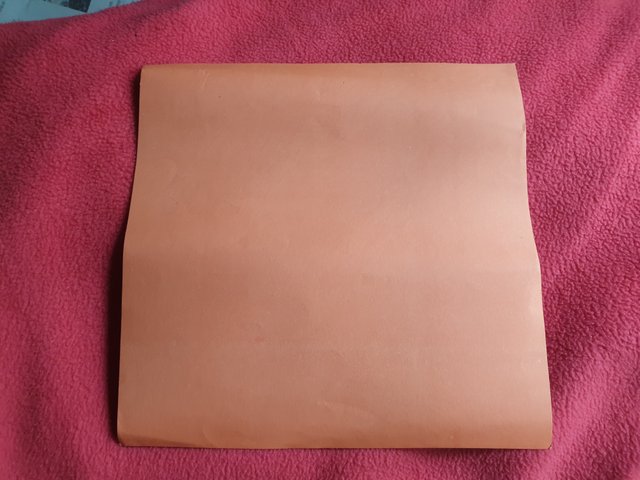
Steps to craft
Step 1,

First take A4 size orange color paper and cut it into 20.5 : 20.5 square size with scissors.
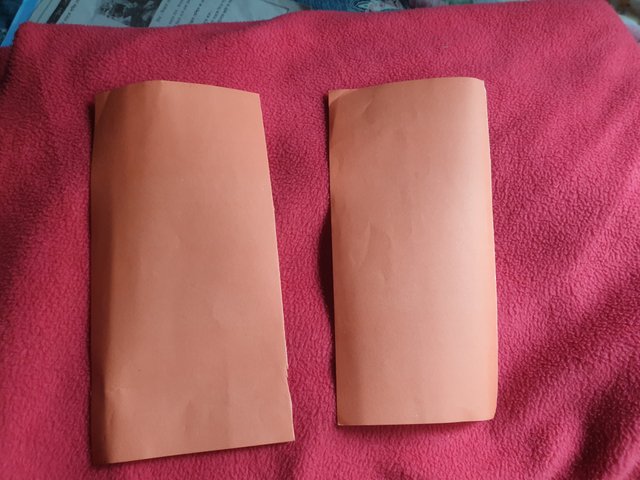
20230316_101545.jpg

DiHLrjiPetHt6ciV9azim9NPHuTMQ59H51nYE8xqo83cHxoWjkEXJT9iFny5FDK6V87zhnX5kJcSGE6ahn1RouZuijdX8aHZSZuNzNLrHLCesrYQeLFEN3XWqtzgug...5JkLh48hmSy2Vocb8Q1ZmVRFSQE6pKeyXuZTkTt2EgzjyyZw14xbJEQeSpMhQGMsjfy2JgnjmiZATtiTZUt9hdaNJ5oWr4DTthVH964jvSwCVZQRoyCX3KLi6i.png

Step 2,

Cut the square orange paper along the middle with scissors and divide the paper into two sections.
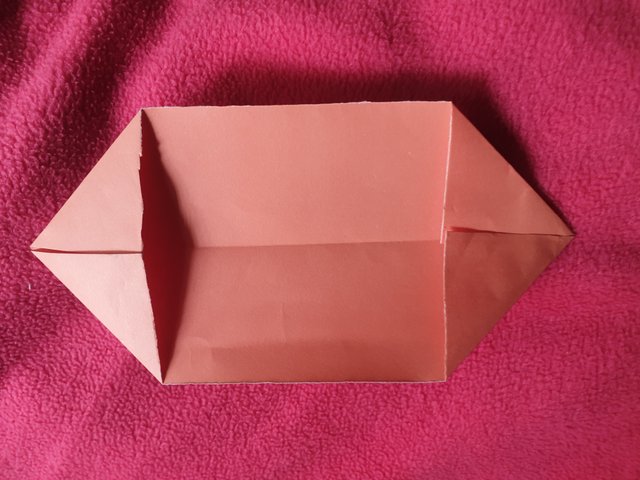
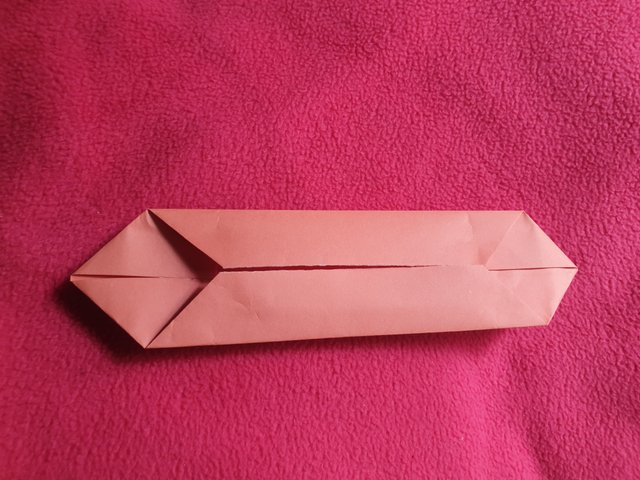
20230316_101906.jpg

DiHLrjiPetHt6ciV9azim9NPHuTMQ59H51nYE8xqo83cHxoWjkEXJT9iFny5FDK6V87zhnX5kJcSGE6ahn1RouZuijdX8aHZSZuNzNLrHLCesrYQeLFEN3XWqtzgug...5JkLh48hmSy2Vocb8Q1ZmVRFSQE6pKeyXuZTkTt2EgzjyyZw14xbJEQeSpMhQGMsjfy2JgnjmiZATtiTZUt9hdaNJ5oWr4DTthVH964jvSwCVZQRoyCX3KLi6i.png

Step 3,

After cutting the square paper into two parts, make a triangular fold on both sides of the divided paper.

20230316_102338.jpg

DiHLrjiPetHt6ciV9azim9NPHuTMQ59H51nYE8xqo83cHxoWjkEXJT9iFny5FDK6V87zhnX5kJcSGE6ahn1RouZuijdX8aHZSZuNzNLrHLCesrYQeLFEN3XWqtzgug...5JkLh48hmSy2Vocb8Q1ZmVRFSQE6pKeyXuZTkTt2EgzjyyZw14xbJEQeSpMhQGMsjfy2JgnjmiZATtiTZUt9hdaNJ5oWr4DTthVH964jvSwCVZQRoyCX3KLi6i.png

Step 4,

Fold the triangular folded orange paper vertically from the two sides of the paper.

20230316_102903.jpg

DiHLrjiPetHt6ciV9azim9NPHuTMQ59H51nYE8xqo83cHxoWjkEXJT9iFny5FDK6V87zhnX5kJcSGE6ahn1RouZuijdX8aHZSZuNzNLrHLCesrYQeLFEN3XWqtzgug...5JkLh48hmSy2Vocb8Q1ZmVRFSQE6pKeyXuZTkTt2EgzjyyZw14xbJEQeSpMhQGMsjfy2JgnjmiZATtiTZUt9hdaNJ5oWr4DTthVH964jvSwCVZQRoyCX3KLi6i.png

Step 5,

Unfold the folded orange paper and start folding the orange paper again along the fold and after folding the entire paper, unfold the paper again.

20230316_103206.jpg

DiHLrjiPetHt6ciV9azim9NPHuTMQ59H51nYE8xqo83cHxoWjkEXJT9iFny5FDK6V87zhnX5kJcSGE6ahn1RouZuijdX8aHZSZuNzNLrHLCesrYQeLFEN3XWqtzgug...5JkLh48hmSy2Vocb8Q1ZmVRFSQE6pKeyXuZTkTt2EgzjyyZw14xbJEQeSpMhQGMsjfy2JgnjmiZATtiTZUt9hdaNJ5oWr4DTthVH964jvSwCVZQRoyCX3KLi6i.png

Step 6,

Now take another piece of orange paper and fold it in half once along the middle of the paper.
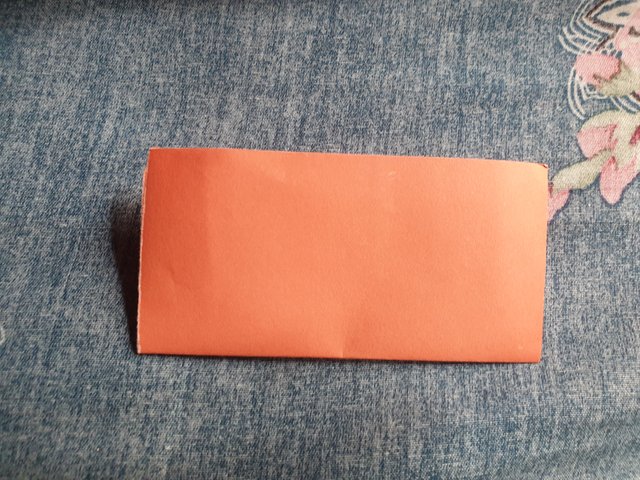
20230316_103452.jpg

DiHLrjiPetHt6ciV9azim9NPHuTMQ59H51nYE8xqo83cHxoWjkEXJT9iFny5FDK6V87zhnX5kJcSGE6ahn1RouZuijdX8aHZSZuNzNLrHLCesrYQeLFEN3XWqtzgug...5JkLh48hmSy2Vocb8Q1ZmVRFSQE6pKeyXuZTkTt2EgzjyyZw14xbJEQeSpMhQGMsjfy2JgnjmiZATtiTZUt9hdaNJ5oWr4DTthVH964jvSwCVZQRoyCX3KLi6i.png

Step 7,

Then fold the folded orange paper a few more times and unfold the orange paper at the end of the fold.
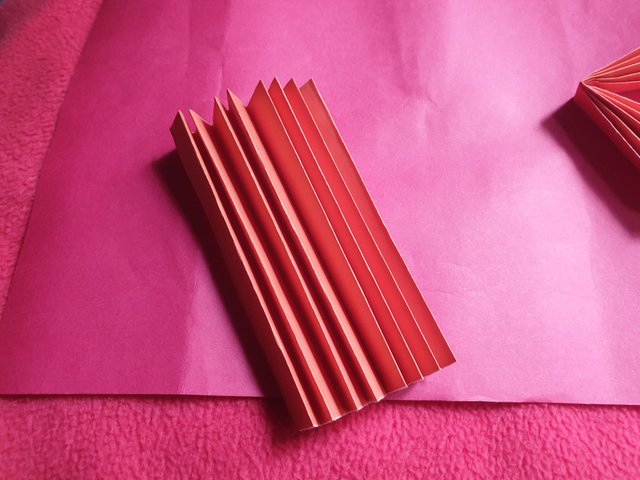
20230316_104056.jpg

DiHLrjiPetHt6ciV9azim9NPHuTMQ59H51nYE8xqo83cHxoWjkEXJT9iFny5FDK6V87zhnX5kJcSGE6ahn1RouZuijdX8aHZSZuNzNLrHLCesrYQeLFEN3XWqtzgug...5JkLh48hmSy2Vocb8Q1ZmVRFSQE6pKeyXuZTkTt2EgzjyyZw14xbJEQeSpMhQGMsjfy2JgnjmiZATtiTZUt9hdaNJ5oWr4DTthVH964jvSwCVZQRoyCX3KLi6i.png

Step 8,

Now fold the paper along the middle of the folded orange paper and move it to one side of the paper and at the same time unfold this fold of paper.
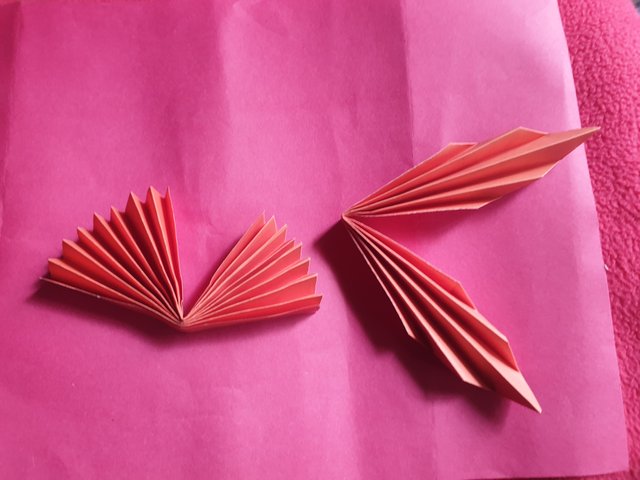
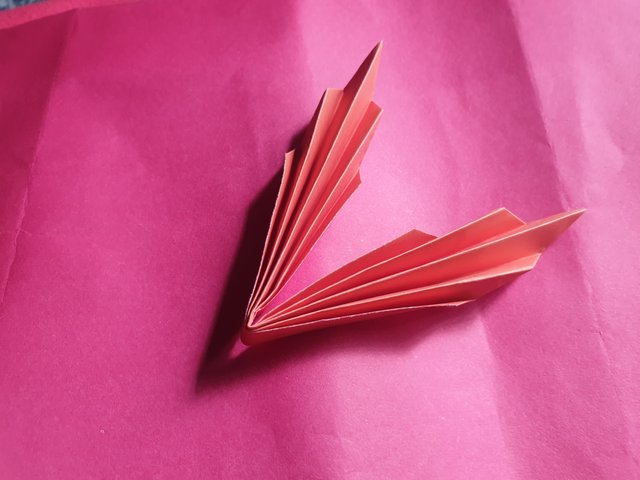
20230316_104806.jpg

DiHLrjiPetHt6ciV9azim9NPHuTMQ59H51nYE8xqo83cHxoWjkEXJT9iFny5FDK6V87zhnX5kJcSGE6ahn1RouZuijdX8aHZSZuNzNLrHLCesrYQeLFEN3XWqtzgug...5JkLh48hmSy2Vocb8Q1ZmVRFSQE6pKeyXuZTkTt2EgzjyyZw14xbJEQeSpMhQGMsjfy2JgnjmiZATtiTZUt9hdaNJ5oWr4DTthVH964jvSwCVZQRoyCX3KLi6i.png

Step 9,

In this step, attach the folded parts of the two pieces of orange paper together with paper glue.

20230316_105654.jpg

DiHLrjiPetHt6ciV9azim9NPHuTMQ59H51nYE8xqo83cHxoWjkEXJT9iFny5FDK6V87zhnX5kJcSGE6ahn1RouZuijdX8aHZSZuNzNLrHLCesrYQeLFEN3XWqtzgug...5JkLh48hmSy2Vocb8Q1ZmVRFSQE6pKeyXuZTkTt2EgzjyyZw14xbJEQeSpMhQGMsjfy2JgnjmiZATtiTZUt9hdaNJ5oWr4DTthVH964jvSwCVZQRoyCX3KLi6i.png

Step 10,

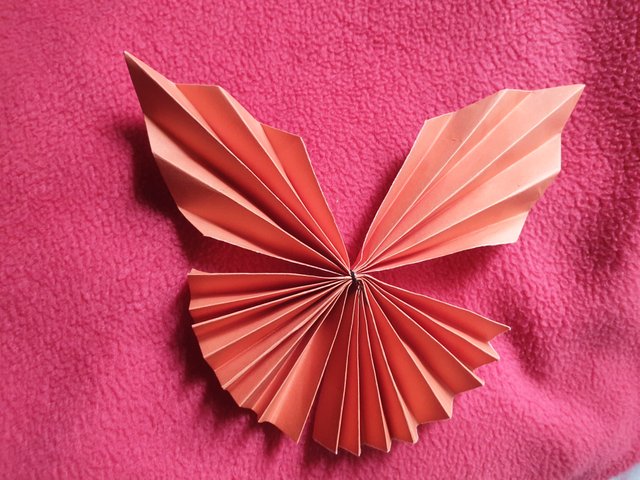
At the bottom of the orange paper butterfly made in the last step, we connect the two pieces of paper below the butterfly with paper glue and place it by making a butterfly crown.

20230316_123935.jpg20230316_142729.jpg

DiHLrjiPetHt6ciV9azim9NPHuTMQ59H51nYE8xqo83cHxoWjkEXJT9iFny5FDK6V87zhnX5kJcSGE6ahn1RouZuijdX8aHZSZuNzNLrHLCesrYQeLFEN3XWqtzgug...5JkLh48hmSy2Vocb8Q1ZmVRFSQE6pKeyXuZTkTt2EgzjyyZw14xbJEQeSpMhQGMsjfy2JgnjmiZATtiTZUt9hdaNJ5oWr4DTthVH964jvSwCVZQRoyCX3KLi6i.png

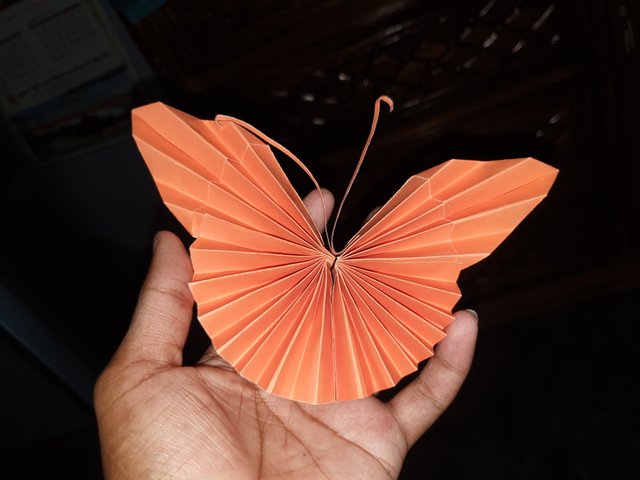
As of today this was my orange paper butterfly that I presented to you with step by step photography and I hope you will like my orange paper butterfly as well.

AmRc67RgYaWTCbCd1L4AQP82AFWYYzZC15DpSZWeSYgzVMwcXnhFaWfH5Cpf7KAYeFGQGeQW5cijsP1H3JPGdP3b57kRt4hLTjj42r8aDMd7ftB26fGSo8AqmLE3jrgfTBFyjiQWQ5fqtkrEgj9URmmh8JuTZvPQ.png

Thank you very much

AB
PhotographerMe
DeviceSamsung Galaxey S9+

CC-

@hive-141434

Authors get paid when people like you upvote their post.
If you enjoyed what you read here, create your account today and start earning FREE STEEM!
Sort Order:  

@tipu curate 4

¡Congratulations! This post has been upvoted through -steemcurator06.
We support quality posts, and good comments anywhere, with any tags.

PicsArt_03-04-10.27.16.jpg
Curated by :<@graceleon>

Thank you so much dear @graceleon mam for your support 🥰

You are very skillful creating figures on paper, I have seen your work and you really do excellent things.
Thank you for sharing your work with us.

DescriptionInformation ✅or ❌
Plagiarism Free#steemexlusive
Bot FreeClub#club100

Te invitamos a seguir las redes sociales para Steem y Steemit:

@steemesp@steemeng@steem.ind

Moderador en  Recreative Steem

 Instagram YouTube Twitter

Me gustó mucho la mariposa que compartiste. Es muy fácil de hacer y queda muy bonita. Saludos