How are you all young friends, I hope you are always in good health and always given safety by the almighty, for friends who are not healthy, I hope you get well soon so you can do your daily work as usual, amen.
- A brief History
A brief history according to Wikipedia: originated from a thesis written by Hernando Barragan, at the Institute Ivrea, Italy in 2005, developed by Massimo Banzi and David Cuartielles and named Arduin of Ivrea. Then it was renamed Arduino which in Italian means brave friend.
Arduino's initial goal was to create easy and inexpensive devices, from existing devices at the time. And these tools are intended for students who will create design and interaction tools.
Currently the development team is Massimo Banzi, David Cuartielles, Tom Igoe, Gianluca Martino, David Mellis and Nicholas Zambetti. They strive for 4 things in this Arduino, namely:
- Affordable price
- Can run on various operating systems, Windows, Linux, Mac, and so on.
- Simple, with a programming language that is easy to learn by lay people, not only for technical people.
- Open Source, hardware and software.
The nature of Arduino which is Open Source, makes Arduino grow very rapidly. So many devices like Arduino were born. Like DFRDuino or Freeduino, while for local there is CipaDuino made by SKIR70, then there is MurmerDuino made by Robot Unyil, there is another AViShaDuino whose one of the makers is Robot Class Admin.
Until now the official party has made various types of Arduino. Starting from the easiest to find and the most widely used, the Arduino Uno. Until Arduino is already using ARM Cortex in the form of a Mini PC. Until now there have been hundreds of thousands of Arduinos in use in the world since 2011.
Arduino has also been used by large companies, for example Google uses Arduino for Accessory Development Kits, NASA uses Arduino for prototypes, there is another Large Hadron Colider uses Arduino in some ways for data collection.
Many ask what programming language does Arduino actually use? Arduino actually uses a simplified C language. So that ordinary people can become digital artists, can learn Arduino easily.
tutorials
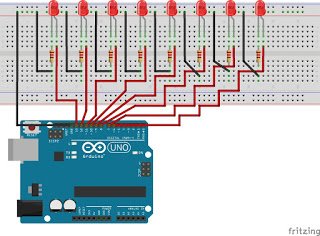
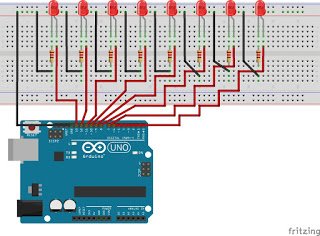
At this time we will try to make a system using LEDs, the tutorial that we will discuss there are 4 tutorials using LEDs with the following material:
1. Arduino
2. LED
3. Resistor 100 Ohm
3. Jumpers
4. Trial Board
.jpg)
Program 1 turns on 13 . LED
Coding
void setup() {
pinMode(13, OUTPUT);
}
void loop() {
digitalWrite(13, HIGH);
}
___________________________________________________________
Program 2: LED flashes
Coding
void setup() {
pinMode(13, OUTPUT);
}
void loop() {
digitalWrite(13, HIGH);
delay(1000);
digitalWrite(13, LOW);
delay(1000);
}
___________________________________________________________
Program 3: control 8 LED
Coding
// Program 3 : kontrol 8 LED
void setup() {
pinMode(6, OUTPUT);
pinMode(7, OUTPUT);
pinMode(8, OUTPUT);
pinMode(9, OUTPUT);
pinMode(10, OUTPUT);
pinMode(11, OUTPUT);
pinMode(12, OUTPUT);
pinMode(13, OUTPUT);
}
void loop() {
digitalWrite(6, 0);
digitalWrite(7, 1);
digitalWrite(8, 0);
digitalWrite(9, 1);
digitalWrite(10, 0);
digitalWrite(11, 1);
digitalWrite(12, 0);
digitalWrite(13, 1);
}
___________________________________________________________
Program 4: Running LED
coding
void setup() {
pinMode(6, OUTPUT);
pinMode(7, OUTPUT);
pinMode(8, OUTPUT);
pinMode(9, OUTPUT);
pinMode(10, OUTPUT);
pinMode(11, OUTPUT);
pinMode(12, OUTPUT);
pinMode(13, OUTPUT);
}
void loop() {
digitalWrite(6, HIGH);
delay(1000);
digitalWrite(6, LOW);
digitalWrite(7, HIGH);
delay(1000);
digitalWrite(7, LOW);
digitalWrite(8, HIGH);
delay(1000);
digitalWrite(8, LOW);
digitalWrite(9, HIGH);
delay(1000);
digitalWrite(9, LOW);
digitalWrite(10, HIGH);
delay(1000);
digitalWrite(10, LOW);
digitalWrite(11, HIGH);
delay(1000);
digitalWrite(11, LOW);
digitalWrite(12, HIGH);
delay(1000);
digitalWrite(12, LOW);
digitalWrite(13, HIGH);
delay(1000);
digitalWrite(13, LOW);
}
___________________________________________________________
Now that's the basic way to use Arduino using LEDs and for a bonus LED tutorial I will post soon, I hope this article is useful. best regards from me @adipa zakky rakhmad.