I'm back in the class of SLC-S21W2: Creating an Amazon Affiliate Account & Adding Affiliate Links to Your Blog by @hamzayousafzai. in the first edition I still have many shortcomings. And this time, the first thing I did was to improve the layout and Thema of my blog account.
As previously taught that to improve the layout and theme done is to download the latest file provided by @hamzayousafzai, then return to the home page. Select thema then Customize, Restore, upload the extracted rar file. Then we just have to see the results
To create an Amazon Affiliate account, the first thing we have to do is open the Google browser and type Amazon Affiliate Program.
 |
|---|
After the Amazon Affiliate page opens, then we look for the Sign Up menu in the middle of the page. After we click Sign Up, we will see another page for us to fill in the requested information.
 |
|---|
Then what we have to do next is register our Amazon Affiliate account by filling in information in the form of name, email address and password that will be used when the Amazon Affiliate account is registered. (Password at least 6 different characters to make it more valid) Then don't forget to press Create your Amazon account.
 |
|---|
 |
|---|
Then we will be asked to fill in the OTP code that has been sent to the email address that we have filled in. And the results are as shown below
 |
|---|
 |
|---|
We have entered the final stage of creating your Amazon Associates Account. There are four more steps, namely Account Information, List of Websites and mobile applications and profiles.
In filling in the four data we must be very careful, I suggest to look back at the video tutorials that have been given by the tutor
 |
|---|
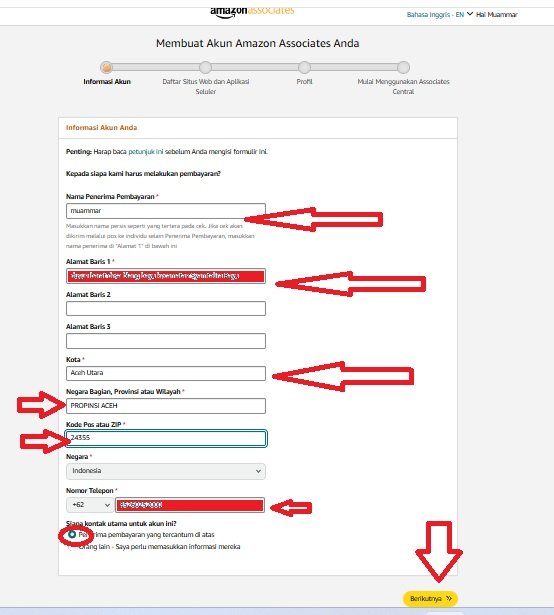
Account Information
In this section we are asked to fill in the payee's name, complete residential address. Then the postal code, country and phone number. Don't forget to choose one main contact. Finally, don't forget to click next below on the right.
 |
|---|
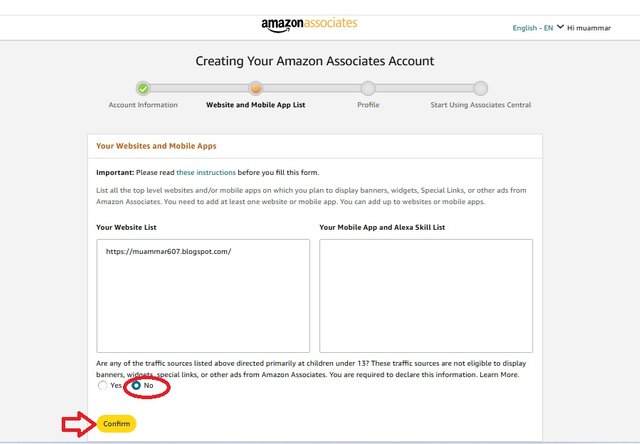
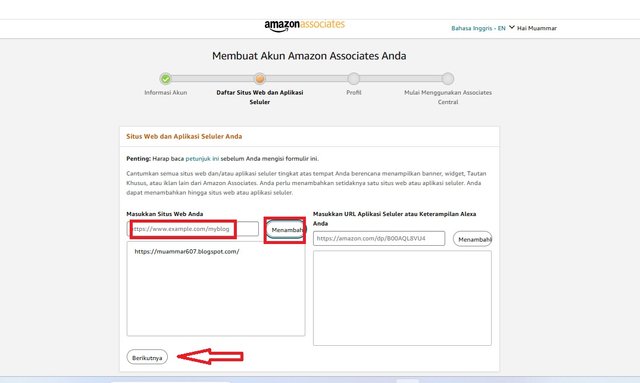
List of Websites and Mobile Apps
Before filling in our blog name. It is necessary to read the instructions first i.e. List all the top-level websites and/or mobile apps where you plan to display banners, widgets, Custom Links or other ads from Amazon Associates. You need to add at least one website or mobile app. You can add up to websites or mobile apps. Next hit the following that is in the bottom send. At the bottom don't forget to select no on Are any of the traffic sources listed above directed primarily to children under the age of 13?
 |
|---|
 |
|---|
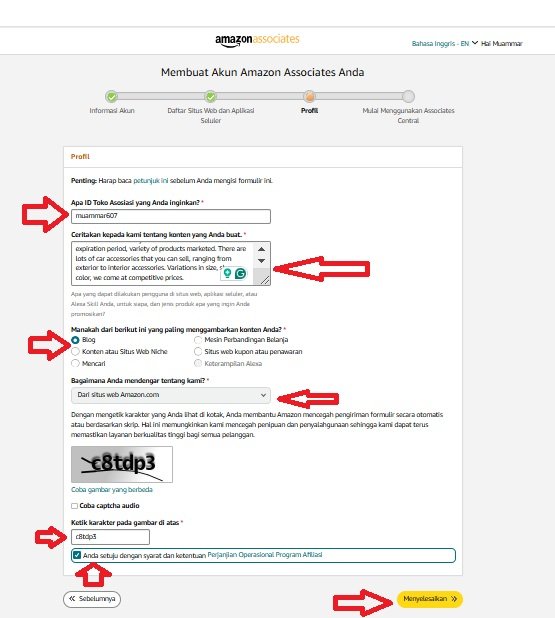
Profile
The next step is to fill out the profile. What you're asked to do is what Association Store ID you want, tell us about the content we create. Choose the one that best describes our content, check the captcha, click You agree to the terms and conditions of the Affiliate Program Operational Agreement and finally click complete.
 |
|---|
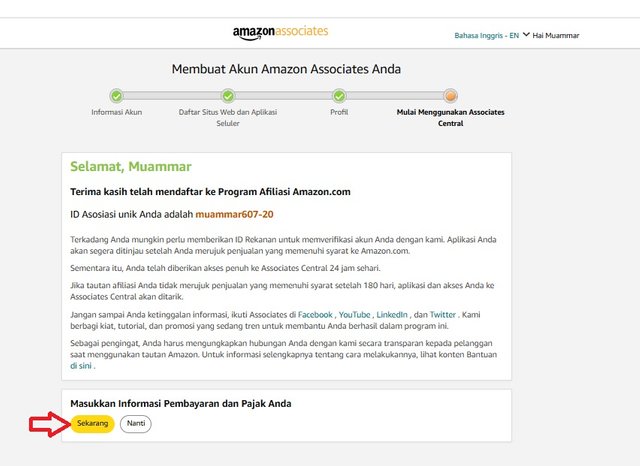
Finally the Amazon.com Affiliate Program has been successfully registered. I got a unique Association ID which is muammar607-20. Has it been completed yet. One more step is to enter your payment and tax information. There are two options now or later. I choose now to complete today's task
 |
|---|
Adding Amazon Affiliate Links to Your Blog
Once the affiliate account is complete, next go to Payment and Tax Information. After clicking next, it will be asked to log in by entering a password. If we forget the password then we can choose to forget the password. Next, it will be sent to our email. To change the password
After that go back to amazon kun. We click sigh in and are asked to enter a cellphone number so that an OTP number can be sent. After that it will go to your payment method page

(https://images.hive.blog/DQmaw9sFFeeedPwdgWHdTGgyYEW6WaywYVoQr1HeQzh8wFD/IMG_5278.JPG)) |

(https://images.hive.blog/DQmejdMYCxstgH5C9uv47jAsVedHqyza3wzegeXzh8MAAui/IMG-20210503-WA0076.jpg)
) |

(https://images.hive.blog/DQmaw9sFFeeedPwdgWHdTGgyYEW6WaywYVoQr1HeQzh8wFD/IMG_5278.JPG)) |
Here's a look at the tax payment method page.
 |
|---|
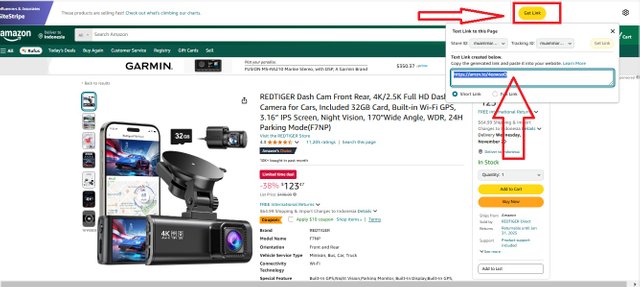
The first step in listing amazon products to our blog is to look for products according to the theme that we will use. I will look for items that focus on car accessories. After the amazon page opens, at the top of the right side there is a link that we must click and take the address
 |
|---|
The next step is to go to the blog page and click on new post. Next as instructed to Switch to HTML View
 |
|---|
 |
|---|
After the new page opens and is already in HTML mode. Then, check the second line where it says “View at Amazon”. We edit the writing with “Buy Now”, then next to View at Amazon there is the writing “Javascript”. Here we also eliminate it and add the affiliate product amzone account likn that we copied earlier.
 |
|---|
Then we return to the writing view mode. The first thing to do is write a title (as stated on the site), then write product details, don't forget to add photos by clicking the photo symbol then we will enter the gallery on the laptop. After that, wait a few moments waiting for all the photos to enter.
 |
|---|
After that, click publish in the upper right corner, and a notification will appear to confirm the publication. After everything is done, we click publish and don't forget to click conform. The product that we entered is immediately visible in our blog view. This method is the same as in the SLC-S21W1 guide
 |
|---|
My main focus in this blog is automotive related. Because the world of the automotive industry, especially cars, is growing very rapidly. Cars with the latest brands always come out every year. That way the market opportunity for car accessories is very promising.
Car accessories are not only to beautify your car, but for people car accessories are an important part that must be owned and updated. Well with that condition, of course, it will be very wide open to the benefits of running a business selling car accessories.
Selling car accessories products on amazon is very promising. Diverse choices for consumers who certainly have a larger share. With unique results and affordable prices
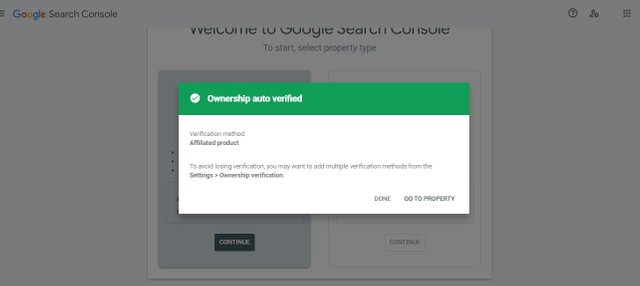
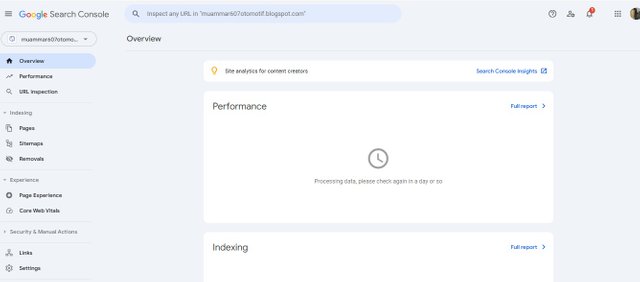
To register our blog the step to do is type Google Search Console in the google brouser. Next click start now. Then the patch will be like the photo below. Oh yes, Google Search Console is a free platform for website owners to monitor how the website is performing in the organic realm of Google.
 |
|---|
 |
|---|
Here is my blog link
| Product Link 1 | Product Link 2 | Product Link 3 | Blog Link |
|---|---|---|---|
| Link 1 | Link 2 | Link 3 | Link blog |
Thus the learning task of SLC-S21W2, hopefully useful and input from my friends is very much needed for future improvements, I also want to invite @waterjoe @alee75 and @ayijufridar to participate in this learning.


Good content and keep sharing quality content on the Steemit platform, we are waiting for your brilliant ideas. This article got 100% votes from @waterjoe
Downvoting a post can decrease pending rewards and make it less visible. Common reasons:
Submit
Thank you very much for sharing your assignment task with us! We truly appreciate the time, effort, and creativity you have put into completing this assignment. Your dedication to following the guidelines and your commitment to learning are evident, and it’s a pleasure to see your progress.
Below are the evaluation results, highlighting the strengths of your post and any areas of focus for improvement:
Teacher Recommendation and Feedback!
You did a solid job creating your Amazon Affiliate account and showing all the steps—well done!
You also added three products to your blog but I noticed you missed using a custom theme. This is why your blog currently isn’t as user-friendly as it could be. I think you may have missed the first lecture and I recommend going back to watch it. It will guide you on how to create a high-quality blog that’s optimized for Amazon Affiliates.
You chose "automotive" as your niche which is a great choice but make sure to focus on market research and understanding customer demand in this area to help your blog stand out.
Finally you successfully listed your blog on Google Search Console nice work on that! Keep refining these details and you’ll be on track to build a successful affiliate site.
Total | 7.5/10
Downvoting a post can decrease pending rewards and make it less visible. Common reasons:
Submit
Plagiarism Free / AI Article Free
* #burnsteem25
* Community
* Charity
null 25% ❌
steembetterlife ✔️
worldsmile 10%❌
Appeal to community members:
Verified by @el-nailul
Downvoting a post can decrease pending rewards and make it less visible. Common reasons:
Submit