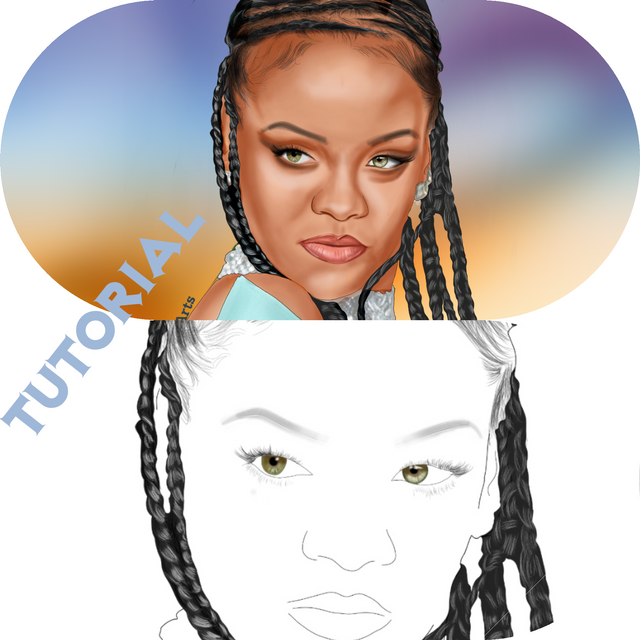
So it thought to myself, it has been long I created a female artwork. I really didn't have a plan to but since it has also been a long time since my last full tutorial which I will have to refer a lot of my students to later on. Why not? My choice of celebrity wasn't predetermined this time, I just asked a random friend what who he'd want me to draw and he said Rihanna's picture by Samir Hussein/Getty Images. That was all I needed. At this point, if you are looking to attempt this, I believe you already have foreknowledge of the basics. My previous tutorials have already covered most of the basics. This is not exactly your tutorial for pro nor beginners neither so let's say intermediate. My previous full tutorials were a success as I have referred a lot of people to it and it proved quite helpful. So let's get to it, how did we get it done?
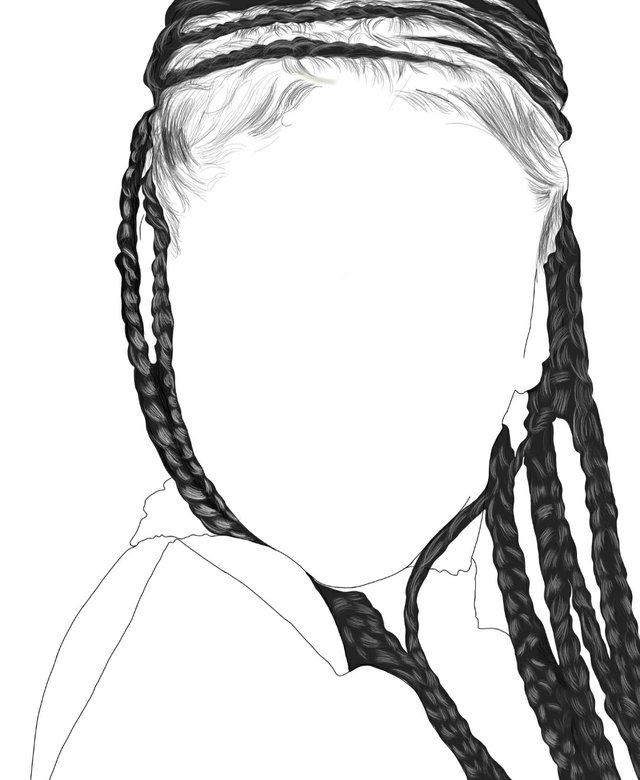
Firstly we create a custom sketch of 3745x3810, this is to get above average quality of art, it will be bad if we finish everything up and it has patches of blur and lacks conspicuity, it would be bad for business. So yeah, the image is imported on the custom resolution and we will be using two brushes for this. Medium Tip Marker (Under design) and Traditional hard pencil (Under traditional). Medium tip marker will be used to for the outlining. I could decide to first outline the body or the hair or both at once but since Rihanna's hair is quite complex, let's start with the hair. We are first going to outline the base before moving to shade the texture of the hair with the traditional brush and then finishing it up with the highlights.
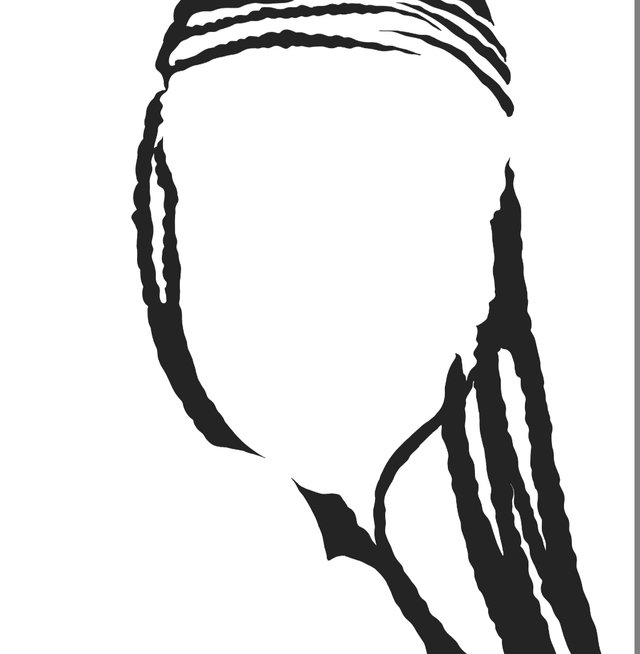
This is the hair base filled. We are not actually filling it up with the darkest shade of black because of the shadows which would have to be black so there has to be at least little contrast between the shadow and the main colour. Now that this is done, we are going to create a blank layer for the stroking. This layer will be placed above the hair base. We'll be using a faintly light grey for the stroking so it can come out just a little bit, but not too much. Stroking should be done patiently and judiciously to get more accurate results. We are using a traditional pencil brush size of 1.2 with RGB (56, 56, 56) to stroke it.
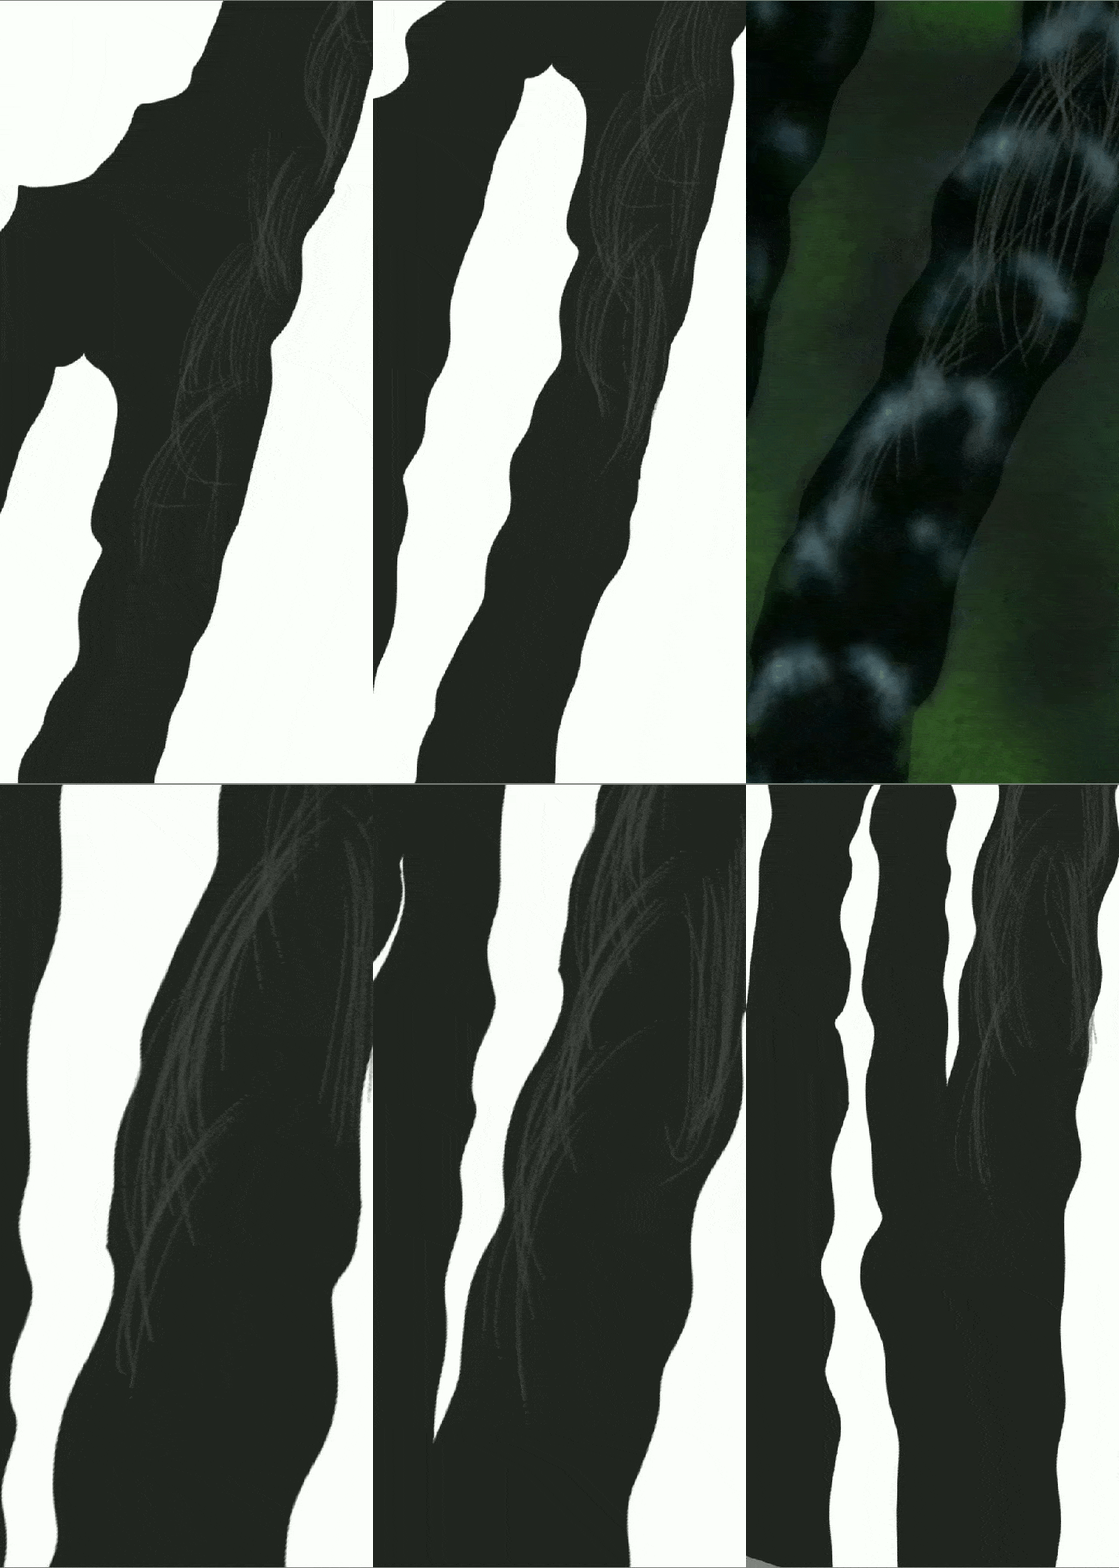
With time, a thousand strokes should finish it up (Just kidding, it could even be more than that.. XD). Another layer is created this time for the highlights of the colour RGB (215, 215, 215). Pardon my use of RGB, I would have preferred color codes but then there's no way to input them in Autodesk Sketchbook, you could only set the color position. The highlights are done right in the middle of the previously stroked 'faintly light grey'. The purpose of this is to kind of create a transition of the colours from dark to light without a noticeable sharp contrast at any point, Like a gradient would do.
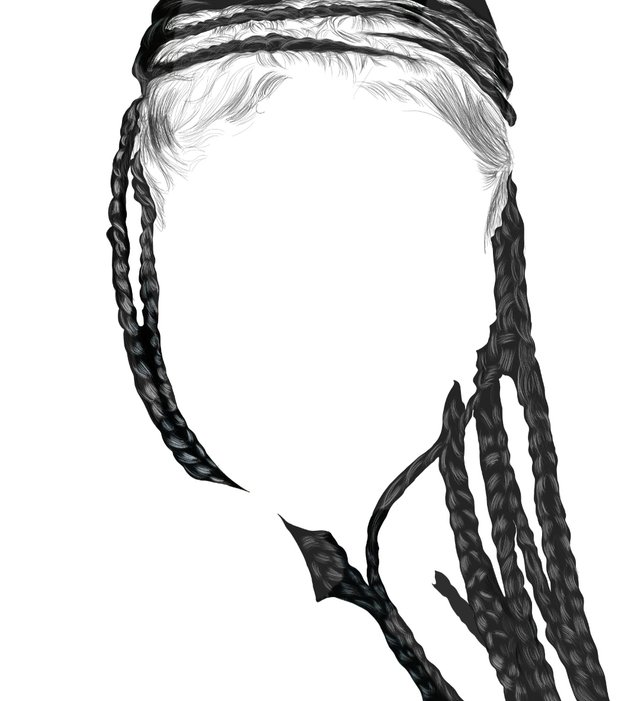
I have to mention that before you attempt stroking in quick succession, make sure your hand has attained high level stability if not, your work would be looking funny even if everything was done rightly. That aside, we are going to use a pitch black colour for the very dark areas too to finish everything up and we will be done with the hair. After that, we need to complete the body outline. Actually it would have been considered normal if we completed the body outline on the layer of the hair base but then, the avenue to make independent modifications on layers when the need arises should be prioritized. Although it know that with my resolution, It means I'll have to work with less layers but then, we can always merge layers when we are done with 'em.
What I am trying to say is, we are going to create a new layer below the hair base. And on this layer will be the outline for the body. Please hide the all the hair layers so as to have a clean layer to look through when outlining. If not, the hair structures will get in the way and you won't be able to cover all the openings. You know from the basics, we can only fill and enclosed area. Body outlining is done with Medium tip marker at 100% opacity and 2.3 size. It doesn't have to be accurate when drawing the head outline because really, the hair will be covering the most part of it. So it will be pointless if you spend your time to trace the head to perfection and at the end of the day, it won't be visible and only if it is an enclosed area or not would matter.
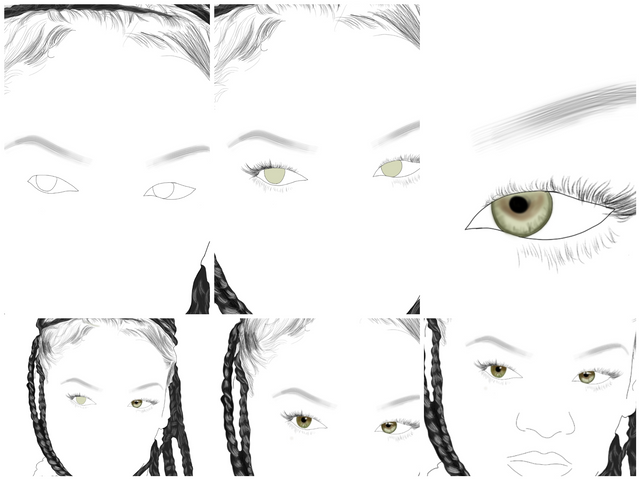
We have to create another layer above the body outline layer for the internal outline. The internal outline comprises the eye, nose, mouth and eyebrow. Starting from the eyebrows, there are actually two ways it could be done. We could decide to use the traditional pencil to stroke every strand of hair on it with a very small brush size or we could use a wet brush like the Brush 5 under texture. I think I'll like to go for the latter. I prefer the brush using a wet look. So we increase the size of the brush substantially and trace the eyebrow in one stroke of the brush. It is important we achieve this with one stroke for the best possible results so we could try and retry until we get it right. You can use the hard eraser to erase the edges until you achieve the eyebrow shape.
The eye outline is done with the medium tip marker on the same layer. Pardon my use of medium tip marker because there are several means to an end. There are a lot of brushes there that could give you the perfect outline or something you can consider better than the medium tip marker, it really depends on your choice. Along with the eye outline, we also have to calmly stroke the eyelashes with the traditional pencil, this should also be done patiently and for both eye. As we can see from the original image, Rihanna's eyeballs are a bit of green and brown so we are going to make something like that. We will be using four colours to achieve that purpose
Base fill : RGB (214, 217, 186)
Dark shade: RGB (134, 143, 94)
Brown shade: RGB (83, 62, 34)
Black colour
After we have filled the eyeball with the green base. We have to create a new layer above the green base so that we can have a completely independent layer which would make it easy to delete should any problem arise. The soft airbrush is selected and used to shade the edges using the dark shade, more like an outline though but not really. The brown shade is then used to shade the upper part of the eyeball because that is where the shadow is falling out on, like a penumbra region that is not black but brown. Then the black cloud is used to make a black dot in the middle of it - this could be done on a different layer though so that when you continue shading it won't cover the black dot like an overlay. Just so you know, the eye also has a white reflection - something that can give the eye the ultimate realism so I'd encourage you to also watch out for it while shading any eye. Everything looks set on her left eye, we just have to replicate the same thing on the right.
Alright, here comes the challenging part. Shadows and highlights are the most important part of your artwork because that is what people see at the first glance and most people will be quick to judge based on what they can first see without looking at the glorified details. Before that, let's fill the image. Don't forget that to fill the image we have to select the base outline we did below the hair base. Then we can get the complexion for the base outline. Actually, it is actually a tricky stuff. If the image you're making an art of is very clear then you can use the color picker tool to select the mid complexion from her face - not too light, not too dark. I eventually settled for RGB (240, 186,155) for the base fill.
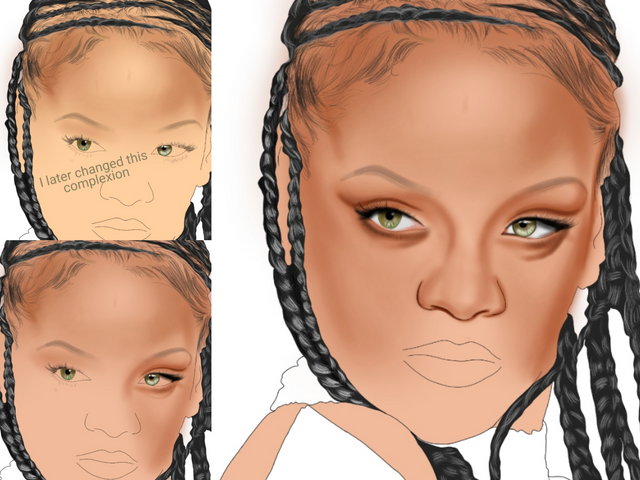
Please take note of this very crucial point when shading, don't make it too heavy when shading. Make sure at every point in your artwork, tweak the size and opacity to give it a light shade so that it can you can have a nice skin blend. The only time you can go against this crucial practise is when you are shading the darkest areas of the image. As you can see from the image below, we have our forehead shading going on nicely, it will all start to fall in place once you start to shade the important parts. Talking of important parts, giving the eyelashes a very dark shade of brown and black will make it look better because we have a lot of shadows there in the original image. So now, it is all up to your own hands give it a quality shade.
Here's a video to give you an idea...
There are two things we need to do after completing the shading for the face. Firstly, the eyebrow outline is too thin. I just noticed it, it is making the eye look awkward. So we'll have to increase the width a little bit by selecting the internal outline layer, erasing the eyebrows we have there with the hard eraser and stroking another, fat one this time around. Secondly, the hair has alot of spaces between the strokes we put there. And by strokes, I mean the hair curls so we are going to create a new layer above the hair curls and use the hr under the texture section to fill up the spaces as it is in the original image. If you want to discover more errors, flick between the original image and your artwork repeatedly in order to know what is off.
Now that we are done with the face, we'd have to move to the mouth but before that, there's something I want to do. Most times, I finish up the artwork before shading the highlights but then for this particular artwork, it is defined by the highlights and I think it will look much better and encourage me if I do the highlights early on. A lot of counterparts prefer a yellowish kinda colour for the highlights and of course, I have tried it too but I think it would look better if it is done with something white. A new layer is created for the highlights and highlights mean the very light areas of the picture so watch out for them and shade them accordingly.
Now we can move to the mouth. We have to first fill the mouth with a pink colour before we start shading and for that to happen, the outline has to be closed. After the filling is done, we can then start shading on a new layer with RGB (142, 49, 35). Shading is done in three parts (layers) the base, the darker areas, the highlights as seen below.
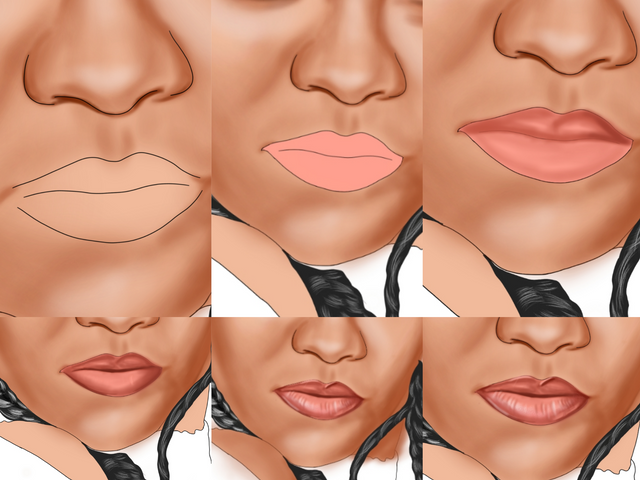
The rest of the body is then shaded on another layer. Reason is because below the shadow layer for the face. If we don't do it that way, the shadows will get interwoven ( since the hand is very close to the mouth) and you won't be able to erase it. While we were shading all along there were spill over at the edges and in fact, there will always be for every shading you do so now that we are done with the shading, we are going to clean the edges with the hard eraser for both the layers.
The final part is the clothing and the necklace. There are two ways to do it. If we shade the cloth from scratch, It will still be good but then what about necklace which is blurred even, it will be extremely painstaking and time consuming to try to do it so we are going to just have it overlay over the image using softlight. To do this. Click on the layer where the original image is and duplicate it. Hide one of them and on the second one, tap on it and change the blending to soft light. This will give the image a soft overlay. Since we are only going to need overlay for the cloth and necklaces, it means we will have to erase some parts of the soft light image layer, every thing the colour touches will be gone, apart from the needed areas.
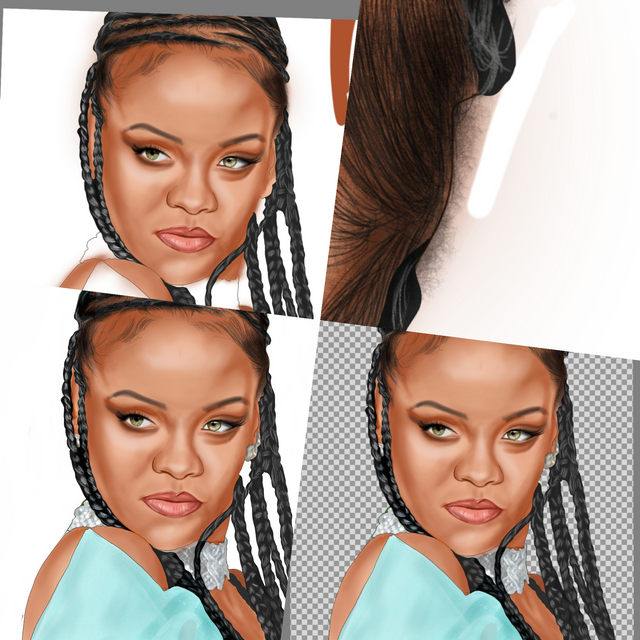
You could make little changes to your artwork and adjust it according to your preference. Now that is is all done, we can then look at the very last (default layer) and hide it which will make the background transparent. Then we can save it and use photo editors like picsart to add it to a blurry background.
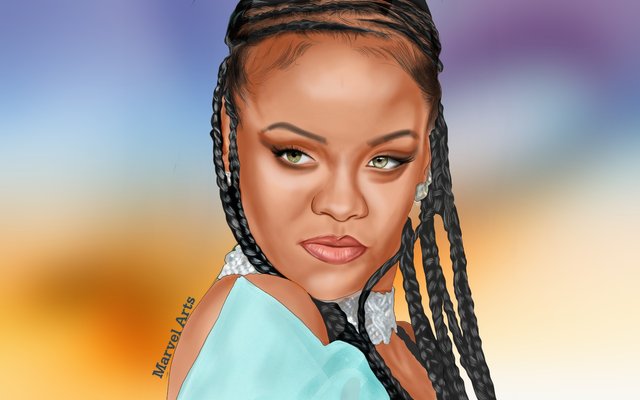
We've come a long way, and here we are, all done. If you have any questions.. feel free to ask.
/Software: Autodesk Sketchbook
TIME: 7 hours/
Link to my previous tutorials that I consider helpful
I also shared this on twitter
https://twitter.com/MarvelStalwart/status/1226023893476966402?s=20
Downvoting a post can decrease pending rewards and make it less visible. Common reasons:
Submit
I think you caught her look and expression very well, @marvel1206. Thank you for showing us your process too :)
@tipu curate
Downvoting a post can decrease pending rewards and make it less visible. Common reasons:
Submit
Upvoted 👌 (Mana: 20/30 - need recharge?)
Downvoting a post can decrease pending rewards and make it less visible. Common reasons:
Submit
You have been curated on behalf of Inner Blocks: a community encouraging first hand content, with each individual living their best life, and being responsible for their own well being. #innerblocks Check it out at @innerblocks for the latest information and community updates, or to show your support via delegation.
Downvoting a post can decrease pending rewards and make it less visible. Common reasons:
Submit
This post was shared in the Curation Collective Discord community for curators, and upvoted and resteemed by the @c-squared community account after manual review.
@c-squared runs a community witness. Please consider using one of your witness votes on us here
Downvoting a post can decrease pending rewards and make it less visible. Common reasons:
Submit
Ok, this does not look easier to me than pencils and paint brush.
But it does look amazing!
Do you do book covers?
Downvoting a post can decrease pending rewards and make it less visible. Common reasons:
Submit
Haha whatever rocks your boat. I consider pencils and paint brush equally challenging. I am just so used to this method that I want to see it to perfection before going traditional because I really started with pencils and all. 😊
I've not done book covers but I believe it won't hurt trying it.
Downvoting a post can decrease pending rewards and make it less visible. Common reasons:
Submit