Hey there everyone! I hope all of you are doing amazing and are healthy. I am going to be posting different tutorials of Adobe Photoshop now and this is going to be my first tutorial. If you want to know more about what kind of Adobe Photoshop is, you can check out my post What is Adobe Photoshop?. In this post, I will tell you step-by-step how to change the color of an object using the tools of Hue and Saturation.
STEP 01
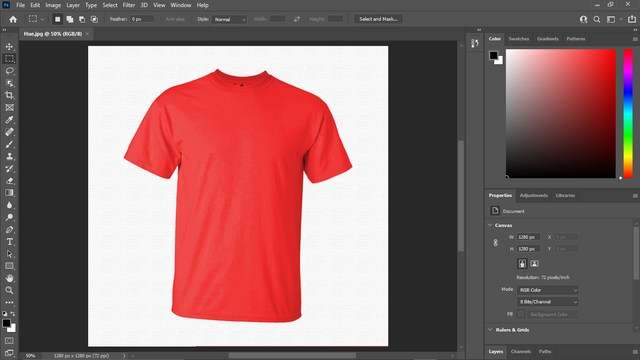
Open any file or an image in Adobe Photoshop. I have used the image of a T-shirt in this tutorial.

STEP 02
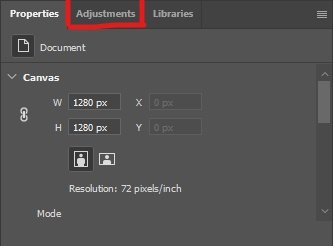
You can see in the right panel of the software a variety of options, from there, go to the Adjustments Tab.

STEP 03
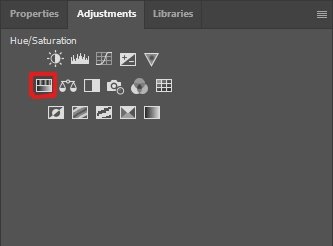
After that, you can see different options and you have to look for Hue and Saturation. When you find it, simply just click on it and it will open the panel from where you can change the Hue and Saturation respectively.

STEP 04
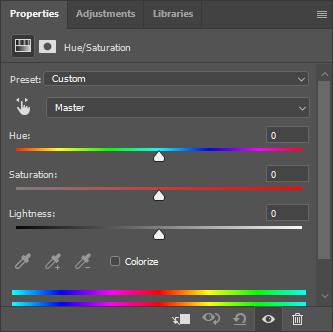
Now you will see different properties. Presets refers to the color combinations provided by the software itself and you can try them out. In the Master option, you will see names of a bunch of colors, this option helps you select a particular color and only change that color, this option is useful for when you have multiple objects with different colors and you want to change only one color without affecting the other objects.
Apart from these two options, you will have a level for Hue, which is used to change the color, Saturation, which controls the intensity of that color, and finally, Lightness which brightens or darkens your artwork.

STEP 05
Well, now the final thing left to do is choose your desired color. Whatever color you want, move the Hue level in the opposite direction of that color, or the best thing you can do is simply input the Hue value of that color in the small box on the top right of the Hue level.
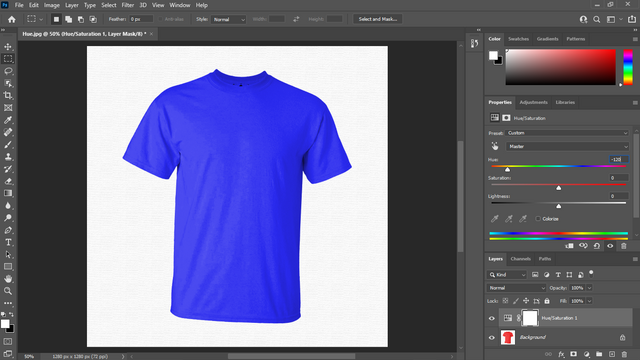
I know the value of the color blue which is -120, so I just entered that in the box as you can see in the below picture.


STEP 06
And lastly, if you want to change the intensity of that color, you can move the Saturation level to the right to increase the color intensity, or to the left to decrease the intensity.

I decreased the intensity from 0 to -45 and you can see, that the color blue has become a bit faded.


CONCLUSION
This was my first tutorial of Adobe Photoshop, there are many more to come, stay tuned! If there is anything you like to add to my tutorial, I will be more than happy to know!
Thanks to the admins and moderators of this community and many wishes for getting selected in the support program for November!
@cryptokraze
@siz-official
@vvarishayy
@farhan-nabeel
@suboohi

You can delegate your SP to @siz-official and take benefit of our Delegation Rewards Offer of getting up to 200% Curation Rewards
You can also use these quick delegation links. Just click on your desired amount of SP you want to delegate and it will be done in process of 1 minute.
50 100 200 300 400 500 1000
2000 3000 4000 5000 10000


Good one Post dear friend you make a very good tutorial for beginners.
Keep it up bro and keep learn with our steem fellows and friends.
Regards, Faran Nabeel
Downvoting a post can decrease pending rewards and make it less visible. Common reasons:
Submit
Thank you so much!
Downvoting a post can decrease pending rewards and make it less visible. Common reasons:
Submit