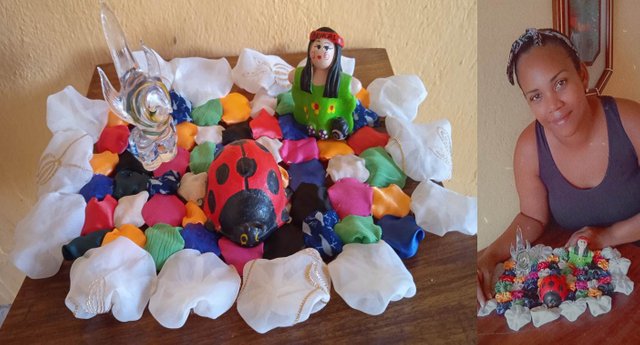
Saludos a todas las chicas de esta hermosa comunidad SteemWomen's Club, me encuentro hoy con ustedes para mostrarles una de mis creaciones que realice en casa con materiales reciclados, un hermoso mantel para centro de mesa colorido.
Greetings to all the girls of this beautiful SteemWomen's Club community, I am meeting you today to show you one of my creations that I make at home with recycled materials, a beautiful colorful tablecloth for centerpiece.
En estos momentos de pandemia eh tenido mucho tiempo libre, y para ocuparme en algo pensé en realizar este hermoso mantel, para despejar mi mente y me sirvió mucho ya que me relajo y me divertí haciéndolo los invito a que vean el paso a paso y se motiven a hacerlo conmigo. Espero les guste
In these moments of pandemic I have had a lot of free time, and to occupy myself with something I thought about making this beautiful tablecloth, to clear my mind and it helped me a lot since I relaxed and had fun doing it I invite you to see the step by step and motivate to do it with me. I hope you like it
Materiales:/Materials:
Retazos de telas de ceda.
Patchwork of ceda fabrics.
Tijera.
Scissors.
Hilo y aguja.
Thread and needle.
Saca costuras.
Take out seams.

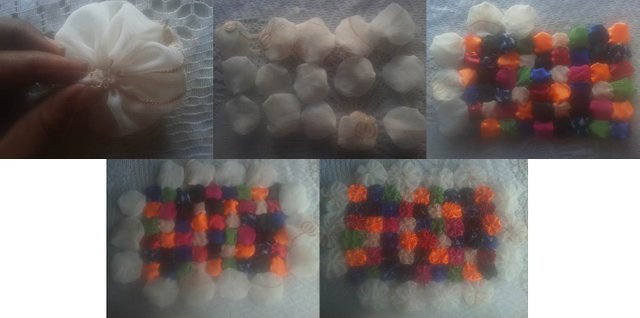
Para realizar este hermosos mantel, comencé cortando círculos en todas las telas (en este caso yo las corte a pulso, pero si quieres utiliza una boquilla de un vaso). Con aguja e hilo cose todos los bordes de los círculos, al terminar tira del hilo para arruchar y luego cose en la punta para asegurarlo.
To make this beautiful tablecloth, I started by cutting circles in all the fabrics (in this case I cut them freehand, but if you want use a nozzle from a glass). With a needle and thread, sew all the edges of the circles, when finished, pull the thread to crease and then sew on the tip to secure it.
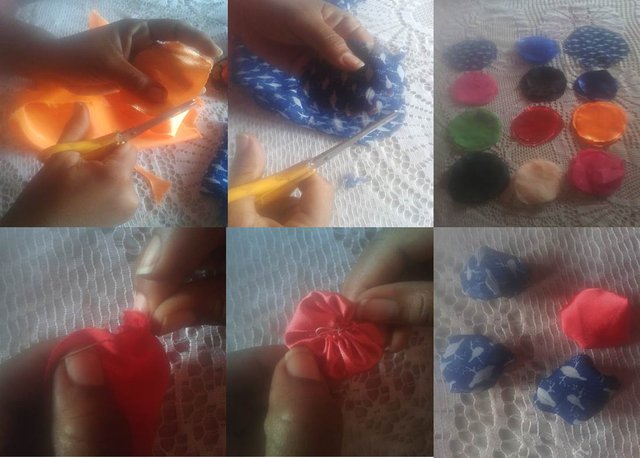
Así sucesivamente hasta tener listo todos los círculos que recortamos,(si quieres un mantel grande recorta mas cantidad de círculos) en este caso yo hice uno pequeño así que no necesitaba muchos círculos. Luego con aguja e hilo empata todo los círculos con 4 puntos de costura, al tu empatarlos puedes darle la forma que quieras.
So on until we have all the circles that we cut out ready, (if you want a large tablecloth cut more number of circles) in this case I made a small one so it does not need many circles. Then with a needle and thread, tie all the circles with 4 stitch points, when you tie them you can give it the shape you want.
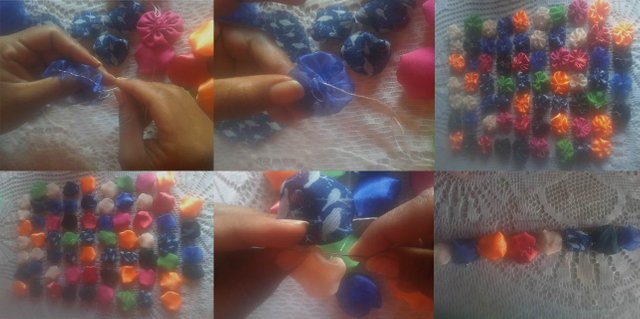
Aquí podrán ver el procedimiento cuando las estuve empatando, podrán notar que se lindo de los dos lados. Al culminar corte en una tela blanca con diseños círculos más grandes que los anteriores, le cosemos el borde.
Here you can see the procedure when I was tying them, you can see that it is nice on both sides. When finishing cut in a white fabric with larger circle designs than the previous ones, we sew the edge.
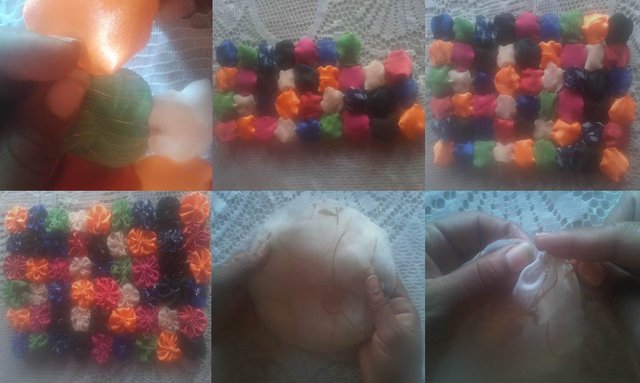
Al coser el borde tiramos del hilo para arruchar, estos los vamos a colocar en los bordes de nuestro mantel con hilo y aguja para hacer un diseño en las orillas. Y listo así queda nuestro hermoso mantel para centro de mesa.
When sewing the edge we pull the thread to crease, we are going to place them on the edges of our tablecloth with thread and a needle to make a design on the edges. And that's how it is our beautiful tablecloth for centerpiece.

Hola amiga @gressy esta muy interesante esa manualidad, bastante laboriosa pero terapéutica, gracias por compartirla, me gusto!
#onepercent
#venezuela
#affable
Downvoting a post can decrease pending rewards and make it less visible. Common reasons:
Submit
Gracias amiga, si es muy laboriosa pero queda hermoso, a su orden.
Downvoting a post can decrease pending rewards and make it less visible. Common reasons:
Submit
Saludos!
Downvoting a post can decrease pending rewards and make it less visible. Common reasons:
Submit
¡HERMOSO trabajo!¡Aplausos!full color...colirio para mis ojos.Te felicito.
Downvoting a post can decrease pending rewards and make it less visible. Common reasons:
Submit
Gracias amiga, muchas gracias por tu bello comentario mi amor.
Downvoting a post can decrease pending rewards and make it less visible. Common reasons:
Submit