.jpeg)
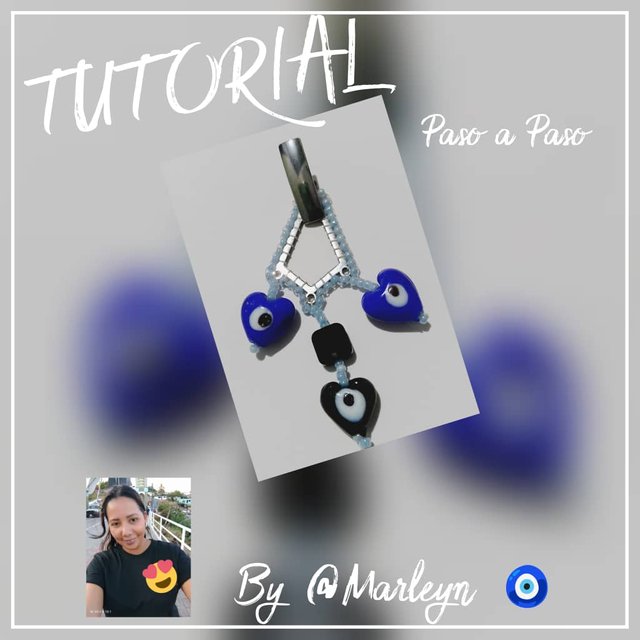
Feliz y Bendecido nuevo día, ante todos espero se encuentren bien llenos de mucha energía, salud y ganas de aprender cada día cosas nuevas. El día de hoy les traigo un tutorial paso a paso para realizar unos Zarcillos medianos de ojos turcos ya que están muy de moda, Según la pagina Lavani El significado popular del ojo turco es que posee propiedades protectoras. Se dice que protege contra el mal de ojo, la envidia y la mala suerte, y que brinda buena suerte y felicidad a su dueño. En la cultura turca se cree que su presencia en el hogar o en la ropa puede traer buena fortuna y protección, Yo particularmente no creo en eso pero me encanta esta pieza y me gusta mucho realizarla o utilizarla en mis creaciones, Ante todo espero que les guste y logren entender mi explicación para que te Atrevas a prender junto a mi nuevos procesos, si tienes dudas escríbeme, si tienes concejos escríbeme, estaré feliz de leerte y ante todo Gracias por leerme.
Happy and Blessed new day, I hope you all are well and full of energy, health and desire to learn new things every day. Today I bring you a step by step tutorial to make a medium sized Turkish eye tendrils as they are very fashionable, According to the page Lavani The popular meaning of the Turkish eye is that it has protective properties. It is said to protect against the evil eye, envy and bad luck, and to bring good luck and happiness to its owner. In Turkish culture it is believed that its presence in the home or in clothing can bring good fortune and protection, I particularly do not believe in that but I love this piece and I really like to make it or use it in my creations, I hope you like it and manage to understand my explanation so that you dare to try new processes with me, if you have questions write me, if you have advice write me, I'll be happy to read you and above all thank you for reading me.

MATERIALES MATERIALS
Mostacillas tono azul claro, Ojos turcos en forma de corazón, 2 bases de Zarcillos en forma de triangulo, Hilo nailon transparente (NOTA: Yo utilizo hilo blanco para que tu puedas ver las puntadas y se distinga el paso a paso), Tijera, Cristales negros cuadrados numero 4, Base o Pin de zarcillo, Aguja, Amor y mucha paciencia por lo que estamos haciendo
Light blue beads, Turkish eyes in the shape of a heart, 2 bases of tendrils in the shape of a triangle, transparent nylon thread (NOTE: I use white thread so that you can see the stitches and distinguish the step by step), scissors, number 4 square black crystals, base or pin of tendrils, needle, love and a lot of patience for what we are doing.

PASO 01 STEP 01
Vamos a ensartar el hilo en la aguja aproximadamente unos 60 centímetros de largo, Ahora tomamos la punta del hilo y lo vamos a amarrar en la esquina superior derecha de nuestra base triangular, realiza un buen amarre que a mi casi terminando la pieza se me reventó y me toco volver a empezar, Al terminar el amarre corta el hilo sobrante, Recuerda es mejor si utilizas hilo nailon transparente, ya que estéticamente tendrá un mejor acabado.
We are going to thread the thread in the needle about 60 centimeters long, now we take the tip of the thread and we are going to tie it in the upper right corner of our triangular base, make a good tie that to my almost finishing the piece I burst and I had to start again, When finishing the tie cut the excess thread, remember it is better if you use transparent nylon thread, since aesthetically it will have a better finish.

PASO 02 STEP 02
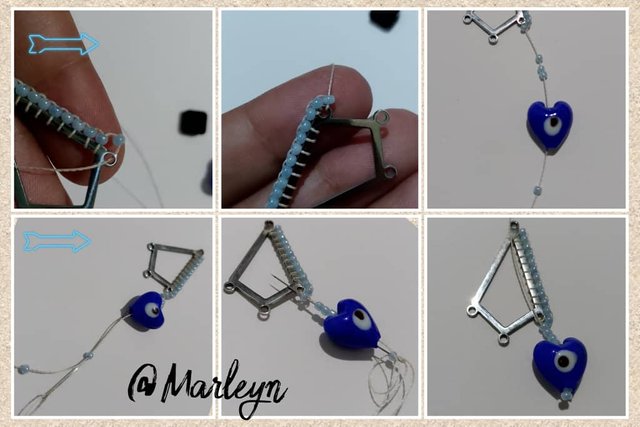
Ahora en la aguja vamos a introducir 2 mostacillas azul claro, que caigan hasta abajo pegadas a la base del zarcillo como te muestro en la segunda imagen, pasaremos la aguja por el centro del triangulo como te muestro en la imagen 3 y la vamos a subir por la segunda mostacilla como te muestro en la imagen 5 del collage, ahora introduce solo una mostacilla en la aguja, y nuevamente pasaremos la aguja por la parte central del triangulo, sube la aguja por la mostacilla y repetimos el proceso hasta llegar abajo, solo al principio introduces 2 mostacillas, después de ese momento es solo una mostacilla.
Now in the needle we are going to introduce 2 light blue beads, that fall to the bottom stuck to the base of the tendril as I show you in the second image, we will pass the needle through the center of the triangle as I show you in the image 3 and we are going to raise it by the second bead as I show you in the image 5 of the collage, now introduce only one bead in the needle, and again we will pass the needle through the central part of the triangle, go up the needle through the bead and repeat the process until we get to the bottom, only at the beginning you introduce 2 beads, after that moment it is only one bead.
.jpeg)
PASO 03 STEP 03
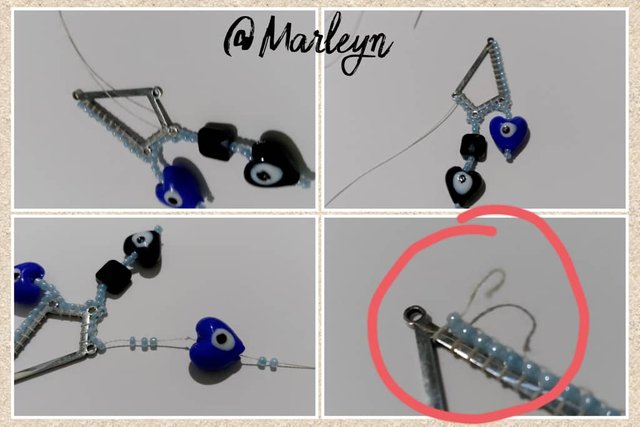
Continua bordando las mostacillas por toda la orilla hasta llegar a la primera punta de nuestra base triangular, al llegar alli vamos a realizar nuestro primer fleco, a mi no me gustan tan largos pero tu puedes hacerlo tan largos coo tu desees, yo introduje 3 mostacillas, el corazon de ojo turco y nuevamente 2 mostacillas, ahora vamos a dejar una mostacilla por fuera y vas a subir la aguja por la segunda mostacilla hasta arriba completamente
Continue embroidering the beads all along the edge until you reach the first point of our triangular base, when you get there we will make our first fringe, I do not like them so long but you can make it as long as you want, I introduced 3 beads, the Turkish eye heart and again 2 beads, now we will leave a bead on the outside and you will raise the needle through the second bead to the top completely.
PASO 04 STEP 04
Como puedes ver este es un proceso totalmente manual y repetitivo, siempre debemos seguir bordando por el mismo lado, cuando hacemos el fleco central lo hacemos un poco mas largo para crear esa distinción, marcando de esta manera el centro de la pieza, yo introduje 3 mostacillas, el cristal cuadrado de color negro, nuevamente 3 mostacillas, el corazón de ojo turco y continúe con 2 mostacillas para el cierre, deje una mostacilla libre y subí la aguja por el resto de las mostacilla hasta llegar nuevamente arriba y continuar el bordado, al llegar al otro extremo realizas el ultimo fleco con el mismo proceso que realizaste el primer fleco. En este Collage te muestro como se me soltó el nudo del principio y bueno como se daño la pieza empecé nuevamente, a todos nos puede pasar y te lo muestro para que entiendas que si te equivocas no te preocupes que eso es parte del proceso de aprender y el proceso creativo de todos.
As you can see this is a totally manual and repetitive process, we must always continue embroidering on the same side, when we make the central fringe we make it a little longer to create that distinction, marking in this way the center of the piece, I introduced 3 beads, the square black crystal, again 3 beads, the Turkish eye heart and continue with 2 beads for the closure, I left one bead free and went up the needle through the rest of the beads until reaching the top again, again 3 beads, the Turkish eye heart and continue with 2 beads for the closure, I left a free bead and went up the needle through the rest of the beads until reaching the top again and continue the embroidery, when you reach the other end you make the last fringe with the same process that you made the first fringe. In this collage I show you how the knot at the beginning came loose and well as the piece was damaged I started again, it can happen to all of us and I show it to you so that you understand that if you make a mistake don't worry that is part of the learning process and the creative process of all of us.
.jpeg)
PASO 05 STEP 05
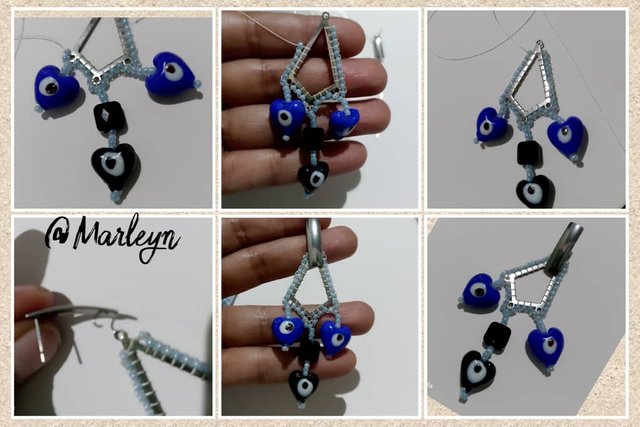
Cuando terminemos de bordar debemos hacer un nudo, luego regresamos la aguja por las mostacillas y mientras lo vas haciendo seguimos haciendo nudos de manera que no se suelte y a la vez quede el puedo escondido, corta el hilo sobrante y pasamos a colocar la base del zarcillo, normalmente estas bases por la parte de atrás tienen un aro que se abre con facilidad para que agarre la pieza y luego lo cierras con cuidado, siempre pendiente que este bien cerrado para que no se suelte, repite todo el proceso para realizar la segunda pieza, de esta manera hemos finalizado, Recuerda yo te explico el proceso, esta en ti colocar tu toque personal, Atrévete a jugar con los colores, las formas y las piezas.
When we finish embroidering we must tie a knot, then we return the needle through the beads and while you are doing it we continue tying knots so that it does not come loose and at the same time the can is hidden, cut the excess thread and move on to place the base of the tendril, usually these bases on the back have a ring that opens easily to grab the piece and then close it carefully, Repeat the whole process to make the second piece, in this way we have finished, Remember I explain the process, it is up to you to place your personal touch, Dare to play with colors, shapes and pieces.
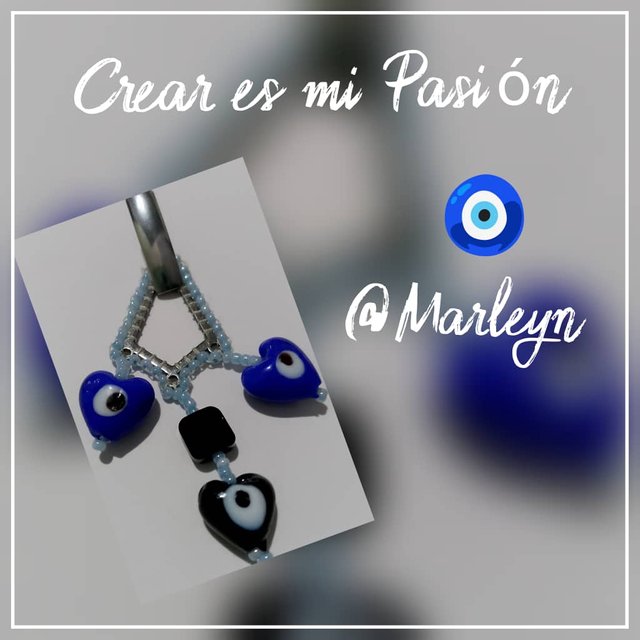


IMAGENES CREADAS EN CANVA
IMAGES CREATED IN CANVA

Hola @marleyn, un placer saludarte
Están muy hermosos tus zarcillos amiga, se ve que tienes mucha creatividad para realizar trabajos manuales y lo podemos ver en este hermoso resultado de tus zarcillos de ojos turcos.
Gracias por compartir con nosotros tu excelente paso a paso tan bien detallado. Te envío un abrazo. Bendiciones
Downvoting a post can decrease pending rewards and make it less visible. Common reasons:
Submit
Gracias @zulay7059 me alegra saber que te ha gustado! Bendiciones
Downvoting a post can decrease pending rewards and make it less visible. Common reasons:
Submit
Best regards
You created exclusive and quality content
Team 01 - Steemit Explorers Team
@graceleon
Downvoting a post can decrease pending rewards and make it less visible. Common reasons:
Submit
Gracias por el apoyo @graceleon. Un abrazo 🤗. Muy agradecida. Dios te bendiga
Downvoting a post can decrease pending rewards and make it less visible. Common reasons:
Submit
Best regards
You created exclusive and quality content
We wish you a happy new year 2025
Team 01 - Steemit Explorers Team
@graceleon
Downvoting a post can decrease pending rewards and make it less visible. Common reasons:
Submit