In this article I want to show new Steemit members how to publish their first article easily. This is a short how-to without bells and whistles and only for the standart-editor. I think this tutorial is important, because many people without HTML-skills are thinking it is very difficult to write an article here, but it is not difficult...
[German] In diesem Artikel möchte ich neuen Steemit-Mitgliedern zeigen, wie sie ganz einfach ihren ersten Artikel veröffentlichen können. Dies ist eine kleine Kurzanleitung, ohne viel Schnickschnack und nur für den normalen Editor. Ich denke diese Anleitung ist wichtig, weil viele Leute ohne HTML-Kenntnisse denken , dass es sehr schwer ist hier einen Artikel zu veröffentlichen, aber es ist nicht schwierig...
I will show you how easy this could work now!
[German] Ich werde dir jetzt zeigen wie einfach das sein kann!
1.
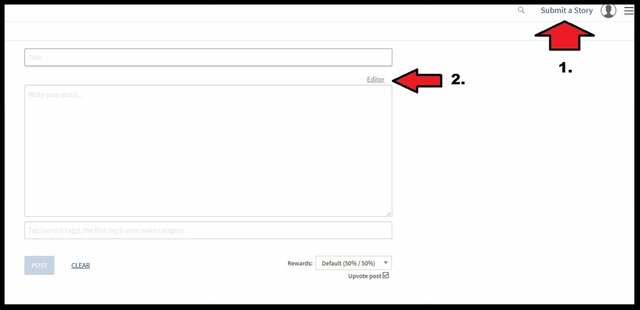
[German] Als Erstes musst du am oberen rechten Rand auf "Submit a Story" klicken und wenn du keine HTML-Erfahrung hast, klicke dann auf "Editor". Das ist der einfache Weg für dich und es ist so wie einen Text in Word, oder eine Email zu schreiben.
2.
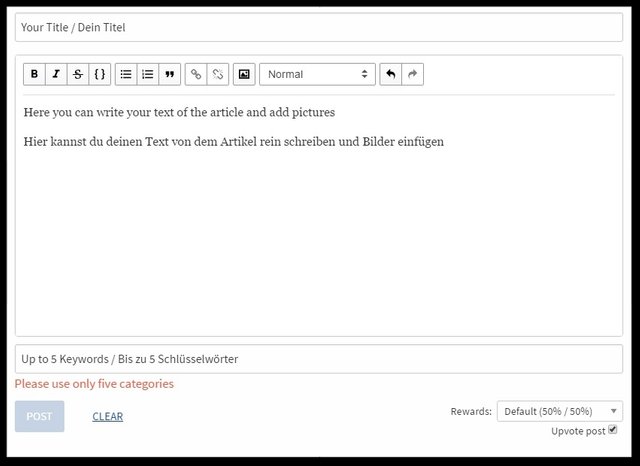
[German] Jetzt kannst du deinen Titel und den Haupt-Text schreiben. In das letzte Feld kannst du bis zu fünf Tags/Schlüsselwörter einfügen, getrennt mit Leerzeichen, die zu deinem Artikel passen. Die Schlüsselwörter/Tags sind wichtig, damit dein Artikel von anderen gefunden wird.
3. How to write in bold letters?
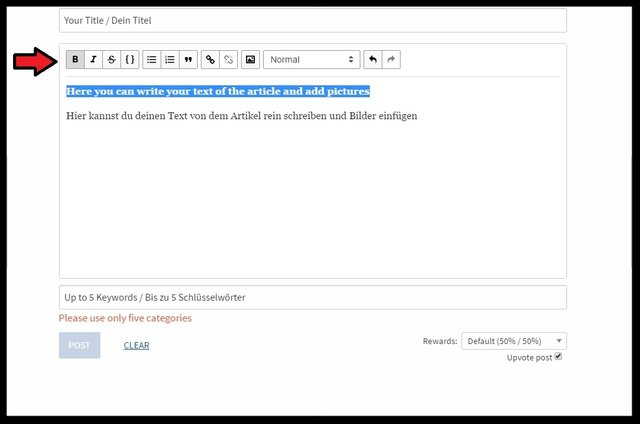
[German] Wenn du etwas fett schreiben möchtest, markiere einfach den Text den du fett schreiben möchtest und klicke auf das "B" in der Editor-Leiste oben.
4. How to write headlines?
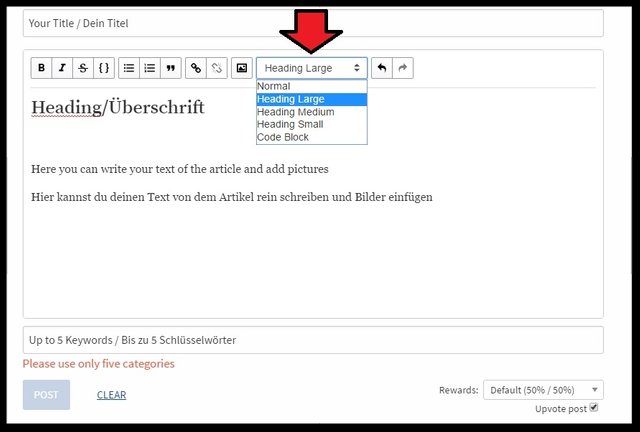
[German] Wenn du Teile deines Textes in großen Überschriften schreiben möchtest, markiere einfach die Text-Stellen und wähle ein Überschrifts-Format, wie in dem Screenshot oben gezeigt.
5. How to add links?
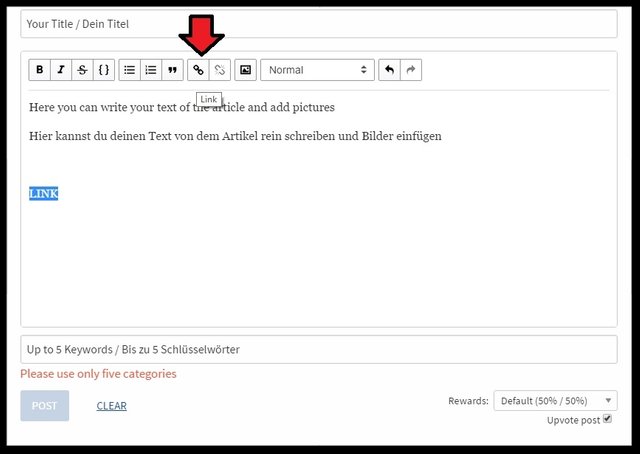
[German] Wenn du einen Link hinter einen Text einfügen möchtest, markiere einfach die Text-Stelle, klicke auf das Link-Symbol und füge den Link in das Feld oben ein.
6. How to add pictures?
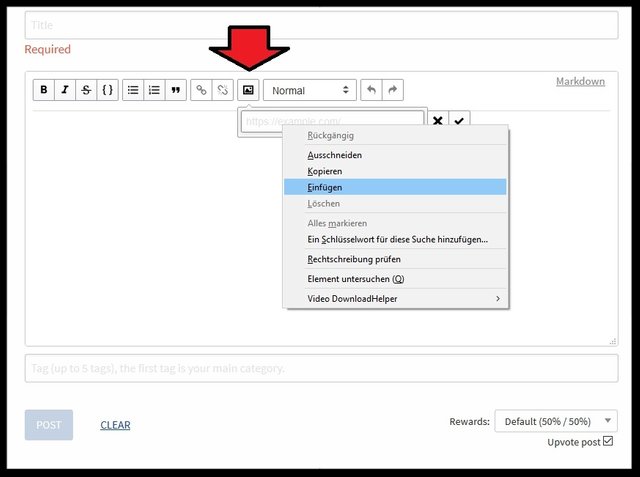
[German] Um Bilder einzufügen, musst du einfach auf das Bild-Symbol in der Editor-Leiste klicken und die direkte Bild-URL einfügen. (Endet mit .jpg, .png, oder .gif) Du kannst sie zum Beispiel durch Rechts-klicken auf deine Bilder bei Facebook und dann "Bild-URL kopieren", bekommen. Du kannst auch Bilder von anderen Quellen nutzen, aber wenn es nicht deine eigenen Bilder sind, füge unbedingt die Bild-Quelle darunter hinzu, wegen den Copyrights.
7. How to use my own pictures, which are not already uploaded at facebook etc.?
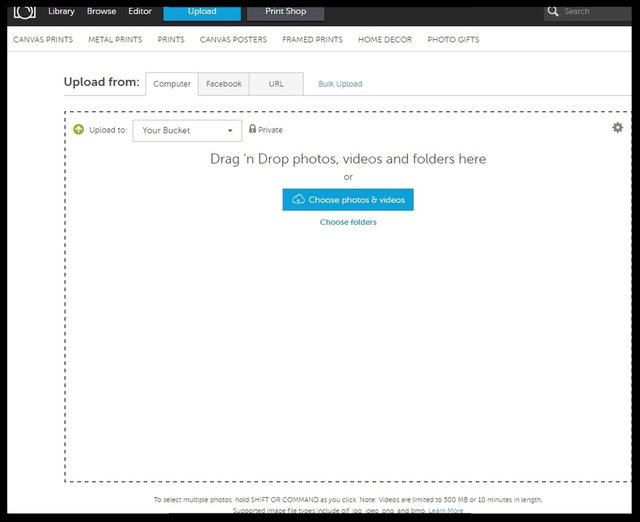
[German] Du kannst die Bilder überall hochladen wo du möchtest und dann musst du einfach die Bild-URL kopieren. Ich kann das kostenlose Web-Tool photobucket.com empfehlen, was es auch als App-Version gibt, um deine Bilder direkt von deinem Smartphone hochzuladen. Nachdem du deinen kostenlosen Account angelegt hast, kannst du die Bilder dort einfach über "Upload" hochladen, wie du an dem Screenshot oben sehen kannst.
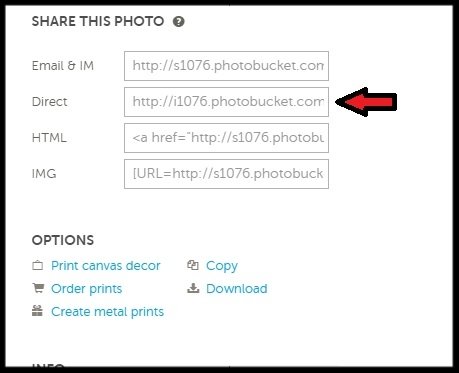
[German] Nachdem die Bilder hochgeladen sind, kannst du rechts an der Seite die Bild-URL kopieren (oder mit Rechts-Klick, "Bild-URL kopieren") und sie wie in Punkt 6 gezeigt, in das Feld einfügen. Vorher natürlich noch in die entsprechende Stelle in deinem Text klicken, wo das Bild erscheinen soll.
I hope this tutorial is easy to understand for new members and Im happy about your feedbacks!
[German] Ich hoffe diese Anleitung ist für neue Mitglieder leicht zu verstehen und freue mich über euer Feedback!
Best regards and hear you in my next article!
[German] Beste Grüße und wir hören uns in meinem nächsten Artikel!

Jonas Ahrens

Hi there, Many thanks for your invaluable tutorial. I just have one question, I'm trying to write poetry in the standard editor like you show above but I can't seem to get it into the right format and so it all becomes merged together. Can you give any advice, please?
Downvoting a post can decrease pending rewards and make it less visible. Common reasons:
Submit
In which format do you want your article?
Downvoting a post can decrease pending rewards and make it less visible. Common reasons:
Submit
Great post. Thank you. Upvoted and resteemed
Downvoting a post can decrease pending rewards and make it less visible. Common reasons:
Submit
Thank you very much @bhavnapatel68!
Downvoting a post can decrease pending rewards and make it less visible. Common reasons:
Submit
Thanks to you @future24. Your article will help lot of new people to get the knowledge how to compose their articles. Very beneficial to the steemit platform.
Downvoting a post can decrease pending rewards and make it less visible. Common reasons:
Submit
Thx, for all the new members it's very helpful to have these simple instructions. Maybe they could also use StackEdit where it's much easier to edit an article because you get an immediate display of the result at the right side of the screen and it is stored automatically for later actions on the text.
Downvoting a post can decrease pending rewards and make it less visible. Common reasons:
Submit
Thank you @pery! Yes this is a great tool for people without HTML-skills.
Downvoting a post can decrease pending rewards and make it less visible. Common reasons:
Submit
GOOD JOB. KEEP HELPING NEW STEEMERS @future24
Downvoting a post can decrease pending rewards and make it less visible. Common reasons:
Submit
Thank you @funnyman and yes: Steem On! :)
Downvoting a post can decrease pending rewards and make it less visible. Common reasons:
Submit
Great!
And it is possible to book lessons?
I would have been interested in money Stiim structure: they pay, far better to invest, vzaimoinvestirovanie.
Then related projects: the photo, cut the link, reviews and more.
Of course, there ip, but there is not very convenient, and it is not clear. Also part of the projects under some sort of source and / or does not work.
Beginner? :)
Downvoting a post can decrease pending rewards and make it less visible. Common reasons:
Submit
Thank you! :D For which topic you would book a lesson?
Downvoting a post can decrease pending rewards and make it less visible. Common reasons:
Submit
It is now happy to review scanned job applications around Stiim.
I've looked through a lot of material (the third day of study), and many have found, but strange in its entirety topics:
Something like this...
Downvoting a post can decrease pending rewards and make it less visible. Common reasons:
Submit
I almost forgot:
Downvoting a post can decrease pending rewards and make it less visible. Common reasons:
Submit
Am I allowed to share this article on FB?
Downvoting a post can decrease pending rewards and make it less visible. Common reasons:
Submit
Yes of course you can share it on FB @tanemahuta.
Downvoting a post can decrease pending rewards and make it less visible. Common reasons:
Submit
good post. i am currently building a website with simple instructions for steemit and think your post would be a good link to include on the site.
https://steemit.com/steemit/@pcste/new-website-www-howtosteemit-com-simple-newbie-instructions-first-test-stage-please-give-feedback
Downvoting a post can decrease pending rewards and make it less visible. Common reasons:
Submit
Great idea @pcste and of course I will be happy about including my link!
Downvoting a post can decrease pending rewards and make it less visible. Common reasons:
Submit
I am a complete beginner, so I read your article. I learned one thing: "Click on the editor". Thanks. I had been struggling with the HTML markup. I up-vote you for that.
Now I have two tips for other newbies, that I want to share:
Uploading photos:
If you don't already have an online photo, e.g. on your facebook page, then by far the easiest way to get a url to the photo is to use postimg.org. It requires no registration, no password, no email verification, and no details. Just click on "Select Photos", and the URL that you can use on Steemit appears immediately. Do be sure to use the SECOND link down called "Direct Link".
Re-sizing photos
My second tip is to do with resizing photos. They may be too big and you want a smaller one.
Normally an image comes up starting with "https://steemitimages.com/..." followed by a lot of letters and numbers and then the name of the file somewhere in there.
Add the following before it "https://img1.steemit.com/500x500/". You now have "https://img1.steemit.com/500x500/https://steemitimages.com/..." . Your image size is now 500 X 500 or whatever size you chose.
Colours
What I can't figure out, is how to change the colour of text.
Downvoting a post can decrease pending rewards and make it less visible. Common reasons:
Submit
Hyy Thank You Very Much
Downvoting a post can decrease pending rewards and make it less visible. Common reasons:
Submit
Much appreciated on the quick'torial.
Downvoting a post can decrease pending rewards and make it less visible. Common reasons:
Submit
Very well done and very helpful. Thank you. DAN-keh shoon
Downvoting a post can decrease pending rewards and make it less visible. Common reasons:
Submit
Thank you for the good article. I thought the Markdown/HTML was the best way to write effective posts, but good posts can still be written with this basic editor.
Downvoting a post can decrease pending rewards and make it less visible. Common reasons:
Submit
This post has been linked to from another place on Steem.
Learn more about and upvote to support linkback bot v0.5. Flag this comment if you don't want the bot to continue posting linkbacks for your posts.
Built by @ontofractal
Downvoting a post can decrease pending rewards and make it less visible. Common reasons:
Submit
Hi, I have a question. Am I allowed to post a screenshot of an article from another site? Of course, I will provide the sources and acknowledgement on my post as well. Will that be okay?
Downvoting a post can decrease pending rewards and make it less visible. Common reasons:
Submit
It appears that Photobucket requires a storage fee, unless I want to share my photos with the world, with the smallest plan costing $34.99/year. Is this correct, or am I misreading the website?
Downvoting a post can decrease pending rewards and make it less visible. Common reasons:
Submit
Normally it is for free, but you can use this site to upload pictures for free too, because Photobucket is very buggy: https://picload.org/
Downvoting a post can decrease pending rewards and make it less visible. Common reasons:
Submit
Thank you for the article. I'm new to the site and this is helpful!
Regards
Downvoting a post can decrease pending rewards and make it less visible. Common reasons:
Submit