This is my MK1 version, made this from an old cctv cam, infrared torch and cheap 4.3" LCD screen and parts from maplin + screwfix.
Because we have poultry at our allotment, we get a lot of rats stealing the duck food. recently it has become a real problem to such anextent that my duck Vic was bitten by a rat. we have no choice but to cull the rats.
We have tried snapper traps, snares, poision, gravel traps over tunnels, every time they have learnt a new route.
So i decided to to try night vision.
If youve checked out night vision products for air rifles, you'l see they are pretty expensive.
this setup was made for about £60 (all earnt from steemit)


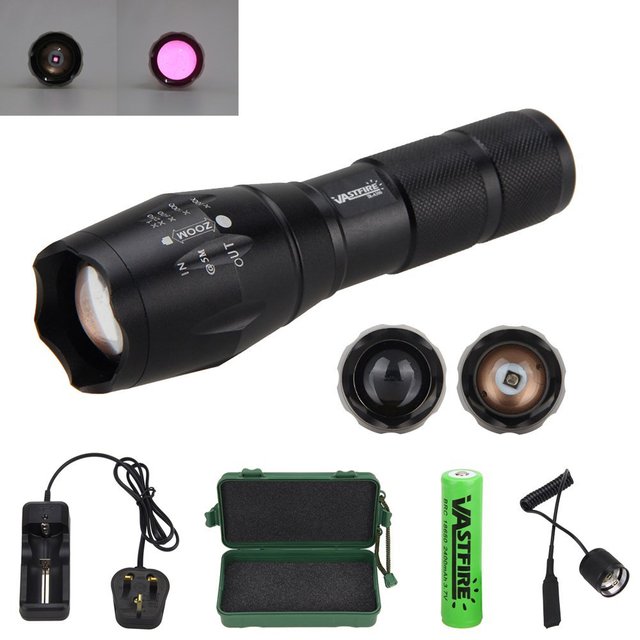
You will need an infrared illuminator (torch) i bought this 1

https://www.amazon.co.uk/gp/product/B06ZZWZHLL/ref=oh_aui_detailpage_o03_s00?ie=UTF8&psc=1
A cctv cam thats infrared ready or a cam with infrared filter removed (if you want to remove the filter there are tutorials, google them)

This 1 was taken out of a home cctv set (bullet cam with infrared leds attached)
You dont need the ir leds, but if you have a cam already with ir leds then theres a good chance its had the ir filter removed.
You will also need a 12mm or 16mm lens as the one on most cctv cams are 2.8mm wide angle.
when i was building this project the only 12mm or 16mm lenses i could find where in china and would take 2 weeks for delivery, if you can wait that is the cheapest option.
you can however get a zoom lens that goes up to 12mm .I got 1 of these...
https://www.amazon.co.uk/gp/product/B06XT8BQZK/ref=oh_aui_detailpage_o00_s00?ie=UTF8&psc=1
Ive also seen tutorials with people using cheap car reversing cams. some are ir ready. check to see if they will take another lens (S Mount (M12)
This site sells cams with ir filter removed, and correct lens attached for £25 however they are out of stock atm.
http://www.diy-nightvision.com/product/kpc-e700-board-cam-ir-filter-removed-16mm/
ive seen a similar cam for about £35 but cant find the link any more.
good options are sony efio or super had
If you want a good quality cam that comes ir ready and with 16mm lens, then this is a good option that a lot of DIY projects are using. these are quite a bit more expensive.
https://www.amazon.co.uk/Night-Vision-KPC-E700-Filter-Removed/dp/B01MQV9I8U/ref=sr_1_1?ie=UTF8&qid=1508516017&sr=8-1&keywords=NIGHT+VISION+-+KPC-E700PUB+SONY
I bought a 4.3" lcd screen
https://www.amazon.co.uk/gp/product/B01FRRI4NA/ref=oh_aui_detailpage_o01_s00?ie=UTF8&psc=1
I bought a project box and switch from maplin. you can get boxes without the edges that stick out like on mine (they had none in stock when i went into my local store)
i got this 1 in the end
https://www.maplin.co.uk/p/box-with-base-type-3-black-116x64x46mm-yn37s
switch
https://www.maplin.co.uk/p/snap-in-miniature-round-rocker-switch-red-jr97f
Some parts from screwfix
FLOPLAST SP296 SOCKET PLUG BLACK
https://www.screwfix.com/p/floplast-sp296-socket-plug-black/46863
FLOPLAST PUSH-FIT STRAIGHT COUPLER BLACK 40 X 40MM
https://www.screwfix.com/p/floplast-push-fit-straight-coupler-black-40-x-40mm/53679
To build the sight :
drill a 40mm hole in the centre of the project box.
make a hole in the end of the floplast socket plug , large enough to fit your camera lens through.
try and make a tight fit so the cam sits in place
drill a hole a hole in the top of the project box to fit wires from lcd.
drill another hole somewhere on the box to put your wire from the battery into the box.
make a hole on the box to fit your switch.
Now push the socket plug with your cam through the hole you made in the project box.
stick the lcd to the top of the project box and feed the wire through the hole you made earlier.
now wire a lead to the switch (i added a connector so i can plug a battery in easily)
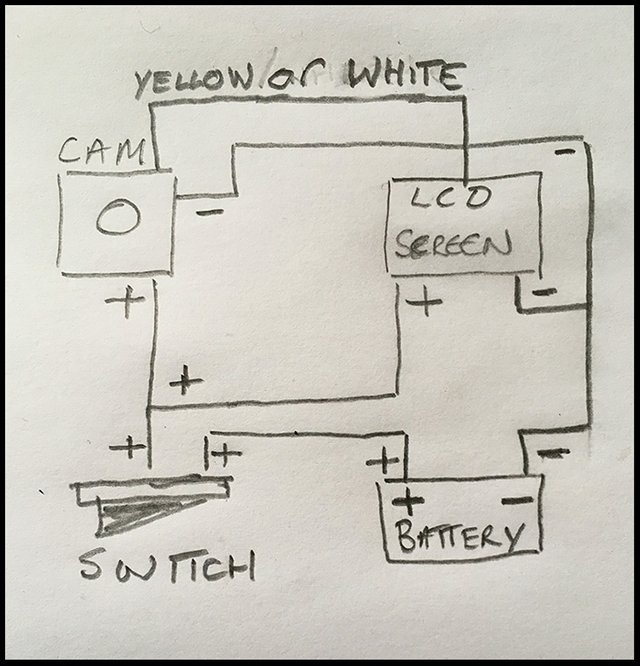
wire the the screen, cam and switch together like the diagram below

now attach the 40mm coupler to the open end of the socket plug and fit the other end to your rifle scope. you may have to add something to get a tight fit on your scope.
You will need a 12v battery i used a 3 cell Li-Po battery that i use for my quadcopter.
The hardest bit i found while setting up was getting the cam lens in focus on the scope cross hairs. its a bit faffy because you have take the cam off the scope to focus. you also have to experiment with the length of tube between the scope and cam.
some links to the sources i used to make this project.
http://www.diy-nightvision.com/
https://www.youtube.com/results?search_query=diy+night+vision+rifle+scope
http://www.nightvisionforumuk.com/viewforum.php?f=29&sid=708ab4b6e2f03d6fb649cb44a7b522bf
some of my other diy projects and tutorials
https://steemit.com/offgrid/@pcste/off-grid-d-i-y-solar-system-for-the-allotment-shed-using-re-cycled-parts-how-to-do-it
please vote pc for witness.
to vote for me go to : https://steemit.com/~witnesses scroll down the page and enter pcste into the box (dont use @sign) then click vote
Thank you for sharing.
It looks too simple to be true pcste - though I'm sure it hasn't been all plain sailing, even once you had all the parts to hand!
Is that your final verion, Steve, or are there any modifications in the pipeline?
Downvoting a post can decrease pending rewards and make it less visible. Common reasons:
Submit
Second Amendment Steve ? surely not 😊x
Downvoting a post can decrease pending rewards and make it less visible. Common reasons:
Submit
we ant got a 2nd amendment u fartknocker
:-)
Downvoting a post can decrease pending rewards and make it less visible. Common reasons:
Submit
Not yet ...😊x
Downvoting a post can decrease pending rewards and make it less visible. Common reasons:
Submit