Shader Programming: Massively parallel art
The second part of a STEEM-exclusive series in which we play with shader programming to create beautiful graphics.
PART 2: Varying stuff across the image
The story so far
Last time, we got to the point where we had a little program executing millions of times per frame on your GPU. That's great, but all it was doing was showing a red screen! Let's see how we can change the pixel colour based on where we are on the screen.
The fragCoord parameter
As you know from last time, one of the parameters our mainImage() function accepts is fragCoord -- a 2D vector with our current {x,y} screen coordinate.
These are given to us in actual pixel number form; if the viewing window (viewport) is 1920 x 1080 for example, the x coordinate will range from 0 to 1920 and y from 0 to 1080.
This is all well and good, and gives us a way we can tell whereabouts on the screen we are, but whenever the viewport is resized the ranges of {x,y} coordinates that we get change too.
This can be a bit inconvenient; what we really want are coordinates that range from 0.0 to 1.0 in each axis, independent of screen size.
Introducing iResolution
It turns out that as well as the fragCoord parameter, Shadertoy automatically makes a bunch of other useful inputs available to our shader program. You can expand the "Shader inputs" tab just above the Shadertoy code panel to see them all, but the one we're interested in is iResolution.
This is a vector containing the current viewport resolution. That's just what we need to convert our coordinates as given by fragCoord to values between 0.0 and 1.0, so that {0.0, 0.0} is the bottom left of the viewport and {1.0, 1.0} is the top right.
If we divide our current screenspace coords by the total viewport resolution, we get exactly what we want. Go ahead and make a new shader on Shadertoy, paste this, and recompile with the Play button (though the output will still just be red for now):
void mainImage( out vec4 fragColor, in vec2 fragCoord )
{
    // Calculate uv coord (each axis normalised from 0 to 1.0)
    vec2 uv = fragCoord / iResolution.xy;

    // Output to screen
    fragColor = vec4(1.0, 0, 0, 1.0);
}
You can see that GLSL makes it really easy to divide vectors. Each component gets automatically divided by the equivalent component; so just saying uv = fragCoord / iResolution; is enough for GLSL to understand that we mean uv.x = fragCoord.x / iResolution.x; uv.y = fragCoord.y / iResolution.y;
All the vector operations work in a similar manner. Wait a minute -- what's that .xy doing on the end of iResolution? Well, for no apparent reason Shadertoy uses a vec3 instead of a vec2 for iResolution (even though only the x and y components are of interest). By specifying .xy after the name of the vec3, we are selecting just the x and y components for the division operation. This is required, because it would make no mathematical sense to divide a vec2 by a vec3.
Selecting certain vector components in this way is called swizzling in GLSL.
The specific variable name uv is just used by common convention, and in a graphics programming context uv nearly always refers to a normalised screenspace coordinate or texture coordinate.
So can it PLEASE not just be red now?
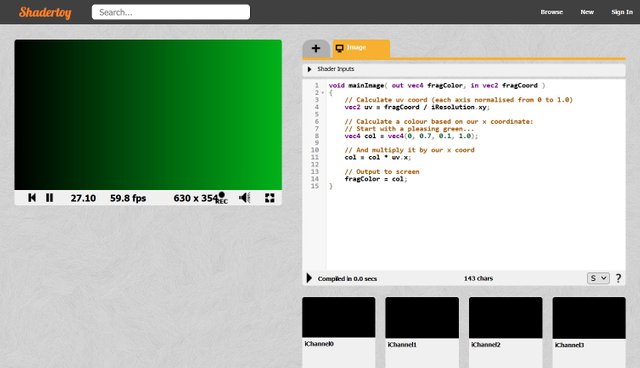
Yes! Now that we have a uv coordinate, we have a way of telling where we are on the screen. As a trivial demo of this (but at least it's not just red), let's try affecting the colour based on the x coordinate.
void mainImage( out vec4 fragColor, in vec2 fragCoord )
{
    // Calculate uv coord (each axis normalised from 0 to 1.0)
    vec2 uv = fragCoord / iResolution.xy;

    // Calculate a colour based on our x coordinate:
    // Start with a pleasing green...
    vec4 col = vec4(0, 0.7, 0.1, 1.0);

    // And multiply it by our x coord
    col = col * uv.x;

    // Output to screen
    fragColor = col;
}
Paste it in and try it. You should see a nice black-to-green horizontal gradient.

How does that work?! Remember our program is only calculating the colour for A SINGLE PIXEL, based on the x coordinate for this particular run through the program. Nowhere do we have to specify that we want this to happen in a big loop for the whole screen. The GPU knows that since it's rendering a quad that covers the entire screen, it must call our program once for every single pixel, passing us a different fragCoord every time.
So, having created a vec4 to hold our RGBA colour, we then multiply it by whatever the current x coordinate is. Since x varies between 0 and 1.0, that will leave our little pixel completely black when x is 0 (left-hand edge), completely green when x is 1.0 (right-hand edge), and a proportionally darker shade of green anywhere in between.
Let's add a dimension
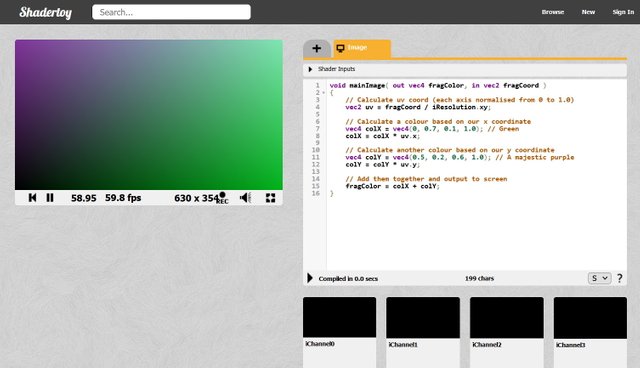
In a similar way, we can do another gradient in y, and add the colours together for a nice effect:
void mainImage( out vec4 fragColor, in vec2 fragCoord )
{
    // Calculate uv coord (each axis normalised from 0 to 1.0)
    vec2 uv = fragCoord / iResolution.xy;

    // Calculate a colour based on our x coordinate
    vec4 colX = vec4(0, 0.7, 0.1, 1.0); // Green
    colX = colX * uv.x;

    // Calculate another colour based on our y coordinate
    vec4 colY = vec4(0.5, 0.2, 0.6, 1.0); // A majestic purple
    colY = colY * uv.y;

    // Add them together and output to screen
    fragColor = colX + colY;
}

You can go into fullscreen mode to see your shader at the same resolution as your monitor; it's the rightmost icon underneath the render panel.
You may have noticed that Shadertoy displays a framerate below the render panel. Even though we're just calculating a static image, we're actually calculating it 60 times a second.
For a typical 1920 x 1080 fullscreen viewport, that means our little program is executing 124,416,000 times every single second!
Granted, it's not doing anything particularly exciting yet. Next episode, we'll introduce animation, by using another handy input provided by Shadertoy. Stay tuned!
This post was upvoted by @hustleaccepted
Use our tag #hustleaccepted and mention us at @hustleaccepted to get an instant upvote.
Also, you can post at our small community and we'll support you at Hustle Accepted
Visit our website at Hustle Accepted
Downvoting a post can decrease pending rewards and make it less visible. Common reasons:
Submit