Original creation date: 15th December 2019
Note: Originally I posted this on my Wordpress Blog (https://1337codersblog.wordpress.com), but I decided to switch to steemit, so I copied it from there.
Simple light barrier - Part 4
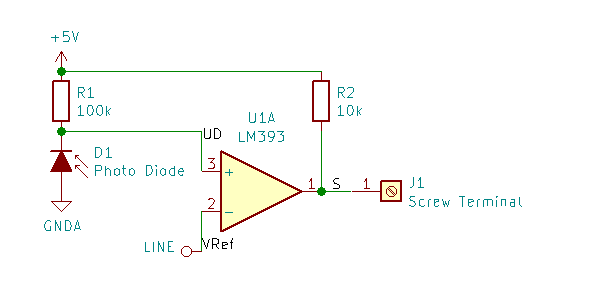
In the last 2 days I further improved my design of a fast and easy to build light barrier:

R1 should be high, so it amplifies the light related voltage drop of the photo diode. I did not took the time to figure out the optimal value for R1 but 100k Ohm turned out to be good enough. R2 is a pullup resistor for the comparator U1A. Without that pullup resistor, the comparator always outputs low level. A value of 10k Ohm turned out to be a good value. VRef is the reference voltage. When the voltage drop of the photo diode is higher than VRef the comparator outputs high level. Else it outputs low level. UD is the voltage drop of the photo diode. S is the output signal. It is high when the light barrier detects an object and low if not. You can invert this behaviour when needed by swapping the connections of VRef and UD.
In my test there was a distance of 10 millimeters between the LED and the photodiode and when no object was present the voltage drop of the LED was near by 0 Volt. When an object was present the voltage drop was nearby 5 Volt. Theoretically this would be enough to omit the comparator and directly give the signal into a logic circuit or a consumer driving MOSFET. Nevertheless I decided to keep the comparator to be sure to have a clean signal even when the LED degrades or the photodiode is polluted with dirt. While the test I also found out that a reference voltage of 0.3 Volt was enough to cleanly detect if an object is present.