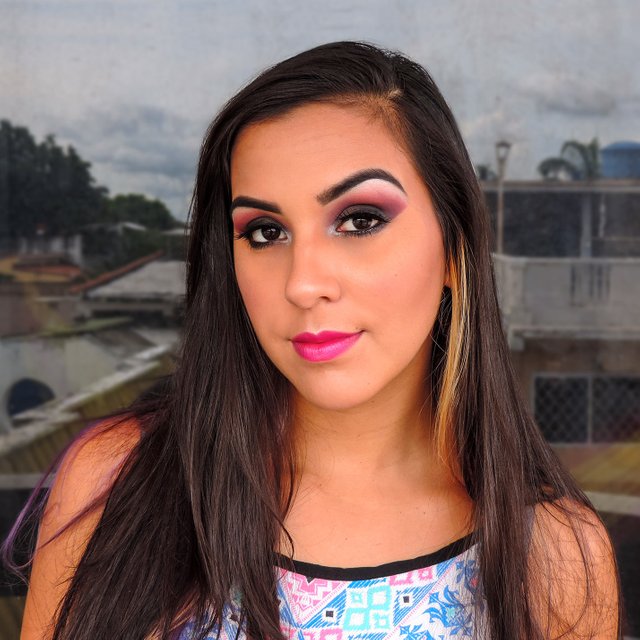
In our first introduction post to this makeup series we commented that we were going to be publishing several types of makeup and tips. Being the Day Makeup the first one, in this second post Victoria will talk about night makeup, so that you can achieve a professional and elegant finish. I look forward to helping you and any questions you may have can be asked in the comments.
If you want to highlight the best attributes of your face and always be perfect for every occasion, it is essential that you learn basic makeup techniques, with patience and practice you will get to look a perfect face for every situation of your day to day. The invention and implementation of makeup has been one of the best tools of seduction, reflects much femininity, however, all makeup can become a double-edged sword if not used properly, if you put too much can be covering your natural beauty and will make you look like a clown.
If you love makeup and don't know how to use it properly, don't worry, I will be guiding you at all times with lots of tips and secrets that will help you learn quickly.
Hands on the brush!
En nuestro primer post introductorio a esta serie de maquillaje comentamos que íbamos a estar publicando varios tipos de Maquillajes, tips y consejos. Siendo el Maquillaje de Día el primer post, en este segundo post Victoria les hablará sobre el maquillaje de noche, para que puedan lograr un acabado profesional y elegante. Espero ayudarles y cualquier duda que tengan pueden comentarla en este post.
Si deseas resaltar los mejores atributos de tu rostro y estar siempre perfecta para toda ocasión, es indispensable que aprendas técnicas de maquillaje básicas, con paciencia y práctica conseguirás lucir un rostro perfecto en tu día a día. La invención e implementación del maquillaje ha sido una de las mejores herramientas de seducción, refleja mucha feminidad, sin embargo, puede convertirse en arma de doble filo si no se utiliza adecuadamente, si colocas demasiado puede estés tapando tu belleza y te hará parecer como un payaso.
Si te encanta el maquillaje y no sabes como utilizarlo adecuadamente, ¡tranquila!, yo te estaré guiando en todo momento con muchos consejos y secretos que te ayudarán.
¡Manos a la brocha!
NIGHT MAKE-UP
The makeup at night allows us to play with many more colors than the day makeup, making the makeup can accentuate and mark the best features; this type of makeup can be used in parties, dinners, dances and night out with friends.
At night you can use colors that during the day would make any woman look overly makeup.
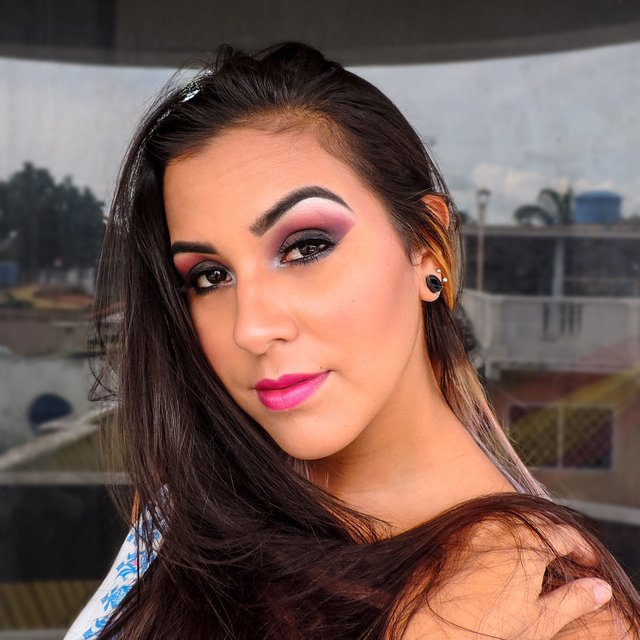
Now I will give you recommendations and tips about how to make this beautiful makeup called Smokey Eyes, the perfect look to give your eyes an air of mystery and sensuality, also makes our eyes look bigger and gives a dramatic touch... I'll give you some tips on how I did it and at the end of the post there's a referencial image with the tools I used to do it.
MAQUILLAJE DE NOCHE
El maquillaje de noche nos permite usar muchos más colores y brillos a diferencia del maquillaje de día, logrando que se pueda acentuar y marcar los mejores rasgos; Este tipo de maquillaje puede ser utilizado en fiestas, cenas, bailes y salidas nocturnas.
Durante la noche se pueden utilizar colores que durante el día harían que cualquier mujer pareciera excesivamente maquillada.
A continuación daré recomendaciones y tips sobre este hermoso maquillaje llamado Smokey Eyes, el look perfecto para darle a tus ojos un aire de misterio y sensualidad, además hace que nuestros ojos luzcan más grandes y dan un toque dramático... Les daré unos tips de como lo hice y al final del post hay una imagen tipo leyenda con las herramientas que utilicé para lograrlo.
Eyes
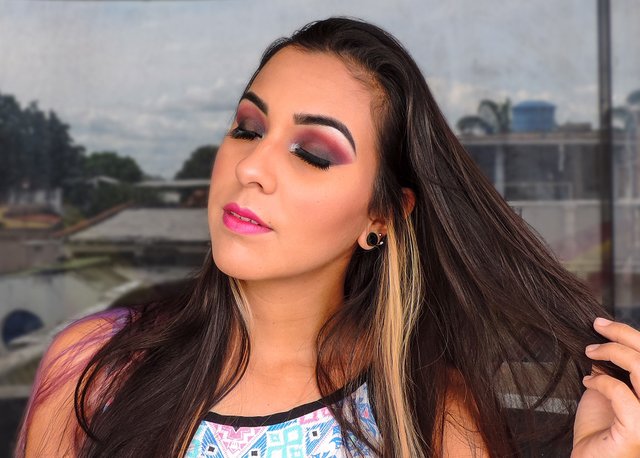
- In this case I started by applying eye makeup to avoid staining the skin. In the night makeup we can play with several colors applied in the transition line of the eye, they must be WARM and matte colors, you can make a smokey eyes with black, navy blue and dark purple shades.
I used the warm and cool color palette from Mac.
- For my smoky eyes, I chose a fuchsia transition shade and for the mobile eyelid a black shade.
I used the warm and cool color palette from Mac.
- Before applying any shade to the eyelid you should apply a concealer or primer of your skin color and seal it with beige or off-white shade to match the shade, this way the makeup will have a better finish.
The concealer I used was Mac and the shadow was bone tone.
- After having selected the shades to be used, and having sealed my eyelids with bone or beige shade and concealer, I proceeded to apply the transition shade in the eye socket and in the fixed eyelid (fuchsia shade that I selected), we will blur it from the outside to the inside with the same movement, until the marked lines disappear.
I used the warm and cool color palette from Mac.
- Once our transition line is ready, we proceed to place concealer on the mobile eyelid partially, apply the dark shadow to be used, in my case the black shade, blur and join with the transition line. The union of the two must be well blurred so that it is degraded and without any strong lines.
I used the warm and cool color palette from Mac.
- For this makeup we will use a good layer of mascara and thus give enough volume to our eyelashes.
I used Volume Mascara from Maybelline.
Ojos
- En este caso inicié maquillando los ojos, para evitar manchar la piel. En el maquillaje de noche podemos jugar con varios colores aplicados en la línea de transición, deben ser colores CÁLIDOS y mate; se puede realizar un smokey eyes con sombra negra, azul marino y morados oscuros.
Utilicé la paleta de colores cálidos y fríos de Mac.
- Para mis ojos ahumados (Smokey Eyes), elegí de transición un tono fucsia, y para el parpado móvil un tono negro.
Utilicé la paleta de colores cálidos y fríos de Mac.
- Antes de aplicar cualquier sombra en el párpado, debes colocar corrector o primer del color de tu piel y sellarlo con sombra beige o color hueso para igualar el tono, así el maquillaje tendrá un mejor acabado.
El corrector que utilicé fue marca Mac, del tono de mi piel, y la sombra fue tono hueso.
- Luego de haber seleccionado los tonos a utilizar, y haber sellado mis parpados con corrector y sombra tono hueso o beige, procedí a aplicar el tono de transición en la cuenca del ojo y en el párpado fijo (tono fucsia que seleccioné), este lo vamos a difuminar de afuera hacía adentro con el mismo movimiento, hasta desaparecer las líneas marcadas.
Utilicé la paleta de colores cálidos y fríos de Mac.
- Una vez lista nuestra línea de transición, procedemos a colocar corrector en el párpado móvil parcialmente, aplicamos la sombra oscura a utilizar, en mi caso el tono negro, difuminamos y unimos con la línea de transición. Hay que difuminar bien la unión de ambas para que quede degradado y sin ninguna línea marcada.
Utilicé la paleta de colores cálidos y fríos de Mac.
- Para este maquillaje utilizaremos una buena capa de Rimel, y así darle bastante volumen a nuestras pestañas.
Utilicé rimel de Volumen Maybelline.
Skin
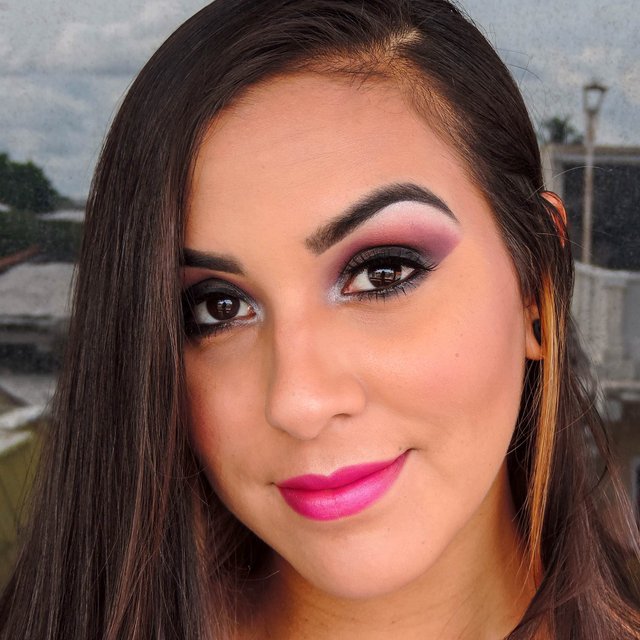
- Before starting any makeup we must have a clean face and if possible apply a moisturizing cream that is not too greasy. There are also creams that allow makeup to last longer.
I used an active moisturizing emulsion of natural extracts that helps to fix makeup.
- For dark circles under the eyes, you can apply an orange undertone concealer that is skin colored, do not use very strong oranges, this must be applied to the dark circles before using the foundation. If you do not have dark circles under your eyes, do not use this concealer.
I used an orange undertone from Kylie. I diffused with a "Beauty Blender" sponge.
- Once our dark circles have been corrected, we proceed to apply the foundation, apply it with the brush "Cat's Tongue" and blur it with the "Skunk" brush.
I used a # 30 foundation from Mac.
- To add lighting, we can use a lighter shade of your skin corrector for the dark circles under the eyes, apply it to the dark circles under the eyes, to the nose line and to the arch on the upper lip, after using the undertone and the foundation, remember that you must blend them well with a brush or makeup sponge.
I used a corrector from Mac and applied with Beauty Blender sponge
- To seal the foundation we must use compact or loose powders and apply it with small touches.
I used compact powder Kylie
- I used a matte blush, preferably pink colors that are not too bright, but lighter or pastels.
I used an "old pink" shade from the brand Clinique.
Piel
- Antes de empezar cualquier maquillaje debemos tener el rostro bien limpio y si es posible colocar una crema hidratante que no sea muy grasosa. También hay cremas que permiten que el maquillaje perdure más tiempo.
Utilicé una emulsión activa hidratante de extractos naturales que ayuda a fijar el maquillaje.
- Para las ojeras, puedes aplicar un corrector con subtono naranja que sea colores pieles, no utilizar naranjas muy fuertes, este debes aplicarlo en la ojera antes de utilizar la base. Si no tienes ojeras no utilices este corrector.
Utilice un subtono naranja de Kylie. Difuminé con una esponja Beauty Blender.
- Una vez corregida nuestra ojera, procedemos a aplicar la base, la aplique con la brocha "Lengua de Gato" y difuminé con la brocha "Mofeta".
Utilice una base N° 30 Mac.
- Para agregar luz, podemos utilizar un corrector de ojeras un tono más claro de tu piel, aplicarlo en la zona de la ojera, en la línea de la nariz y en el arco del labio superior, después de haber usado el subtono y la base. Recuerda que tanto como los correctos y las bases debes difuminarlos bien con brocha o esponjas para maquillaje.
Utilicé un corrector marca Mac y apliqué con esponja Beauty Blender
- Para sellar la base debemos utilizar polvos compactos o sueltos y aplicarlo con pequeños toques.
Utilicé polvo compacto Kylie
- Usa rubores mate, preferiblemente colores rosas que no sean muy llamativos, sino mas claros o pasteles.
Utilicé un tono rosa viejo de la marca Clinique.
Lips
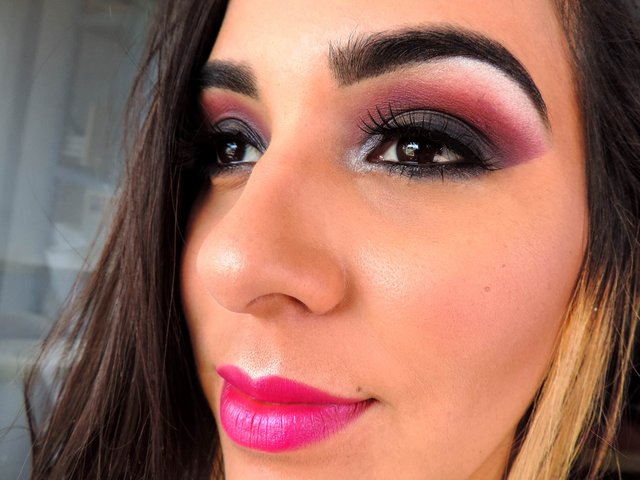
- For lips choose creamy, or matte lipsticks, also depending on the shade of the makeup you can use a Nude shades.
I used a fuchsia tone from Mac.
Eyebrows
- For the eyebrows avoid marking them too much and make a very false eyebrow, use the tone of your hair and shade it. If your eyebrows are very bushy, just try to fill them in.
I used Kleancolor eyebrow ointment Ebony tone, apply with an angled brush.
Labios
- Para los labios elige labiales cremosos, o mates, también dependiendo de la tonalidad del maquillaje se puede utilizar un tono Nude.
Utilicé un tono fucsia de Mac.
Cejas
- Para las cejas evita marcarlas demasiado y realizar una ceja muy falsa, utiliza el tono de tu vello y sombreala. Si tienes las cejas muy pobladas intenta sólo rellenar.
Utilicé pomada para cejas marca Kleancolor tono Ebony, aplique con una brocha angular.
Final
- Remember that at the end we can illuminate the skin a little, placing a powder, cream or liquid illuminator in the area of the tip of the nose, above the cheekbones, in the curve under the eyebrows (fixed eyelid) and upper lip. If you use it in cream or liquid you can apply it with your fingers with small touches, and if it is in powder form with a fan brush.
I used a liquid illuminator Kleancolor Icy tone.
Final
- Recuerda que al final podemos iluminar un poco la piel, colocando un iluminador en polvo, crema o líquido en la zona de la punta de la nariz, arriba de los pómulos, en la curva debajo de la cejas (párpado fijo) y labio superior. Si utilizas en crema o líquido puedes aplicarlo con los dedos con pequeños toques, y si es en polvo con una brocha abanico.
Yo utilicé un iluminador líquido Kleancolor tono Icy.
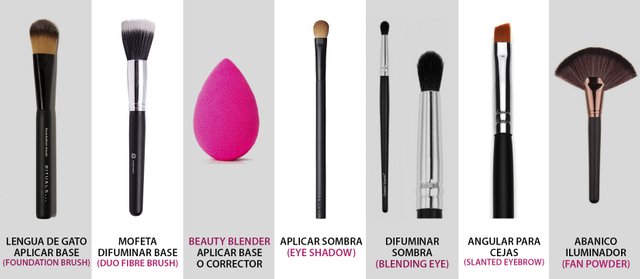
Here's the graphic description of what the tools I used for this perfect makeup look like for any daytime occasion.
Remmeber this was a post about makeup tips, step by step post tutorials are on the kitchen!
I will be back soon, talking about other Types of Make-ups and their respective tips and suggestions.
Thank you for reading us!
-V
Acá les dejo la descripción gráfica de como lucen las herramientas que utilicé para este maquillaje perfecto para el día.
Recuerda que esto fue un post sobre tips de maquillaje, ¡los tutoriales paso a paso están en la cocina!.
Volveré pronto, hablaré sobre otros Tipos de Maquillajes y los respectivos consejos y sugerencias.
¡Gracias por leernos!
-V


Toda la información, los textos, el relato, las imagenes y fotos, donde no se especifique lo contrario, son de nuestra autoría y propiedad
iPod Touch 5, iPhone 5, BLU R1 HD, Nikon Coolpix P520, GoPro Hero 3+, Sony Alpha300
Diseño de Logo y Firma por @themonkeyzuelans como Multitakers
Banderas/Flags - Icons8
iPod Touch 5, iPhone 5, BLU R1 HD, Nikon Coolpix P520, GoPro Hero 3+, Sony Alpha300
Diseño de Logo y Firma por @themonkeyzuelans como Multitakers
DISCLAIMER: dropahead Curation Team does not necessarily share opinions expressed in this article, but find author's effort and/or contribution deserves better reward and visibility.
to maximize your curation rewards!
with SteemConnect
12.5SP, 25SP, 50SP, 100SP, 250SP, 500SP, 1000SP
Do the above and we'll have more STEEM POWER to give YOU bigger rewards next time!
News from dropahead: How to give back to the dropahead Project in 15 seconds or less
Downvoting a post can decrease pending rewards and make it less visible. Common reasons:
Submit
You got voted by @votefun thanks to Princess. We are still in early alpha, users can use us to get free upvotes. This is mainly directed towards users of the @cryptowithincin bot. We are in a few discord servers. To get full benefits, you have to be subscribed to @cryptowithincin. To support us, you can delegate to @votefun or just give this comment a upvote.
Downvoting a post can decrease pending rewards and make it less visible. Common reasons:
Submit
World of Photography
>Visit the website<
You have earned 6.50 XP for sharing your photo!
Daily photos: 1/2
Daily comments: 0/5
Multiplier: 1.30
Block time: 2018-06-28T15:27:21
Total XP: 220.00/200.00
Total Photos: 35
Total comments: 1
Total contest wins: 0
Follow: @photocontests
Join the Discord channel: click!
Play and win SBD: @fairlotto
Daily Steem Statistics: @dailysteemreport
Learn how to program Steem-Python applications: @steempytutorials
Developed and sponsored by: @juliank
Downvoting a post can decrease pending rewards and make it less visible. Common reasons:
Submit
Excelente tutorial de maquillaje, buenos tips para quien desea tener un aspecto a lucir en las noches..! ¡Votado por Engranaje!
Downvoting a post can decrease pending rewards and make it less visible. Common reasons:
Submit
HERMOSAS fotografías! excelente tuto!
Voy a tomarlos en cuenta para maquillarme en mis salidas nocturnas :$ JAJAJAJA!
Downvoting a post can decrease pending rewards and make it less visible. Common reasons:
Submit