Welcome to my complete guide to mining steemit on Windows
This guide is for everyone to get setup in mining or has had problems due to outdated guides that are not updated and have been left for months.
Over the last several months they has been many changes to the wallet thus why I have decided on putting this guide together.
I will continue to update and make changes so bookmark and save it as am sure it wil come in handy not only for you but other people you might bump into along the way asking for advise and guides on Windows mining.
The reason behind why I have done what I have done is due to the amount of problems I have had in getting mining operational and working. I have asked many about it and hardly anyone helped me.
I gave it one more shot and I eventually got a pm from a guy called @soulthug This is one of the most helpful guys I have met within steemit so far.
Willing to go the extra mile and help a mining guy out taking own time and dedication in fixing and resolving my problems SO AS I NOW SHOUT A BIG THANK YOU TO YOU SIR FOR GETTING ME FULLY RUNNING.
It has given me the inspiration to put this together and keep it updated. I have also spoke to @soulthug and has said if anyone needs help you can ask myself and him as we pretty good at working though things. So if you get stuck with any of the below feel free to comment or hit us both up in the Rocket.chat mining room :)
So lets get on with the steps and everything to get you operational in mining.
Files And Software Needed
Compacted and zipped up for simple use. If you do not have 7 zip or winrar installed hears link to zip that is free.
Other Files Needed
Blockchain as of 3rd Sep 2016
Credit to @dab for providing hosted blockchain support for downloading faster and continued updates.
Original link for blockchain if would like to download separate http://steemd.ru
Windows Miner Software Credit to @btscube original link https://github.com/btscube/steem/releases/tag/0.13.0-rc3
Software and blockchain uploaded by myself
https://mega.nz/#!OtcwSIhQ!r1YCi8L0_UQZpy7KB5mtJTbBEe8PkZgSejxCbGhGRO4
The mega link has all files and blockchain included and also blockchain is compressed to 50% so unpacked is about 2GB of data but nice compression used for you all :)
So now you got all the files let's get cracking into the mining world.
So if you have not made an account yet make one https://steemit.com/create_accountUse your fb or reddit as you are going to be using this for mining later on.
Now you need to decide on what driver you are going to be using so be wise and select somewhere simple. So you have downloaded the Miner Software and Blockchain zip now lets unpack it.
If you have 7zip or winrar right click the zip and extract to. This will extract all the files into a new folder called Miner Software and Blockchain.
Once you have done this you can delete the old zip or you can safe keep it for other computers or a backup. Now you should have a folder with 2 folders in called blockchain and steem-win-13-0rc3
Now you want to make a new folder on the same drive you are going to be mining with so I created a folder called iBeSteemIn. You can name the folder anything you want so long as you can remember it or is simple for you to use when going into commands and entering to start mining.
Once you have done this go back into your steem-win-13-0rc3 folder highlight all files in it, right click and cut.
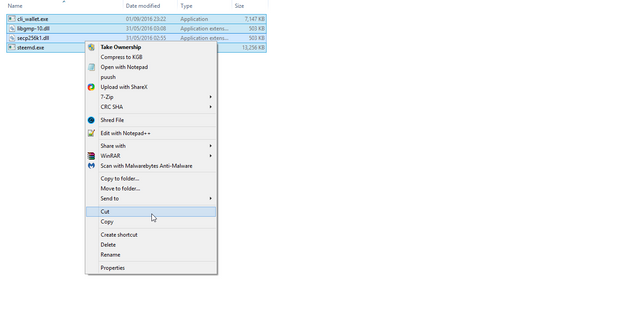
Now go into your named mining folder and right click and paste into it you should have something looking like this.
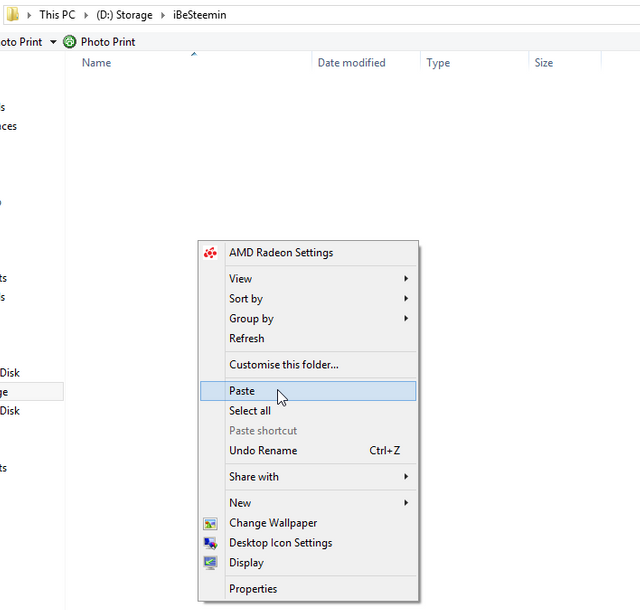
So as you can see am using my D drive have notepad open too so you can note down all the paths to where all your files and folders are going to as you will need this later on and you might want to make a configuration notepad and save it somewhere safe.
Now that we have the main files for mining lets get cracking on getting the miner updated.
So now that you have moved stuff out of the folder into your main folder lets now go into that. In my case I am now in D:\iBeSteemin in you will see steemd.exe double click it and it should open a command prompt window like this.
You will see a bunch of text on it and errors No witnesses configured!
No miners configured!
Do not worry this is perfectly fine you will also see it has now created the folder witness_node_data_dir this is where your config is and also your blockchain data is stored. You now need to access this folder and also add in your blockchain data.
So go into witness_node_data_dir you will see a folder called blockchain go into this folder. You will now see database dblock and object database. You can ignore the other folders.
Now double click database. You should have a folder called block_num_to_block go into this folder you should have 2 files one called blocks one called index delete both of them.
Now open another window open and go to the location where you extracted your Miner Software and Blockchain. Now with the downloaded blockchain do the same steps as above but do not delete the files instead highlight both the files blocks and index and cut. Now you have them go back into the folder where you are going to be mining from and go back into witness_node_data_dir then back into blockchain back into database back into block_num_to_block this folder if done correct should be empty and no files in it. Right click in the folder and paste this will then move your downloaded blockchain and index into the folder and should look like this
 )
)
Once this has copied everything close the folder down. Now goto your drive where you have saved your folder and instead of clicking into it we want to open this in CMD prompt so to do this in my case is D drive you should see it like this ie your named folder you made for it.

right click it and chose command prompt here if you do not have the option when right clicking hold down CTRL then right click it and should see chose command prompt here do this twice so you have 2 windows open like this.
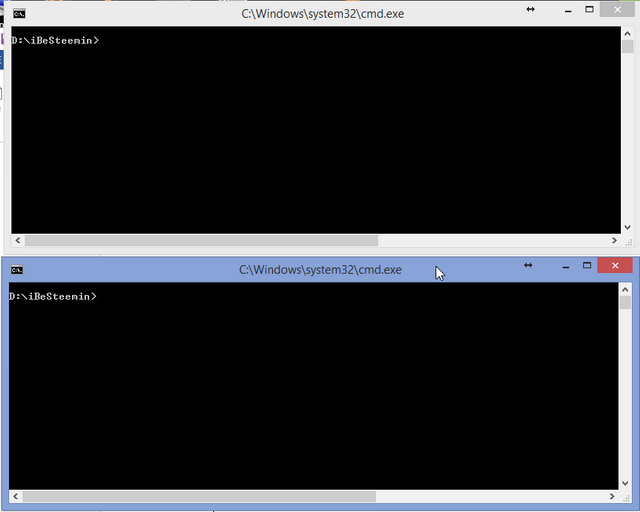
You are going to be using both of them to work with steem and also cli wallet.
The first command prompt window you are going to use for steemd so lets get this running
Enter the following command steemd just copy the below and then on your command window right click and will paste in and hit enter.
steemd D:\iBeSteemin\witness_node_data_dir --rpc-endpoint
Make sure you use the right drive letter and folder for where ever yours is. You should then get the following.

This is fine
Now go to the 2nd command prompt window and enter the following command cli_wallet.exe
And you should end up with 2 command prompts like this.
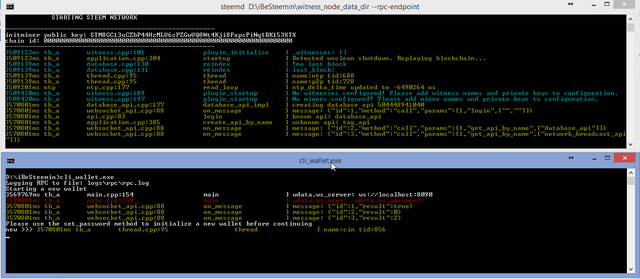
Perfect. Now time to make a password so use the command set_password password123
Put your own password in and make it something you will remember and something that no one can guess only you know. I am using password 123 as an example so do not be stupid using this password. I am using this for this guide and guide only so you get the point :P
You should now have this on your cli wallet command prompt

set_password password123
set_password password123
null
Now we need to unlock the wallet create an account and also brain key.
Use the following command: unlock your password you created.
This will now unlock your wallet and should look like this.

Now this is done we now need to create account and brain key. Make sure you backup this and keep safe because you are going to need it later and also in future if you have any problems.
So to create account use the following command get_account DaCrazyOne
If you get the following message in this picture then this is perfect as the account not being used 
Now we need to make a brain key for it. Use the following command to create brain key
suggest_brain_key You should get the following.

Now copy them simply left click and highlight and right click when it has highlighted all brain key it will look as tho it has deselected it but instead it has copied to clipboard now paste this into your notepad for safe keeping.
Now we need to import keys from our account on steemit
SO first of all go to steemit website and login.
Next go to password and generate a new password.
Make sure you save and backup your password as this is for your account so do not forget to backup save. Now you have done this copy your password
In my instant it was P5JUJZAJRqP6rtUjStCa
Now you have this goto your cli wallet and we now need to import keys and update.
Goto your online account and goto permissions.
And click on show priv key it might ask you to login to show so login and show.
You will get a bunch of keys like so.

You want to copy the active priv key. For owner key it does not show so we use cli wallet to access this information that is needed when importing.
So whatever your account name is use this command and put your own username in and also your password to access your steemit account.
get_private_key_from_password crazyearner owner your_steemit_password
gives me
"STM6P2FrqNEWWXtAL9hRABq7rV1AXj8RTtwDPsZn6uSbkCGPDbWdE",
"5KX1dUrALB2cAGiU1vGPHHBiL9mP6gr7fwH3sccvcD6uWyafFMd"
This will return your priv key for owner the 2nd lot number is your private key, so take note and copy into note pad by left clicking highlighting and right clicking then pasting into notepad so that you can then use for importing owner key.
So to import keys use the following commands.
import_key your_active_priv_key
import_key your_Owner_ priv key
import_key import your brain priv key that was generated from suggest brain key early on.
If done correct for active and owner you should get true for both results like so.

Now we need to update our witness so that it shows on our account over at steemit.
To do this use the following command make sure you are using your username and also brain pub key too so copy into notepad and then add your info.
update_witness add_your_steem_username " " add_your_pub_key_from_brain {"account_creation_fee":"5.000 STEEM","maximum_block_size":65536,"sbd_interest_rate":1000} true
Fees will be adjusted according to updates and changes made to wallet system.
If you have done this correctly then you will get a result something like this.
If done correct you will get result as above or alike it then you can check your steemit account online to confirm it has updated your witness.

Now scroll down and look on the left side where you see Owner key history (5) and Authorities if you have updated correctly you should have the following
Signing
Owner
Active
Posting
Memo
Go down a little more you will see your witness details and also your information for mining as can see I already missed 2 so it is correctly configured and in operation.
Now we need to update our conf file and also make changes and we about ready to mine.
So now close down steemd goto command prompt window and press CTRL+C this will close it down. Keep both windows open as we will need to re-use them shortly.
So let us go into out miner folder and now we need to edit our conf file. So go into your witness_node_data_dir folder and you will see config.ini file you can open this in notepad and also save and to better read use notepad++ The # tags in lines will be removing some and adding in data removing the # will result in the line been active.
So first in your conf file locate the following
# Endpoint for P2P node to listen on
# p2p-endpoint =
Remove the # for # p2p-endpoint =
And add the following ip 127.0.0.1:8090 so it should look like this
# Endpoint for P2P node to listen on

p2p-endpoint = 127.0.0.1:8090
Next look for # P2P nodes to connect to on startup (may specify multiple times)
# seed-node =
Remove the line # seen-node= and add the following in this is my list but you can and in other seed nodes from https://status.steemnodes.com to get an active working list of nodes.
So this should then look like this.
# P2P nodes to connect to on startup (may specify multiple times)
seed-node = 185.82.203.92:2001
seed-node = 52.74.152.79:2001
seed-node = 52.63.172.229:2001
seed-node = 104.236.82.250:2001
seed-node = 104.199.157.70:2001
seed-node = steemd.pharesim.me:2001
seed-node = seed.steemnodes.com:2001
seed-node = seed.steemwitness.com:2001
seed-node = seed.steemed.net:2001
seed-node = steem-seed1.abit-more.com:2001
seed-node = steem.clawmap.com:2001
seed-node = 52.62.24.225:2001
seed-node = steem-id.altexplorer.xyz:2001
seed-node = 213.167.243.223:2001
seed-node = 162.213.199.171:34191
seed-node = 45.55.217.111:12150
seed-node = 212.47.249.84:40696
seed-node = 81.89.101.133:2001
seed-node = 46.252.27.1:1337
seed-node = seed.royaltiffany.me:2001
Now look for
# name of witness controlled by this node (e.g. initwitness )
# witness =
Remove the # and put in your username from steemit website should look like this
# name of witness controlled by this node (e.g. initwitness )
witness = "crazyearner"
now find # name of miner and its private key (e.g. ["account","WIF Active key from steem account"] )
Remove the # and the following but remember to use your own username and keys
# name of miner and its private key (e.g. ["account","private-key = PRIVATE_BRAIN_SUGGESTED_KEY"] )
miner = ["crazyearner","5Kh1L9Tze1j5XhWwdPAZaVUptcfRrfY3jR7ffxW5HpSkHix8STH"]
Now find
# Number of threads to use for proof of work mining
# mining-threads = 2
Where # mining-threads = 2 is remove the # this will make active however put to something that your cpu is capable of so if dual core 2 if quad 4 and so on. I would recommend 1 to trail it out and make sure working etc then you can increase threads to more later.
Now find
# WIF PRIVATE KEY to be used by one or more witnesses or miners
# private-key = xxxxxxxxxxxxxxxxxxxxxxxxxxxx
Remove the # and after the = sign put a space then put your wif_priv_key in.
Now save this and come out of it.
Now go back to your command prompt window is for steemd and enter the following
steemd D:\iBeSteemIn\witness_node_data_dir --rpc-endpoint
If you made a custom folder for your block chain use this command
steemd -d D:\iBeSteemIn\dachain --rpc-endpoint
This will create its own folder where all block chain data is stored if you using without -d command this will create default folder witness_node_data_dir
And then when you are starting up your miner make sure you use correct command and directory.
Once this is loaded up give it some time to do its checks and run if you have done it correctly you should get your steemd window like this.
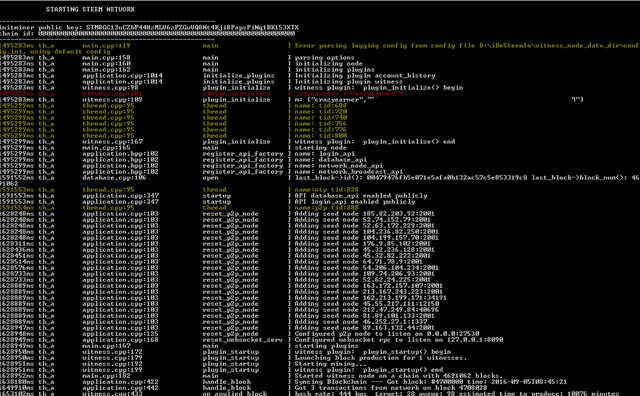
This is me actively mining and you should be too J. Now go back to your cli client command promt and enter the following cli_wallet.exe and hit enter.
It will say locked. Use command unlock and put your password in and hit enter. This should return null and then unlocked.
Now enter list_my_accounts if done correct you will get the following.

This shows your account balance and is active and up and running.
If you get any problems in mining or starting miner run this command to allow reply of your blockchain
steemd D:\iBeSteemIn\witness_node_data_dir --rpc-endpoint --replay-blockchain
and you should now be running smooth.
So their you have it you should now be up and running and mining.
I will update this and add in time savers for all you people to make things quicker and simple to run mining once got the main parts above done.
I do hope this has been inspiration to you and you have succeeded in mining, and that this solves a lot of your problems and I intend to keep this updated as best as I can with the help of other people such as @SoulThug So for now I would like to say thank you for taking the time to read this and I wish you a successful mining adventure.
Updates to still come
Layout, Picture size and links to be updated to see better.
witness updates
miners updates
Wallet updates
.bat file creation to run both cli wallet and steem from 1 click

Thanks for this. I've been looking for an updated guide to put in the Steemit FAQ
Downvoting a post can decrease pending rewards and make it less visible. Common reasons:
Submit
Seemit FAQ cool thanks for taking the time to read though lot more to come too. I will be working on short cut version when I get around to it. Just want to make sure everything is on it. Will have a few more things and advanced settings too coming. Thanks again.
Downvoting a post can decrease pending rewards and make it less visible. Common reasons:
Submit
This is really useful and well written, I'll try to set it up tomorrow. Thanks.
Any estimates how much one older pc could possibly mine in 24 hours? say something along lines of i3 cpu and intel gpu.
Downvoting a post can decrease pending rewards and make it less visible. Common reasons:
Submit
You should maybe get 1 or 2 blocks a day all depends on luck really and if get i3 not sure maybe 1 block or more who knows all comes down to that magic luck at end of day :)
Downvoting a post can decrease pending rewards and make it less visible. Common reasons:
Submit
thanks for the guide, I see this being of use in the future. seems like a lot of info to wrap your brain around
Downvoting a post can decrease pending rewards and make it less visible. Common reasons:
Submit
nice walk through @crazyearner !
I'll have to try out Windows mining and will certainly use this guide. I have a 4 core Intel i5 chip. Have you noticed which resources are being use the most from Steem mining? RAM, the CPU cores, HDD i/o activity? All the above? lol
Downvoting a post can decrease pending rewards and make it less visible. Common reasons:
Submit
cpu activity is used most it does use some other resources nut not much and when your trialing out try 2 threads as your max will be 4 and ull find running at 4 threads you will find it hard to run other apps in the process.
Downvoting a post can decrease pending rewards and make it less visible. Common reasons:
Submit
Small update.
Now added in replay command if getting stuck on starting mining. Can happen if you have closed down miner unexpectedly and just clicked the x and not closed down by using CTRL+C to exit clean.
Downvoting a post can decrease pending rewards and make it less visible. Common reasons:
Submit
way too long to read tonight commented so I will remember to read it in the morning
Downvoting a post can decrease pending rewards and make it less visible. Common reasons:
Submit
Theirs a lot in this but its having almost everything in one guide and I will eventually get to shot handing this and making a lot more compact. I know people do not like long winded guides but most the guides miss out a lot that is included in this and why I have done what I did :)
Downvoting a post can decrease pending rewards and make it less visible. Common reasons:
Submit
Bad idea to public share your keys
Downvoting a post can decrease pending rewards and make it less visible. Common reasons:
Submit
All passwords including private keys have since been changed since making the guide. Was used for guide only :)
Downvoting a post can decrease pending rewards and make it less visible. Common reasons:
Submit
Congratulations @crazyearner! You have received a personal award!
Click on the badge to view your own Board of Honor on SteemitBoard.
For more information about this award, click here
Downvoting a post can decrease pending rewards and make it less visible. Common reasons:
Submit
Congratulations @crazyearner! You received a personal award!
You can view your badges on your Steem Board and compare to others on the Steem Ranking
Vote for @Steemitboard as a witness to get one more award and increased upvotes!
Downvoting a post can decrease pending rewards and make it less visible. Common reasons:
Submit