
BACKGROUND
I wanted to make #STEEM mining as accessible as possible to all Steemians, no matter the machine. Starting with @Pfunks guide and @Anyx's help, I was able to get my own miners up and running. However, I quickly noticed the seemingly endless requests for help in the STEEM slack for mining setup. Looking around, there was no real TL;DR style guide to mining so I took it upon myself to give back to the community. I present to you OMotherHen's 1 Click Miner Scripts. From feeble laptops to full dedicated mining farms, the scripts I've coded simplify the setup and deployment of Steem Miners. Users with minimal to no Linux experience will still be able to get mining in Linux with minimal trouble.
NOTICE
(If you already have Ubuntu 16.04 installed, skip to CHAPTER 2!)
WHAT YOU'LL BE USING
VMware Workstation 12.1.1 Player for Windows 64-bit operating systems
https://my.vmware.com/en/web/vmware/free#desktop_end_user_computing/vmware_workstation_player/12_0
Ubuntu 16.04 Server 64 Bit
http://releases.ubuntu.com/16.04/ubuntu-16.04-server-amd64.iso
A Windows 64-Bit Computer
CHAPTER ONE: SETUP A VM TO RUN THE MINING SOFTWARE
- Download and install VMWare Workstation Player
- Download Ubuntu 16.04 Server 64 Bit
- Open VMware Player
- Press Ctrl-N
- For Installer Disk Image File, browse to where you downloaded Ubuntu 16.04 and double click on that file.
- Click Next
- Fill out the resulting boxes, the Username and Password will be used to log into Ubuntu.

- Click next twice
- Select "Store virtual disk as single file"
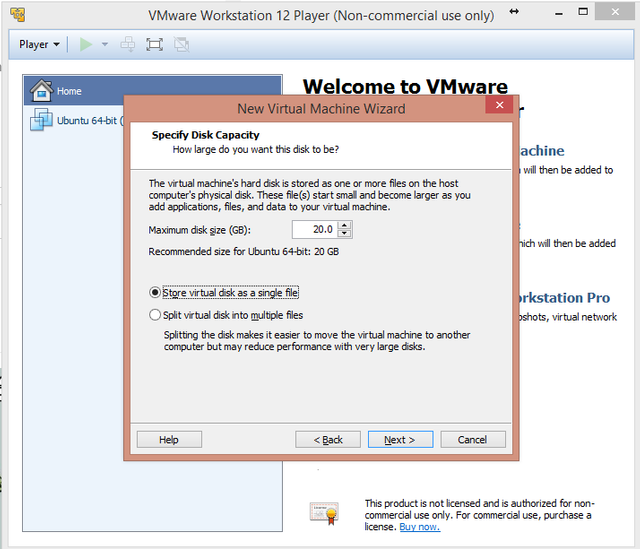
- Click next
- Press Customize Hardware
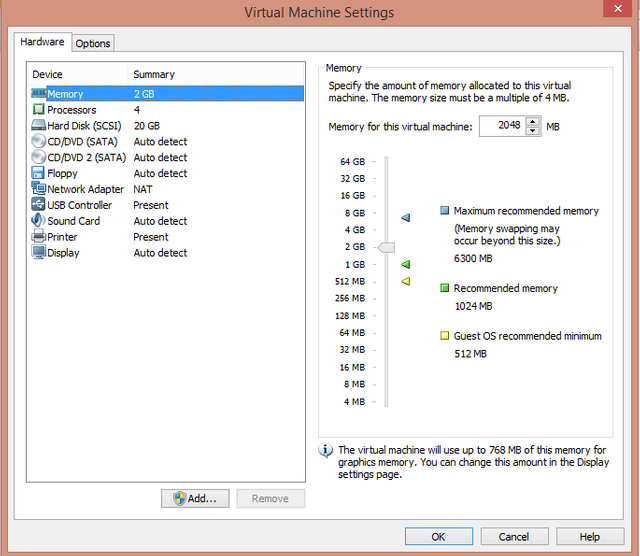
- Make sure you enter at least 2GB of ram for the VM
 ]
] - Make sure you specify the amount of threads you want the VM to use. If you have a processor with hyperthreading, Ex (An i7), you will have twice as many threads than physical cores.

- Click Close
- Click Finish
- VMwarePlayer will do its thing for setting up your VM enviroment..
- Whenever it prompts you to install VMware-tools, click OK
- If it prompts you to update keyboard interrupt values, click OK
- Wait until you're greeted with a login prompt
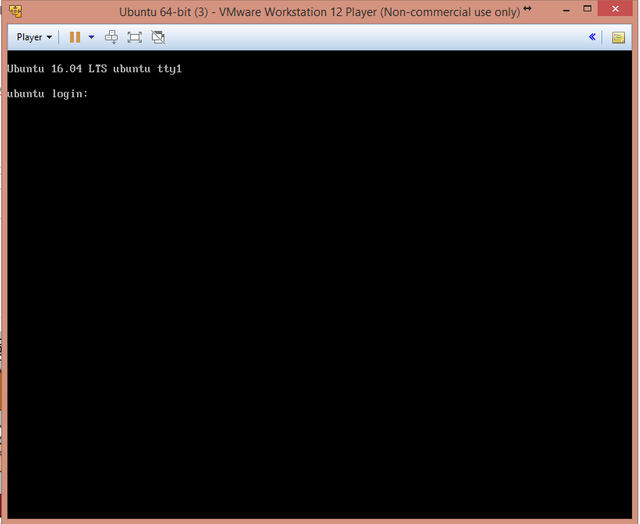
CHAPTER TWO: RUN THE SCRIPTS AND WATCH THE MONEY FLOW
- Login with your previously setup Username/Password
- Brainlessly type (no copy paste!) in the commands below, you have better things to worry about!
- When prompted for a password, enter in the same password you used to login at first!
sudo apt-get -y install git
git clone https://github.com/omotherhen/firstTimeMiningInstall/
cd firstTimeMiningInstall
bash minerScript.sh
- If the screen goes black, hit BACKSPACE. It's just a screensaver for command line!
- And now watch the fireworks until you're greeted with a prompt to enter in the number of mining threads.
- Enter in how many STEEM accounts you want to make, the more mining power you have, the more accounts you'll want so that you do not waste time waiting in queue. If you do not know, 4 accounts is a good start.
- Enter in the names you'd like for each account, note that you cannot use uppercase/special characters/spaces in your username, and you can not start the name with a number either!
- That's it! The script will do the rest of the work for you. You're done setting up your first Linux miner in a VM!
CHAPTER 3: DEPLOY YOUR IMAGE ACROSS MULTIPLE COMPUTERS
ON THE SOURCE COMPUTER
- Back on windows, open up File Explorer
- Enter this into the explorer bar and hit Enter C:\Users%USERNAME%\Documents\Virtual Machines

- Copy the Ubuntu 64-bit folder to a USB device to transfer it on another computer
ON THE DESTINATION COMPUTER
- Put the Ubuntu 64-bit folder that you copied earlier on the computer
- Download and install VMware Player on the computer
- Open VMware Player
- Press CTRL+O
- Navigate to the folder you copied the Ubuntu 64-bit folder to and double click on the resulting file
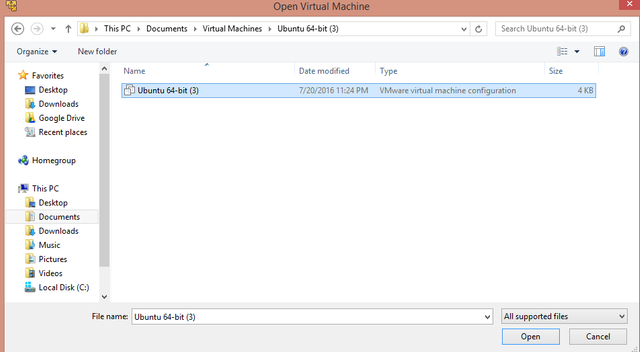
- Right click on the following VM that pops up and click on settings
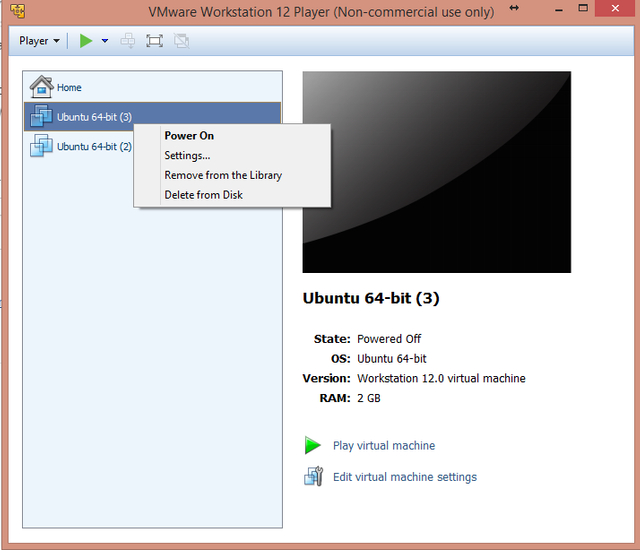
- Set the memory and processors to the desired values for this computer just like before
- Click OK
- Start the VM by double clicking on the name of it
- Enter in the following command
cd ~/firstTimeMiningInstall/ && bash clonedMiner.sh - Enter in how many threads you set the VM to, and you're done!
- Keep repeating Chapter 3 to however many computers you'd like!
NOTE
- Whenever you power down a VM, shutdown the mining software within it first by pressing CTRL-C and waiting for it to finish
- Then you can click 'X' on the VM window and shutdown
- Once you power the VM up again and want to mine, simply type in:
cd ~/steem/programs/steemd && ./steemd - Then you're off the races once again!
- If you have problems with the compiled steem miner on a cloned machine, you may have to re-compile the miner.
- I will include a script to automate this process in the near future!
AND FINALLY.....
Please leave feedback in the comments, I'll be happy to update my scripts/guide for more functionality based on your feedback!
Great idea , but lot of miners also wants Windows miner solution :)
Downvoting a post can decrease pending rewards and make it less visible. Common reasons:
Submit
This is a windows solution! It runs ubuntu on a virtual machine (VM). I just went through the steps and I'm up and running!
Downvoting a post can decrease pending rewards and make it less visible. Common reasons:
Submit
@bitscube has a windows solution!
Downvoting a post can decrease pending rewards and make it less visible. Common reasons:
Submit
You should install open-vm-tools instead because that vmwares own is not optimized for linux.
Downvoting a post can decrease pending rewards and make it less visible. Common reasons:
Submit
Great guide!
Downvoting a post can decrease pending rewards and make it less visible. Common reasons:
Submit
Thank you Cherish!
Downvoting a post can decrease pending rewards and make it less visible. Common reasons:
Submit
I can't even get past chapter one
I can't see where I can change the number of threads.
I'm still on socket 929, inbefore: outdated hardware; was just testing.
I am running Windows 7- 64 bit.
Not complaining, I like the post - got me thinking.
It's not one-click EZPZ, tho.
Downvoting a post can decrease pending rewards and make it less visible. Common reasons:
Submit
Your hardware is outdated :) Your CPU does not support virtualization. Cheers!
Downvoting a post can decrease pending rewards and make it less visible. Common reasons:
Submit
@omotherhen THE REAL MVP! Can you do a tutorial showing how to secure these mining account owner passwords?
Downvoting a post can decrease pending rewards and make it less visible. Common reasons:
Submit
Thanks, setting up now. Couple questions if you don't mind:
We enter in STEEM accounts, is the first one our main account and the others new ones?
How does one know how much they are mining and how is it accessed?
Downvoting a post can decrease pending rewards and make it less visible. Common reasons:
Submit
Your main account is whatever is higher in alphabetical order, lets say you have miners b, a, h: miner a would always be first to mine a block, thus generating the most steem. You can check if you have mined a block at www.steemd/@your-account-name-here and you can access your accounts via their name and private key
Downvoting a post can decrease pending rewards and make it less visible. Common reasons:
Submit
Thanks, I followed the instruction above, for the first miner I put my regular steem account (as I couldn't figure from the instructions if I was to do this but thought from other mining stuff I read it should be in there), and I put variations on the next four in alphabetic declension. But I haven't had any way of putting in a private key.
And how do I find the private key on the accounts that were created by the miner program?
Miner seemed to be running, but it hasn't budged from 96% for quite a while, I'll leave it overnight to see if anything happens. (running vmware ubuntu server 16, 8 core, 5 miners, gaming laptop)
I rebooted twice and it has frozen for the third time at 96.0232%, will leave it be for some hours.
Apologies if I sound a bit ignorant of these matters, I'm good at following directions but this setup seems to imply one already knows more than is said. Any useful info greatly appreciated!
BTW, setup was a breeze, thanks for your efforts.
Downvoting a post can decrease pending rewards and make it less visible. Common reasons:
Submit
Private keys are automatically generated for you :) during setup you should see your private keys spat out on the screen. If you want to view them enter in this command:
cd ~/steem/programs/steemd/witness_node_data_dir && nano config.ini
Downvoting a post can decrease pending rewards and make it less visible. Common reasons:
Submit
I got a "Exception binding outgong connection to desired local endpoint: bind; Bad file descriptor
2326559ms ntp ntp.ccp:177 read_loop ] ntp_delta_time updated to -8984 us
Killed"
and then the command line. This was running since last night till it killed
will restart and give another try, steep learning curve
Downvoting a post can decrease pending rewards and make it less visible. Common reasons:
Submit
I'm thinking that since I used my @ name as a miner it gave a new key that didn't match. So I've gone and changed the miner's names in config.ini, which may or may not work. Might just delete the VM and start over, but would appreciate some guidance on this as it's not clear from the instructions. Many thanks.
Downvoting a post can decrease pending rewards and make it less visible. Common reasons:
Submit
Is there any point to mine when your computer is 4 years old? I don't really understand the mining process. Thanks!!
Downvoting a post can decrease pending rewards and make it less visible. Common reasons:
Submit
many thanks, @omotherhen
I read somewhere that I need to set some settings to ensure that the miner doesn't eat all my money-- something about not having myself as a witness twice? Is that still the case or no?
Downvoting a post can decrease pending rewards and make it less visible. Common reasons:
Submit
Yes, the clonedMiner.sh script takes care of that for you so you dont have to worry about duplicate witnesses (Which would happen if you just cloned the machine without running the clonedMiner.sh script!) :) Happy mining!
Downvoting a post can decrease pending rewards and make it less visible. Common reasons:
Submit
code looks good, will give it a try
Downvoting a post can decrease pending rewards and make it less visible. Common reasons:
Submit
Let me know! I've added a few more goodies to GitHub but havent updated guide yet.
Downvoting a post can decrease pending rewards and make it less visible. Common reasons:
Submit
Potential issue in line 148: getting a connection timeout with einfachmalnettsein.de, now on try 6. Tried connecting from servers in NY and Amsterdam. Perhaps try to wget http://steemitup.eu/witness_node_data_dir.tar.gz upon fail?
Downvoting a post can decrease pending rewards and make it less visible. Common reasons:
Submit
The guy maintaining the web-link was updating it I believe, it's back up now. I will add fallbacks though for sure in the near future!
Downvoting a post can decrease pending rewards and make it less visible. Common reasons:
Submit
Thanks!
Downvoting a post can decrease pending rewards and make it less visible. Common reasons:
Submit
hi @omotherhen .. i am trying out your script which is very well documented , thanks for your efforts. I am getting these errors
unzip: cannot find or open steem-blocks-and-index.zip, steem-blocks-and-index.zip.zip or steem-blocks-and-index.zip.ZIP.
How should I proceed ? Would really appreciate your help
Downvoting a post can decrease pending rewards and make it less visible. Common reasons:
Submit
Love the information you have in here. Thanks for making it easy to use. The cloning to other machines will definitely save me a lot of time.
Downvoting a post can decrease pending rewards and make it less visible. Common reasons:
Submit
Anytime!
Downvoting a post can decrease pending rewards and make it less visible. Common reasons:
Submit
For STEEM App Creators and Developers
https://steemit.com/steemit/@marsresident/bots-and-the-steemit-ecosystem
Downvoting a post can decrease pending rewards and make it less visible. Common reasons:
Submit
Hi followed but soon as tiI I input bash minerScript.sh
I get the file directory not found
Downvoting a post can decrease pending rewards and make it less visible. Common reasons:
Submit
I was using the bitcube one till super computer came on the scene and I am not sure if they have seen whats going on yet
Downvoting a post can decrease pending rewards and make it less visible. Common reasons:
Submit
Thanks! This is really helpful
Downvoting a post can decrease pending rewards and make it less visible. Common reasons:
Submit