Working on vacuum tube amplifiers is dangerous. There are extremely high voltages in most tube amplifiers. Use extreme caution, and if you have any questions ask them. You will need some basic tools for working on tube amps and some of them can even be made at home. The first tool you will need is common sense. Below is a list of others which you will likely find useful.
A soldering Iron, mine is a 25w Weller. You will need some solder, some Flux, and a sponge to clean the tip on. later you may find you want one with adjustable temp, or digital read out. If you buy a Weller, the tips are available from a variety of sources. you will want to have a few extras on hand.
A Digital volt ohm meter. You will need one capable of 600v which will cost a little more. You can pay a little or you can pay a lot. I use a Fluke which I have had for over 10 years. It is reliable and when it does not work it is easy to fix. You may find that an analog VOM will be nice to have also. Try and find one with a capacitor test setting. You will also want to have an assortment of banana leads to go along with your meter. Usually they come with probes, but not with roach clips. (alligator clips) Fluke sells a nice kit with several different styles of probes and leads.
A lightbulb limiter. You can make one of these. It is as simple as wiring a lightbulb in series with the primary. I made an extension cord with the lightbulb and a switch in the middle. The purpose is to prevent short circuits and limit voltage to the amp in the absence of, or in conjunction with a Variac. I repaired a lot of tube equipment using a lightbulb limiter before I found a Variac I could afford.
A Variac is a variable isolation transformer which adjusts wall voltage down to 0 volts or all the way to full voltage. I repaired a lot of tube equipment before I found a Variac I could afford. Mine is a 10 amp model I bought used for $100 which is about 1/4 of new retail for the same unit. If you find a good deal on a 5 or 10 amp unit, buy it! I would not consider anything under 5 amps to be useful for tube audio amp repair.
A Tube tester. look for a Hickok or a Jackson. Good tube testers are rather expensive. look for deals and you can save lots of money. I paid 35 bones for mine. On ebay it sells for over a grand. Tube testers are useful but not absolutely required. The best tube tester is the circuit that a specific tube is running in. I will write more on this topic later in the series.
Later on you will find need for a signal generator and a scope. Not for basic startup and testing.
The most important thing you need is a clear and focused mind, free from distractions.


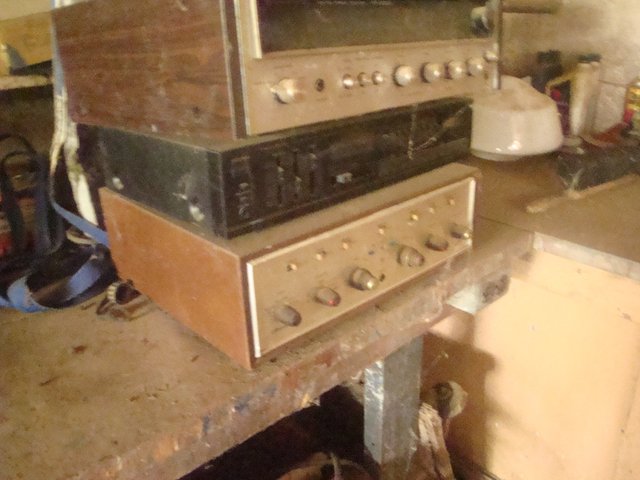
So you've joined the club. You have brought an old stereo tube amp at a yard sale and are extremely excited to start it up and have a listen. You have heard all of the hype and are totally ready to experience the sublime pleasure of music through tubes. This is the critical point in time where your next step could spell disaster. Resist the temptation to plug the unit directly into the wall. It is difficult I know, but applying voltage to an amp which is this old can cause irreparable failure of the amps output transformers. First we need to do an inspection. First step, pull out the fuse, make sure it is the correct fuse for the unit. If it calls for a slow blow, use a slow blow, not a nail, not an automotive blade type fuse, not foil or a 22 long rifle cartridge. If you don't have the correct fuse, thats fine, start a parts order list. Inspect the power cord, often times they fray out and require replacement. Often times you will find the cord cut. This was done by technicians to indicate a unit with problems which is unsafe to plug in. (hint)
Inspect the chassis inside and out. Remove the covers from the top and bottom of the amp and check for black traces, cobwebs, mud dobbers, and resistors which have ben blown in half. Look carefully at the area around the power supply can capacitors. for signs of heat damaged resistors. A common failure mode of vacuum tube amps is for the first cap after the rectifier to short and take out the resistor immediately before it.
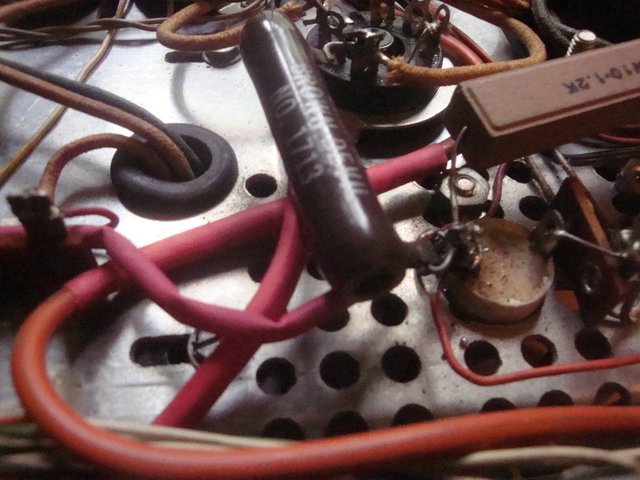
This was a resistor which was blown apart by high voltage in a Scott LK72B with shorted caps. I replaced it with the resistor you see in the picture. like usual it was the resistor right between the rectifier an the first stage of filtering.

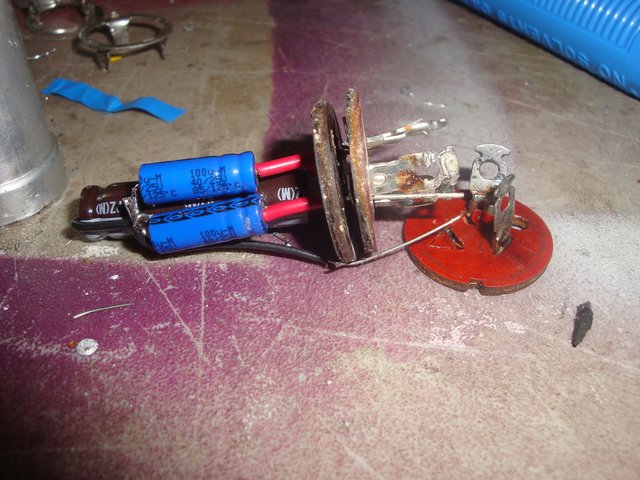
This is a sign that the power supply capacitors have shorted and will need replacement. Add them to your parts list. I tend to replace all of them at once. You have some choices, you can search for a brand new can style twist lock cap, you can pull the guts out of yours and rebuild it, or if you have room you can solder brand new components to a terminal strip under the chassis and leave the twist lock can there for originality. Use common sense here and decide for yourself what would be best for your specific amp. I highly recommend replacing the electrolytic caps prior to powering up the amp. If you have the ability, now would be a good time to run all of the tubes through the tube tester.
Below is a photo of a can cap I restufed with new components.
Next step is to plug your amplifier in to your variac, or lightbulb limiter, and apply some ac voltage. Make sure you have speakers or a dummy load hooked to the correct terminals prior to throwing the switch, tube amplifiers need to be loaded when powered up. Hooking a source to the input allows further trouble shooting. Start with your variac on 0 volts, or with a 200w lightbulb in your limiter, and apply power by turning the knob up. I do this step with the amp flipped over and the bottom cover off, so that I can use my meter to test things as they come up to voltage. Clip your negative meter lead to the chassis of the amp, and use the positive lead to check some voltages. As you bring the unit up to power, (raising the voltage on the variac, or installing smaller and smaller wattage lightbulbs ) probe the control grids of the power tubes, they should be close to 0 volts on the DC voltage scale. If one or more of them begins to rise to 20 or 30 volts or more when you raise the line voltage it indicates that a coupling capacitor has failed and is allowing high voltage DC to pass to the next stage and throw off the bias of the control grid. The correct thing to do at this point is to shut the unit down and replace the coupling caps on the output stage. Good caps are available from a variety of sources at a variety of prices. I use some that cost about $2 each from Mauser. A power tube should have some amount of negative voltage on the grid in relation to the cathode. Verify this is the case by clipping your meters ground lead to the cathode of the power tube in question and the probe to the grid. The voltage displayed should be negative in an amplifier which is working properly. It is common for power amplifiers to have one or both of these problems after having sat for 40 to 60 years or in some cases longer than that! Electrolytic capacitors have a shelf life of 10 years. I think it is safe to say these caps are all on borrowed time at this point. High voltage capacitors are expensive, and they are not going to have them at Radio Shack. The individual caps are $3 to $5 and must be ordered. Original Can style caps are available for $30 to $50. Neglecting to perform this step is likely to damage your power or output transformers. It can be expensive and time consuming to source a transformer which has not been made in decades. The sellers of such parts know their value and will likely get $50 dollars or more for a power transformer, and quite a bit more than that for an output transformer for an antique piece of tube equipment. Changing caps and slowly powering up a tube amplifier properly will insure you do not slag a transformer. It does not guarantee that the previous owner didn't slag the transformers before you got it.
If you have speakers and a source hooked up, you are now ready to hear some music. Set the selector to the correct source, and bring the volume up until you hear sound. Bring the Variac voltage up to 110 Measure it inside the amp, the scale on the knob of the Variac is not really accurate. Tube amps were designed and built when our power was delivered at 110VAC. Today the voltage at your wall can be as high as 130, which is bad news. It can be corrected by installing a termistor in the primary circuit of the power transformer. That will be a topic for a later discussion, but go ahead and add some CL80 thermistors to your parts order and thank me later. Be careful, at this stage you should still have the amp upside down and the bottom off. Check the B+ voltage and make sure it is within 10% of the published value. If you can't find the schematic at least make sure it is lower than the voltage rating of the first power supply cap. You can also monitor the heater voltage. It should be between 6 and 6.3 volts and never higher. Continue to monitor the bias on the grids. At this stage I leave the amp on for an hour or so at rated voltage, checking bias, and checking transformers for signs of excessive heat. Monitor the tubes themselves visually for red plate. If one power tube shows radically different voltages than the others or begins to red-plate shut the amp down and try and find out why. If the amplifier passes these tests, and you have replaced the power supply and coupling caps it is relatively safe to put the cover back on, turn it over and use it to power some speakers. I don't recommend trying to fix everything wrong all at once. Get the unit running, and begin making a list of problems you encounter while listening to music. Most will be due to dirty controls, which is simply a matter of cleaning the pots associated with the problem area. Use your common sense and you should be safe to listen for extended periods but do not leave tube equipment running unattended.
At this point it should be obvious that you have something special ,which most people have never experienced. Pat yourself on the back, you have made the first steps towards having a restored and functional tube audio system.

Please post more. I love old tube amps.
Downvoting a post can decrease pending rewards and make it less visible. Common reasons:
Submit
Congratulations @trainbuftony! You have received a personal award!
Click on the badge to view your own Board of Honor on SteemitBoard.
For more information about this award, click here
Downvoting a post can decrease pending rewards and make it less visible. Common reasons:
Submit
Congratulations @trainbuftony! You received a personal award!
You can view your badges on your Steem Board and compare to others on the Steem Ranking
Vote for @Steemitboard as a witness to get one more award and increased upvotes!
Downvoting a post can decrease pending rewards and make it less visible. Common reasons:
Submit