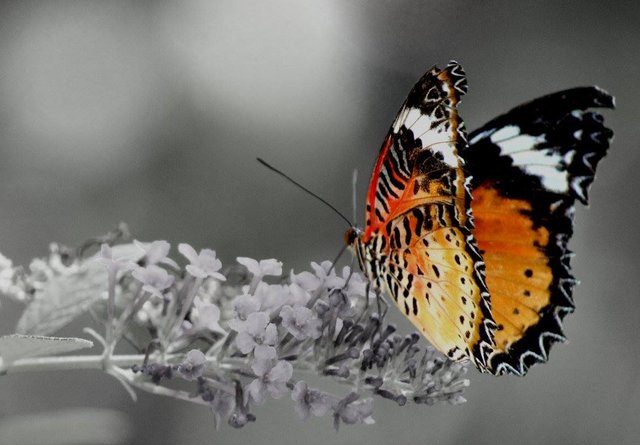
I took this photo of a monarch butterfly when visiting the Butterfly Museum at Houston, Texas a few years back.

Taken under the following camera settings:
- Aperture: f/5.6
- Focal length/zoom setting: 250mm
- Shutter Speed: 1/800 sec
- ISO: 1600
Camera used: Canon T3i, Lens used: 55-250mm basic, Tripod used: No
1. Aperture explained - f/5.6
f/5.6 aperture denotes a lens aperture setting which is rather big in size. Smaller the f-number means, larger the hole or aperture that permits the light onto the sensor. A larger aperture was chosen for this shot, as a larger aperture results in a small "Depth of Field", by which I could keep the butterfly in focus and blur out everything in front of and behind the butterfly. Depth of field is nothing but the depth upto which things will appear in focus in a scene. Lower the depth of field, better it is for blurring out the surroundings and keeping only the main subject of the scene (in this case, the butterfly) in focus.
2. Focal length explained - 250mm
250mm focal length means, I took this photo standing a good distance away from the butterfly with my lens completely zoomed in. This was done for two reasons, 1) Standing close would increase the chances of spooking the butterfly and it flying away 2) Zooming in the lens also automatically adds to the reduction of "depth of field". (Please refer to basic lens optics to know why this is so).
3. Shutter speed explained - 1/800 sec
The general rule of thumb when using a zoom lens is that, the shutter speed should atleast be as much as the number denoting the focal length. For example: If you are at 250mm focal length (in other words, in the most zoomed in setting when using a 55-250mm zoom lens), your shutter speed should atleast be 1/250th of a second, to prevent any motion blur occuring due to your hand movement/camera shake. (The reason for this is simple geometry - if I am looking at a scene through my lens in its most zoomed in setting, any motion/shake of the camera gets magnified in the scene. Moving my camera by a few centimeters will mean moving many meters in the scene.)
However, in this particular scene, instead of sticking to a shutter speed of 1/250th of a second, I went a few steps further and selected a shutter speed of 1/800th of a second. This was done to prevent any additional motion blur that could occur due to the butterfly fluttering its wings.
4. ISO setting explained: 1600
ISO denotes nothing but the sensitivity of the camera's sensor. This photo was being taken inside a closed indoor setting of a butterfly museum, with many plants and trees indoors - which caused low lighting. Even though the aperture setting I selected was wide open at f/5.6 allowing maximum amount of light to go through the lens onto the sensor, I had increased the shutter speed considerably to 1/800th of a second to prevent motion blur, which ultimately means very less light would fall on the camera's sensor. Therefore in order to get a well exposed photo with sufficient brightness, I had to significantly increase the sensitivity of the camera's sensor, by increasing the ISO setting to 1600.
5. Selective Coloring explained
Selective coloring photographs work best when the object you wish to leave selectively colored is of bright and vibrant color. In this case, a bright and orange monarch butterfly was the perfect subject for me to use for a selective coloring photograph. Using photoshop, I carefully selected the butterfly, turned everything else B&W, increased the color saturation of the butterfly. Also, increased the brightness and contrast of the overall image.
One of the reasons for me to choose this photo for selective coloring is that the white and black patterns on the wings of the butterfly blended well with the rest of the black and white scene.
Summary
1. Big aperture setting of f/5.6 used to create low depth of field to isolate and keep the butterfly in focus and blur the rest.
2. Fully zoomed in setting of 250mm used to take the shot from a distance and to add the low depth of field.
3. Very high shutter speed of 1/800th of a second used to prevent any motion blur that could have occured due to the butterfly's wing flutter.
4. High ISO setting of 1600 used due to low lighting caused by indoor surroundings and by a very fast closing shutter.
5. Selective coloring of butterfly done using photoshop enhancing its color and making the rest of the scene black and white.
---------------------------------------------------------------------------------------------------------------------------------
As a photographer who is always learning from others, I like to share the technique behind my shot with fellow enthusiasts and learners. Any comments/criticisms are most welcome.
I maintain my photography profile on the social site VIEWBUG.COM
Heres a link to my bio on viewbug - https://www.viewbug.com/member/Krishna_Kumar#/Krishna_Kumar/bio
This photo originally uploaded by me on Viewbug, July 2013 - https://www.viewbug.com/photo/4024465
---------------------------------------------------------------------------------------------------------------------------------
Very beautifull photo @kkposts the butterfly really stands out!
Downvoting a post can decrease pending rewards and make it less visible. Common reasons:
Submit
Thank you very much @cynetyc ! Selective coloring comes out best when the subject is of bright vibrant colors and can stand out w.r.t the surroundings
Downvoting a post can decrease pending rewards and make it less visible. Common reasons:
Submit
and the butterfly wings back back back back
Downvoting a post can decrease pending rewards and make it less visible. Common reasons:
Submit
It is a beautiful contrast of colors. Great shot!
Downvoting a post can decrease pending rewards and make it less visible. Common reasons:
Submit
Thank you very much for your kind words!
Downvoting a post can decrease pending rewards and make it less visible. Common reasons:
Submit