It’s been the perfect day at @caffetto. It was a sweltering 87° in Minneapolis today and I cringed at what the sweat box known as my favorite coffee shop would undoubtedly be. Strangely, though, in a physics defying turn of events, it was comfortable and dare I say “room temperature” for even a typical room, the entire night! Another plus, if that I was either on, or @tarotbyfergus was really off because he got steam rolled during Magic: The Gathering most of the evening. That’s just how it goes. There’s been days that no matter how or what I played, I got my assed kicked. It was just nice to see it happen to him, over and over again.
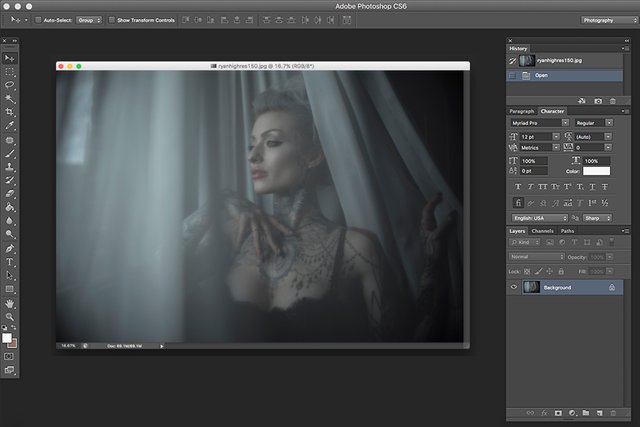
I thought it would be interesting to do another Photoshop tutorial. I’ve done a few of these here on Steemit and they seemed to go over well. I just finished two massive look books for two of my favorite clients, and now I’m able to start catching up on other shoots, client stuff and my recent shoot with @ryanashley. As I’ve mentioned in previous tutorial blogs, I know there are far more effective, efficient ways to achieve the same result in Photoshop. I’m just unapologetically showing my process. Enjoy.
This particular photo of @ryanashley presents more challenges for post processing than the average photo. The thing that gives this image it’s ghostly appearance is that it is shot through the same sheer curtain she’s pulling back. It forces the camera to focus through the fabric, creating a cloudy appearance. Not always a desirable effect, but I wanted to experiment since @ryanashley and I have shot together over a dozen times.
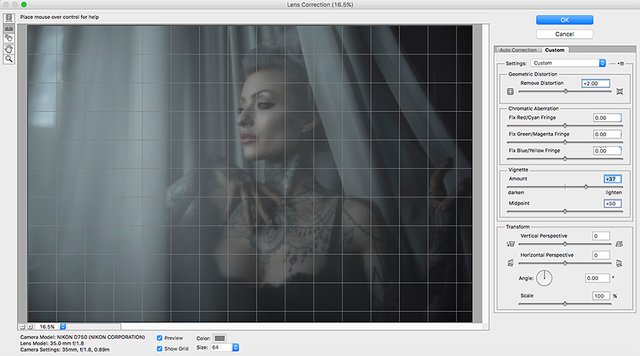
The first thing I needed to do was adjust the Lens Correction. Filter > Lens Correction > Custom and apply a +2.0 Remove Distortion effect and about a +20 Lighten Vignette to light the shadows out of the corners. That may not apply to you. I’m shooting a full censor D750 camera with a 35mm lens. I personally don’t care for the vignette that’s created, but you may. It’s just a personal preference.
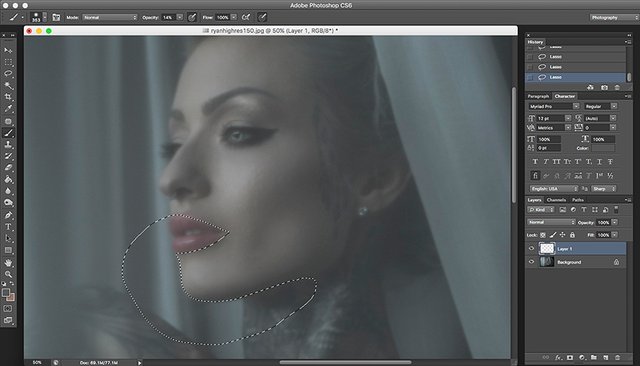
The second step is making pseudo-masking selections of the face, adding a second layer and evening out the distribution of shadows and lights. Know your clients. One thing that I’ve learned about @ryanashley is she’s very conscious of shadows under her bottom lip. I also smooth the harshness of the shadows under the contours of the cheekbones. I’ve said this in the past, but much of the editing I’m doing these days is more like digital painting than typical photo post-processing.
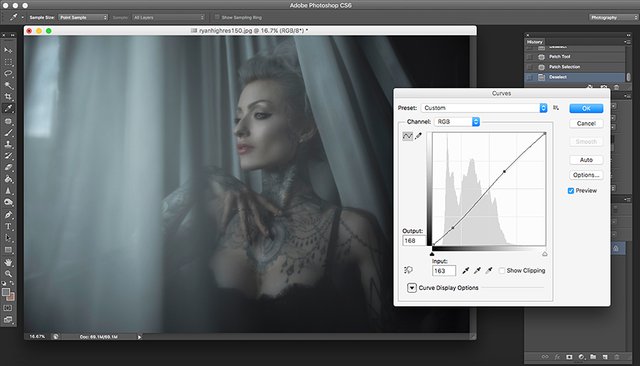
When I finish the smoothing of the face, I merge that layer down. You can continue working on separate layers, but I’m not good enough to keep them in my head and too unorganized to name and label them, so I tend to work on one layer, constantly merging down as I go.
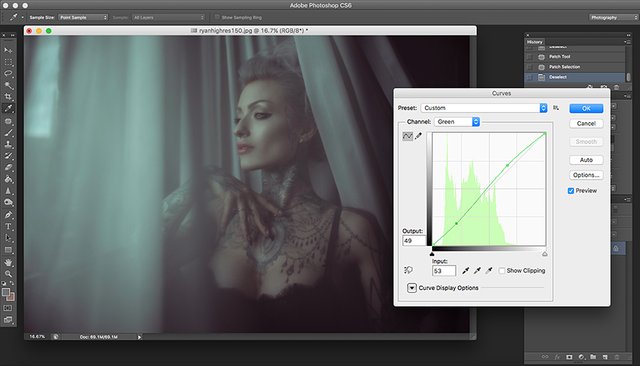
Next, I adjust the colors of the photo with Image > Adjustments > Curves. I do a slight opposing up and down tweak just to punch the contrast, then break in to the separate color curves. I drag my Red curve up at the output […about 185] and down at the input […again, 185]. I do the exact same steps with the Green curve, but reverse the output and input so they’re crossing the threshold in the opposite directs of the Red curve channel. You’ll end up with a fantastic, bizarre image that looks slightly cross processed.
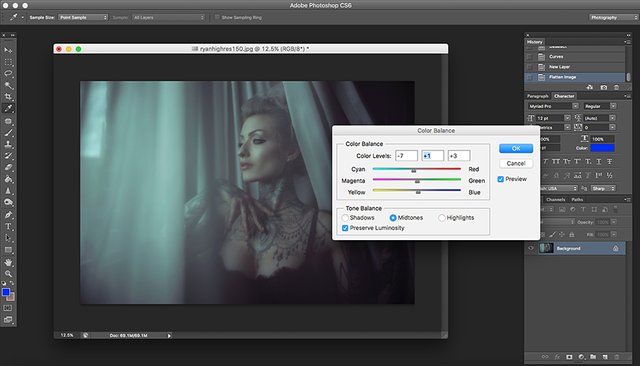
Following this step, I need to make adjustments to the colors of the image individually. I make some quick slider adjustments to the Color Balance under Image > Adjustments > Color Balance. You’ll have to mess around here and land on a color palette that suits your taste. I tend to bring in a little warmth with yellow, but even it with Cyan.
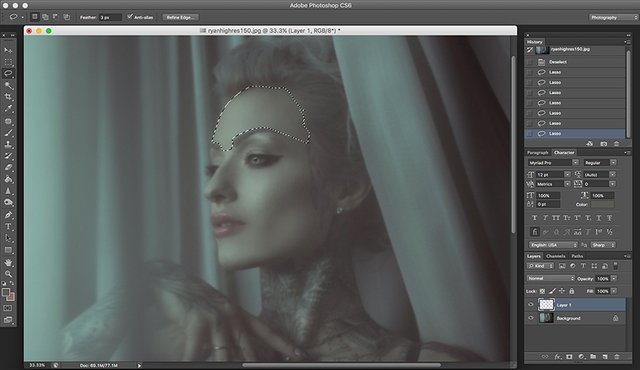
Getting close to finishing this image, I do a once over looking for areas that bother me. In this case, I noticed the forehead was uneven. My best approach was to build up color using the eyedropper to select the same color as the area I was trying to correct. From there, add a layer and paint in at a low transparency. Just build up with the airbrush tool, but don’t go so far that you overwhelm the texture of the curtain fabric. Again, I mask with the select tool, stopping at the eyebrows, then merge down with I have what I need.
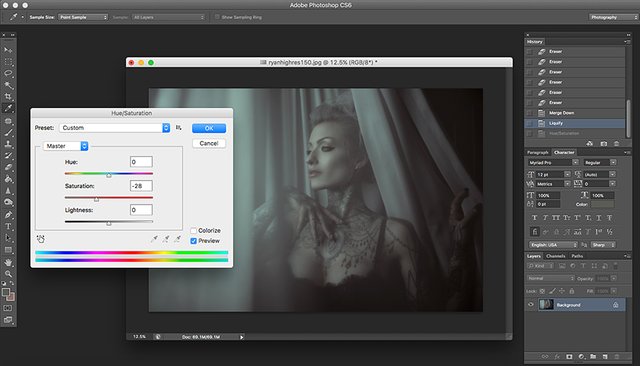
My last step is to flatten some of the saturation that came with the color processing. Image > Adjustments > Hue/Saturation and then decrease the saturation by -25, but again, that’s with this particular image. Most images won’t get this last step. One of the reasons I don’t apply Actions to my photos is they’re all unique. Shooting with only available light is far too unpredictable to apply a processing Action across all images. I like it that way.
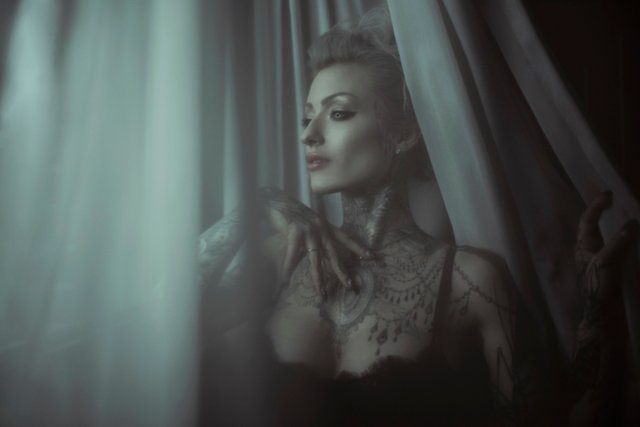
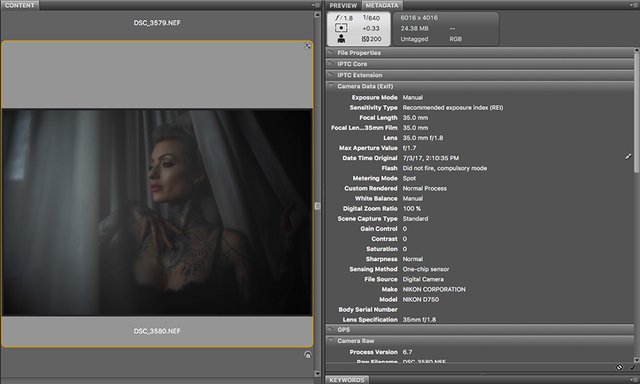
Here's a look at the camera meta data for the camera nerds. Hope that tutorial helps some of you. Here’s a look at the final image. I’m sharing this exclusively here on Steemit. It won’t be hitting Instagram or other social networks for several weeks. Enjoy. I post almost daily. For more photography, art, illustration and tutorials, follow me @kommienezuspadt!
Bookmarking this, I have been asking for a while to get a lesson on how you get the color tone in your images. Thanks for posting this, I am looking forward to giving the color processing a try.
Cheers,
@kellyjanderson
Downvoting a post can decrease pending rewards and make it less visible. Common reasons:
Submit
Wow, great Tutorial!!! Thanks you!
Downvoting a post can decrease pending rewards and make it less visible. Common reasons:
Submit
There is quite a lot of work and effort you put into your photoshop work. Obviously you love what you do and take the time to educate us through a well laid out tutorial for others to learn and benefit. Thanks for your selfless efforts. - Troy
Downvoting a post can decrease pending rewards and make it less visible. Common reasons:
Submit
What is the best free alternative for Photoshop?!
Downvoting a post can decrease pending rewards and make it less visible. Common reasons:
Submit
That is an awesome tutorial!
It kind of makes me wish I weren't colorblind :)
Tomorrow will be my day...
Downvoting a post can decrease pending rewards and make it less visible. Common reasons:
Submit
LOL for the camera nerds. It's cool to see your work process for editing. Thank you for sharing Lars.
Downvoting a post can decrease pending rewards and make it less visible. Common reasons:
Submit
Definitely bookmarking this! Thank you for this Steemit exclusive post :)
Lovely day to you friend!
Downvoting a post can decrease pending rewards and make it less visible. Common reasons:
Submit
Thank you @kommienezuspadt, it was a nice info on your creative workflow. Upvoted, resteemed & DPS.
Downvoting a post can decrease pending rewards and make it less visible. Common reasons:
Submit
Thanks for posting this tutorial! I love that you do some painting in your edits... it really makes the photos yours.
She is a gorgeous model to begin with, but I can see why you've shot together so many times. Her look with your style of photography is a match made in heaven.
The end result here is very ethereal, and sooo beautiful.
Downvoting a post can decrease pending rewards and make it less visible. Common reasons:
Submit
Like that greenish cyan tint to the final output. Gives a sense of mystery. And of course appreciate the overall look of the model and preparation.
Downvoting a post can decrease pending rewards and make it less visible. Common reasons:
Submit
Good Post Thanks
Downvoting a post can decrease pending rewards and make it less visible. Common reasons:
Submit