Introduction

On one side of the fence, photography is an overly technical field and sometimes difficult for people to absorb all of the theory involved. On the other side, photography is an art form that thrives on creativity and imagination. It's important to understand that both sides are equally as important to begin taking better photos. Some people have a natural talent for composition, exploring unique angles and finding interesting subjects to shoot. Some of these creative individuals make the mistake of having too much faith in their camera’s pre-programmed (automatic) settings. Instead of learning the required theory they allow camera think and choose the settings on their behalf. A photographer needs to understand the camera's settings in order to realize what artistic effects are possible and how to achieve them when desired. Someone who is drawn to the art side of photography will often limit their own artistic abilities by not learning how to master their camera. Then there are some who have no issue with learning the technical aspects of photography however their photos still fall into the (average) category because they neglect rules of composition and believe that buying the best camera will result in better photos. In reality, a $20,000 camera in the hands of someone who only learns from one side of the fence will usually result in average photos. Great photos come from learning and practicing all aspects of photography.
A great photographer isn't afraid of looking silly to find a unique angle or explore different perspectives. When venturing into photography there are some questions you need to ask yourself. The first question is what do you want to be, a photographer or a picture taker? Anyone can pick up a camera, set it to automatic mode (the friendly green box), point the camera and shoot! If your goal is to become a photographer you'll need to pretend the little green box doesn’t exist. This goes for most of the other automatic settings found in modern cameras. You have to be willing to learn and become smarter than your camera which isn’t overly difficult to achieve. The camera is looking for a good exposure without taking any of the artistic aspects into consideration. It applies some software presets to your image before compressing and saving it as a JPEG file. Automatic camera settings just can’t compare to what a knowledgeable photographer can achieve. Even after you’ve learned enough to start calling yourself a photographer there will always be something new to learn. Whether it's 5 years or 20 years from now, learning is something you should always be doing and you'll never reach a point of knowing everything.
Before you spend any amount of money on high-end camera equipment you should ask yourself another question. Do you want to be an average photographer or a great one? If you’re looking to start a photography business keep in mind the industry is already oversaturated with average photographers. Perhaps your goal is to just learn how to take better photos of your family, friends, pets, trips, etc. This is perfectly ok too but just remember the path to better photos is the same regardless. It's important to assess your goals and budget to really determine what equipment is right for you.
Digital Single Lens Reflex (DSLR) Camera Basics
Exposure
The term exposure sounds complicated but it really isn't. It's simply a term to say the film or camera sensor was "exposed" to light. Think of an exposure as a glass of water and your goal is to fill the glass right to the top without overfilling or underfilling it. You have three different settings to control your exposure and it's your job to juggle these settings to capture a photo. These settings are ISO, shutter speed and aperture. There is no right or wrong answer for which setting to use over the other. Instead, you need to think about what effect (both positive and negative) each setting will have on your photo and prioritize accordingly. If you have a specific effect in mind it's your job to know how to achieve it.
A few examples:
- Using shutter speed to intentionally blur areas of movement in the scene (clouds, water, vehicle tail lights, helicopter rotors, race car wheels, etc)
- Using Aperture to control the depth of field to intentionally blur out the background. This can help to isolate your subject from the background and make the subject pop a little better. Aperture can also be used to clean up (simplify the scene - rule of composition) the background if it happens to be messy, cluttered or takes away from the subject in some way.
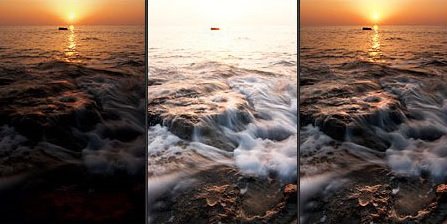
There are some topics / terms you need to understand about exposure. I will do my best to keep them as simple and straightforward as possible. I’ll be using a series of photographs to compare and demonstrate. Once again they sound complicated but they’re really not.
- Dynamic Range
- This is a term is used to describe the range of light your camera is capable of capturing in the bright and dark areas in a single photo. Think of this as a sliding range and it’s up to you to decide which area to expose for. Human eyes are able seeing a much larger range of this information than any camera on the market today. Let’s say it’s a bright sunny day and you want to have the sky and clouds in your shot. By choosing to expose for the sky you will end up capturing less information in the shadow areas of your photo. More expensive cameras have better dynamic range which gives better flexibility however it’s a limitation that exists with all of today’s camera technologies.

- There are many tools a photographer can use to overcome this limitation. I would consider them to be advanced photography techniques and not within the scope of this document, however these are some in case you wish to look into them further.
- Lens filters (Graduated, Neutral Density)
- High Dynamic Range (HDR) - Merging multiple exposures together to capture all of the lighting information in one single image.
- Highlights
- This is a term to describe the bright areas of a photo
- Shadows
- This is a term to describe the darker areas of of a photo
- “Stops” of light
- A “Stop” is simply a halving or a doubling of available / perceived light. It’s really that simple!
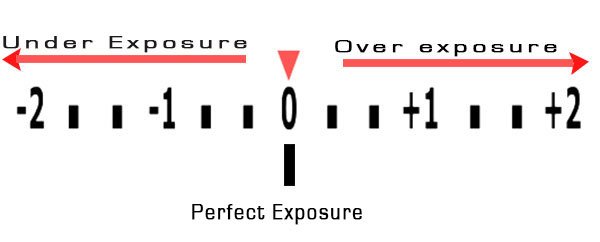
- Every camera has a ½ stop or two ⅓ stops between every full stop. The below is an example of a light meter with 2 notches (⅓ stops) between every full stop.

- Light Meter (example above)
- A light meter is a great tool built into all DSLR(s) but can also be a confusing one if you don’t understand how it works. You’ll be left frustrated if you’re expecting a high level of accuracy. Why do some photos come out perfect when using the meter and others end up under or overexposed? For example, we expect our GPS to take us directly to the front door of the address we’re trying to get to. What if your GPS could only get you onto the requested street and left you to figure out the rest? It’s important to understand that your light meter wants to see the world as 18% gray. Because of this, it's only able to get you to the street and not the front door.
- This means a proper exposure (based on meter reading) for a mostly light-colored subject will come out underexposed (too dark). You’ll need to let in more light to compensate in order to nail a perfect exposure.
- This also means a proper exposure (based on meter reading) for a mostly darker-colored subject will come out overexposed (too bright). You’ll need to limit the amount of light to compensate in order to nail a perfect exposure.
- It’s up to you as the photographer to decide what the subject is, how bright or dark it is, and whether or not you should change your settings to compensate accordingly. You can always take a test shot and decide from there. Back in the film days this was not possible and you had to make sure you got it right the first time.
- A light meter is a great tool built into all DSLR(s) but can also be a confusing one if you don’t understand how it works. You’ll be left frustrated if you’re expecting a high level of accuracy. Why do some photos come out perfect when using the meter and others end up under or overexposed? For example, we expect our GPS to take us directly to the front door of the address we’re trying to get to. What if your GPS could only get you onto the requested street and left you to figure out the rest? It’s important to understand that your light meter wants to see the world as 18% gray. Because of this, it's only able to get you to the street and not the front door.
ISO
Is the sensitivity of your camera's sensor. The higher the ISO the less light you require to achieve a proper exposure. Think of ISO as different sizes of drinking cups which require more or less water to fill depending on which one you choose. A low ISO number (most cameras start at 100) represents the largest cup size and requires the most amount of water to fill it. The highest ISO number (every camera is different) would represent the smallest cup size. The only effect that ISO adds to a photo is for the most part, a negative one. The higher the ISO the more grain/noise you’ll see in your image. You’ll want to use the lowest number possible however don’t be afraid to use higher settings when needed in darker situations. Most modern camera bodies can handle at least ISO 1600 before becoming too noisy.

Shutter Speed
Shutter speed is the length of time the camera sensor is exposed to light. How long will it take to fill the cup size (ISO) you’ve chosen. It can create dramatic effects by freezing action with a fast shutter speed or intentionally blurring motion with a slower shutter speed. 
Shutter speed is measured using seconds or fractions of a second. The range for most cameras in manual (M) mode is from 30 seconds to 1/8000 of a second. One important rule of thumb to remember is to never shoot slower than your focal length when hand holding. If you have a 200mm lens then you shouldn’t shoot any slower than 1/200sec. You can get away with shooting a little bit slower if your lens has image stabilization to compensate for hand shake. This can also be called vibration reduction, optical stabilization, etc. Each lens manufacturer calls it something different.
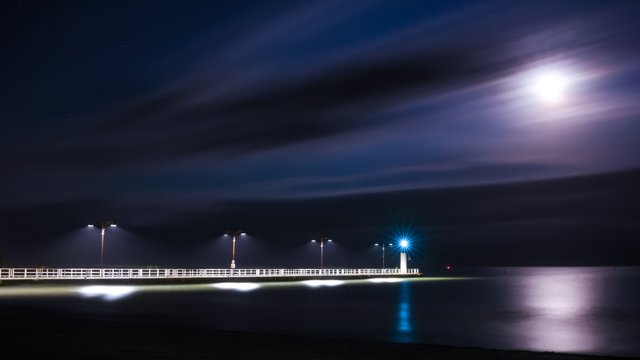
Here’s an example of a long exposure (shutter left open for many seconds) that I took on a small lake in The Muskokas. You can see how the clouds blur across the sky and give a sense of motion in the photo. Any motion in the water is also blurred and creates a very aesthetically pleasing, simplified and less chaotic feel to the photo.

Aperture
Aperture is the variable size hole inside your lens that controls how much light travels into the camera body. It can be compared to the pupil of your eye. Large pupil size equals large aperture, while a small pupil size equals small aperture. If we re-visit the cup of water comparison you could also think of aperture as the valve on your faucet. How much you open the faucet will determine how fast the water flows into the cup and and how long (shutter speed) you should leave the valve open to fill the cup to the top. In photography, the aperture value is represented with f-stops (eg. F16). This can be confusing at first since the lower numbers represent larger openings and larger numbers represent smaller openings. This is because the F-Number is actually a ratio (eg. 1:16). The converted decimal format for 1:16, for example, is 0.0625 and is a much smaller number than 1:2.8 which would be 0.3571. This isn’t something you really need to remember but does give a better understanding as to why it seems a bit backwards.
The creative effect to remember for aperture is the depth of field. The depth of field is the area of an image that appears sharp. A large f-number like F32 would have everything in focus for both the foreground and the background. A smaller f-number like F1.4 would have blurred background and foreground objects like in the example below. As I mentioned before this can be very useful to isolate a subject from the background/foreground. It helps to simplify the scene which is one of the rules of composition.

I hear many people talk about how aperture controls depth of field however I rarely hear people talk about how it’s only one of three factors that control depth of field. All three are important when trying to achieve a desired result. The other two factors for determining the depth of field are:
- Focal length - Longer focal lengths (eg. 200mm) equal smaller (more shallow) depths of field. Wider focal lengths (eg. 16mm) equal larger (deeper) depths of field
- Distance from camera to subject - The closer your camera is to a subject the smaller (more shallow) your depth of field will be. The farther away your camera is to a subject the larger (deeper) your depth of field will be.
Practice, Practice, Practice!!!
I’ll leave off by saying practice! Even if you don’t have a DSLR at the moment. Canon provides a very useful tool to help understand and begin practicing these concepts. It’s great for those who don’t have a DSLR yet but would still like to practice/learn the basics.
Stay tuned for part 2 and we’ll dive a bit deeper and continue learning how to take better photos.
Very extensive post and some great advice in there, the most important being practice, with digital you can shot until your hearts content so why not do it.
Downvoting a post can decrease pending rewards and make it less visible. Common reasons:
Submit
Congratulations @meva999! You have received a personal award!
Click on the badge to view your Board of Honor.
Do not miss the last post from @steemitboard:
SteemitBoard and the Veterans on Steemit - The First Community Badge.
Downvoting a post can decrease pending rewards and make it less visible. Common reasons:
Submit
Congratulations @meva999! You received a personal award!
You can view your badges on your Steem Board and compare to others on the Steem Ranking
Vote for @Steemitboard as a witness to get one more award and increased upvotes!
Downvoting a post can decrease pending rewards and make it less visible. Common reasons:
Submit