Have you ever wondered what the world looks like in an immersive, bird's eye view? This is the world of 360 panoramas. Before you start, there is concepts and software you will need.
Projections.
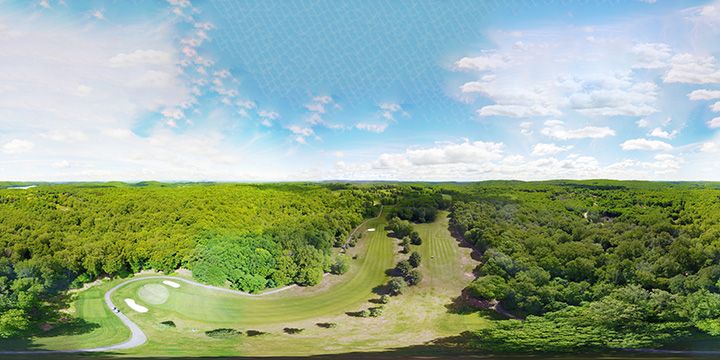
The most widely supported projection for 360 degrees panorama viewing is the equirectangular format. Here is an example.

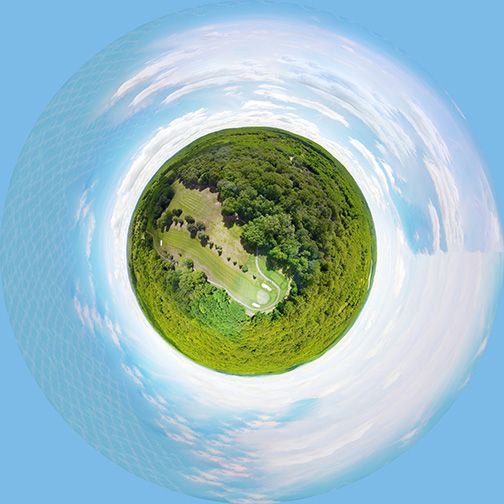
If you want the look of a little planet with a surrounding sky, try a stereographic projection. Be aware, since the drone can't capture all of the skies, you'll want to be careful when I mention artificial skies later, as they may not appear correctly in your panorama viewer or stereographic projection. Here's an example of a stereographic projection.

Drones and Laws.
Make sure you're following your local drone regulations before flying! If you're in the United States, like me, you will need a FAA aircraft certification, which cost 5 dollars. After getting your identification number from the FAA official website, you will need to visibly mark that on your drone. Make sure you look for no fly zones and aerodromes before you take flight. I personally use a DJI Mavic Pro.Weather and Setting.
Make sure you're not in the high-velocity wind, precipitation, or in high glare environments. Partly cloudy conditions work best. Make sure your drone can operate in the temperature you are in. Since stability from GPS and visual can only go so far, make sure your drone is at least 200 feet in altitude to prevent severe ghosting and failure in image stitching.Software.
I prefer the software Autopano, by Kolor. Unfortunately, the price is hefty, but the software includes anti-ghost rendering, which can be a great help. If you want a free and open source solution, I recommend Hugin, which comes with an OpenGL panorama viewer. The basic concept of the software is to load your photos, find the control points through software. If the stitching is not good enough, apply some manual control points as well, and render the panorama. If you fork up the money to use APG, there are two important tips: Crop the panorama to be a full sphere (2:1 aspect ratio), and select the gear icon on the corner of your preview. Slide the resolution to 100 percent, make sure you are using the "antighost" mode, and render. Depending on your computer's computation power, this may take awhile. You will need Adobe Photoshop in order to use content-aware fill to complete your missing sky.
To capture a 360 panorama, simply take off and guide your aircraft to your desired location. As mentioned earlier, make sure you're high enough that your aircraft's small movements from the wind do not affect the image's perspective. Make the camera gimbal pitch parallel to the horizon, then take a ring of pictures by yawing the aircraft. Make sure each image overlaps at least 50%. Next, adjust your gimbal pitch downwards, and take another ring. Make sure that ring overlaps 50% with the previous ring. Rinse and repeat, until your gimbal is pointed directly towards the ground. Take two shots, perpendicular to each other. If you're not sure about your photo coverage, don't be afraid to take a bit more than necessary. Redundancy is good.
Stitch your photos together via your stitching software, and load up Photoshop. Make a mask layer, to mask the ground. You can do this by using the marquee tool and selecting the sky and the unfilled area. The unfilled area can be a solid color, black, white, or transparent, depending on your software. It will always be at the top of your panorama. The mask button is the third icon on the bottom right corner of the window. It looks like a Japanese flag. After masking, select the original layer. It should be called Layer 0. It is not the one with black and white, rather it's the one to the left of the chain icon. Click on it. Now, use the magic wand tool to select the unfilled area. After doing so, click on edit>fill. You can also use Shift+F5. A window will pop up. Change "Contents:" to Content-Aware. Make sure "Mode:" is set to "Normal", and Opacity is set to 100%! After doing this, press OK. Allow Photoshop time to process. Once finished, delete the mask (the black and white thing to the right of the chain symbol). Save your photo as either JPEG or PNG. Now, you can view the panorama in a viewer, such as PanoGLView, which comes with Hugin for Mac and Linux, or use an online viewer. You can also view this in VR headsets, such as the Oculus Rift, HTC Vive, Gear VR, and (not recommended) Cardboard. A simple Google search should point you to a good 360 or VR viewer. Since I own a Gear VR, I use Samsung VR Gallery. Oculus 360 photos is buggy on the Gear VR.
Enjoy your new high resolution 360 panoramas!
Hey man! You got a nice and informative post. And I want to nominate to our compilation post. This could get more attention to your blog and maybe some extra votes. Reply if you accept.
This gem of a post was discovered by the OCD Team!
Reply to this comment if you accept, and are willing to let us share your gem of a post! By accepting this, you have a chance to receive extra rewards and one of your photos in this article may be used in our compilation post!
You can follow @ocd – learn more about the project and see other Gems! We strive for transparency.
Downvoting a post can decrease pending rewards and make it less visible. Common reasons:
Submit
Sure thing! I'm a new user here, and having a foundation can really help.
Downvoting a post can decrease pending rewards and make it less visible. Common reasons:
Submit
Thats great! You should start making an #introduceyourself post. Where you explain your interest and what are you doing here. And I recommend you to start following people and comment in other people posts.
Downvoting a post can decrease pending rewards and make it less visible. Common reasons:
Submit
Hi. I am a volunteer bot for @resteembot that upvoted you.
Your post was chosen at random, as part of the advertisment campaign for @resteembot.
@resteembot is meant to help minnows get noticed by re-steeming their posts
To use the bot, one must follow it for at least 3 hours, and then make a transaction where the memo is the url of the post.
If you want to learn more - read the introduction post of @resteembot.
If you want help spread the word - read the advertisment program post.
Steem ON!
Downvoting a post can decrease pending rewards and make it less visible. Common reasons:
Submit
Hey! You made it to the compilation post. You can read it here.
Downvoting a post can decrease pending rewards and make it less visible. Common reasons:
Submit