
About Metavault.Trade
Metavault.Trade is a new kind of Decentralised Exchange, designed to provide a large range of trading features and very deep liquidity on many large cap crypto assets.
Traders can use it in two ways:
- Spot trading with swaps and limit orders.
- Perpetual Futures trading with up to 30x leverage on short and long positions.
Metavault.Trade aims to become the go-to solution for traders who want to stay in control of their funds at all times without sharing their personal data. Its innovative design gives it many advantages over other existing DEXes:
- Very low transaction fees.
- No price impact, even for large order sizes.
- Protection against liquidation events: the sudden changes in price that can often occur in one exchange (“scam wicks”) are smoothed out by the pricing mechanism design relying on Chainlink price-feeds.
All-in-one platform: Spot and Leverage trading.
Trading
Metavault.Trade is a cutting-edge Decentralised Exchange platform that doesn’t require registration. To start trading on Metavault.Trade all you need is a Web3 wallet.
Connecting your Wallet
Connect your wallet by clicking the “Connect Wallet” button in the header:
You will need to have MATIC in your wallet to start trading.
Open a Position
To open a position, click on the “Trade” button in the header.
You will be taken to the trading panel. Click on Zone 1 to choose the currency you want to trade.
Choose the currency in the dropdown menu.
Then, in Zone 2 click on “Long” or “Short” depending on which side you would like to open a position on.
Choosing to “Long” a position earns a profit if the token’s price goes up and makes a loss if the token’s price goes down.
On the other side, choosing to “Short” a position earns a profit if the token’s price goes down and makes a loss if the token’s price goes up.
When clicking on Zone 3 a panel will appear where you can select the currency with which you will pay to open a position.
After selecting the currency you want to proceed with, enter the amount you would like to trade in the “Pay” section and use the slider to determine the applied Leverage.
In the example below, we use 100 MATIC to open a Long position on MATIC with a 4.8x leverage.
As you move the Leverage slider, you can see the values of Liquidation Price and Fees changing accordingly. The Trading Fee to open a position is 0.1% of the position size. There is a similar closing fee of 0.1%.
Additionally, a “Borrow Fee” is deducted at the start of every hour. This is the fee paid to the counter-party of your trade. The fee per hour will vary based on utilization, it is calculated as (assets borrowed) / (total assets in pool) * 0.01%.
The box below the position box summarizes the trade with: the Entry Price, the Exit Price (which is the price you would get if you were to close the trade immediately after opening it), the Borrow Fee and the available liquidity in the pool.
Before confirming the transaction, a pop-up will appear summarizing all the relevant data and giving you the option to set slippage to a higher value.
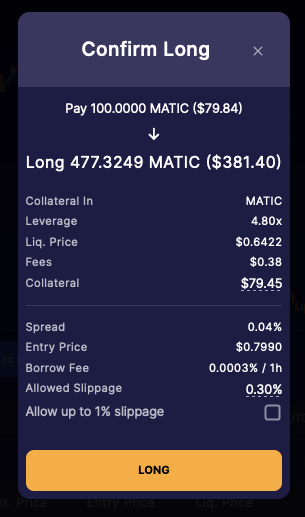
See the next section for Default Slippage Settings.
Setting Slippage
Slippage is the difference between the expected price of the trade and the execution price.
Because of the deep liquidity offered by the Metavault.Trade pool, there are no price impacts for trades, yet there can be slippage due to price movements between the moment when your trade transaction is submitted and when it is confirmed on the blockchain.
The maximum slippage you accept for a trade can be customized by clicking on your address in the header and on the Settings button accessible from the dropdown menu.
Position Management
Once opened, your trades are added under the chart, in the Positions list. You can visualize your entry and liquidation prices on the chart by ticking the “Chart positions” box in Zone 1 below:
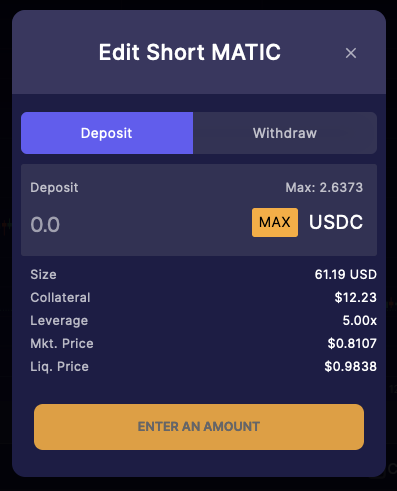
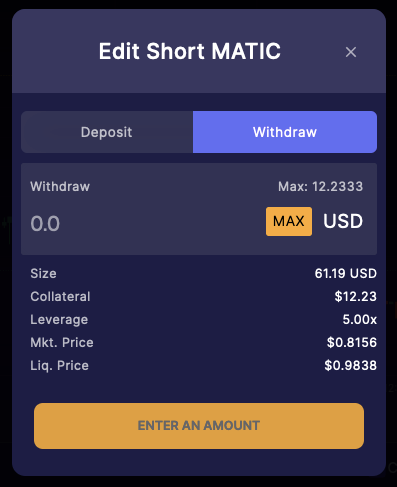
You can manage your position by clicking on the three little dots in Zone 2. A pop-up will appear that will allow you to either deposit or withdraw collateral. You will notice the effect of this action on your leverage and liquidation price.
Deposit Collateral:
Withdraw Collateral
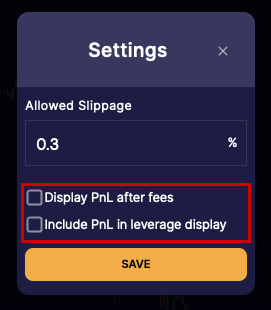
Leverage for a position is displayed as (position size) / (position collateral). If you’d like to display the leverage as (position size + PnL) / (position collateral), you can customize this by clicking on your address in the header and on the Settings button in the dropdown menu.
Closing Positions
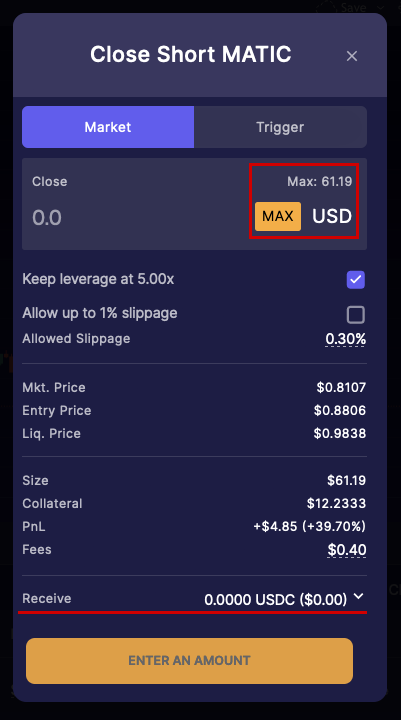
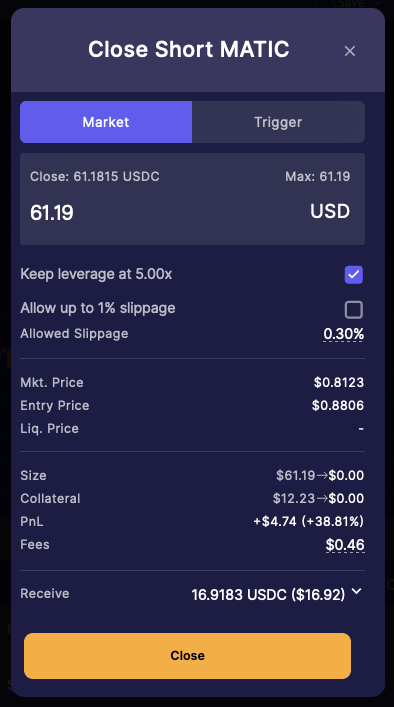
To close a position completely, click on the “Close” button in zone 2
By selecting the “Max” button in the pop-up window. You will get a summary of PnL and fees before confirming the transaction. To close the position partially, enter any amount below the maximum possible. You can choose the currency in which you want your balance to be paid out when you close the position (Last section -> Receive)
Stop-Loss / Take-Profit Orders
You can set stop-loss and take-profit orders by clicking on the “Close” button and selecting the “Trigger” tab. Here you can also select the currency in which you want your balance to be paid out when you close the position (Last section -> Receive)
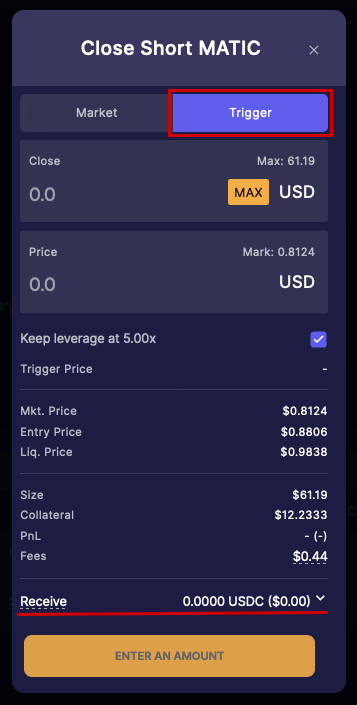
Please note that the amount of the desired asset to receive is depending on the exchange rate at the time of execution.
Your newly created trigger order now appears in your position’s row, as well as under the “Orders” tab where you can cancel or edit it, by changing the trigger price if needed.
It will also be displayed on the chart if you tick the box “Chart positions”.
If you close a position manually, the associated trigger orders will remain open, you would need to cancel them manually if you do not want the order to be active when opening future positions.
Please Note that orders are not guaranteed to execute, this can occur in a few situations including but not exclusive to:
- The mark price which is an aggregate of exchange prices did not reach the specified price
- The specified price was reached but not long enough for it to be executed
- No keeper picked up the order for execution
- Additionally, trigger orders are market orders and are not guaranteed to execute at the trigger price.
Partial Liquidations
In case the market goes against your trade, there will be a price at which the loss amount is very close to the collateral amount.
The Liquidation Price is calculated as the price at which the (collateral — losses — borrow fee) is less than 1% of your position’s size. If the token’s price crosses this point then the position will be automatically closed.
Due to the borrow fee your liquidation price will change over time, especially if you use a leverage that is more than 10x and have the position open for more than a few days, so it is important to monitor your liquidation price.
If there is any collateral remaining after deducting losses and fees, then the corresponding amount would be returned to your wallet.
Pricing
Thanks to its innovative design there is no price impact for trades on Metavault.Trade, even for large orders. This means, you can execute large trades exactly at the mark price.
- The mark prices are displayed next to the market name and under the swap box.
- Long positions will be opened at the higher price and closed at the lower price while short positions will be opened at the lower price and closed at the higher price.
Another advantage of the platform is that there is only a small spread for entering and exiting trades. In the example below, there is no spread or entry and exit prices remain the same.
Tokenomics
Token Information
MVX token address: 0x2760E46d9BB43dafCbEcaad1F64b93207f9f0eD7
After staking MVX, you will receive staked MVX:
MVX staked token address: 0xaCEC858f6397Dd227dD4ed5bE91A5BB180b8c430
Staking
Staked MVX generates three reward types:
- MATIC
- esMVX
- Multiplier Points
30% of swap and leverage trading fees are converted to $MATIC and distributed to the accounts staking MVX.
Treasury Assets
The MVX-USDC LP liquidity is provided and owned by the Protocol (MVX Treasury). 100% of the fees from this trading-pair are converted into USDC and deposited into the MVLP as Protocol-owned liquidity of the MVX Treasury every friday.
Supply
The maximum supply of MVX is 10,000,000. Minting beyond this maximum supply is controlled by a 28 day timelock, an eventuality that will only be considered if the demands of the protocol necesitate an increase of the supply.
Circulating supply changes are dictated by the number of tokens that are distributed through other DEXs, vested, burnt and spent on marketing.
MVX allocations are:
- 1.2 million for marketing, partnerships and community development
- 6 million reserved for rewards (as esMVX which can be converted over time to MVX)
- 1 million for liquidity on Uniswap (reserve held in the MVX-Multisig)
- 300,000 for MetavaultDAO team (linearly vested over two years with a three-month cliff)
- 1.5 million allocated to presale
Presale
MVX token price at launch: 1 USDC
- GMX community sale = 200,000 MVX at 20% discount (0.8 USDC/MVX), 200 slots
- Whitelisted public presale = 1,000,000 MVX at 10% discount (0.9 USDC/MVX), 500 slots
- Metavault DAO community sale = 300,000 MVX at 20% discount (0.8 DAI/MVX), 300 slots
- Total $ to be raised in presale: 1,060,000 USDC + Metavault DAO Treasury allocation from MVD -> MVX sale
- -> 500,000 USDC paired with 500,000 MVX initial liquidity V3 Pool
- -> 60,000 USDC as marketing budget
- -> 500,000 USDC as initial MVLP liquidity (owned by the MVX Treasury)
Liquidity is owned by the Metavault protocol and is stored under the multi-signature wallet.
MVX vs MVLP Price
MVX’s price is entirely speculative. MVLP’s price depends on the prices of tokens that are indexed.
Learn More:
Website : https://metvault.trade
Telegramm : https://t.me/MetavaultTrade
Twitter : https://twitter.com/MetavaultDAO
Medium : https://metvault.medium.com
Discord: https://discord.com/invite/metavault
Author
Bitcointalk Username:
Climacun11
Bitcointalk Profile link:
https://bitcointalk.org/index.php?action=profile;u=3508211
Wallet Address: 0xb6fc48c299B462B6a43f6B3068259cc0A948b7a9