PowerPoint presentations are widely used in people’s work. Sometimes, in order to protect a PowerPoint presentation from being modified, the author makes it read-only. When a PowerPoint file is in read-only status, no changes can be made. Edit, insert, copy, delete and Save As are not allowed. In other words, you cannot do anything to a read-only PPT file, except to open and view it.
Read-only mode indeed helps secure a PowerPoint presentation, but sometimes it may bring you troubles or inconveniences. For example, if you get/download a PowerPoint presentation from the net, but find that it is read-only, you will want to remove the read-only status. Now on this page, I would like to show you how to remove read-only from PowerPoint 2016 presentation. Of course, the steps also work for a later or earlier version of Microsoft PowerPoint.
Tips: The author of a PowerPoint presentation can make it read-only in two ways: by Mark as Final or by assigning a password to modify, so the method to remove read-only will depend on the specific case. But in any case, it will be an easy task which you can do even without any computer skills.
Case 1: When the PowerPoint presentation is marked as final
If the PowerPoint presentation is marked as final, you can directly open it without any prompt, but will find a yellow banner at the top of the presentation saying “MARKED AS FINAL”. In this case, you can simply click Edit Anyway on the yellow banner to remove the read-only status from this PowerPoint presentation.

Case 2: When the PowerPoint presentation requires a password to modify
If you’re prompted to enter a password to modify when opening the PowerPoint presentation, you need to enter the right password to open it, or you will have to open the presentation file as read-only. In this case, how to remove read-only depends on whether you have the password.
Part 1: How to remove read only when you have the password
Step 1: Open the PowerPoint presentation. When the dialog pops up asking to enter the password to modify, enter your right password and click OK.

Step 2: Click File > Save As, then choose one location you will save the presentation file.
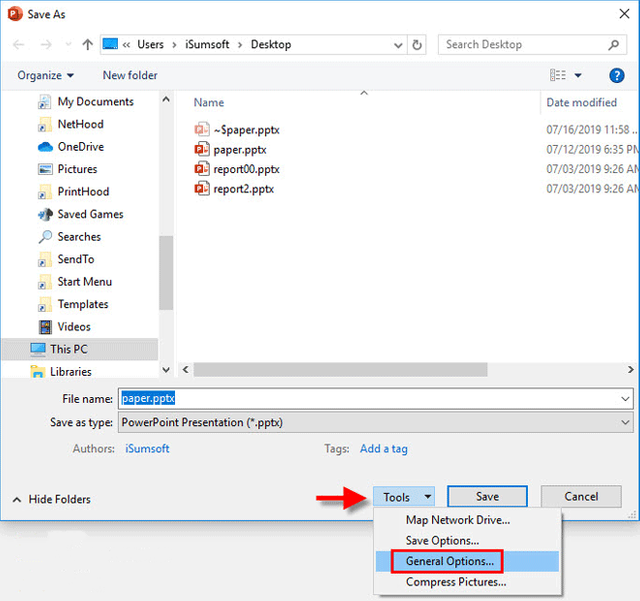
Step 3: When the Save As dialog opens, click Tools > General Options.

Step 4: When the General Options dialog opens, you can see the Password to modify box is with a password. Delete the password to modify using the Backspace key on your keyboard, then click OK. Finally, click Save to save the presentation.
Part 2: How to remove read-only without password
If you don’t have the password to modify (sometimes also called read-only password), keep the PowerPoint presentation closed and then follow these steps to remove the read-only.
Step 1: Download and install the iSumsoft PowerPoint Protection Refixer.
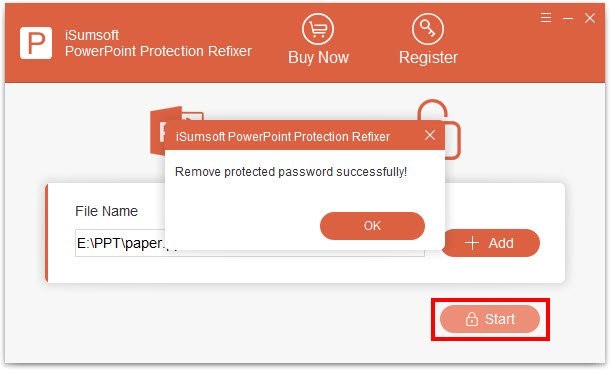
Step 2: Click the Add button to add the PowerPoint file to this program.
Step 3: Click the Start button to remove the read-only password and unprotect the PowerPoint presentation.
