Being a commuter I needed a way to be notified when is time to leave the office,
a sort of alarm clock that wake me up when I'm too much into the code.
The best way that came to my mind was a scheduled task that trigger a powershell
script.
Entering toasts notifications
Toasts allow your app to provide time-sensitive or personally relevant
notifications to users regardless of whether they are in another app or on the
Start screen, lock screen, or desktop. For example, you could use a toast to
inform a user of:an incoming VOIP call
a new instant message
a new text message
a calendar appointment or other reminder
other personally valuable notifications that a user requests.
MSDN
Powershell to the rescue
To use .Net toasts notifications first of all we need to add the runtime type to
our script:
[Windows.UI.Notifications.ToastNotificationManager, Windows.UI.Notifications, ContentType = WindowsRuntime] | Out-Null
[Windows.UI.Notifications.ToastNotification, Windows.UI.Notifications, ContentType = WindowsRuntime] | Out-Null
[Windows.Data.Xml.Dom.XmlDocument, Windows.Data.Xml.Dom.XmlDocument, ContentType = WindowsRuntime] | Out-Null
The first line is the Toast Notification Manager,
that is used to raise toast notifications.
The second line is the object used to define the look and feel of our notification
Toast Notification
The third line is the object that will contain the XAML
definition of the notification (it's based on xml)
When we will create the Toast Notifier to show our notification we'll need to pass
an APP id (actually a guid) to uniquely identify our app.
Create a new guid:
PS> New-Guid

Guid
----
110366bd-56e2-47ed-9bdf-3ce1fa408b6c
Assign it to the variable:
$APP_ID = '110366bd-56e2-47ed-9bdf-3ce1fa408b6c'
Next one is the XAML definition of the template. On this
page you
can find an overview of the different types of toasts notifications and the
respective XAML. For the purpose of my script ToastText02 is the best one:
One string of bold text on the first line, one string of regular text wrapped
across the second and third lines.
To customize the text content we use an Here string with 2 variables:
$template = @"
<toast>
    <visual>
        <binding template="ToastText02">
            <text id="1">$($Title)</text>
            <text id="2">$(Get-Date -Format 'HH:mm:ss')</text>
        </binding>
    </visual>
</toast>
"@
$Title will be our script parameter to allow us to reuse the script for
different purposes. Get-Date will show us on the second line that is time to
leave the office and go home.
Finally we load the xml template and pass it to Notification Manager to show the
notification:
$xml = New-Object Windows.Data.Xml.Dom.XmlDocument
$xml.LoadXml($template)
$toast = New-Object Windows.UI.Notifications.ToastNotification $xml
[Windows.UI.Notifications.ToastNotificationManager]::CreateToastNotifier($APP_ID).Show($toast)
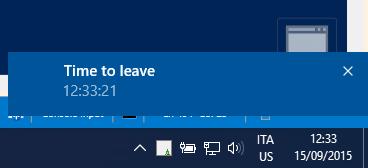
Here's what it looks like on Windows 10:

I'll leave up to you to schedule it and use it as an alarm clock or as you
prefer.
Here's the full script:
param(
    [String] $Title
)

[Windows.UI.Notifications.ToastNotificationManager, Windows.UI.Notifications, ContentType = WindowsRuntime] | Out-Null
[Windows.UI.Notifications.ToastNotification, Windows.UI.Notifications, ContentType = WindowsRuntime] | Out-Null
[Windows.Data.Xml.Dom.XmlDocument, Windows.Data.Xml.Dom.XmlDocument, ContentType = WindowsRuntime] | Out-Null

$APP_ID = '110366bd-56e2-47ed-9bdf-3ce1fa408b6c'

$template = @"
<toast>
    <visual>
        <binding template="ToastText02">
            <text id="1">$($Title)</text>
            <text id="2">$(Get-Date -Format 'HH:mm:ss')</text>
        </binding>
    </visual>
</toast>
"@

$xml = New-Object Windows.Data.Xml.Dom.XmlDocument
$xml.LoadXml($template)
$toast = New-Object Windows.UI.Notifications.ToastNotification $xml
[Windows.UI.Notifications.ToastNotificationManager]::CreateToastNotifier($APP_ID).Show($toast)
Take care.