Hi ! Tool Change like the ones implemented in CNC is very appealing for 3D Printers. I want to implement one at some point on my big one.
Why ?
You can automatically change your print heads for different purposes:
- use different material/filaments: supports, aesthetics or technical purposes to reinforce specific portions of a part.
- prints needing several rolls of filament, detection of the end of filament and it switches automatically to the other filament roll
- tool head with bigger nozzles to print faster a full part or an infill for instance
- tool head with a laser to engrave, to control the part
- tool head with a camera and a pick and place head, to perform the assembly of small components
What ?
On a CNC machine it is implemented as a set of forks aligned and holding the tool as follows:
There is either the tool head moving to the fork or a mechanism that moves the tool from/to the toolhead.
Or it is implemented as kind of rotating carousel that is put next to the CNC and you have a mechanism to move the carousel and another one to move the tool from/to the toolhead.
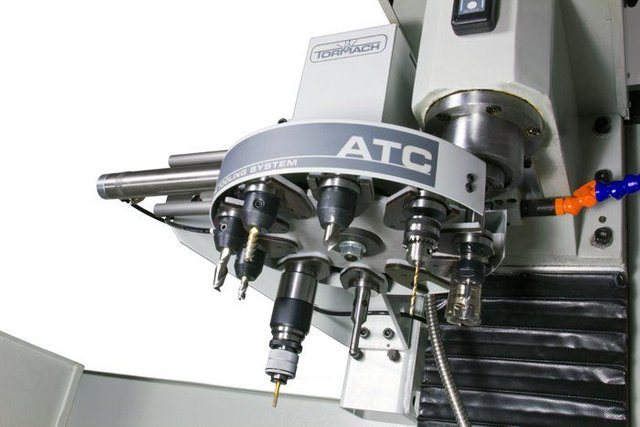
It seems a rather simple thing to implement, but the difficult part is in the details of the repeatability and the accuracy of the tool change required which should be only a few microns.
On most CNC the tool head is unchanged avoiding any deviation on any axis. There is a specific tool head for this purpose and the collet of each tool is built on purpose to perform those tool changes quickly and accurately with an alignment made by the geometry of the collet. Each tool has its own diameter and length, after a kind of homing may be
performed on a specific portion of the machined part.
The 3D Printer case
However on the 3D Printer you do not want to change the nozzle but you want to really change the full tool head, this is were you have a more difficult problem for the repeatability and the alignment of tools.
The offset on X,Y,Z can be assigned either in the slicer or in the firmware, however you still have the problem of the repeatability when the tool head is changed, and the effective mean to align and compute those offsets.
So far all tool change implement I have seen are based on a set of forks that are placed at the boundary of the build volume.
The locking mechanism is either:
- strong rare earth magnets (many Delta tool heads are working fine with high acceleration)
- friction based when engaging the alignment pins (it takes time to wear, I am using this technique for the gantry of my big printer)
- rotating lock with a small servo
The alignment mechanism is either:
- kinematic coupling triangle: (Mark2 and E3D solution) allowing a very good repeatability (https://en.wikipedia.org/wiki/Kinematic_coupling)
- alignment pins (DIY solution): good repeatability.
Existing Implementations
Mark2
The Mark2 is a modified Ultimaker with another head that is held by strong magnets. It is a really nice hack you just print a few parts, add an extruder with a stepper motor and here you go.
Parts to print and bom is here: https://github.com/foehnsturm/Mark2
The drawback of this implementation is the additional weight of both tool head, you need to reduce acceleration a bit and you have to align the Z height of both nozzles (which can cause issues). The next step would be to have two places to hold each hotend but the Ultimaker is a bit small for this.
I like the elegance of the design where magnets are used for both alignment and locking. It is easy to adapt it to print it, alter it and to put on any 3D Printer.
I do not understand why Ultimaker did not use this principle on the Ultimaker 3.
Link: https://magnetic-tool-changer.com/
Link: https://community.ultimaker.com/topic/8754-a-different-multi-extrusion-approach-um-tool-printhead-changer/
E3D
E3D recently shown its solution for the tool changing mechanism. They use a kinematic triangle using the regular mechanic way (sphere + machined end) and they use a small servo with a lock. The tool head is simply a plate holding the 3 spheres of the coupling.

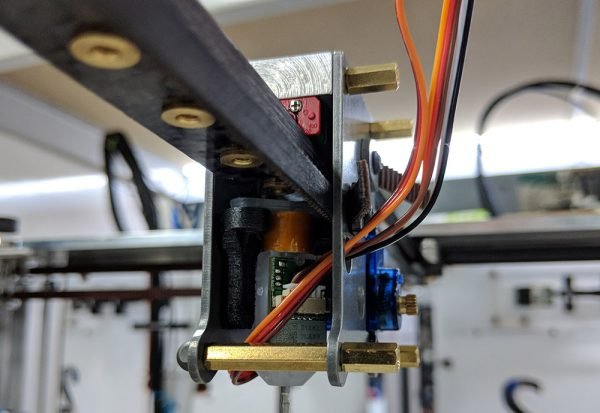
Follows a short photo of the fork storage:
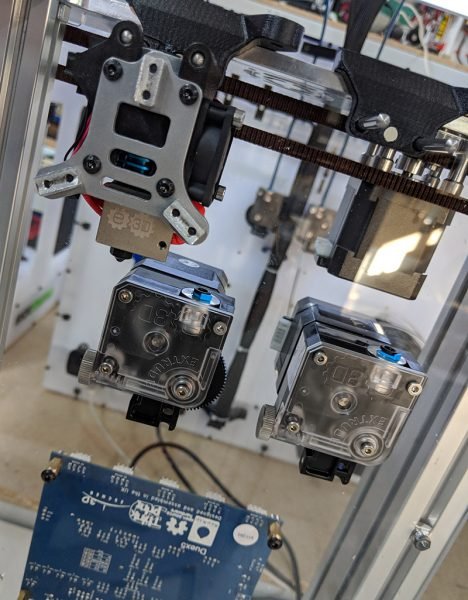
Link: https://e3d-online.com/blog/2018/03/21/tool-changer-q
There are collecting money for pre-orders on this machine: https://e3d-online.com/tool-changer-join-the-queue
Rolmie
Rolmie shown another mechanism using alignment pins with friction lock.
The printer is a CoreXY similar to this one: https://www.thingiverse.com/thing:651117
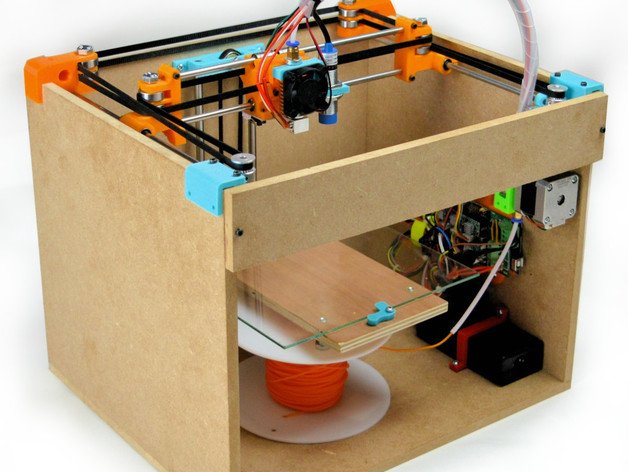
Tool heads are stored on the front panel.
Link: https://hackaday.io/project/26053-tool-switching-multi-extrusion
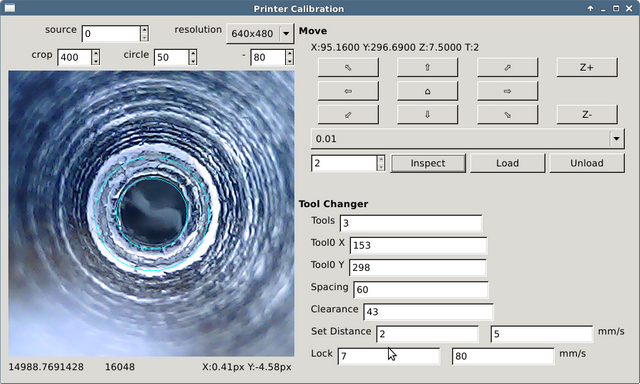
The most interesting part of the work performed from my own perspective is a tool using computer vision and a small USB microscope to perform the alignment of nozzles. It allows also to stress test the tool changing mechanism to check any misalignment, the repeatability and so on. I think it is really worth to follow Rolmie and have a look further.
Edit
René Jurack
René implemented another tool change mechanism using also a kinematic mechanism and strong magnets to hold. I talk about René before for water cooled hotends and Titanium heat throats (http://well-engineered.net/index.php/en/). He also develop an adaptor to put airbrush nozzles to E3D hotends, the thin and long tip is quiet useful on those airbrush nozzle to reduce the heat radiated on the part to print for thin detail and very thin layers.
You can see in the video its own implementation, I like how the part is designed to enable a smooth release.
Interesting.
Yet another subject I knew nothing about XS
Rolmie's work looks very interesting, what with the microscope-level precision !
Downvoting a post can decrease pending rewards and make it less visible. Common reasons:
Submit
I think it is a way that can enable a lot of new things. Printing in full color is very nice too, but printing with several materials that can be hard, soft, transparent, conductive enable to build new kind of products/designs that were not easily feasible for a relatively cheap price.
What is nice is that most of such improvements are relatively cheap to implement at scale.
Downvoting a post can decrease pending rewards and make it less visible. Common reasons:
Submit
This post has received a 11.76% upvote from @msp-bidbot thanks to: @boucaron. Delegate SP to this public bot and get paid daily: 50SP, 100SP, 250SP, 500SP, 1000SP, 5000SP Don't delegate so much that you have less than 50SP left on your account.
Downvoting a post can decrease pending rewards and make it less visible. Common reasons:
Submit
You got a 22.22% upvote from @flymehigh courtesy of @boucaron!
Downvoting a post can decrease pending rewards and make it less visible. Common reasons:
Submit
You got a 20.00% upvote from @upyou thanks to @boucaron! Send at least 0.1SBD or 0.1STEEM to get upvote for next round.
Downvoting a post can decrease pending rewards and make it less visible. Common reasons:
Submit
You got a 16.67% upvote from @childfund courtesy of @boucaron! @childfund is a bid bot to help the steem community sponsor a child.
Downvoting a post can decrease pending rewards and make it less visible. Common reasons:
Submit
You got a 20.70% upvote from @emperorofnaps courtesy of @boucaron!
Want to promote your posts too? Send 0.05+ SBD or STEEM to @emperorofnaps to receive a share of a full upvote every 2.4 hours...Then go relax and take a nap!
Downvoting a post can decrease pending rewards and make it less visible. Common reasons:
Submit
You got a 20.00% upvote from @lrd courtesy of @boucaron!
Downvoting a post can decrease pending rewards and make it less visible. Common reasons:
Submit
Great post!
Thanks for tasting the eden!
Downvoting a post can decrease pending rewards and make it less visible. Common reasons:
Submit
You got a 16.67% upvote from @bodzila courtesy of @boucaron! Join our Discord Channel https://discord.me/SteemBulls for support & feedback
Downvoting a post can decrease pending rewards and make it less visible. Common reasons:
Submit
Join our Discord Channel to connect with us and nominate your own or somebody else's posts in our review channel.
Help us to reward you for making it ! Join our voting trail or delegate steem power to the community account.
Your post is also presented on the community website www.steemmakers.com where you can find other selected content.
If you like our work, please consider upvoting this comment to support the growth of our community. Thank you.
Downvoting a post can decrease pending rewards and make it less visible. Common reasons:
Submit