In this tutorial, I will show you how to setup Angular 2 with ASP NET MVC 5 Application using Visual Studio 2015. To be very honest, this is totally different from Angularjs setup in ASP.NET MVC 5. But don’t worry, I will show you the setup procedure in step by step as easy as possible.
First of all, I will install TypeScript, then install Node.js, and then configure visual studio to use npm, and then create a new project, and then add all the required files for Angular2, and then add all the required references in Layout.cshtml page, and then add some code for View page.
Set up Angular 2 with ASP NET MVC 5 Application
Now I will explain how to setup Angular 2 in ASP NET MVC 5 Application in step by step. So, follow the below steps.
Step # 1 – Install Typescript
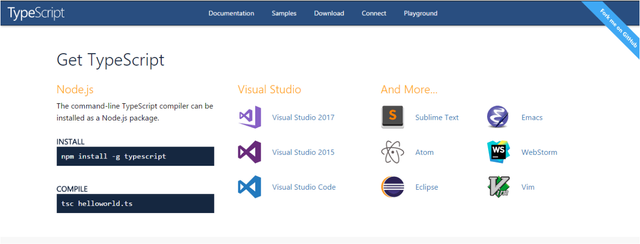
In this first step, we will install Typescript for Visual Studio. Just go to this link (http://www.typescriptlang.org/#download-links) and download typescript for visual studio and then install it. In this project, I am using Visual Studio 2015 and that’s why I will download Typescript for Visual Studio 2015. But if you are using visual studio 2017 then you should have to download typescript for visual studio 2017. You can get Typescript as you required in your project.
Note: – Make sure you don’t get any error.

Step # 2 – Install Node.js
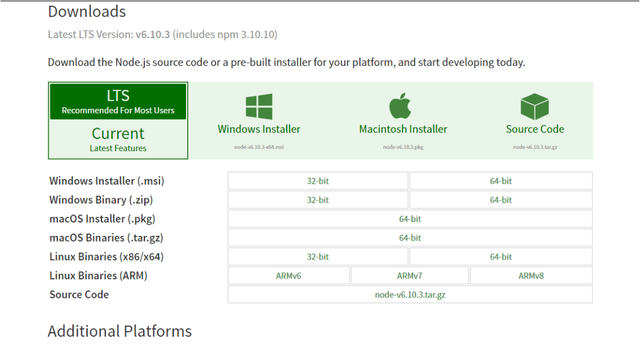
In this second step, we will install Node.js. Just go to this link (https://nodejs.org/en/download/) and download required Node.js and then install it. It will also install npm for you.

Step # 3 – npm Configuration
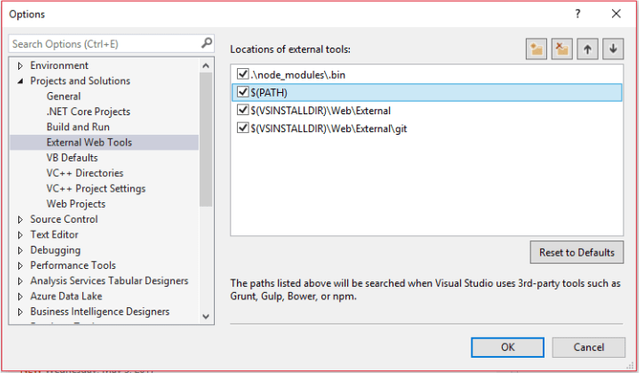
Now in this step, we will configure visual studio to use npm. Just go to Tools => Options. It will show a new “Options” popup.
Then choose “External Web Tools” under Projects and Solutions from the left pane and then you will see four checkboxes in a list and the “Path” variable is at the third position. Just select the “Path” variable and bring it to the second position by just clicking on up arrow button. And then just click “OK” button. Once you do it, just restart your Visual Studio.

Step # 4 – Create a new ASP.NET MVC 5 Project
Now in this step, we will create a new ASP.NET MVC 5 project. Go to File => New => Project and it will show a “New Project” popup.
Then select The “Web” under Visual C# tab from left pane => and then select “ASP.NET Web Application” from the middle pane => and then enter the name of the application in the name field => and then click “Ok” button. This will show a new “ASP.NET Project” popup.
Then choose MVC option => then check the checkbox under the “Add folder and core references for:” => and then just click ok button. It will create a new ASP.NET MVC 5 project.
Step # 5 – Add the Angular2 required files
Now in this step, we will add all the required files in our project.
Add New Folder:
First of all, add a new folder named “app” in your project. To do it, just right click on Project name from the right pane under the solution explorer => Add => New folder => and then name it “app”.
Now, add a new Typescript file under the “app” folder which you have created with the name “app.components.ts”. Go to solution explorer => right click on app folder => choose Add => then choose the TypeScript File => and then enter the name (app.component.ts) => then click ok button and it will create a new file. Now just copy the below code the paste it to app.component.ts file.
import { Component } from '@angular/core';
@Component({
  selector: 'my-app',
  template: `<h1>Hi {{a}}</h1>`,
})
export class AppComponent  { a = 'Congratulation! you have created your first application using Angular2 with ASP.NET MVC 5'; }
Now, add another TypeScript file under the “app” folder with the name “app.module.ts”. Then copy the below code and paste it to app.module.ts file.
import { NgModule }      from '@angular/core';
import { BrowserModule } from '@angular/platform-browser';

import { AppComponent }  from './app.component';

@NgModule({
  imports:      [ BrowserModule ],
  declarations: [ AppComponent ],
  bootstrap:    [ AppComponent ]
})
export class AppModule { }
Now, add another TypeScript file under the “app” folder with the name “main.ts”. And then copy the below code and paste it to main.ts file.
import { platformBrowserDynamic } from '@angular/platform-browser-dynamic';

import { AppModule } from './app.module';

platformBrowserDynamic().bootstrapModule(AppModule);
Add Systemjs.Config.js file:
Now add a js file in your project. Just go to solution explorer (from right pane) => then right click on project name => choose “Add” => and then choose JavaScript file => enter the name “systemjs.config.js” => now just click ok button. It will create a new js file in your project. Now add the below code into systemjs.config.js file.
/**
 * System configuration for Angular samples
 * Adjust as necessary for your application needs.
 */
(function (global) {
    System.config({
        paths: {
            // paths serve as alias
            'npm:': 'node_modules/'
        },
        // map tells the System loader where to look for things
        map: {
            // our app is within the app folder
            app: 'app',

            // angular bundles
            '@angular/core': 'npm:@angular/core/bundles/core.umd.js',
            '@angular/common': 'npm:@angular/common/bundles/common.umd.js',
            '@angular/compiler': 'npm:@angular/compiler/bundles/compiler.umd.js',
            '@angular/platform-browser': 'npm:@angular/platform-browser/bundles/platform-browser.umd.js',
            '@angular/platform-browser-dynamic': 'npm:@angular/platform-browser-dynamic/bundles/platform-browser-dynamic.umd.js',
            '@angular/http': 'npm:@angular/http/bundles/http.umd.js',
            '@angular/router': 'npm:@angular/router/bundles/router.umd.js',
            '@angular/router/upgrade': 'npm:@angular/router/bundles/router-upgrade.umd.js',
            '@angular/forms': 'npm:@angular/forms/bundles/forms.umd.js',
            '@angular/upgrade': 'npm:@angular/upgrade/bundles/upgrade.umd.js',
            '@angular/upgrade/static': 'npm:@angular/upgrade/bundles/upgrade-static.umd.js',

            // other libraries
            'rxjs': 'npm:rxjs',
            'angular-in-memory-web-api': 'npm:angular-in-memory-web-api/bundles/in-memory-web-api.umd.js'
        },
        // packages tells the System loader how to load when no filename and/or no extension
        packages: {
            app: {
                main: './main.js',
                defaultExtension: 'js'
            },
            rxjs: {
                defaultExtension: 'js'
            }
        }
    });
})(this);
Add tsconfig.json file:
Now add a json file in your project. Go to soloution explorer => right click on project name => choose Add => then choose JSON file => Enter the name “tsconfig.json” => then click ok button. It will create a new json file in your project. Now add the below code into tsconfig.json file.
{
  "compilerOptions": {
    "target": "es5",
    "module": "commonjs",
    "moduleResolution": "node",
    "sourceMap": true,
    "emitDecoratorMetadata": true,
    "experimentalDecorators": true,
    "lib": [ "es2015", "dom" ],
    "noImplicitAny": true,
    "suppressImplicitAnyIndexErrors": true
  },
  "exclude": [
    "node_modules/*",
    "**/*-aot.ts"
  ]
}
Add package.json file:
Now add another json file in your project. Go to solution explorer => right click on project name => choose Add => JSON file => enter name “package.json” => then click ok button. And now add the below code into package.json file.
{
  "name": "angular-quickstart",
  "version": "1.0.0",
  "description": "QuickStart package.json from the documentation, supplemented with testing support",
  "scripts": {
    "start": "tsc && concurrently \"tsc -w\" \"lite-server\" ",
    "e2e": "tsc && concurrently \"http-server -s\" \"protractor protractor.config.js\" --kill-others --success first",
    "lint": "tslint ./app/**/*.ts -t verbose",
    "lite": "lite-server",
    "pree2e": "webdriver-manager update",
    "test": "tsc && concurrently \"tsc -w\" \"karma start karma.conf.js\"",
    "test-once": "tsc && karma start karma.conf.js --single-run",
    "tsc": "tsc",
    "tsc:w": "tsc -w"
  },
  "keywords": [],
  "author": "",
  "license": "MIT",
  "dependencies": {
    "@angular/common": "~2.2.0",
    "@angular/compiler": "~2.2.0",
    "@angular/core": "~2.2.0",
    "@angular/forms": "~2.2.0",
    "@angular/http": "~2.2.0",
    "@angular/platform-browser": "~2.2.0",
    "@angular/platform-browser-dynamic": "~2.2.0",
    "@angular/router": "~3.2.0",

    "angular-in-memory-web-api": "~0.1.15",
    "systemjs": "0.19.40",
    "core-js": "^2.4.1",
    "reflect-metadata": "^0.1.8",
    "rxjs": "5.0.0-beta.12",
    "zone.js": "^0.6.26"
  },
  "devDependencies": {
    "concurrently": "^3.1.0",
    "lite-server": "^2.2.2",
    "typescript": "^2.0.10",

    "canonical-path": "0.0.2",
    "http-server": "^0.9.0",
    "tslint": "^3.15.1",
    "lodash": "^4.16.4",
    "jasmine-core": "~2.4.1",
    "karma": "^1.3.0",
    "karma-chrome-launcher": "^2.0.0",
    "karma-cli": "^1.0.1",
    "karma-htmlfile-reporter": "^0.3.4",
    "karma-jasmine": "^1.0.2",
    "karma-jasmine-html-reporter": "^0.2.2",
    "protractor": "4.0.9",
    "webdriver-manager": "10.2.5",
    "rimraf": "^2.5.4",

    "@types/node": "^6.0.46",
    "@types/jasmine": "^2.5.36",
    "@types/selenium-webdriver": "^2.53.33"
  },
  "repository": {}
}
Now right click on the package.JSON file from solution explorer => then click on “Restore Packages”. It will take some time and restore all the required packages.
Note: – Now rebuild (ctrl + B) your project.
Step # 6 – Add Angular 2 references
Now in this step, we will add all the Angular 2 references into our project.
Just go to solution explorer => Views => shared folder => open a _Layout.cshtml file. And then add the below code into _Layout.cshtml file within head tag.
<script src="https://cdn.polyfill.io/v2/polyfill.min.js?features=Intl.~locale.en"></script>
    <script src="node_modules/core-js/client/shim.min.js"></script>
    <script src="node_modules/zone.js/dist/zone.js"></script>
    <script src="node_modules/reflect-metadata/Reflect.js"></script>
    <script src="node_modules/systemjs/dist/system.src.js"></script>
    <script src="systemjs.config.js"></script>
    <script>
      System.import('app').catch(function(err){ console.error(err); });
</script>
Step # 7 – Add Code for View
Now we will add code for our project view page. Go to solution explorer => Views => Home => open Index. Cshtml file. Then you will see some code in Index.cshtml file. Just replace below code with the Index.cshtml file code.
@{
    ViewBag.Title = "Home Page";
}
<div class="row">
    <div class="col-md-12">
        (html comment removed: Start Angular 2)
        <my-app >App Loading...</my-app>
        (html comment removed: End Angular 2)
    </div>
</div>
Step # 8 – Run your project
Now run your project and you will see a message “Hi Congratulation! You have created your first application using angular 2 with ASP NET MVC 5”.
Hi! I am a robot. I just upvoted you! I found similar content that readers might be interested in:
http://dotnetdetail.com/how-to-setup-angular-2-with-asp-net-mvc-5/
Downvoting a post can decrease pending rewards and make it less visible. Common reasons:
Submit
Yes, this blog is mine:-)
Downvoting a post can decrease pending rewards and make it less visible. Common reasons:
Submit