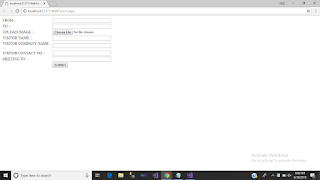
HERE IN THIS ASP.NET Tutorial WE WILL UPLOAD AN IMAGE WHILE SENDING AND EMAIL USING ASP.NET
Here, we will see how can we send email using our Gmail SMTP in c# .NET. Generally, for sending an email from one place to another two parties are required -- first is the sender and the second is the receiver. We will use the Mail Message class of .NET to send an email. For this, we will require a few details:
Sender Email Address
Sender Password
Receiver Email Address
Port Number
EnableSSL property
And most important before we start coding we need to import two namespaces to access the MailMessage Class:
using System.Net;
using System.Net.Mail;
SMTP Class Properties
Following are the properties of the SMTP class.
Host – SMTP Server URL (Gmail: smtp.gmail.com)
EnableSsl – Specify whether your host accepts SSL Connections (Gmail: True)
UseDefaultCredentials – Set to True in order to allow authentication based on the Credentials of the Account used to send emails
Credentials – Valid login credentials for the SMTP server (Gmail: email address and password)
Port – Port Number of the SMTP server (Gmail: 587)
Step 1 :- WebForm2.aspx
<%@ Page Language="C#" AutoEventWireup="true" CodeBehind="WebForm2.aspx.cs" Inherits="WebApplication6.WebForm2" %>
<!DOCTYPE html>
<html xmlns="http://www.w3.org/1999/xhtml">
<head runat="server">
<title></title>
<style type="text/css">
.auto-style1 {
width: 344px;
}
.auto-style2 {
width: 121%;
}
</style>
</head>
<body style="width: 466px; height: 78px">
<form id="form1" runat="server">
<div>
<table class="auto-style2">
<tr>
<td class="auto-style1">
<asp:Label ID="Label1" runat="server" Text="FROM :-"></asp:Label>
</td>
<td>
<asp:TextBox ID="TextBox1" runat="server" Width="246px"></asp:TextBox>
</td>
<td> </td>
</tr>
<tr>
<td class="auto-style1">
<asp:Label ID="Label2" runat="server" Text="TO :-"></asp:Label>
</td>
<td>
<asp:TextBox ID="TextBox2" runat="server" Width="246px"></asp:TextBox>
</td>
<td> </td>
</tr>
<tr>
<td class="auto-style1">
<asp:Label ID="Label3" runat="server" Text="UPLOAD IMAGE :-"></asp:Label>
</td>
<td>
<asp:FileUpload ID="FileUpload1" runat="server" />
</td>
<td> </td>
</tr>
<tr>
<td class="auto-style1">
<asp:Label ID="Label5" runat="server" Text="VISITOR NAME :-"></asp:Label>
</td>
<td>
<asp:TextBox ID="TextBox3" runat="server" Width="246px"></asp:TextBox>
</td>
<td> </td>
</tr>
<tr>
<td class="auto-style1">
<asp:Label ID="Label6" runat="server" Text="VISITOR COMPANY NAME :-"></asp:Label>
</td>
<td>
<asp:TextBox ID="TextBox4" runat="server" Width="246px"></asp:TextBox>
</td>
<td> </td>
</tr>
<tr>
<td class="auto-style1">
<asp:Label ID="Label7" runat="server" Text="VISITOR CONTACT NO :-"></asp:Label>
</td>
<td>
<asp:TextBox ID="TextBox5" runat="server" Width="246px"></asp:TextBox>
</td>
<td> </td>
</tr>
<tr>
<td class="auto-style1">
<asp:Label ID="Label8" runat="server" Text="MEETING TO :-"></asp:Label>
</td>
<td>
<asp:TextBox ID="TextBox6" runat="server" Width="246px"></asp:TextBox>
</td>
<td> </td>
</tr>
<tr>
<td class="auto-style1"> </td>
<td>
<asp:Button ID="Button1" runat="server" OnClick="Button1_Click" Text="SUBMIT" />
</td>
<td> </td>
</tr>
<tr>
<td class="auto-style1"> </td>
<td>
<asp:Label ID="Label4" runat="server" ForeColor="Lime"></asp:Label>
</td>
<td> </td>
</tr>
</table>
</div>
</form>
</body>
</html>
Step 2 :- C# Code
using System;
using System.Collections.Generic;
using System.Linq;
using System.Web;
using System.Web.UI;
using System.Web.UI.WebControls;
using System.IO;
using System.Net;
using System.Net.Mail;
namespace WebApplication6
{
public partial class WebForm2 : System.Web.UI.Page
{
protected void Page_Load(object sender, EventArgs e)
{
}
protected void Button1_Click(object sender, EventArgs e)
{
string folderPath = Server.MapPath("~/Files/");
if (!Directory.Exists(folderPath))
{
Directory.CreateDirectory(folderPath);
}
FileUpload1.SaveAs(folderPath + Path.GetFileName(FileUpload1.FileName));
string text = @"<html><body>" +
"<h3><b>This Person Is Coming For Official Visit.</b></h3>" +
"<table>" +
"<tr><td width=150px>Visitor Image :</td><td><img src='cid:image1' height=70px width=70px></td></tr>" +
"<tr><td width=150px>Visitor Name :</td><td>" + TextBox3.Text.ToString() + "</td></tr>" +
"<tr><td width=150px>Visitor Company :</td><td>" + TextBox4.Text.ToString() + "</td></tr>" +
"<tr><td width=150px>Visitor ContactNo :</td><td>" + TextBox5.Text.ToString() + "</td></tr>" +
"<tr><td width=150px>Meeting To :</td><td>" + TextBox6.Text.ToString() + "</td></tr>" +
"<tr><td width=150px>Purpose :</td><td>Official Visit</td></tr>" +
"<tr><td width=150px>Date :</td><td>" + System.DateTime.Now.ToString() + "</td></tr>" +
"</table>" +
"</body></html>";
using (MailMessage mm = new MailMessage(TextBox1.Text.ToString(), TextBox2.Text.ToString()))
{
AlternateView htmlview = default(AlternateView);
htmlview = AlternateView.CreateAlternateViewFromString(text, null, "text/html");
LinkedResource imageResourceEs = new LinkedResource(Server.MapPath("~/Files/" + FileUpload1.FileName.ToString()), "image/jpg");
imageResourceEs.ContentId = "image1";
imageResourceEs.TransferEncoding = System.Net.Mime.TransferEncoding.Base64;
htmlview.LinkedResources.Add(imageResourceEs);
mm.Subject = "Visitor Notification";
mm.Body = text;
mm.IsBodyHtml = true;
mm.AlternateViews.Add(htmlview);
using (SmtpClient smtp = new SmtpClient())
{
smtp.Host = "smtp.gmail.com";
smtp.EnableSsl = true;
NetworkCredential NetworkCred = new NetworkCredential("[email protected]","password");
smtp.UseDefaultCredentials = true;
smtp.Credentials = NetworkCred;
smtp.Port = 587;
smtp.Send(mm);
Label4.Text = "Email Sent";
}
}
}
}
}
Output :-
Here Is An Video Related To Topic In This Blog

