Hello once again!
So if you read my previous post you probably seen how to work with Mixer in a very basic way.
Today i'll try to show you a slightly more advanced features of Mixer and how to make a 3D object without making a 3D object (what?!).
So first of all a quick introduction on 3D and textures.
Because we talk about Railroads, lets first look at some basic railroads, go to Google or Flickr and check some out.
Lets break it into how many objects are in a simple very very short segment.
- Concrete/Wood slab.
- 2x Metal Rails.
- 2x Metal nails/Springs (depends which type of rail and where)
- Ballast/Floor
Now, if we are just doing it for pictures references it's not a big deal, but if we want to make it for game, then this is a totally different story.
Why? well for each object we need to create a model, each model in 3D space is built from triangles, or in a more professional language "Polygon" or sometime with Ngons (N = number of verts or edges) which are not very common.
In game we try to have as low amount of triangles as we can, the reason is resources the PC or whichever device we run our game on, so imagine a mobile device trying to run good old Crysis...
Yup, the minimum tris' the better your game will run and the more other stuff you can put in the scene.
In most games you need to think that you first have the main environment, game objects such as pick ups, enemies, NPC's, VFX, Animations, and so on...
Each one of there elements your processor and GPU are breaking into tiny elements and render them on your screen, and we are talking about huge amounts of data.
So, what about railroads? well... one segment times... lets say 10 meters and we got more then 10 segments so it's quite a lot of data out system need to go through.
Not very efficient now is it? and besides most railroads are for cosmetics only, unlike the real world in games you can play with gravity and space so are the rails really need to be that realistic?
Simple answer: No!
So how can we bypass it without having a huge track model and waste time of out 3D modeler?
Make a 3D texture!
With textures you can create effect that looks 3D but in truth it's not at all, if you remember there used to be the changing signs on the side roads which were actually triangles with parts of and ad that just spin every few seconds and then there was a new ad, MAGIC!
So with the same principle textures work, depends on the angle you can create the illusion of 3D space, it's much more efficient and fast to make.
I know, what's the catch? Generally only size, textures take quit some space but rendering is very fast as our system just need to reference it once and replicate it a few more times while 3D models are slightly more tricky as they require some extra calculations such as light and angles which are heavy resources consumer.
And now the practical stuff!
First lets open Photoshop, Yes photoshop!
What we actually doing is creating a mask for Mixer.
A quick explanation: Black = 0, White = 1, so anything which is black will be almost flat, white anything which is white will be on top or higher.
Lets start by creating a black space of lets say 800x800 pixels.
And now fill in with black, make new layer and create some white lines wish will be our rails.
Now I'm not going to be super accurate with it but feel free to use measurements to get it super correct.
Best way is to use a fixed size rectangular selection tool and duplicate it, ad of course fill it with white, after all our rails are located at the top.
Now you should have something like this:
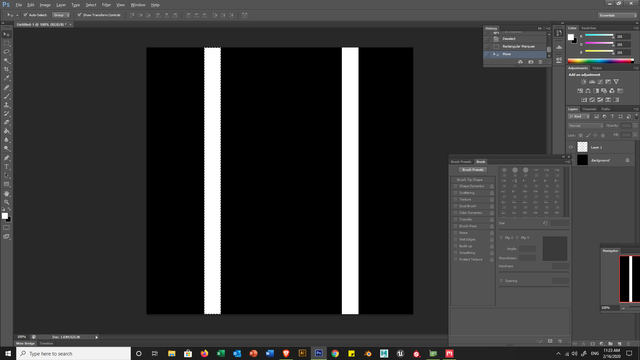
Now lets make the slabs, same as before, new layer and make some relatively wide slabs and space them evenly, tip: Shift+Up or Down arrows to make it snap with even distance.
And fill them with a mid grey colour, and move the layer to be under the rails.
Overall that's it, you can use this BUT let give it slightly more personality.
One way is to use Stroke on the slabs with black colour and use as gradient and make it as Shape Burst from the center.
I do not recommend using Emboss and Bevel though they do make a very nice effect but you are stuck to only Up or Down light.. which is not very great for a "3D" illustion.
Here is my example, I used some Inner Glow and and stroke to make a soft transition of the slabs and on the rail just a light stroke to give it a little "spacing", again I can't make it a complete step by step as it is not a rocket science, be creative and do make mistakes that how you learn a become better!!!
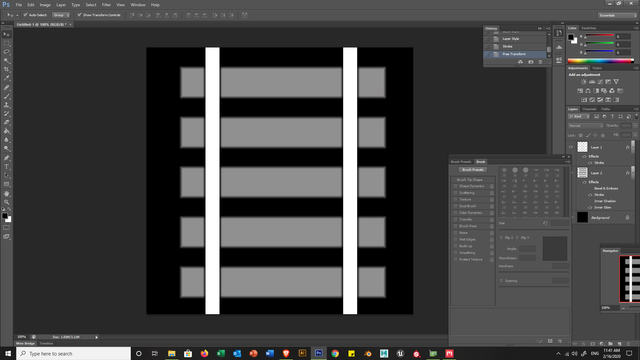
Save the image as a PNG, and it;s important! PNG have all the data Mixer need to understand it's a mask, besides PNG are better the JPG, but heavier...
Now of the fun part, open Mixer!
Make a new mix and same as from the first post, make a new solid layer but this time make ANOTHER solid layer.
Why 2? on the second one look at the bottom of the screen you see a square with a circle in it? click it, it will create a mask on that solid layer.
Now click on the little mask window and again on the square with the circle but this time note there another one on the top and this time it shows many options, lets choose image.
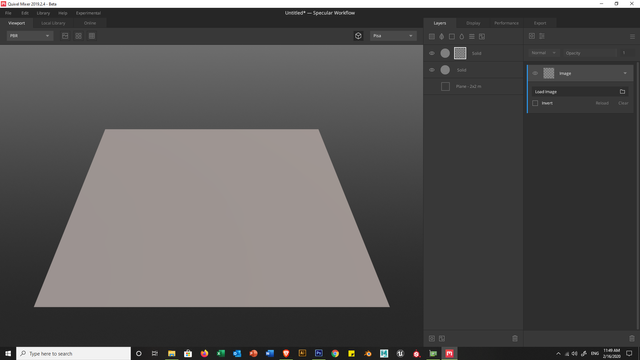
Click load image and put the rail image mask we just created.
If you can barely see it's ok! Click the main sold layer and:
- Blend from Below.
- Push the Wrap to Base all the way to 0.
- Play with the Threshold to the level you see fit.
- And fix with the radius if needed.
And you should get something like this, if you see it flat, don't forget to tick the Displacement button the top left near the PBR drop-down.
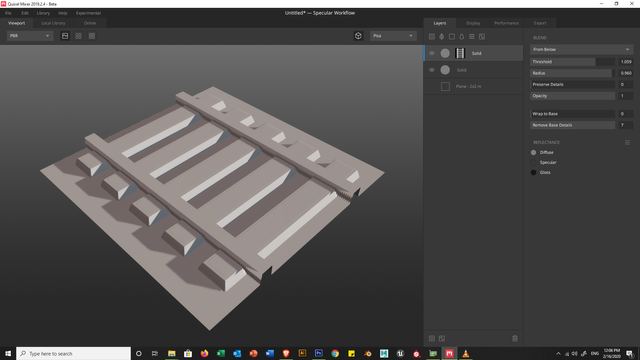
Now, it look slightly rough, lets click back on our mask and choose for the mask modifiers, that is the little sliding bars near the mask image button from before, and add a Blur modifier.
Choose Gaussian and I found 0.06 to fit just right.
Ok, let's add some surfaces!
Hopefully you got some surfaces to your gallery, if not NOW is the time to do it!
Get some nice gravel and wood, also consider some rusty metal or nice shiny metal, don't worry about colours as we can change it later.
Now lets add the first surface, now it is very important we do it in the right way try to always work from the ground up, the reason for that is that it will make more sense and you can make correct changes on the spot rather then go back and start playing with all the layers again...
Now, I added some gravel, I started by Blending from Below and I play a little bit with the Threshold and just a bit with the Radius.
Next I wrapped to base by just a bit 0.3, and I play with the high and low to give the gravel a little more volume.
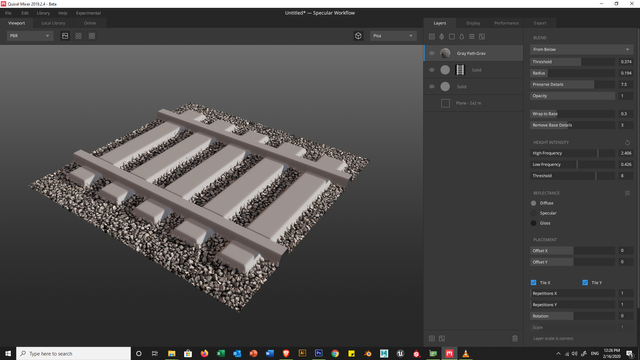
Great! Now lets add the wood, this time I blend from Above, after all we already have the base ballast with the gravel, and I just lightly touch the Threshold and Radius.
Ok, now it get's a little tricky, that the point where we need to "Paint" some on the surface, but to do with we gonna use a Paint Mask, so click the little square with the little line and the bottom of the layer list.
So it's pretty straight forward thing we can notice there is a slight bleeding of the wood to the gravel, so pick up any brush and change the size to fit and "paint" over the gravel, alternatively you can put a mask image of the rail but without the whites and grey, it's all up to you.
Also I do recommend to go over the rails as sometime you might get some wood on the rails and it will look pretty bad...
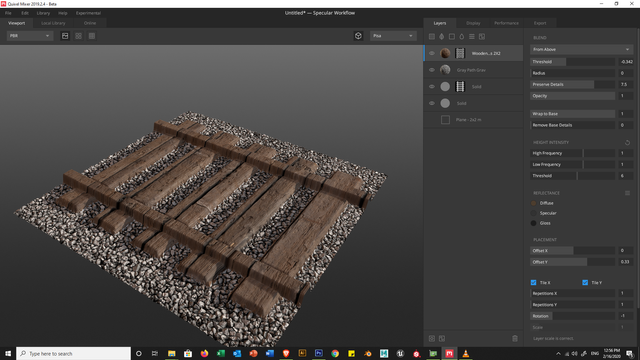
Awesome, it's starting to look like rail tracks.
Same as before, lets put some rusty metal, Blend from above and make a "Paint Mask" and this time paint everything EXCEPT the rails, and play a little with Threshold and Radius just a bit.
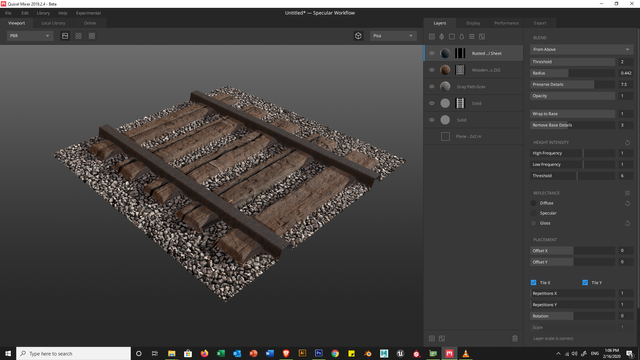
I have optimized the wood little bit to give it more character with the high and lows and I gave them metal bars a little more gloss and change the colour to grey.
Basically that's it. You got a 3D texture without any modeling without any triangles, isn't it great?
Next time ill pump this textures to Unreal Engine to show how these stuff look in real time playing but for now I just gave a little more idea what else you can make in Mixer and this is without any knowledge of 3D modeling yet you make a 3D illusion effect that looks very convincing.
Here I went a little over and added some Moss and Grass to give it more life also painted with some brown colour in the middle of the track to give it a little feeling as if it a well used track so you got this dirt in the middle section.
And add a slight depression on the middle after the slabs are not 100% straight.
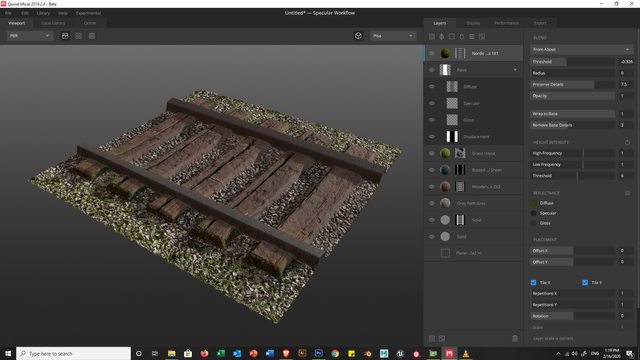
There you have it, feel free to ask question and ill try to answer and again, test, try, fail, do it again, and succeed!
Thanks for reading!
Congratulations @kerulian! You have completed the following achievement on the Steem blockchain and have been rewarded with new badge(s) :
You can view your badges on your Steem Board and compare to others on the Steem Ranking
If you no longer want to receive notifications, reply to this comment with the word
STOPDo not miss the last post from @steemitboard:
Vote for @Steemitboard as a witness to get one more award and increased upvotes!
Downvoting a post can decrease pending rewards and make it less visible. Common reasons:
Submit
@kerulian Wow this work is amazing! The explanation was very detailed and the image capture help to see the work process. Just out of curiosity I will ask you: why do you work with Quixel? Is one program more professional than another? What advantages does it offer you? What has been the most challenging 3D design? ... many questions hahahaha, regars
Downvoting a post can decrease pending rewards and make it less visible. Common reasons:
Submit
Hi, thank for your feedback.
So for your questions:
And compared with other programs such as Substance Painter, it's by far more easy to create textures for large spaces such as environments and buildings and also create procedural generated tiles for game maps.
Downvoting a post can decrease pending rewards and make it less visible. Common reasons:
Submit
Thank you for the kindness to respond. People usually prefer certain programs for easier handling, for more impressive results, for certain properties that other programs do not have, for the use of low resolutions, etc.
It is interesting to know those why?
At some point I would like to see the comparison you will make between two software. Although it is much better to see you create new 3D designs. Regards
Downvoting a post can decrease pending rewards and make it less visible. Common reasons:
Submit
Great Tutorial! Im a Quixel User and i appreciate your good content!
Oh really? I bought it a year ago and it was like 80$ or so. xD
Downvoting a post can decrease pending rewards and make it less visible. Common reasons:
Submit
After being momentarily confused by your title I figured you'd be talking about displacement or normal maps and oh look you're making a displacement map XD That's a pretty cool railway tile, are you going to start putting scenes together after making all these textures? :D
Downvoting a post can decrease pending rewards and make it less visible. Common reasons:
Submit
Hi, thanks for your feedback!
Yes I will, I am currently doing a pretty big project so i'll try today to free some time to make another post with a guide and put some stuff in a scene.
I might upload a game file that could be downloaded and played, not something too fancy, just a demo.
Stay tuned!
Downvoting a post can decrease pending rewards and make it less visible. Common reasons:
Submit
Hi kerulian,
Visit curiesteem.com or join the Curie Discord community to learn more.
Downvoting a post can decrease pending rewards and make it less visible. Common reasons:
Submit