I've been running OSMC on a Raspberry Pi for awhile now. Repositories rise, go bust and then a new one crops up in place of the last one. I just took mine straight back to basics and started from scratch. Here's how it's done.
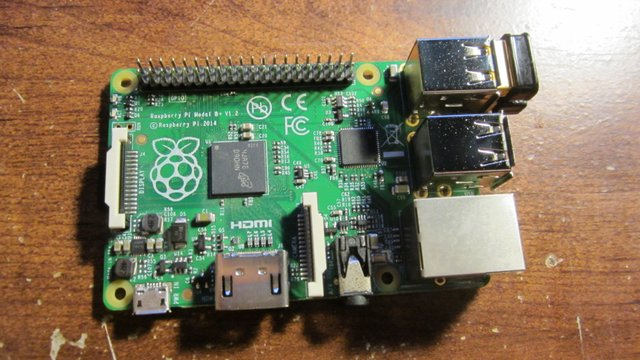
First, you'll need a few things. For starters, you'll need a Raspberry Pi board. For those who don't know what that is, here's a photo:
This is a Raspberry Pi B+, basically, an older model. The Raspberry Pi 2 (the one hooked up to my TV currently running) works but you'll be restricted to Standard Def movies if you don't want it to buffer. I'm upgrading that board as soon as I can.
Second thing you need is a Micro SD card, I recommend about 32GB just to have room.
Here's the list of everything else that are absolute necessities:
A Wireless Keyboard/Mouse combo controller or just a keyboard and mouse you're not using that might be laying around.
A case with a fan or heat sinks for your Raspberry Pi board (Optional)
Wi-Fi USB Dongle (If you have the newer board, you won't need it. The 3 and 3+ models have Wi-Fi and Bluetooth built in)
A Micro USB cellphone charger to power this thing.
An HDMI Cable
That's the physical stuff you'll need. Here's the digital
OSMC http://osmc.tv/downloads
SD Formatter
Etcher
Okay, let's get this bad boy together!
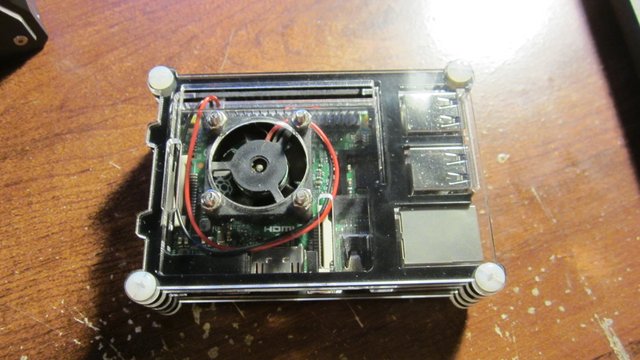
Take your board and put your case on it if you have one. The one I have is a stacked and screwed case with a fan for the CPU like this...
Then, after getting that box put together, stick that MicroSD card into the SD card adapter and stuff it into the SD Card Slot on your computer.
Open SD Formatter and click Options. Choose Full (Erase) from the top dropdown menu and click OK. Then click the button to begin formatting.
Go to OSMC.tv and download the disc image for your particular board. Unzip the file. Contained within that file is your .iso disc image. Put that somewhere you'll know where it is.
Open Etcher and select your disc image. Choose the drive letter for your SD card. Click flash. Let it do its thing there. Might take a minute or two. Not too long.
When that disc image is done flashing to your card, remove your card, take the micro SD card out of the adapter and slap it into the slot on the board. Make sure it clicks when you push it into the slot.
Next, you're going to plug the HDMI cable into the box and the TV. You'll want to go ahead and plug the keyboard and mouse into it as well and then, plug the cellphone charger into the box and then, plug it into your power strip.
OSMC will boot up and do it's thing. It will be installing itself properly on the card and making sure that it is ready to go. Next, it will ask you to choose language, time zone and your personal preferences. Make sure that the box is either plugged in to your router via ethernet cable or that you log into your wi-fi properly.
Finally, we get to the fun part. Don't just start using it just yet, you need to do a few things first. First, find File Manager under Settings. Add Source and then, where it says "None" select that and type http://diggzrepo.ddns.net/ and hit okay. Rename the repository Diggz. Then, back out to the settings menu and head to Add Ons. Select "Install from Zip File" and then select Diggz and you want to click Chef Wizard Installer. Give that a few minutes until a dialogue box pops up that says that the installation is complete. Back out to your main menu and head on over to Programs. Select The Chef program and select Chef Builds. You'll need to pay particular attention to which version of OSMC you have. Select your build based on that one but you want the Xenon build (trust me on this one...worth it) and then head down to Standard Install and select it. Let it install. This might take a few more minutes so grab some tea or coffee and let it to it's thing again. Once it's done, select Force Close and hit it.
Now once it's rebooted and it comes back up, let it finish and you can link it to your Trakt.tv account if you like.
Once it's done...you're in business. Select your movie, play and enjoy.
The reason we've selected the Diggz Repository is because it has literally everything you need to start watching TV and movies.
Congratulations! You've hacked together your own little set top box and you can stream all your favorite stuff. As an aside, I would recommend using a VPN when doing this, just to be safe.
Enjoy!!!!


Congratulations @msgtmac! You received a personal award!
You can view your badges on your Steem Board and compare to others on the Steem Ranking
Vote for @Steemitboard as a witness to get one more award and increased upvotes!
Downvoting a post can decrease pending rewards and make it less visible. Common reasons:
Submit