You have your shiny new manuscript typed out and ready to go, but what do you need to do to get it ready for publication on Amazon?
In Part 1 we covered adding the front matter and the Table of Contents in LibreOffice. In this tutorial, we will insert a map and manually add a link to the Table of Contents, and then format the body of the novel which is the story itself.
Adding a map, and linking it to the Table of Contents (TOC).
As always, we need to add a page break (Insert > Page Break) after the TOC, to create a new section, and to make sure that your formatting doesn't get jumbled. Kindle / eBook pages are dynamic, which means that a page, for example, will contain more text on a tablet, than it will on a phone. This can really mess up your formatting. You don't want the legal text to flow over into your dedication page etc. So always add page breaks, rather than simply clicking enter until you get to the next page.
Please Note: If you choose the 70% royalty option when you publish on Amazon, Amazon will charge you a delivery fee, based on the size of your final document. For this reason you should add as few images as possible, and make sure they aren't huge, or it could eat away all your profits.
Inserting a MAP
To insert the image, click Insert > Image.

Once again, add a Page break after the Map.
It's important for people to be able to access the map quickly and easily, which means that we should add a link in our Table of Contents. In the last section we covered creating a TOC automatically. In this section, I will show you how to add a manual entry.
In order to link a page to your TOC, you need to create a bookmark on the destination page, and then point the TOC to it.
Creating the bookmark.
A bookmark does exactly what it does in the physical world. It saves your place, allowing you to return to that spot quickly and easily.
Above the map, click on the page as though you were going to insert some text. This is where you would like your bookmark to appear.

If the map takes up the entire page, leaving you with no space to click above it, you can simply resize the Map. This will not affect the final result in your eBook.
To do this:
- Click on the map.
- Blue squares will appear on the corners of the image.
- Click and drag one of those squares to resize the image.
Once you have clicked on the top of the page, Select Insert > Bookmark.

Call it whatever you like, but make sure there are no spaces in the name. This kept me scratching my head for a while. So "Map" is okay, but "Map 1" won't be recognized in Kindle Create.
Click OK.

The next step is to add the link into the Table of Contents.
You can edit the TOC as you would edit any other block of text. If you cannot edit the TOC, that means you didn't uncheck "Protected against Manual changes" when you created your TOC. To fix that, right click on the TOC and select "Edit index or table of contents" or "Edit Index" in newer versions of LibreOffice.
Add a new Item into your TOC. You can type whatever you want. I used "Map," no surprises there, but it doesn't have to be the same word you used for your bookmark.

Highlight the item you just added, by Double clicking on it or by click-and-dragging your mouse across it.
Select Insert > Hyperlink.

The Hyperlink panel will allow you to create a link to a website, an email address, an existing document or a new document. (You can use this same panel to add a link to your website or a newsletter signup form at the end of your novel. You could also create a link back to your Amazon page, and ask your readers to leave a quick review if they enjoyed the book) For now though, we want to link to an existing document.
Select Document in the left panel, and click the target selector. (as highlighted in the image below.)

Under "bookmarks," Select the name of the bookmark you inserted earlier. (If you don't see it, click "+" to expand.)

Click Apply, and then OK on the previous dialog to create the link.
You will notice that the link is now blue and underlined, like a link that you would typically find on the internet. You will also notice that it looks different to the other links in the TOC. Don't worry about it. Kindle Create will fix this later.

Please Note: It's important to create all your links before importing your manuscript into Kindle Create. At the moment, KC doesn't allow you to edit links, so if there are any changes, you will have to go back into your word processor and then start the Kindle Create import process all over again. I've wasted a lot of time doing this.
That's all there is to it! you are now ready to dive in to the body of your manuscript.
Formatting the body
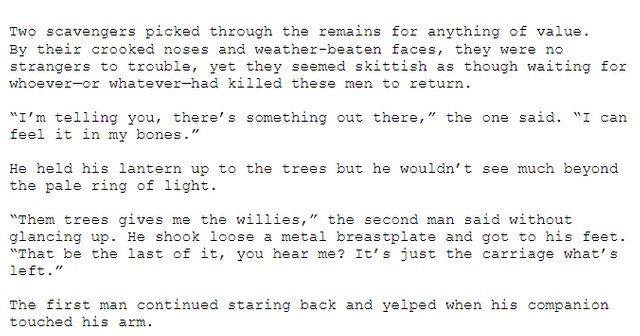
We were always taught in School to insert blank lines between paragraphs. While that's fine for essays, it adds far too many unnecessary pages onto a novel, resulting in higher printing costs. Instead of using blank lines, publishers use first line indents, or tab stops, as illustrated in the images below.
The following is incorrect:

You need to remove the blank lines, and indent the first line of each new paragraph instead:

Note: Do not use actual tab spaces, (as in hitting the tab key.) This will break your formatting, and you will end up with double tab spaces later on. Rather use your word processor's built in tab stops or first-line indenting tools. If you've inserted any tabs, you will need to remove them.
Fortunately, bulk removing tabs is easy enough to do in LibreOffice.
Click on Edit > Find and Replace.

Tabs are considered special characters. To search for them, there are a few things you need to do:
- Type "\t" into the "search for" edit box. This is the code for Tab spaces.
- You then need to tell the program that you are searching for a special character, otherwise it will simply look for the letters: "\t" and probably won't find anything. To do this, click to expand "Other options" at the bottom of the dialog, and make sure that "regular expression" is checked.
- Leave the "Replace with" edit box blank.
- Click "Replace all."
This will remove all the tabs in your document.
Now we will use the word processor to insert the first-line indents instead.
Select all the text in your novel, from "Chapter 1" right to the End.
Note: Ctrl+A will select everything, including the front matter.
An easy way to only select the body is to:
- Click at the beginning of chapter one, as though you were going to type something.
- Scroll to the end of the document.
- Then, holding shift, click the end of the last paragraph, and everything inbetween will be selected.
Select Format > Paragraph.
Make sure you are on the Indents & Spacing tab.

The "first line" spinbox is where you choose how much space to add to the beginning of every paragraph.
Select about 1 - 1.3 cm, or 0.4 - 0.5 inches
Click OK
Your manuscript should now be properly formatted.

It's time to save your document, and head over into Kindle Create.
Please Note: By default, LibreOffice saves an .ODT file, which isn't compatible with Kindle Create. You have to save your file as a .DocX, which is Microsoft Words default file format.
To do this, click file > save as > Under "Save as Type", choose "Microsoft word 2007-2013 XML (.DocX)." In newer versions it may say "Word 2007-2019."
That's enough for today. In part 3, we will finally start working in Kindle Create.
Please subscribe for more tutorials, reviews and my musings on everything fantasy and writing related.
If you enjoyed this tutorial, and would like to check out some of my work, Please visit my Amazon profile.
You can also follow me on Twitter, Minds and Gab.

Chat to you soon!
Congratulations @bradcarsten! You have completed the following achievement on the Steem blockchain and have been rewarded with new badge(s) :
You can view your badges on your Steem Board and compare to others on the Steem Ranking
If you no longer want to receive notifications, reply to this comment with the word
STOPVote for @Steemitboard as a witness to get one more award and increased upvotes!
Downvoting a post can decrease pending rewards and make it less visible. Common reasons:
Submit