You are probably familiar with techniques of sharpen images using High Pass Filter in Photoshop. High Pass filtering also used in sound processing and electronics. Such processing oversaturate high-contrast areas of the image, as though "outlining" the contours. In a broader sense, this technique can also be used for adding more dramatic effect to your image. But today I don’t want to tell about "values for the genre", and show how easily we can achieve a similar effect in Fusion.
Fusion is one of the leading software for compositing, undeservedly forgotten in the past, but now experiencing a rebirth, thanks to the efforts of "Blackmagic Design". Like a many node-based programs, lack of "ready for use" solutions is compensate by the ability to combine different basic nodes into new ones. For example, feature-rich Nuke has a lot of tools, which are combinations of other nodes. And in Blender opposite — only the basic algorithms, spartan atmosphere. Fusion on that score in the middle.
1. Design
So, our main goal — to build a simple node, which gives result as close as possible to Photoshop High Pass filter. Create new comp, and place 7 nodes inside the Flow:
- Loader — Load our original source file
- Blur — Does blur, but for convenience, you can rename it to Radius, it will be more precise.
- Color Curves — Invert our blurred image. So call it — Invert.
- Unsharp Mask — Yes, it’s strange, but this node will be need us for solution.
- Three Merge nodes — One will be the "adapter" between Loader and all others, it will be needed later. The second — collect the overlay image, the third — mix it with the original. For convenience, let’s call them: Input, HighPass and Result.
Combine these nodes in the same order as shown in Figure 1. Yellow arrow — Input/Background, green — Foreground.
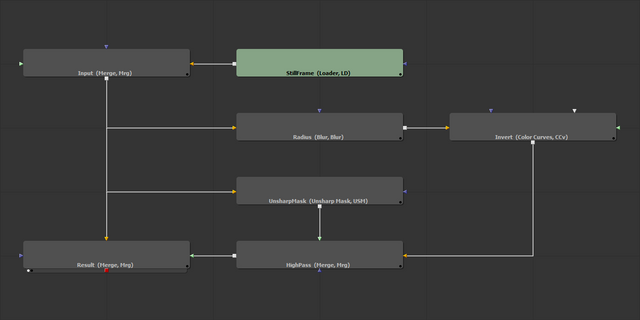 Fig. 1. Node tree.
But should to say I didn’t come to this simple, concise form immediately. In the beginning I tried to realize it with two nodes Channel Boolean, with blending Add and Divide, mixing them onto neutral background. This method has peeped in Nuke, but it used other blending methods, which not presented in Fusion, but the logic was the same. Later, I gave up the background in favor of a simple mix 50/50. In the end, it was found that no difference between these two approaches. I get the same overlay mask. So I decided that will describe only the short version. It is unlikely that there is an application where an algorithm can’t be implemented.
Now let us consider setting for created nodes. For convenience, I have illustrated the most important, noting the critical areas by a red frame, I will describe only some of the nuances, and then we will look specifically at node Unsharp Mask.
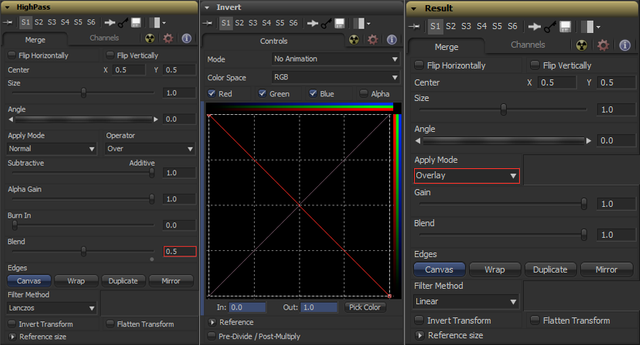 Fig. 2. Setting for HighPass (Merge), Invert (Color Curves), Result (Merge) nodes.
If you are use 8-bit source, it’s important to set the Color Depth to Float16 / Float32. Otherwise, Blur will cut the brightness, and the correct result is not achieved.
By default, the node Blur and Color Curves affect all three color channels and the alpha, we don’t want it, so uncheck the box next Alpha, before making changes.
In order not to bother with the curve, you can simply select all points (Ctrl + A), and then press V (Reverse).
Here we are getting to the most interesting — node Unsharp Mask. Once we get the output image from our node-group, it becomes obvious that Blur in Fusion works differently as opposed to High Pass Filter algorithm in Photoshop. We get the desired "illumination" on the edges, but the fine details are hopelessly smoothed. Below I’ll show you how it looks.
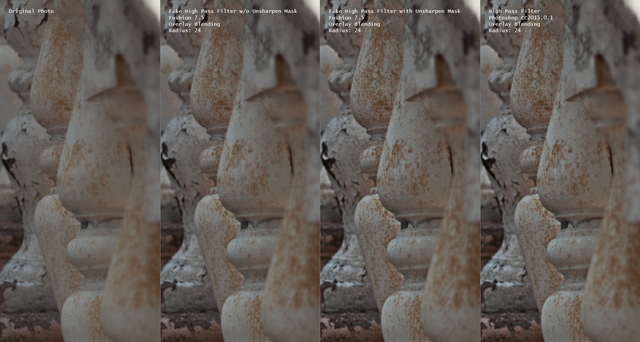 Fig. 3. Left to right: original; fake High Pass without Unsharp Mask; Unsharp Mask enabled; filter inPhotoshop with equivalent Radius value.
However, simply sharpen the source image isn’t enough, sharpness should be in direct proportion to the value of Radius. Type "= Radius.XBlurSize / 2.48" into Size input of Unsharp Mask panel, without the quotes. It will create a simple expression. As you may remember, Radius — is the name of our Blur node, and may be different in your case. The 2.48 number is not some constant value, I figured it by brute force, while white level on Difference blend become the lowest possible.
2. Node Building
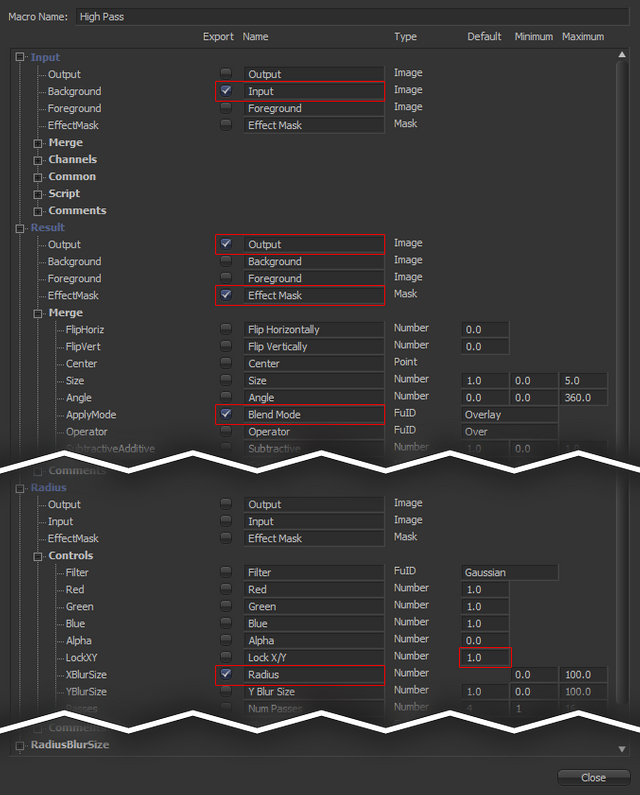
Fig. 4. Create Macro dialog window.
Now that most of the work done, we need to build macros from our nodes. To do this, select all nodes except Loader, right-click on one of them, then select Macro -> Create Macro. In the window that appears, check the boxes as shown in Figure 4. I did ApplyMode active to be able to change the blending mode. But should be noted that it doesn’t produce the same effect as Photoshop. Soft Light algorithm calculate colors differently, and make image darken. Save our macros to directory:
"C:\Users\Public\Documents\Blackmagic Design\Fusion\Macros" (for Windows Seven/Vista), or
"C:\Documents and Settings\All Users\Documents\Blackmagic Design\Fusion\Macros" (for Windows XP), C— letter of your system drive, or
"Documents\Blackmagic Design\Fusion\Macros" (for Mac OS). Now you can call it like other common tools, through context menu Add Tool -> Macros -> HighPass or by "search" (Ctrl + Space).
3. Conclusion
Of course, this is only imitation of effect, and it doesn’t give 100% match. Perhaps may seem that one Unsharp Mask node could be enough to increase the sharpness. But it sharpens too much. And absolutely unnecessary to screw masks and make magic with Gain and Threshold slides, when I know what want to achieve. Moreover, using of High Pass are more or less universally, wherever possible to blend layers, on the other hand, sharps filters/nodes/magic in other applications may looks and works differently. But I already said too much, so will allow you to verify the result on illustrative examples:
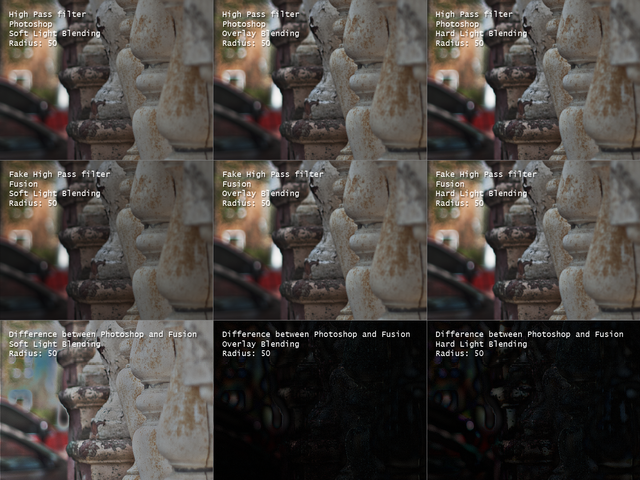 Fig. 5. Comparison of true High Pass filter in Photoshop, and ours fake Fusion analogue.
For the purity of the experiment, images were converted into a linear color space. I reduced the white threshold too much on Difference blends to make it more noticeable. As you can see, Soft Light in Fusion is something completely different than same in Photoshop or After Effects, but in the other two modes the differences are almost invisible by eye. For the most lazy, here is the code of created macro:
{
	Tools = ordered() {
		HighPass = MacroOperator {
			Inputs = ordered() {
				MainInput1 = InstanceInput {
					SourceOp = "Input",
					Source = "Background",
					Name = "Input",
				},
				Input2 = InstanceInput {
					SourceOp = "Result",
					Source = "ApplyMode",
					Name = "Blend Mode",
				},
				Input3 = InstanceInput {
					SourceOp = "Radius",
					Source = "XBlurSize",
					Name = "Radius",
					Default = 1,
				},
				Input1 = InstanceInput {
					SourceOp = "Result",
					Source = "EffectMask",
				},
			},
			Outputs = {
				MainOutput1 = InstanceOutput {
					SourceOp = "Result",
					Source = "Output",
				},
			},
			ViewInfo = GroupInfo {
				Name = "High Pass",
				Pos = { 0, 0, },
			},
			Tools = ordered() {
				Input = Merge {
					CtrlWShown = false,
					NameSet = true,
					Inputs = {
						PerformDepthMerge = Input { Value = 0, },
					},
					ViewInfo = OperatorInfo { Pos = { 495, 808.5, }, },
				},
				Result = Merge {
					CtrlWShown = false,
					NameSet = true,
					Inputs = {
						Background = Input {
							SourceOp = "Input",
							Source = "Output",
						},
						Foreground = Input {
							SourceOp = "HighPassNode",
							Source = "Output",
						},
						ApplyMode = Input { Value = FuID { "Overlay", }, },
						PerformDepthMerge = Input { Value = 0, },
					},
					ViewInfo = OperatorInfo { Pos = { 495, 907.5, }, },
				},
				Radius = Blur {
					CtrlWZoom = false,
					CtrlWShown = false,
					NameSet = true,
					Inputs = {
						ProcessAlpha = Input { Value = 0, },
						Alpha = Input { Value = 0, },
						XBlurSize = Input {
							SourceOp = "RadiusBlurSize",
							Source = "Value",
						},
						Input = Input {
							SourceOp = "Input",
							Source = "Output",
						},
					},
					ViewInfo = OperatorInfo { Pos = { 605, 841.5, }, },
				},
				UnsharpMask = UnsharpMask {
					CtrlWShown = false,
					NameSet = true,
					Inputs = {
						Alpha = Input { Value = 0, },
						XSize = Input {
							Value = 5,
							Expression = "Radius.XBlurSize/2.54",
						},
						Input = Input {
							SourceOp = "Input",
							Source = "Output",
						},
					},
					ViewInfo = OperatorInfo { Pos = { 605, 874.5, }, },
				},
				HighPassNode = Merge {
					CtrlWShown = false,
					NameSet = true,
					Inputs = {
						Blend = Input { Value = 0.5, },
						Background = Input {
							SourceOp = "Invert",
							Source = "Output",
						},
						Foreground = Input {
							SourceOp = "UnsharpMask",
							Source = "Output",
						},
						FilterMethod = Input { Value = 8, },
						PerformDepthMerge = Input { Value = 0, },
					},
					ViewInfo = OperatorInfo { Pos = { 605, 907.5, }, },
				},
				Invert = ColorCurves {
					PickColor = true,
					CtrlWZoom = false,
					CtrlWShown = false,
					NameSet = true,
					Inputs = {
						EditAlpha = Input { Value = 0, },
						Red = Input {
							SourceOp = "InvertRed",
							Source = "Value",
						},
						Green = Input {
							SourceOp = "InvertGreen",
							Source = "Value",
						},
						Blue = Input {
							SourceOp = "InvertBlue",
							Source = "Value",
						},
						Alpha = Input {
							SourceOp = "InvertAlpha",
							Source = "Value",
						},
						NumberOfSamplesOnMatchCurve = Input { Value = 64, },
						IgnoreTransparent = Input { Value = 1, },
						Input = Input {
							SourceOp = "Radius",
							Source = "Output",
						},
					},
					ViewInfo = OperatorInfo { Pos = { 715, 841.5, }, },
					Tools = {
						InvertGreen = LUTBezier {
							KeyColorSplines = {
								[0] = {
									[0] = { 1, RH = { 0.333333333333333, 0.666666666666667, }, Flags = { Linear = true, }, },
									[1] = { 0, LH = { 0.666666666666667, 0.333333333333333, }, Flags = { Linear = true, }, },
								},
							},
							SplineColor = { Red = 0, Green = 255, Blue = 0, },
							CtrlWShown = false,
							NameSet = true,
						},
						InvertRed = LUTBezier {
							KeyColorSplines = {
								[0] = {
									[0] = { 1, RH = { 0.333333333333333, 0.666666666666667, }, Flags = { Linear = true, }, },
									[1] = { 0, LH = { 0.666666666666667, 0.333333333333333, }, Flags = { Linear = true, }, },
								},
							},
							SplineColor = { Red = 255, Green = 52, Blue = 52, },
							CtrlWShown = false,
							NameSet = true,
						},
						InvertAlpha = LUTBezier {
							KeyColorSplines = {
								[0] = {
									[0] = { 0, RH = { 0.333333333333333, 0.333333333333333, }, Flags = { Linear = true, }, },
									[1] = { 1, LH = { 0.666666666666667, 0.666666666666667, }, Flags = { Linear = true, }, },
								},
							},
							SplineColor = { Red = 204, Green = 204, Blue = 204, },
							CtrlWShown = false,
							NameSet = true,
						},
						InvertBlue = LUTBezier {
							KeyColorSplines = {
								[0] = {
									[0] = { 1, RH = { 0.333333333333333, 0.666666666666667, }, Flags = { Linear = true, }, },
									[1] = { 0, LH = { 0.666666666666667, 0.333333333333333, }, Flags = { Linear = true, }, },
								},
							},
							SplineColor = { Red = 68, Green = 68, Blue = 255, },
							CtrlWShown = false,
							NameSet = true,
						},
					},
				},
			},
		},
	},
	ActiveTool = "HighPass",
}
Hi! I am a content-detection robot. I found similar content that readers might be interested in:
http://mozg-studio.org/blog/making-high-pass-node-in-fusion/
Downvoting a post can decrease pending rewards and make it less visible. Common reasons:
Submit