.jpg)
I just completed 4th week of course 5 in 2 days.
What I (We) learn in the 4th week of this course?
In the fourth week of this course, we'll learn about secure network architecture. It's important to know how to implement security measures on a network environment, so we'll show you some of the best practices to protect an organization's network. We'll learn about some of the risks of wireless networks and how to mitigate them. We'll also cover ways to monitor network traffic and read packet captures. By the end of this module, you'll understand how VPNs, proxies and reverse proxies work; why 802.1X is a super important for network protection; understand why WPA/WPA2 is better than WEP; and know how to use tcpdump to capture and analyze packets on a network. That's a lot of information, but well worth it for an IT Support Specialist to understand!
To Join this course click on the link below
.jpg)
Google IT Support Professional Certificate http://bit.ly/2JONxKk
Our main objectives.
- Implement security measures on a network environment.
- Understand the risks of wireless networks and how to mitigate them.
- Understand how to monitor network traffic and read packet captures.
Meet Our trainer(s) for Course 5

Gian Spicuzza
His name is Gian Spicuzza, and I'm the Program Manager in Android Security. He helps protect Androids, two billion plus devices, by managing and driving new security features for each Android design release or versions of Android.
Theory covered in Week 4
1. Network Hardening Best Practices
Congrats on getting this far, you're over halfway through the course, and so close to completing the program. In this section, we'll cover ways few to harden your networks. Network hardening is the process of securing a network by reducing its potential vulnerabilities through configuration changes, and taking specific steps. In the next few lessons, we'll do a deep dive on the best practices that an IT support specialist should know for implementing network hardening. We'll also discuss network security protection along with network monitoring and analysis. There's a general security principle that can be applied to most areas of security, it's the concept of disabling unnecessary extra services or restricting access to them. Since any service that's enabled and accessible can be attacked, this principle should be applied to network security too. Networks would be much safer if you disable access to network services that aren't needed and enforce access restrictions. Implicit deny is a network security concept where anything not explicitly permitted or allowed should be denied. This is different from blocking all traffic, since an implicit deny configuration will still let traffic pass that you've defined as allowed, you can do this through Akhil configurations. This can usually be configured on a firewall which makes it easier to build secure firewall rules. Instead of requiring you to specifically block all traffic you don't want, you can just create rules for traffic that you need to go through. You can think of this as whitelisting, as opposed to blacklisting. While this is slightly less convenient, it's a much more secure configuration. Before a new service will work, a new rule must be defined for it reducing convenience a bit. If you want to learn more about how to configure a firewall rules and Linux and other implementations, take a look at the references in the supplementary reading. Another very important component of network security is monitoring and analyzing traffic on your network. There are a couple of reasons why monitoring your network is so important. The first is that it lets you establish a baseline of what your typical network traffic looks like. This is key because in order to know what unusual or potential attack traffic looks like, you need to know what normal traffic looks like. You can do this through network traffic monitoring and logs analysis. We'll dive deeper into what network traffic monitoring is a bit later, but let's quickly summarize how laws can be helpful in this context. Analyzing logs is the practice of collecting logs from different network and sometimes client devices on your network, then performing an automated analysis on them. This will highlight potential intrusions, signs of malware infections or a typical behavior. You'd want to analyze things like firewall logs, authentication server logs, and application logs. As an IT support specialist, you should pay close attention to any external facing devices or services. They're subject to a lot more potentially malicious traffic which increases the risk of compromise. Analysis of logs would involve looking for specific log messages of interests, like with firewall logs. Attempted connections to an internal service from an untrusted source address may be worth investigating. Connections from the internal network to known address ranges of Botnet command and control servers could mean there's a compromised machine on the network. As you learned in earlier courses of this program, log and analysis systems are a best practice for IT supports specialists to utilize and implement. This is true too for network hardening. Logs analysis systems are configured using user-defined rules to match interesting or a typical log entries. These can then be surfaced through an alerting system to let security engineers investigate the alert. Part of this alerting process would also involve categorizing the alert, based on the rule matched. You'd also need to assign a priority to facilitate this investigation and to permit better searching or filtering. Alerts could take the form of sending an email or an SMS with information, and a link to the event that was detected. You could even wake someone up in the middle of the night if the event was severe enough. Normalizing logged data is an important step, since logs from different devices and systems may not be formatted in a common way. You might need to convert log components into a common format to make analysis easier for analysts, and rule-based detection systems, this also makes correlation analysis easier.
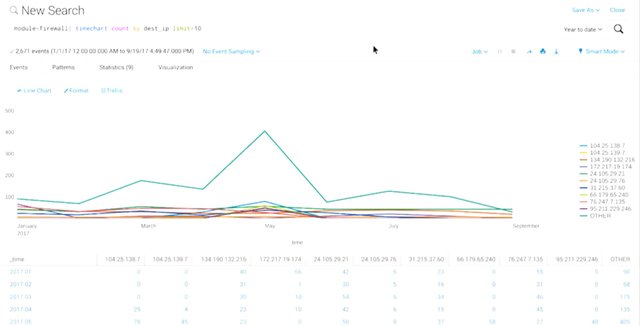
Correlation analysis is the process of taking log data from different systems, and matching events across the systems. So, if we see a suspicious connection coming from a suspect source address and the firewall logs to our authentication server, we might want to correlate that logged connection with the log data of the authentication server. That would show us any authentication attempts made by the suspicious client. This type of logs analysis is also super important in investigating and recreating the events that happened once a compromise is detected. This is usually called a post fail analysis, since it's investigating how a compromise happened after the breach is detected. Detailed logging and analysis of logs would allow for detailed reconstruction of the events that led to the compromise. Hopefully, this will let the security team make appropriate changes to security systems to prevent further attacks. It could also help determine the extent and severity of the compromise. Detailed logging would also be able to show if further systems were compromised after the initial breach. It would also tell us whether or not any data was stolen, and if it was, what that data was. One popular and powerful logs analysis system is Splunk, a very flexible and extensible log aggregation and search system.
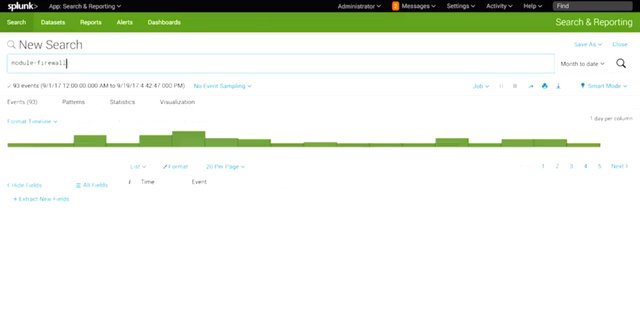
Splunk can grab logs data from a wide variety of systems, and in large amounts of formats. It can also be configured to generate alerts, and allows for powerful visualization of activity based on logged data. You can read more about Splunk and the supplementary readings in this lesson. Flood guards provide protection against Dos or denial of service attacks. Think back to the CIA triad we covered earlier, availability is an important tenet of security and is exactly what Flood guard protections are designed to help ensure.
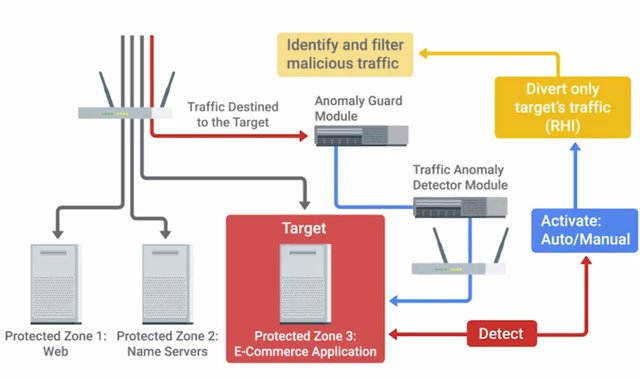
This works by identifying common flood attack types like sin floods or UDP floods. It then triggers alerts once a configurable threshold of traffic is reached. There's another threshold called the activation threshold. When this one is reached, it triggers a pre-configured action. This will typically block the identified attack traffic for a specific amount of time. This is usually a feature on enterprise grade routers or firewalls, though it's a general security concept. A common open source flood guard protection tool is failed to ban. It watches for signs of an attack on a system, and blocks further attempts from a suspected attack address.
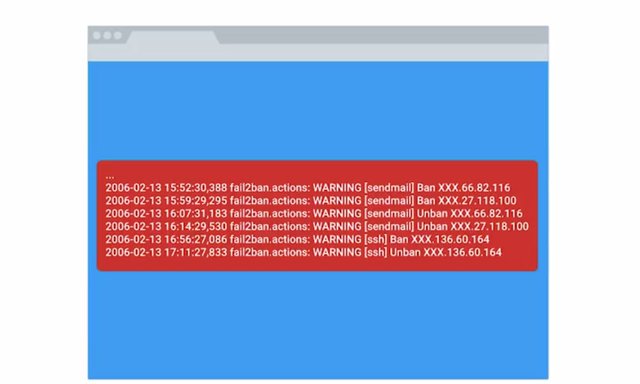
Fail to ban is a popular tool for smaller scale organizations. So, if you're the sole IT support specialist in your company or have a small fleet of machines, this can be a helpful tool to use. Network separation or network segmentation is a good security principle for an IT support specialists to implement. It permits more flexible management of the network, and provides some security benefits.
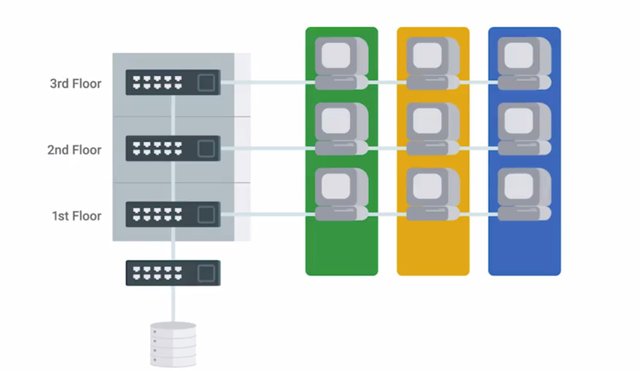
This is the concept of using VLANs to create virtual networks for different device classes or types. Think of it as creating dedicated virtual networks for your employees to use, but also having separate networks for your printers to connect to. The idea here is that the printers won't need access to the same network resources that employees do. It probably doesn't make sense to have the printers on the employee network. You might be wondering how employees are supposed to print if the printers are on a different network. It's actually one of the benefits of network separation, since we can control and monitor the flow of traffic between networks more easily. To give employees access to printers, we'd configure routing between the two networks on our routers. We'd also implement network ackles that permit the appropriate traffic.
For more information on this check out the following links:
Cisco IOS firewall rules https://www.cisco.com/c/en/us/td/docs/security/security_management/cisco_security_manager/security_manager/4-1/user/guide/CSMUserGuide_wrapper/fwaccess.html
Juniper firewall rules
https://www.juniper.net/documentation/en_US/junos/topics/usage-guidelines/services-configuring-stateful-firewall-rules.html
Iptables firewall rules
https://www.digitalocean.com/community/tutorials/iptables-essentials-common-firewall-rules-and-commands
UFW firewall rules
https://www.digitalocean.com/community/tutorials/ufw-essentials-common-firewall-rules-and-commands
Configuring Mac OS X firewall
https://support.apple.com/en-us/HT201642
Microsoft firewall rules
https://technet.microsoft.com/en-us/library/cc754274(v=ws.11).aspx
2. Network Hardware Hardening
we'll cover some ways that an IT Support Specialist can implement network hardware hardening. We talked about general network hardening, and now we're going to dive deeper into more specific tools and techniques for hardening a network. We'll pay close attention to features and options available on networking infrastructure hardware. In an earlier lesson on networking, we explored DHCP. It's the protocol where devices on a network are assigned critical configuration information for communicating on the network.
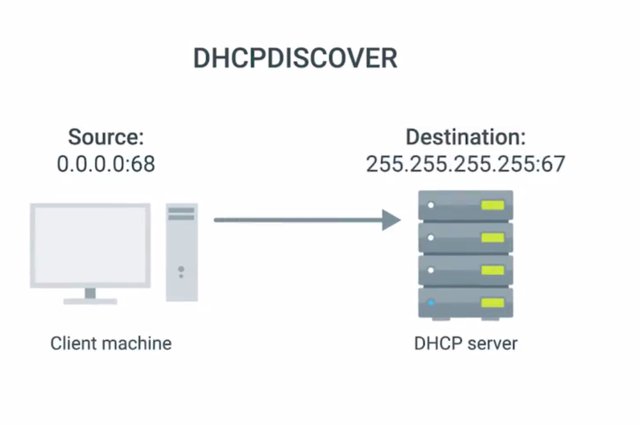
You also learned about configuring DHCP in another course of this program. So, you can see how DHCP is a target of attackers because of the important nature of the service it provides. If an attacker can manage to deploy a rogue DHCP server on your network, they could hand out DHCP leases with whatever information they want. This includes setting a gateway address or DNS server, that's actually a machine within their control. This gives them access to your traffic and opens the door for future attacks. We call this type of attack a rogue DHCP server attack. To protect against this rogue DHCP server attack, enterprise switches offer a feature called DHCP snooping. A switch that has DHCP snooping will monitor DHCP traffic being sent across it. It will also track IP assignments and map them to hosts connected to switch ports. This basically builds a map of assigned IP addresses to physical switch ports.
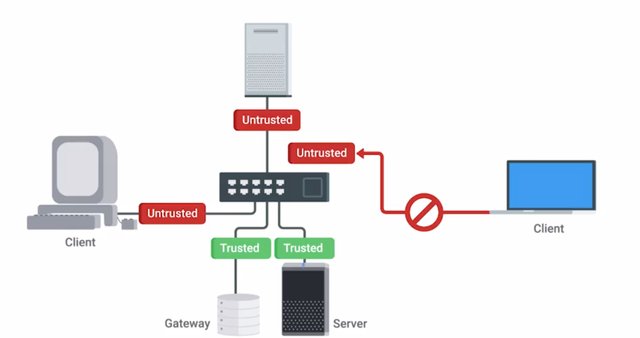
This information can also be used to protect against IP spoofing and are poisoning attacks. DHCP snooping also makes you designate either a trusted DHCP server IP, if it's operating as a DHCP helper, and forwarding DHCP requests to the server, or you can enable DHCP snooping trust on the uplinked port, where legitimate DHCP responses would now come from. Now any DHCP responses coming from either an untrusted IP address or from a downlinked switch port would be detected as untrusted and discarded by the switch. Let's talk about another form of network hardware hardening, Dynamic ARP inspection. We covered ARP earlier from the how does it function standpoint. ARP allows for a layer to men-in-the-middle attack because of the unauthenticated nature of ARP. It allows an attacker to forge an ARP response, advertising its MAC address as the physical address matching a victim's IP address. This type of ARP response is called a gratuitous ARP response, since it's effectively answering a query that no one made. When this happens, all of the clients on the local network segment would cache this ARP entry. Because of the forged ARP entry, they send frames intended for the victim's IP address to the attacker's machine instead. The attacker could enable IP forwarding, which would let them transparently monitor traffic intended for the victim. They could also manipulate or modify data. Dynamic ARP inspection or DAI is another feature on enterprise switches that prevents this type of attack. It requires the use of DHCP snooping to establish a trusted binding of IP addresses to switch ports.
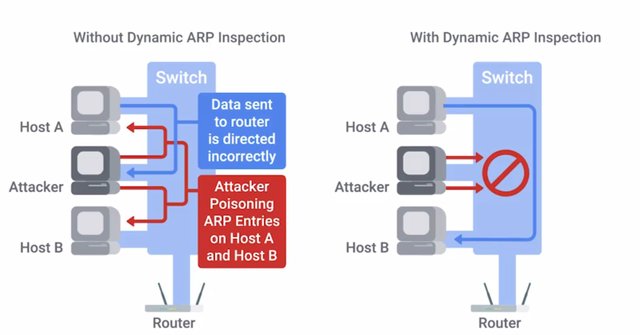
DAI will detect these forged gratuitous ARP packets and drop them. It does this because it has a table from DHCP snooping that has the authoritative IP address assignments per port. DAI also enforces great limiting of ARP packets per port to prevent ARP scanning. An attacker is likely to ARP scan before attempting the ARP attack. To prevent IP spoofing attacks, IP source guard or IPSG can be enabled on enterprise switches along with DHCP snooping. If you're an IT Support Specialist at a small company that uses enterprise-class switch hardware, you'll probably utilize IPSG. It works by using the DHCP snooping table to dynamically create ackles for each switchboard. This drops packets that don't match the IP address for the port based on the DHCP snooping table. Now, if you really want to lock down your network, you can implement 802.1X. We've added details about how to configure this in the supplementary reading. But for now, let's discuss this at a high level. It's important for an IT Support Specialist to be aware of 802.1X. This is the IEEE standard for encapsulating EAP or Extensible Authentication Protocol traffic over the 802 networks. This is also called EAP over LAN or EAPOL, it was originally designed for Ethernet but support was added for other network types like Wi-Fi and fiber networks. We won't go into the details of all EAP authentication types supported. There are about 100 compatible types, so it would take way too long. But we'll take a closer look at EAP-TLS since it's one of the more common and secure EAP methods. When a client wants to authenticate to a network using 802.1X, there are three parties involved. The client device is what we call the supplicant. It's sometimes also used to refer to the software running on the client machine that handles the authentication process for the user. The open source Linux utility wpa_supplicant is one of those.
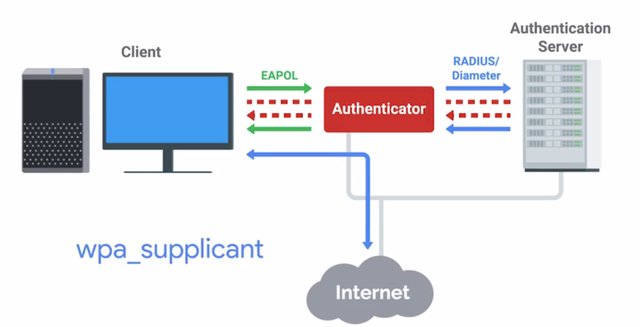
The supplicant communicates with the authenticator, which acts as a sort of gatekeeper for the network. It requires clients to successfully authenticate to the network before they're allowed to communicate with the network. This is usually an enterprise switch or an access point in the case of wireless networks. It's important to call out that while the supplicant communicates with the authenticator, it's not actually the authenticator that makes the authentication decision. The authenticator acts like a go between and forwards the authentication request to the authentication server. That's where the actual credential verification and authentication occurs. The authentication server is usually a radio server. EAP-TLS is an authentication type supported by EAP that uses TLS to provide mutual authentication of both the client and the authenticating server. This is considered one of the more secure configurations for wireless security, so it's definitely possible that you'll encounter this authentication type in your IT career. Like with many of these protocols, understanding how it works can help you if you need to troubleshoot. You might remember from Course 4 that HTTPS is a combination of the hypertext transfer protocol, HTTP, with SSL-TLS cryptographic protocols.
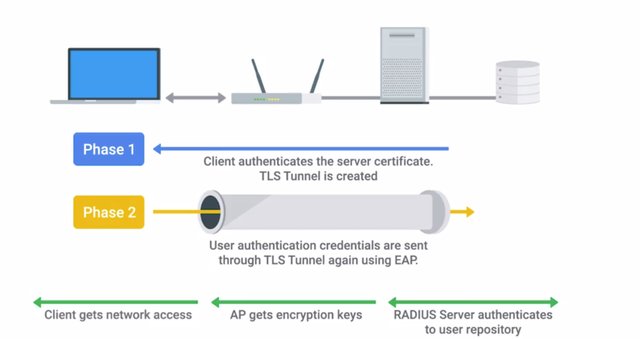
When TLS is implemented for HTTPS traffic, it specifies a client's certificate as an optional factor of authentication. Similarly, most EAP-TLS implementations require client-side certificates. Authentication can be certificate-based, which requires a client to present a valid certificate that's signed by the authenticating CA, or a client can use a certificate in conjunction with a username, password, and even a second factor of authentication, like a one-time password. The security of EAP-TLS stems from the inherent security that the TLS protocol and PKI provide. That also means that the pitfalls are the same when it comes to properly managing PKI elements. You have to safeguard private keys appropriately and ensure distribution of the CA certificate to client devices to allow verification of the server-side. Even more secure configuration for EAP-TLS would be to bind the client-side certificates to the client platforms using TPMs. This would prevent theft of the certificates from client machines. When you combine this with FTE, even theft of a computer would prevent compromise of the network. We're covering a lot of complex processes right now. If you're really interested in implementing these processes yourself or want to dive into even more details about how it all works, check out the supplementary readings for this lesson. Keep in mind, as an IT Support Specialist, you don't need to know every single step-by-step detail here. Knowing what these processes are and how they work can be very beneficial while troubleshooting and evaluating infrastructure security.
3. Network Software Hardening
Hey, welcome back. In the last lesson, we covered network hardware hardening security measures. Which you should be aware of as an IT support specialist. Now, we're going to shift to network software hardening techniques. Just like with network hardware hardening, it is important for you to know how to implement network software hardening, which includes things like firewalls, proxies, and VPNs. These security software solutions will play an important role in securing networks and their traffic for your organization. Like we mentioned before, firewalls are critical to securing a network. They can be deployed as dedicated network infrastructure devices, which regulate the flow of traffic for a whole network. They can also be host-based as software that runs on a client system providing protection for that one host only. It's generally recommended to deploy both solutions. A host-based firewall provides protection for mobile devices such as a laptop that could be used in an untrusted, potentially malicious environment like an airport Wi-Fi hotspot. Host-based firewalls are also useful for protecting other hosts from being compromised, by corrupt device on the internal network. That's something a network-based firewall may not be able to help defend against.

You will almost definitely encounter host-based firewalls since all major operating systems have built in ones today. It's also very likely that your company will have some kind of network-based firewall. Your router at home even has a network-based firewall built in. VPNs are also recommended to provide secure access to internal resources for mobile or roaming users. We went over the details of VPNs and how they work in securing network traffic. If you need a refresher, feel free to revisit that again. We won't go back over all the details, but here's a quick rundown. VPNs are commonly used to provide secure remote access, and link two networks securely. Let's say we have two offices located in buildings that are on opposite sides of town. We want to create one unified network that would let users in each location, seamlessly connect to devices and services in either location. We could use a site to site VPN to link these two offices. To the people in the offices, everything would just work.
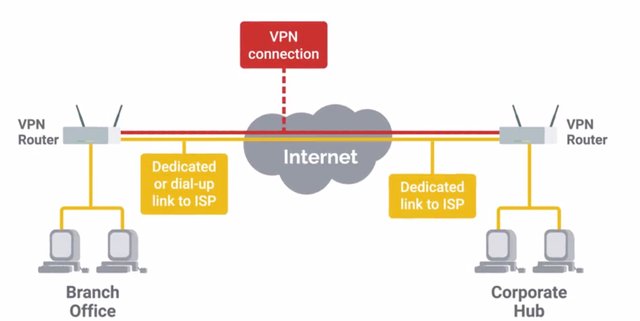
They'd be able to connect to a service hosted in the other office without any specific configuration. Using a VPN tunnel, all traffic between the two offices can be secured using encryption. This lets the two remote networks join each other seamlessly. This way, clients on one network can access devices on the other without requiring them to individually connect to a VPN service. Usually, the same infrastructure can be used to allow remote access VPN services for individual clients that require access to internal resources while out of the office. Proxies can be really useful to protect client devices and their traffic. They also provide secure remote access without using a VPN. A standard web proxy can be configured for client devices. This allows web traffic to be proxied through a proxy server that we control for lots of purposes. This configuration can be used for logging web requests of client devices. The devices can be used for logs, and traffic analysis, and forensic investigation. The proxy server can be configured to block content that might be malicious, dangerous, or just against company policy. A reverse proxy can be configured to allow secure remote access to web based services without requiring a VPN. Now, as an IT. support specialist, you may need to configure or maintain a reverse proxy service as an alternative to VPN. By configuring a reverse proxy at the edge of your network, connection requests to services inside the network coming from outside, are intercepted by the reverse proxy. They are then forwarded on to the internal service with the reverse proxy acting as a relay. This bridges communications between the remote client outside the network and the internal service.
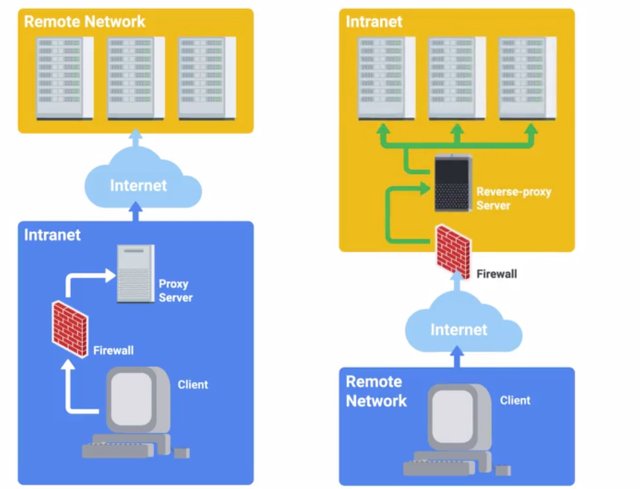
This proxy setup can be secured even more by requiring the use of client TLS certificates, along with username and password authentication. Specific ACLs can also be configured on the reverse proxy to restrict access even more. Lots of popular proxy solutions support a reverse proxy configuration like HAProxy, Nginx, and even the Apache Web Server.
4. WEP Encryption and Why You Shouldn't Use It
In this lesson, we'll cover the best practices for implementing wireless security. As an IT support specialist, you'll be responsible for WiFi configuration and infrastructure. So understanding the security options available for wireless networks is super important to making sure that the best solution is chosen.
We already covered the nuts and bolts of the wireless 802.11 protocol and explained how wireless networks work, so we won't rehash that. But we'll take a closer look at the security implementations available to protect wireless networks. Before we jump into the nitty-gritty details of wireless security, take a second and ask yourself this question, what do you think the best security option is for securing a WiFi network?
It's okay if you're not sure, just keep this question in mind as we go over all the options available along with their benefits and drawbacks. Spoiler alert, there's some pretty technical security stuff coming your way, so put your thinking caps on. The first security protocol introduced for Wi-Fi networks was WEP or Wired Equivalent Privacy. It was part of the original 802.11 standard introduced back in 1997. WEP was intended to provide privacy on par with the wired network, that means the information passed over the network should be protected from third parties eavesdropping. This was an important consideration when designing the wireless specification.
Unlike wired networks, packets could be intercepted by anyone with physical proximity to the access point or client station. Without some form of encryption to protect the packets, wireless traffic would be readable by anyone nearby who wants to listen. WEP was proven to be seriously bad at providing confidentiality or security for wireless networks. It was quickly discounted in 2004 in favor of more secure systems. Even so, we'll cover it here for historical purposes. I want to drive home the point that no one should be using WEP anymore. You never know, you may see seriously outdated systems when working as an IT support specialist. So it's important that you fully understand why WEP is outdated and what you can do instead.
WEP use the RC4 symmetric stream cipher for encryption. It used either a 40-bit or 104-bit shared key where the encryption key for individual packets was derived. The actual encryption key for each packet was computed by taking the user-supplied shared key and then joining a 24-bit initialization vector or IV for short.
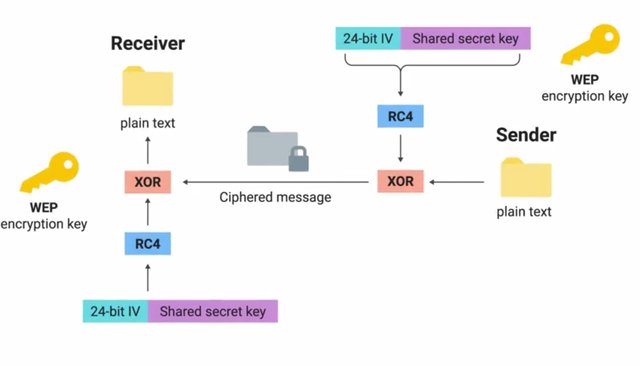
It's a randomized bit of data to avoid reusing the same encryption key between packets. Since these bits of data are concatenated or joined, a 40-bit shared key scheme uses a 64-bit key for encryption and the 104-bit scheme uses a 128-bit key. Originally, WEP encryption was limited to 64-bit only because of US export restrictions placed on encryption technologies.
Now once those laws were changed, 128-bit encryption became available for use. The shared key was entered as either 10 hexadecimal characters for 40-bit WEP, or 26 hex characters for 104-bit WEP. Each hex character was 4-bits each. The key could also be specified by supplying 5 ASCII characters or 13, each ASCII character representing 8-bits. But this actually reduces the available keyspace to only valid ASCII characters instead of all possible hex values. Since this is a component of the actual key, the shared key must be exactly as many characters as appropriate for the encryption scheme. WEP authentication originally supported two different modes, Open System authentication and Shared Key authentication. The open system mode didn't require clients to supply credentials. Instead, they were allowed to authenticate and associate with the access point. But the access point would begin communicating with the client encrypting data frames with the pre-shared WEP key. If the client didn't have the key or had an incorrect key, it wouldn't be able to decrypt the frames coming from the access point or AP.
It also wouldn't be able to communicate back to the AP.
Shared key authentication worked by requiring clients to authenticate through a four-step challenge response process. This basically has the AP asking the client to prove that they have the correct key.
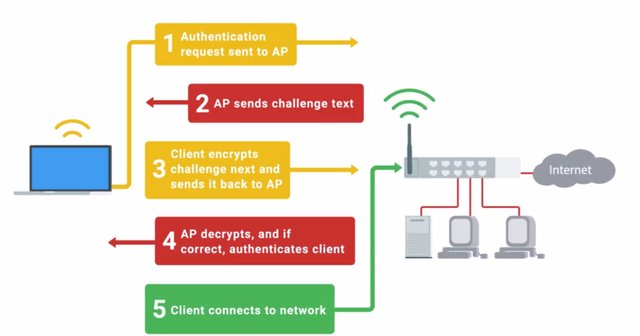
Here's how it works. The client sends an authentication request to the AP. The AP replies with clear text challenge, a bit of randomized data that the client is supposed to encrypt using the shared WEP key. The client replies to the AP with the resulting ciphertext from encrypting this challenge text. The AP verifies this by decrypting the response and checking it against the plain text challenge text. If they match, a positive response is sent back.
Does anything jump out at you as potentially insecure in the scheme? We're transmitting both the plain text and the ciphertext in a way that exposes both of these messages to potential eavesdroppers. This opens the possibility for the encryption key to be recovered by the attacker.
A general concept in security and encryption is to never send the plain text and ciphertext together, so that attackers can't work out the key used for encryption. But WEP's true weakness wasn't related to the authentication schemes, its use of the RC4 stream cipher and how the IVs were used to generate encryption keys led to WEP's ultimate downfall. The primary purpose of an IV is to introduce more random elements into the encryption key to avoid reusing the same one. When using a stream cipher like RC4, it's super important that an encryption key doesn't get reused. This would allow an attacker to compare two messages encrypted using the same key and recover information. But the encryption key in WEP is just made up of the shared key, which doesn't change frequently. It had 24-bits of randomized data, including the IV tucked on to the end of it. This results in only a 24-bit pool where unique encryption keys will be pulled from and used.
Since the IV is made up of 24-bits of data, the total number of possible values is not very big by modern computing standards. That's only about 17 million possible unique IVs, which means after roughly 5,000 packets, an IV will be reused. When an IV is reused, the encryption key is also reused.
It's also important to call out that the IV is transmitted in plain text. If it were encrypted, the receiver would not be able to decrypt it. This means an attacker just has to keep track of IVs and watch for repeated ones. The actual attack that lets an attacker recover the WEP key relies on weaknesses in some IVs and how the RC4 cipher generates a keystream used for encrypting the data payloads. This lets the attacker reconstruct this keystream using packets encrypted using the weak IVs. The details of the attack are outside what we'll cover in this course, but the full paper detailing the attack is available in the supplementary readings if you want to check it out.
You could also take a look at open source tools that demonstrate this attack in action, like Aircrack-ng or AirSnort, they can recover a WEP key in a matter of minutes, it's kind of terrifying to think about. So now you've heard the technical reasons why WEP is inherently vulnerable to attacks. , we'll talk about the solution that replaced WEP. But before we get there, you might be asking yourself why it's important to know WEP, since it's not recommended for use anymore. Well, as an IT support specialist, you might encounter some cases where legacy hardware is still running WEP. It's important to understand the security implications of using this broken security protocol so you can prioritize upgrading away from WEP.
5. Let's Get Rid of WEP! WPA/WPA2
The replacement for WEP from the Wi-Fi Alliance was WPA or Wi-Fi Protected Access. It was introduced in 2003 as a temporary measure while the alliance finalized their specification for what would become WPA2 introduced in 2004. WPA was designed as a short-term replacement that would be compatible with older WEP-enabled hardware with a simple firmware update. This helped with user adoption because it didn't require the purchase of new Wi-Fi hardware. To address the shortcomings of WEP security, a new security protocol was introduced called TKIP or the Temporal Key Integrity Protocol. TKIP implemented three new features that made it more secure than WEP. First, a more secure key derivation method was used to more securely incorporate the IV into the per packet encryption key. Second, a sequence counter was implemented to prevent replay attacks by rejecting out of order packets. Third, a 64-bit MIC or Message Integrity Check was introduced to prevent forging, tampering, or corruption of packets. TKIP still use the RC4 cipher as the underlying encryption algorithm. But it addressed the key generation weaknesses of WEP by using a key mixing function to generate unique encryption keys per packet.
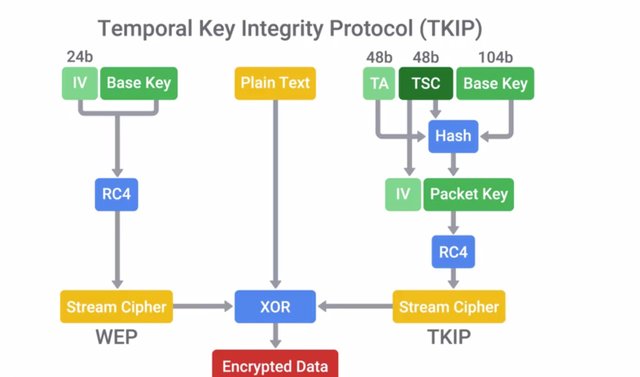
It also utilizes 256 bit long keys. This key mixing function incorporates the long live the Wi-Fi passphrase with the IV. This is different compared to the simplistic concatenation of the shared key and IV. Under WPA, the pre-shared key is the Wi-Fi password you share with people when they come over and want to use your wireless network. This is not directly used to encrypt traffic. It's used as a factor to derive the encryption key. The passphrase is fed into the PBKDF2 or Password-Based Key Derivation Function 2, along with the Wi-Fi networks SSID as a salt. This is then run through the HMAC-SHA1 function 4096 times to generate a unique encryption key. The SSID salt is incorporated to help defend against rainbow table attacks. The 4096 rounds of HMAC-SHA1 Increase the computational power required for a brute force attack. I should call out that the pre-shared key can be entered using two different methods. A 64 character hexadecimal value can be entered, or the 64 character value is used as the key, which is 64 hexadecimal characters times four bits, which is 256 bits. The other option is to use PBKDF2 function but only if entering ASCII characters as a passphrase. If that's the case, the passphrase can be anywhere from eight to 63 characters long. WPA2 improve WPA security even more by implementing CCMP or Counter Mode CBC-MAC Protocol. WPA2 is the best security for wireless networks currently available, so it's really important to know as an I.T. Support Specialist. It's based on the AES cipher finally getting away from the insecure RC4 cipher. The key derivation process didn't change from WPA, and the pre-shared key requirements are the same. Counter with CBC-MAC is a particular mode of operation for block ciphers. It allows for authenticated encryption, meaning data is kept confidential, and is authenticated. This is accomplished using an authenticate, then encrypt mechanism. The CBC-MAC digest is computed first. Then, the resulting authentication code is encrypted along with the message using a block cipher.
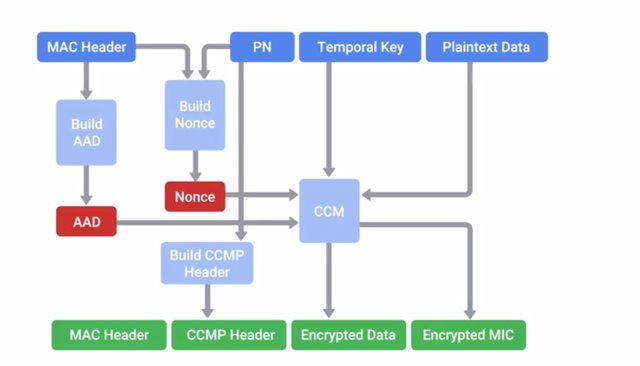
We're using AES in this case, operating in counter mode. This turns a block cipher into a stream cipher by using a random seed value along with an incrementing counter to create a key stream to encrypt data with. Now, let's walk through the Four-Way Handshake process that authenticates clients to the network. I should call out, that while you might not encounter this in your day to day work, it's good to have a grasp on how the authentication process works. It will help you understand how WPA2 can be broken. This process also generates the temporary encryption key that will be used to encrypt data for this client. This process is called the Four-Way Handshake, since it's made up of four exchanges of data between the client and AP. It's designed to allow an AP to confirm that the client has the correct pairwise master key, or pre-shared key in a WPA-PSK setup without disclosing the PMK. The PMK is a long live key and might not change for a long time. So an encryption key is derived from the PMK that's used for actual encryption and decryption of traffic between a client and AP. This key is called the Pairwise Transient Key or PTK. The PTK is generating using the PMK, AP nonce, Client nonce, AP MAC address, and Client MAC address. They're all concatenated together, and run through a function. The AP and Client nonces are just random bits of data generated by each party and exchanged. The MAC addresses of each party would be known through the packet headers already, and both parties should already have the correct PMK. With this information, the PTK can be generated. This is different for every client to allow for confidentiality between clients. The PTK is actually made up of five individual keys, each with their own purpose. Two keys are used for encryption and confirmation of EAPoL packets, and the encapsulating protocol carries these messages. Two keys are used for sending and receiving message integrity codes. And finally, there's a temporal key, which is actually used to encrypt data. The AP will also transmit the GTK or Groupwise Transient Key. It's encrypted using the EAPoL encryption key contained in the PTK, which is used to encrypt multicast or broadcast traffic. Since this type of traffic must be readable by all clients connected to an AP, this GTK is shared between all clients. It's updated and retransmitted periodically, and when a client disassociates the AP. That's a lot to take in, so let's recap. The four messages exchanged in order are, the AP, which sends a nonce to the client, the Client, then sends its nonce to the AP, the AP, sends the GTK, and the Client replies with an Ack confirming successful negotiation.
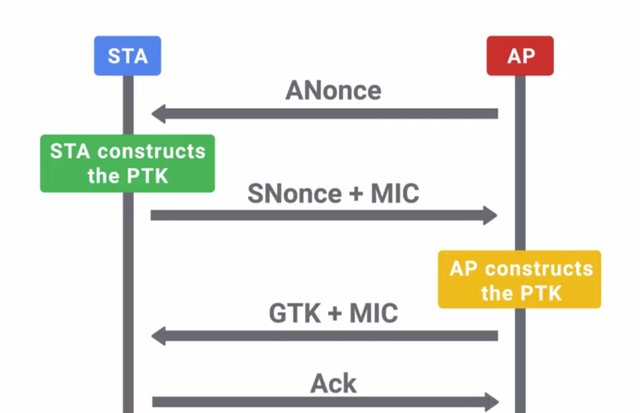
The WPA and WPA2 standard also introduce an 802.1x authentication to Wi-Fi networks. It's usually called WPA2-Enterprise. The non-802.1x configurations are called either WPA2-Personal or WPA2-PSK, since they use a pre-shared key to authenticate clients. We won't rehash 802.1x here since it operates similarly to 802.1x on wire networks, which we covered earlier. The only thing different is that the AP acts as the authenticator in this case. The back-end radius is still the authentication server and the PMK is generated using components of the EAP method chosen. While not a security feature directly, WPS or Wi-Fi protected setup is a convenience feature designed to make it easier for clients to join a WPA-PSK protected network. You might encounter WPS in a small IT shop that uses commercial SOHO routers. It can be useful in these smaller environments to make it easier to join wireless clients to the wireless networks securely. But there are security implications to having enabled that you should be aware of. The Wi-Fi Alliance introduced WPS in 2006. It provides several different methods that allow our wireless client to securely join a wireless network without having to directly enter the pre-shared key. This facilitates the use of very long and secure passphrases without making it unnecessarily complicated. Can you imagine having to have your less technically inclined friends and family enter a 63-character passphrase to use your Wi-Fi when they come over? That probably wouldn't go so well. WPS simplifies this by allowing for secure exchange of the SSID and pre-shared key. This is done after authenticating or exchanging data using one of the four supported methods. WPS supports PIN entry authentication, NFC or USB for out of banned exchange of the network details, or push-button authentication. You've probably seen the push-button mechanism. It's typically a small button somewhere on the home router with two arrows pointing counter-clockwise. The push-button mechanism works by requiring a button to be pressed on both the AP side and the client side.
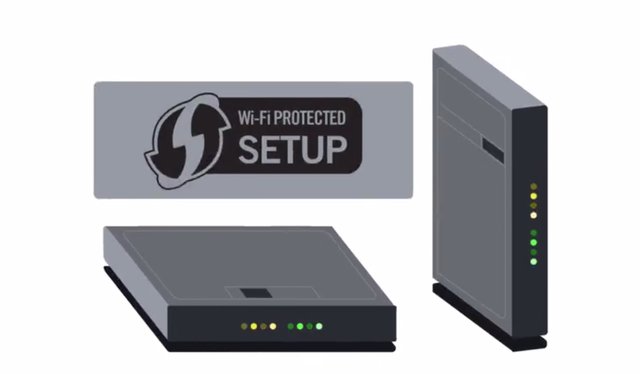
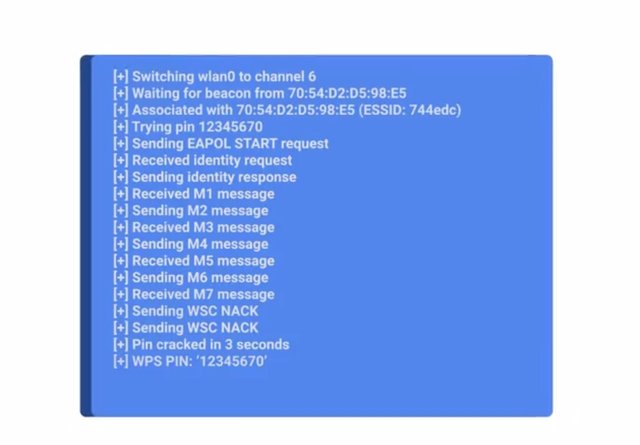
This requires physical proximity and a short window of time that the client can authenticate with a button press of its own. The NFC and USB methods just provide a different channel to transmit the details to join the network. The PIN methods are really interesting and also where critical flaw was introduced. The PIN authentication mechanism supports two modes. In one mode, the client generates a PIN which is then entered into the AP, and the other mode, the AP has a PIN typically hard-coded into the firmware which is entered into the client. It's the second mode that is vulnerable to an online brute force attack. Feel free to dive deep into this by reading more about it in the supplementary readings. The PIN authentication method uses PINs that are eight-digits long, but the last digit is a checksum that's computed from the first seven digits. This makes the total number of possible PINs 10 to the seventh power or around 10 million possibilities. But the PIN is authenticated by the AP in halves. This means the client will send the first four digits to the AP, wait for a positive or negative response, and then send the second half of the PIN if the first half was correct. Did you see anything wrong with this scenario? We're actually reducing the total possible valid PINs even more and making it even easier to guess what the correct PIN is. The first half of the PIN being four digits has about 10,000 possibilities. The second half, only three digits because of the checksum value, has a maximum of only 1,000 possibilities. This means the correct PIN can be guessed in a maximum of 11,000 tries. It sounds like a lot, but it really isn't. Without any rate limiting, an attacker could recover the PIN and the pre-shared key in less than four hours. In response to this, the Wi-Fi Alliance revised the requirements for the WPS specification, introducing a lockout period of one minute after three incorrect PIN attempts. This increases the maximum time to guess the PIN from four hours to less than three days. That's easily in the realm of possibility for a determined and patient attacker, but it gets worse. If your network is compromised using this attack because the PIN is an unchanging element that's part of the AP configuration, the attacker could just reuse the already recovered WPS PIN to get the new password. This would happen even if you detected unauthorized wireless clients on your network and changed your Wi-Fi password.
WPA2 is a really robust security protocol. It's built using best in class mechanisms to prevent attacks and ensure the confidentiality of the data it's protecting. Even so, it's susceptible to some forms of attack. The four-way authentication handshake that we covered earlier is actually susceptible to an offline brute force attack. If an attacker can manage to capture the four-way handshake process just for packets, they can begin guessing the pre-shared key or PMK. They can take the nonces and MAC addresses from the four-way handshake packets and computing PTKs. Sends the message authentication code, secret keys are included as part of the PTK. The correct PMK guess would yield a PTK that successfully validates a mike.
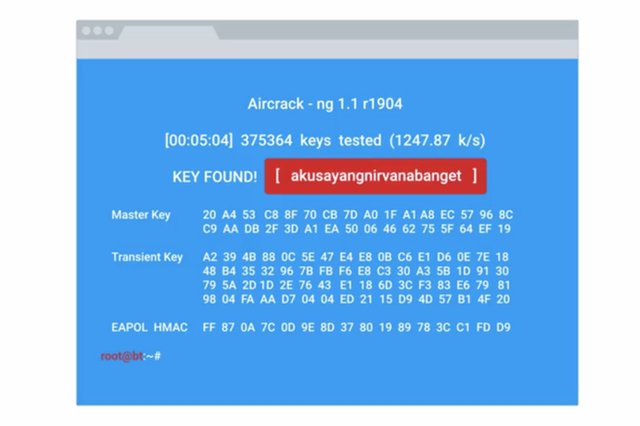
This is a brute force or dictionary-based attack, so it's dependent on the quality of the password guesses. It does require a fair amount of computational power to calculate the PMK from the passphrase guesses and SSID values. But the bulk of the computational requirements lie in the PMK computation. This requires 4096 iterations of a hashing function, which can be massively accelerated through the use of GPU-accelerated computation and cloud computing resources. Because of the bulk of the computations involving computing the PMK, by incorporating the password guesses with the SSIDs, it's possible to pre-compute PMKs in bulk for common SSIDs and password combinations. This reduces the computational requirements to deriving the PTK from the unique session elements. These pre-computed sets are referred to as rainbow tables and exactly this has been done. Rainbow tables are available for download for the top 1000 most commonly seen SSIDs and 1 million passwords.
This is Part 1 of Week 4 For Part 2 Click here : http://bit.ly/2NUgdIh
To Join this course click on the link below
.jpg)
Google IT Support Professional Certificate http://bit.ly/2JONxKk
LInks to previous weeks Courses.
[Week 3] Google IT Support Professional Certificate #32 | Course 5 IT Security: Defense against the digital dark arts
http://bit.ly/2pesAAQ
[Week 2] Google IT Support Professional Certificate #30 | Course 5 IT Security: Defense against the digital dark arts {Part 1}
http://bit.ly/2x9ffgQ
[Week 1] Google IT Support Professional Certificate #29 | Course 5 IT Security: Defense against the digital dark arts
http://bit.ly/2x8hulk
Google IT Support Professional Certificate #0 | Why you should do this Course? | All details before you join this course.
http://bit.ly/2Oe2t8p
#steemiteducation #Computerscience #education #Growwithgoogle #ITskills #systemadministration #itprofessional
#googleitsupportprofessional
Atlast If you are interested in the IT field, this course, or want to learn Computer Science. If you want to know whats in this course, what skills I learned Follow me @hungryengine. I will guide you through every step of this course and share my knowledge from this course daily.
Support me on this journey and I will always provide you with some of the best career knowledge in Computer Science field.

There are a few different ways you can assign leads to employees dynamically. One option is to use a round robin system, in which all the leads are equally distributed among the employees and also you can see it here to get essay writing course there. Another option is to use fields in the employee's profile to determine which leads should go to which employees.
Downvoting a post can decrease pending rewards and make it less visible. Common reasons:
Submit