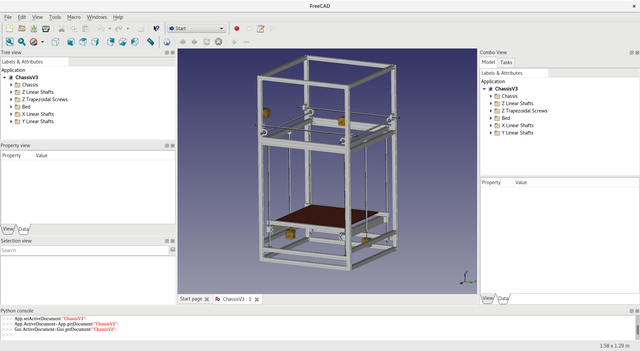
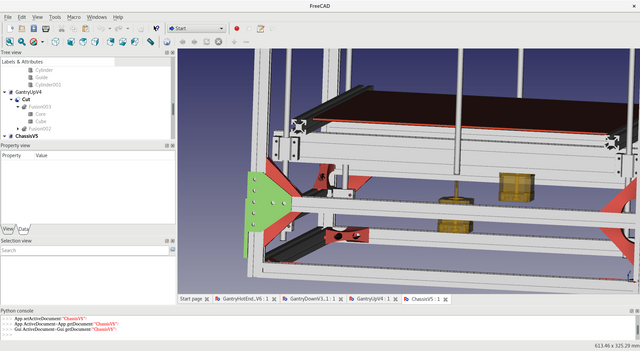
Preparing, planning is useful to build a big picture of what should be done, but of course you need a loose plan and not overdo it. You need to have flexibility and room to fix your mistakes.
In this part, I discuss this. I am using an opensource CAD software called FreeCAD (https://www.freecadweb.org/) to build some drafts of what the 3D Printer could be.
Foot print
I had a very precise idea about the footprint that I was looking for: 1000 mm height, and about 500 to 600 mm for the width and length. The printer should not be too big to move from one room, or being able to put in a car. It does not make sense to reduce too much the height: ability to test different solutions, add new features.
Bed Support, Z Axis
The bed support is simply composed of two 2040 500mm and a few 2020. It uses 4 rods, 2 ACME screws and 2 Steppers.

I do not like the cantilever to support the bed, this design cannot scale with medium to large size bed. There is too much slack, vibration, instability even if you are using larger components. I have a K8200/3DRag with a very long cantilever (about 400mm) for the Z Axis, that is really a disaster for accuracy and repeatability. I just put 8mm rods for the moment.
The Z-Axis uses common SH8/SK8 supports, SC8 bearing supports, and the 2 ACME rods use a KFL08 bearing each.
This simple design can be adjusted very easily from small bed 200mm to a large 400mm.

The inspiration for this goes to the Big Box 3D Printer (https://www.kickstarter.com/projects/e3dbigbox/the-e3d-bigbox-3d-printer) and the FolgerTech FT-5 (https://folgertech.com/products/folger-tech-ft-5-large-scale-3d-printer-kit).
XY Gantry
The XY Gantry is based on an Ultimaker inspired Gantry using 8mm rods with Brass Bushings. The Gantry is external to the chassis to ease maintenance, maximize the internal volume and allow to build an enclosure where most of the electronic components are outside of it. I had a look to the classic gantry, H-Bot and Core XY. For the classic gantry the problem is obvious, the weight of the stepper motor. For H-Bot and Core XY, I have few issues with the complexity of the belt paths, additional idlers, the total weight and the need of several 3D Printed parts.
The Gantry is built using 8mm rods, Brass Bearings, KP08 Pillow Block Bearings that are nice because you can really block the rod with the integrated screw and you can turn the bearing to adjust it. Also, those components are widely available, cost effective and full metal.
It is easy with this external design to tinker around, you can put really big stepper motors, you can add more stepper motors.
In the forthcoming part, I will talk about parts and sourcing such parts.

Great Idea!
I like people who want to build a 3d printer itself! I also build me a 3d printer, but it isn´t such a great machine like yours. I just have a rebuild of the legendary Prusa I3, which I think is acceptable as Hobby. What do you think, is this type of construction better than the construction of the Prusa I3, or why do you select such a "strange" way?
Downvoting a post can decrease pending rewards and make it less visible. Common reasons:
Submit
Thanks ! This is an Ultimaker gantry with a different Z axis.
On a Prusa you have to move both the heat bed and the hotend. On this one you just have the hotend that moves, less weight, less inertia, better acceleration. The bigger it gets the more weight you have to move on the Prusa while it is less in the case on this design.
Dual Z leadscrew is a bit better than the single Z to avoid the heatbed to move, it is the same idea that you have on the Prusa for the Z axis, because if there is no leadscrew on the other side there is always some slack and the longer it gets it is way worth: introduce source of vibration, inconsistent layers.
If I have to upgrade/rebuild one, I will probably put MGN12 for all linear guides, it starts to be cheaper from a price point of view.
Downvoting a post can decrease pending rewards and make it less visible. Common reasons:
Submit
Congratulations @boucaron! You have completed some achievement on Steemit and have been rewarded with new badge(s) :
Click on any badge to view your own Board of Honor on SteemitBoard.
For more information about SteemitBoard, click here
If you no longer want to receive notifications, reply to this comment with the word
STOPDownvoting a post can decrease pending rewards and make it less visible. Common reasons:
Submit
Great, your making me keen to start one. Going to reuse what I can from my Prusa clone, to make something similar to yours.
Downvoting a post can decrease pending rewards and make it less visible. Common reasons:
Submit
Happy to hear that ! I will try to upload the next part soon.
What CAD are you using ? Do you need the draft CAD files to think about what you can do ?
Downvoting a post can decrease pending rewards and make it less visible. Common reasons:
Submit
AutoCad is the main one I use. But things like this I generally go to paper, old school, lol
Downvoting a post can decrease pending rewards and make it less visible. Common reasons:
Submit