Different innovations; building robots, began already ages ago until this present time. Infact, some countries were already using robots as a useful machine for industry purposes and other innovative projects. If we imagine how the world could be seeing robots scattered in different places with different functions then life would be much easier. Somehow, disadvantages and crisis in making and using those machines always have its way beneath everything. Before anything else, let us first define what a robot is and how it can be constructed.
Robot Definition
A robot is a machine especially one programmable by a computer capable of carrying out a complex series of actions automatically. Robots can be guided by an external control device or the control may be embedded within. Robots may be constructed to take on human form but most robots are machines designed to perform a task with no regard to how they look. -- Wikipedia
Robots started to shutter during 4th century and were innovated by ancient inventors and engineers. During those days, their knowledges in building robots were just limited and not that innovative. However, as generation rises, many inventions were flourished and initiated with different operations. Robots have been friendly machines with human interventions. They used it as a tool to make their work easier; faster; as well as accurately. Most people think that somehow if the world would be too much ignited with technologies, people living on earth might have been replaced by robots. Eventhough there are lots of predictions about robot's generation but inventors still propagate more automated technologies.
Robot Project Making.
Last week, we were given a task to construct a soccer robot as our final project of the semester. Basically, this soccer robot does not refer to a robot that has feet and hands but rather a car automated by servo motors which were programmed to kick and push a ball.
Overview of the Project Output
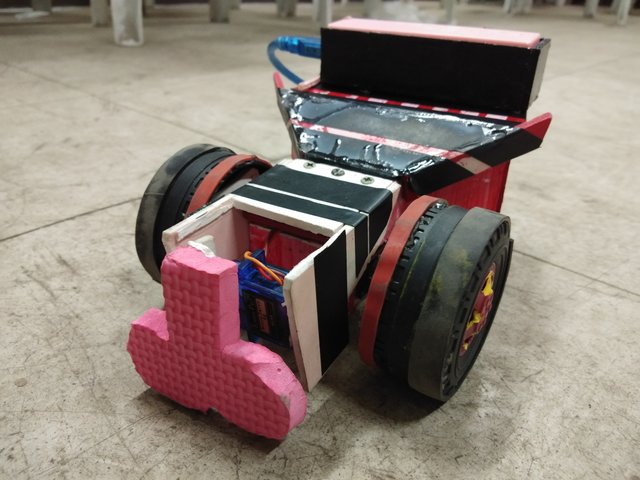
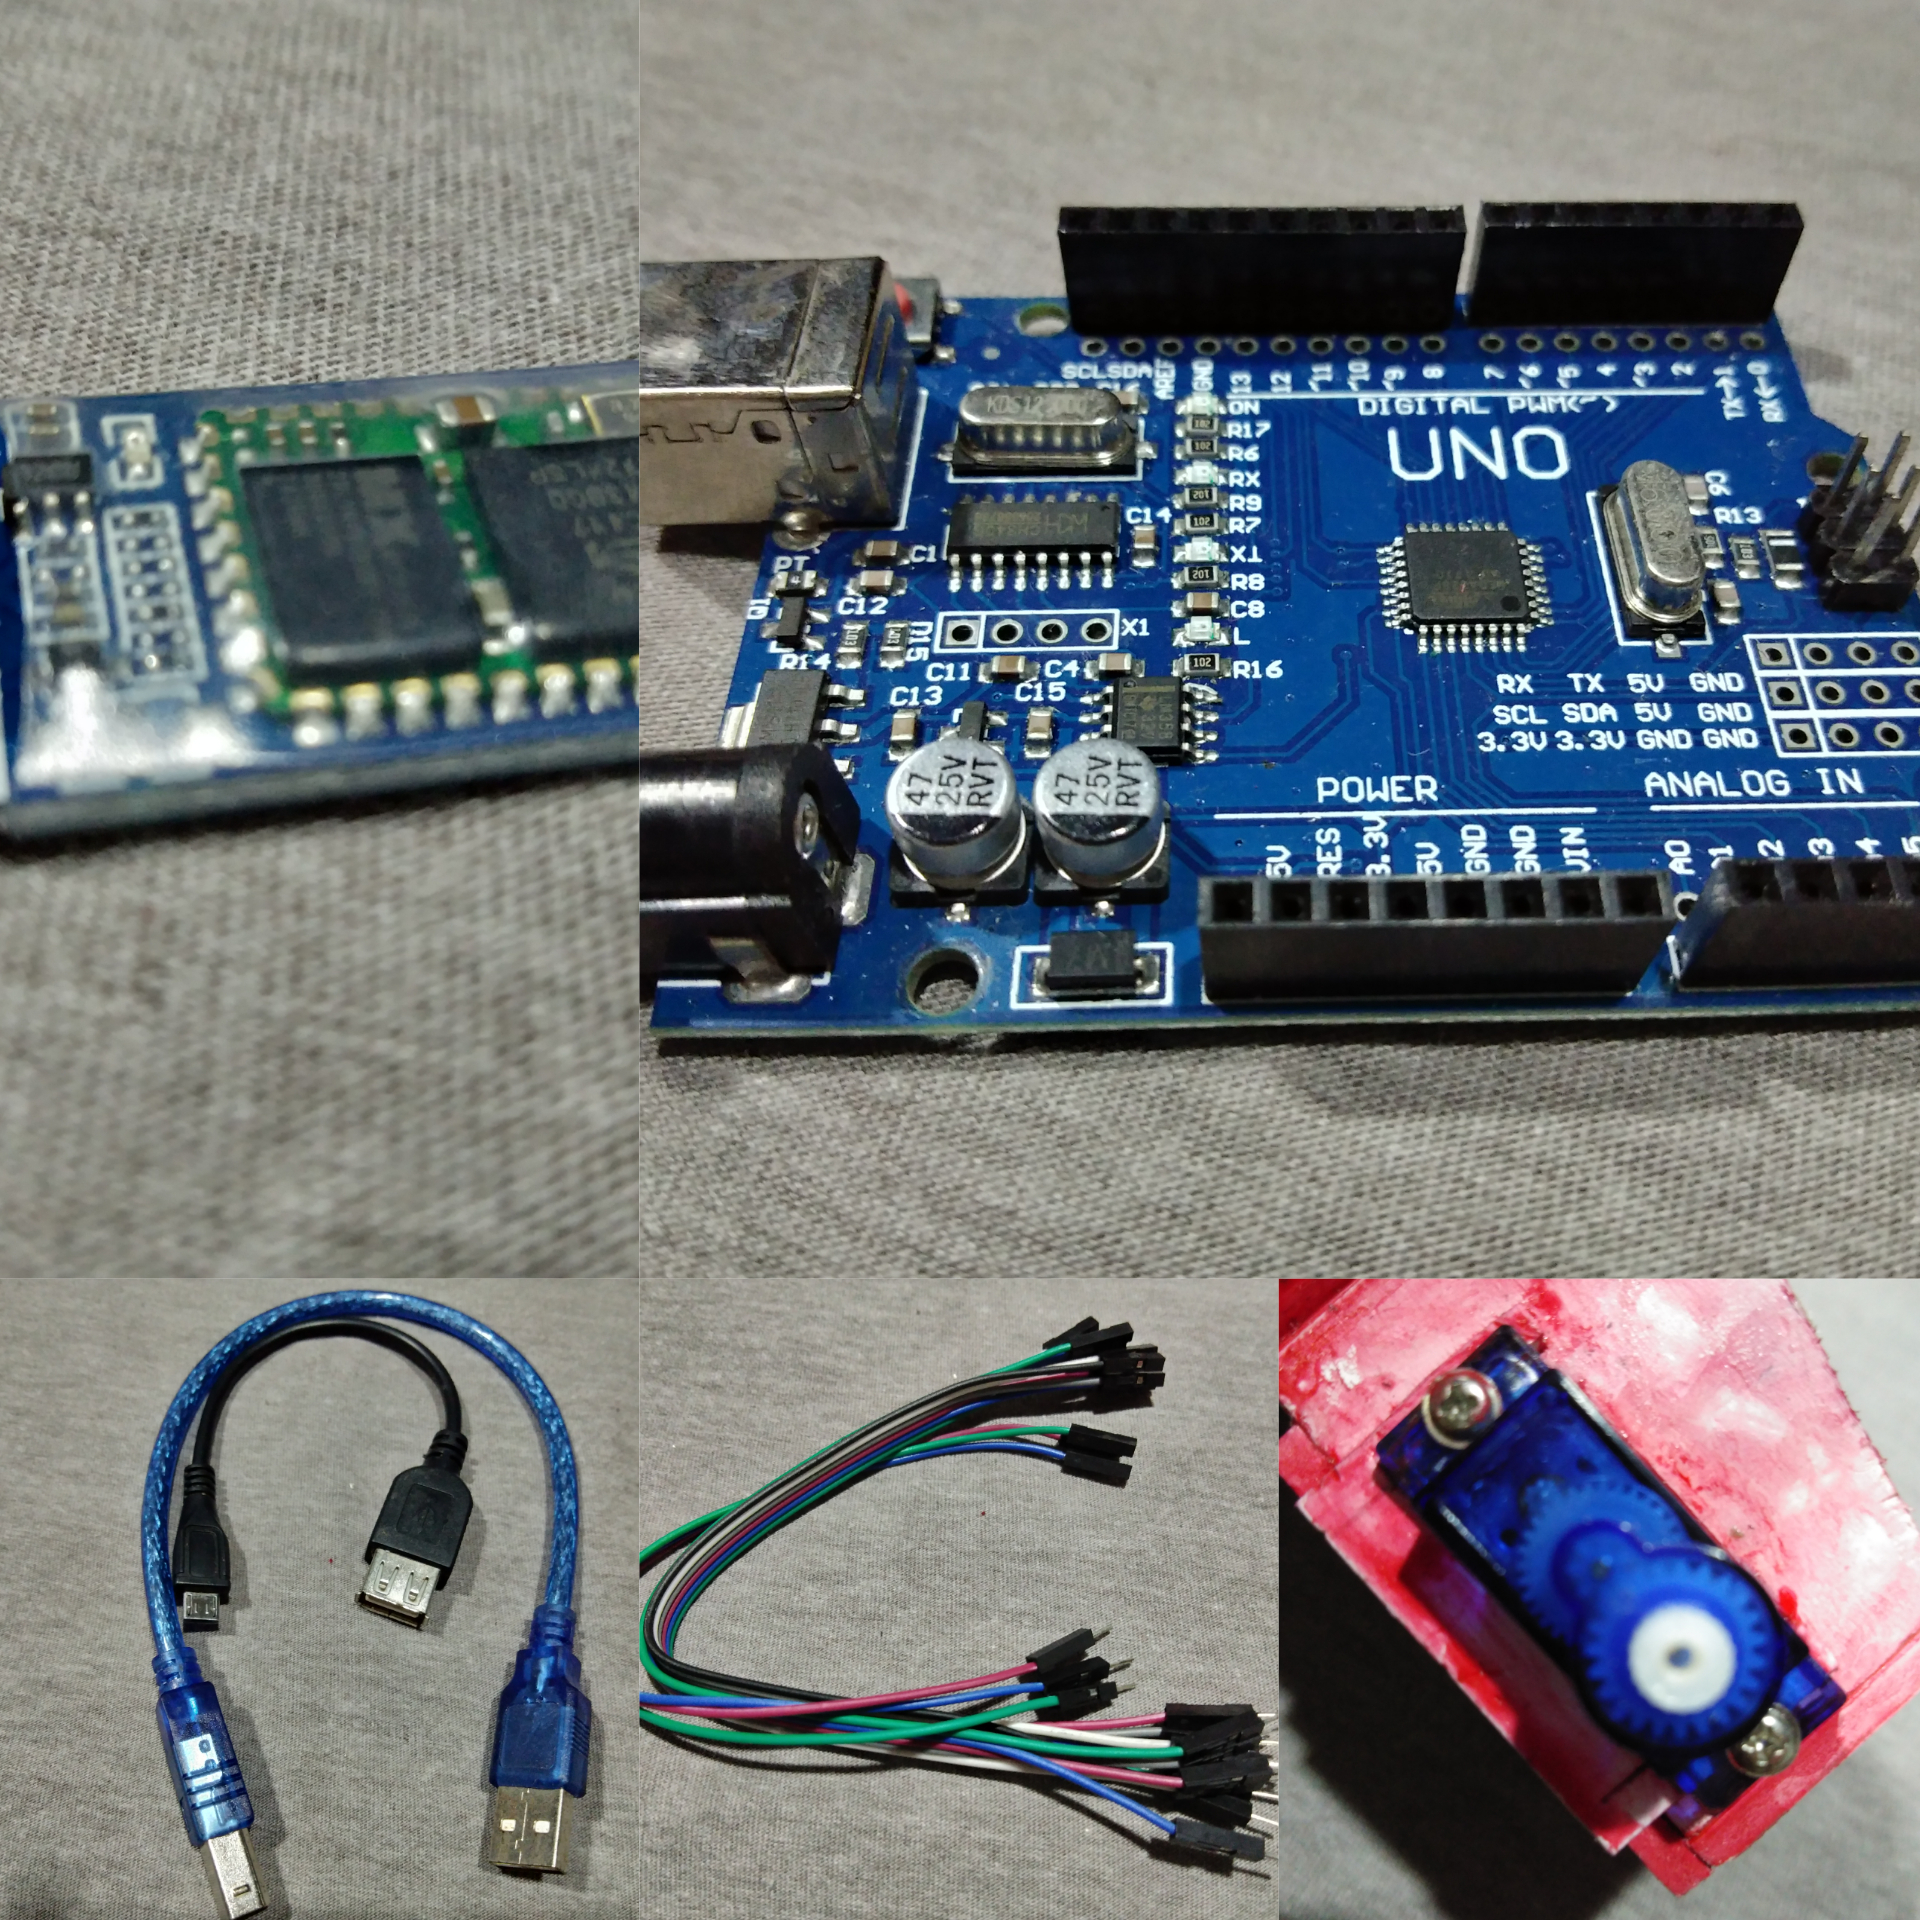
So to start with the process on making the project let me show you and define some functions of the materials used on my robot making.
Materials Used
- Servo motors (360 and 180 operation)
- Arduino Uno
- Bluetooth Module (HC-06)
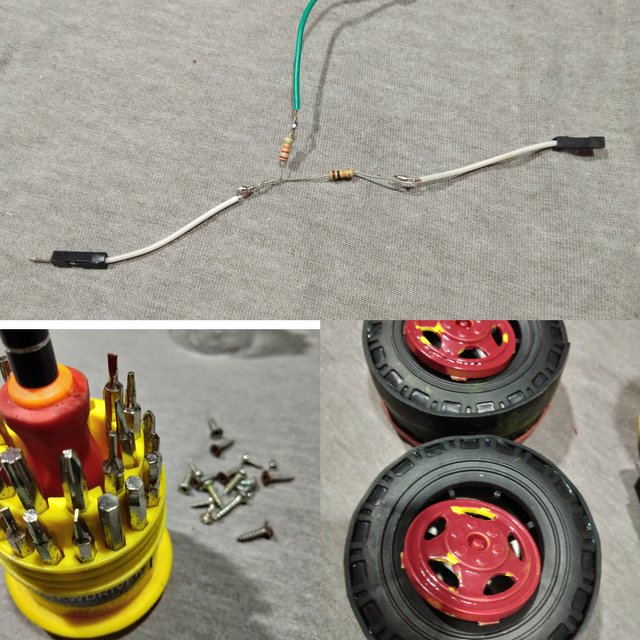
- Resistors (20k and 10k ohms)
- Caster Wheel
- Recycled Wheel from Toys
- Jumper Wires
- Electrical Tape
- Bluetooth Application
Brief definitions of the important materials in making the project:
Arduino Uno -- Arduino is an open source computer hardware and software company, project, and user community that designs and manufactures single-board microcontrollers and microcontroller kits for building digital devices and interactive objects that can sense and control objects in the physical and digital world.
Bluetooth Module -- The HC-06 is a class 2 slave Bluetooth module designed for transparent wireless serial communication. Once it is paired to a master Bluetooth device such as PC, smart phones and tablet, its operation becomes transparent to the user. All data received through the serial input is immediately.
Servo Motors -- A servomotor is a rotary actuator or linear actuator that allows for precise control of angular or linear position, velocity and acceleration.[1] It consists of a suitable motor coupled to a sensor for position feedback. It also requires a relatively sophisticated controller, often a dedicated module designed specifically for use with servomotors.
Jumper Wires -- A jump wire (also known as jumper, jumper wire, jumper cable, DuPont wire, or DuPont cable named for one manufacturer of them) is an electrical wire, or group of them in a cable, with a connector or pin at each end (or sometimes without them simply "tinned"), which is normally used to interconnect the components of a breadboard or other prototype or test circuit, internally or with other equipment or components, without soldering. -- Wikipedia.com
To compensate more about the bluetooth technology started on late 80's; 1989 to be specific. It was coined by King Heerald. Bluetooth is an example of a wireless technology. When we say wireless, these are devices that perform a peer to peer connection between two components without any use of wires. These are managed by Big Companies and these companies were named as SIG (Special Interest Groups), involving five big companies.
However, bluetooth technologies were mostly used for automations in different operations. Without the Bluetooth Mobile App you cannot operate this bluetooth module. So if you want to download this application feel free to click the highlighted words Bluetooth App.
Bluetooth Electronics Interface
After downloading the mobile application you can start by initiating a control panel for your robot.
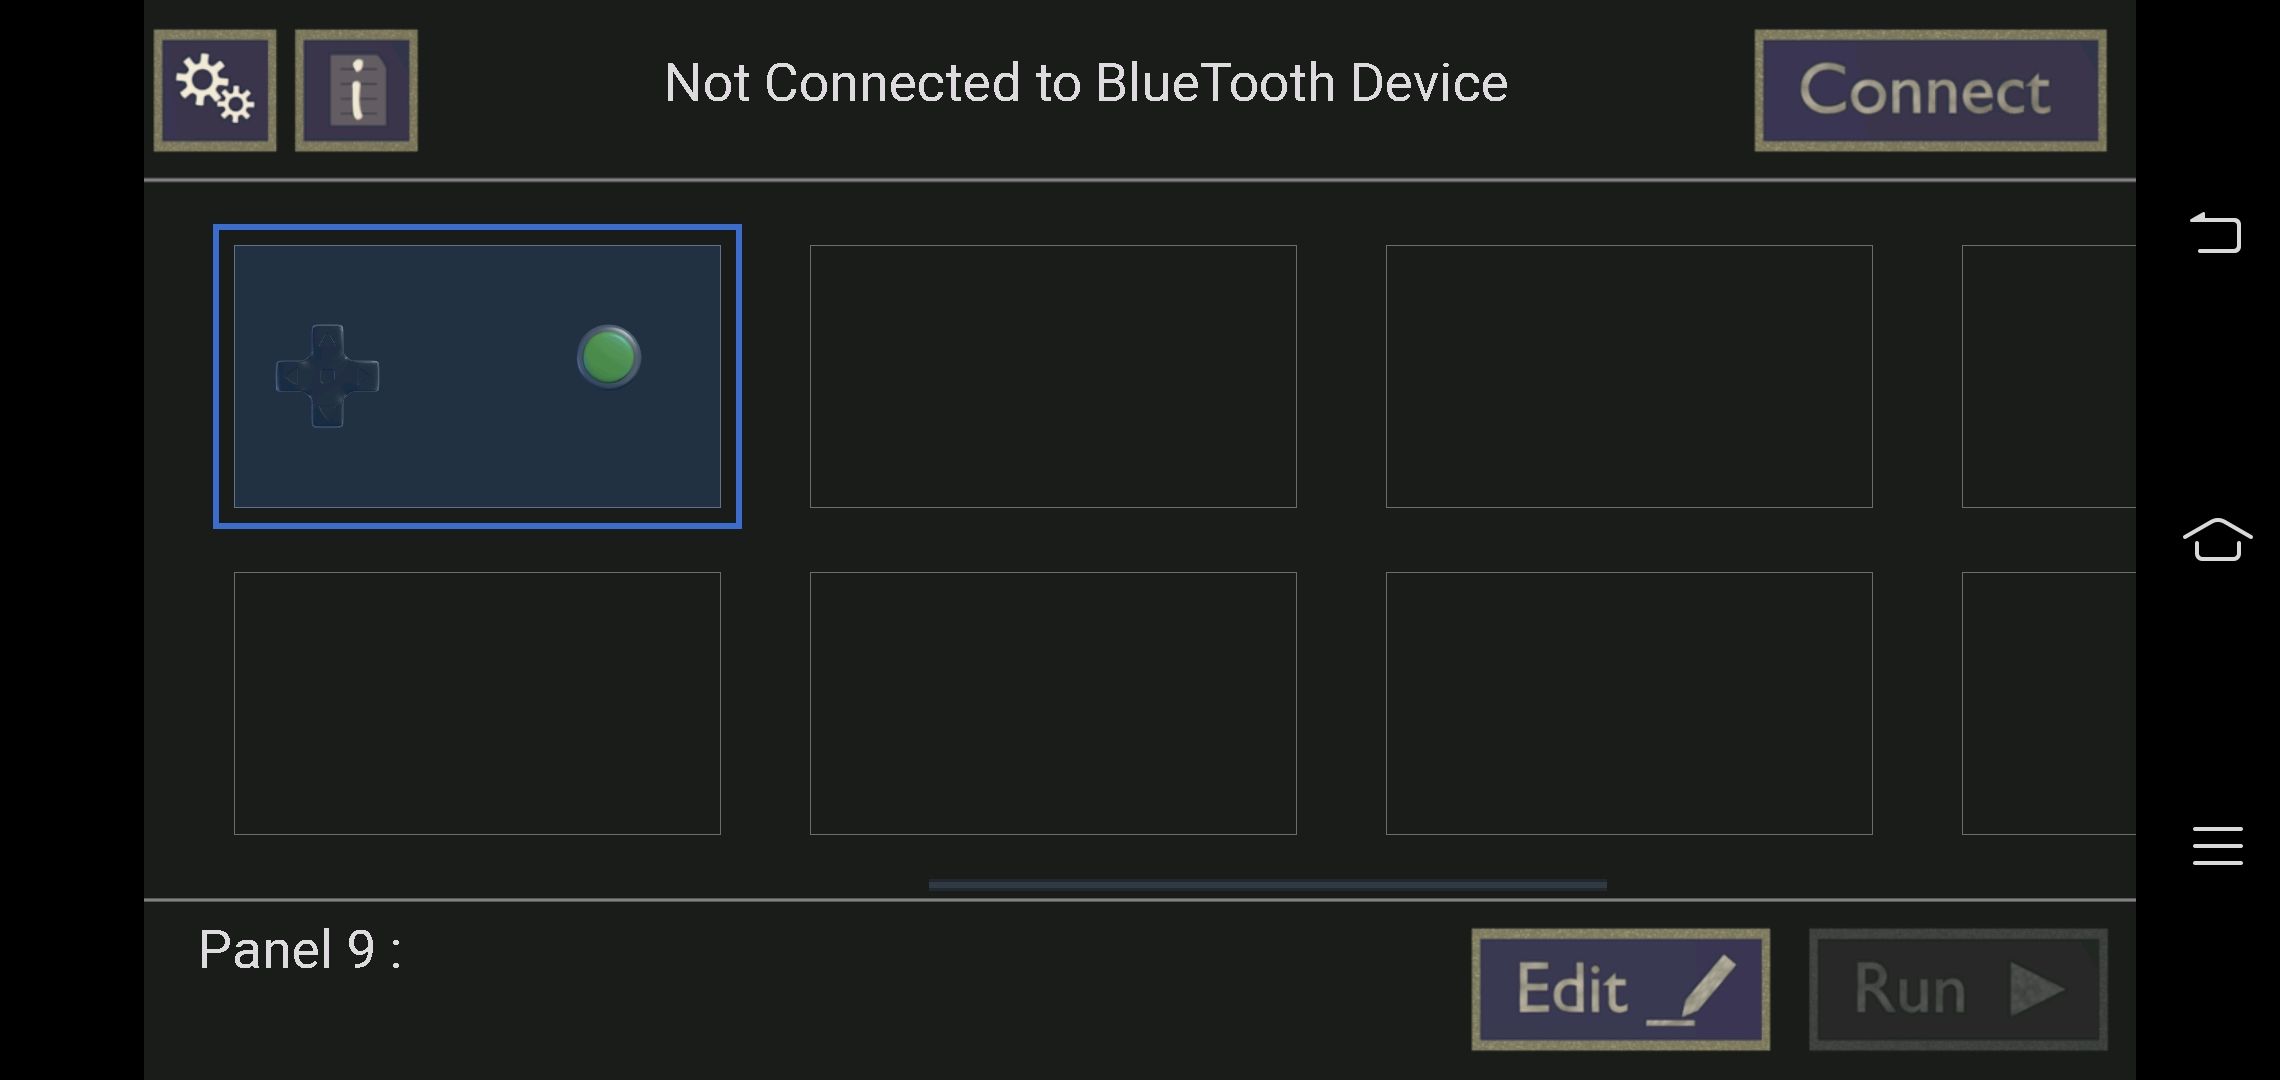
Open your app and then start editing by pressing edit button. The control message you will input in your there must be concise with the input you encoded in your arduino.
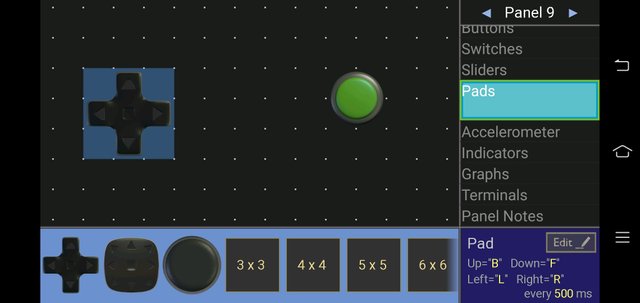
As you can see in the image above, the message I put in the controls are: B for up, F for down, L for left and R for right.
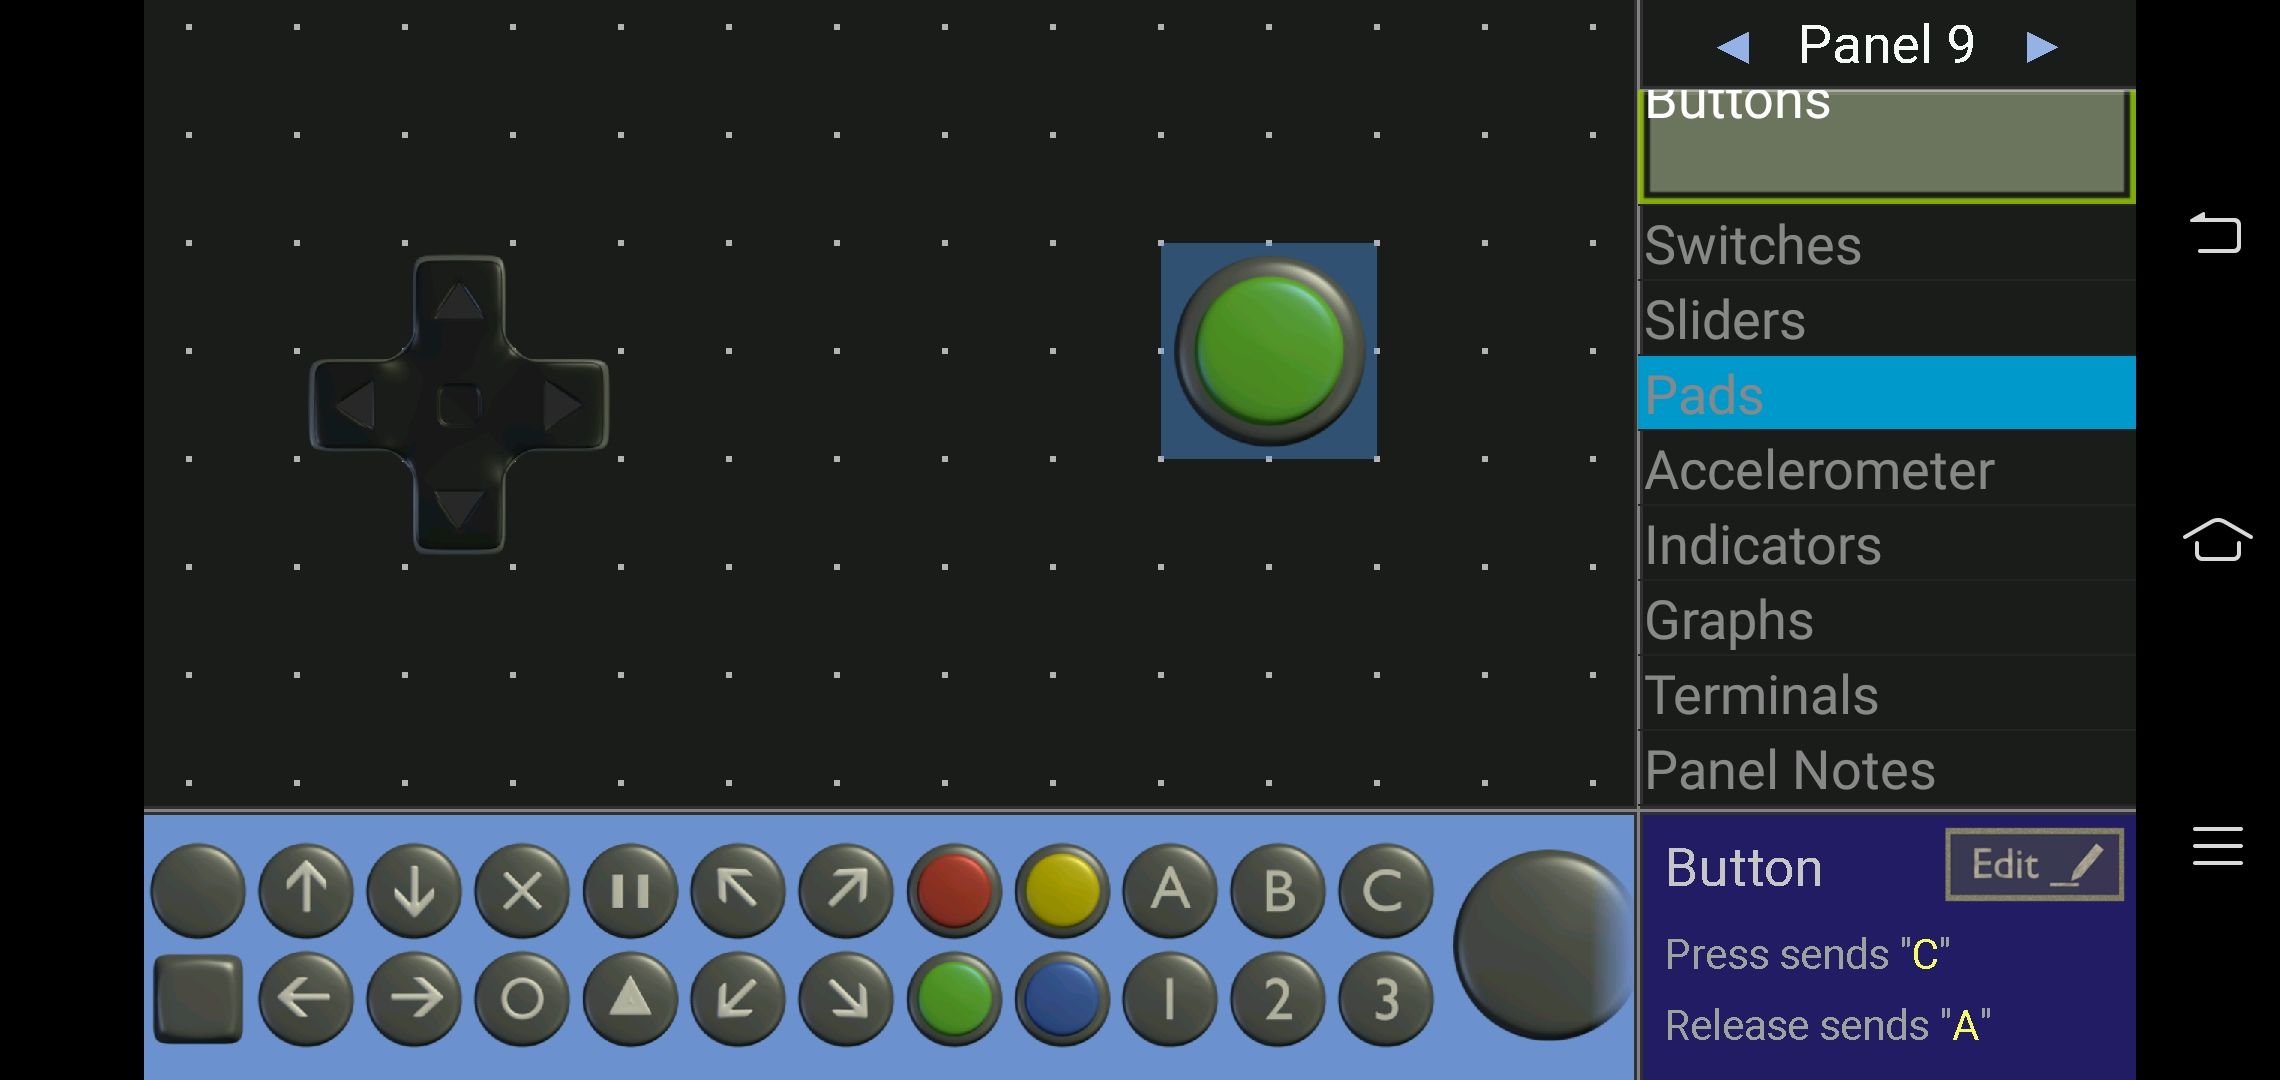
Next is the circular object also use for controlling the robot. This is the one that initiates the attack motion of my robot. As you can see I input there: "C" and "A". Those are appointed to perform the downward and upward movement of the 180 degree servo.
Bluetooth Module Pin Configuration
| Pin no. | Assigned name | Function |
|---|---|---|
| 1 | Vcc | Uses 3.3 to 6 volts supply |
| 2 | Gnd | 0 volts |
| 3 | Tx | port for transmitting data to the arduino board or other microcontrollers |
| 4 | Rx | port for receiving data from the bluetooth mobile app controller |
Pictures of the Materials
Materials for Programming
Materials for Constructing
Step by Step Process
In constructing my robot, I just recycled the base of my last project which is the Collision Avoidance Robot in order to use in making this soccer robot.
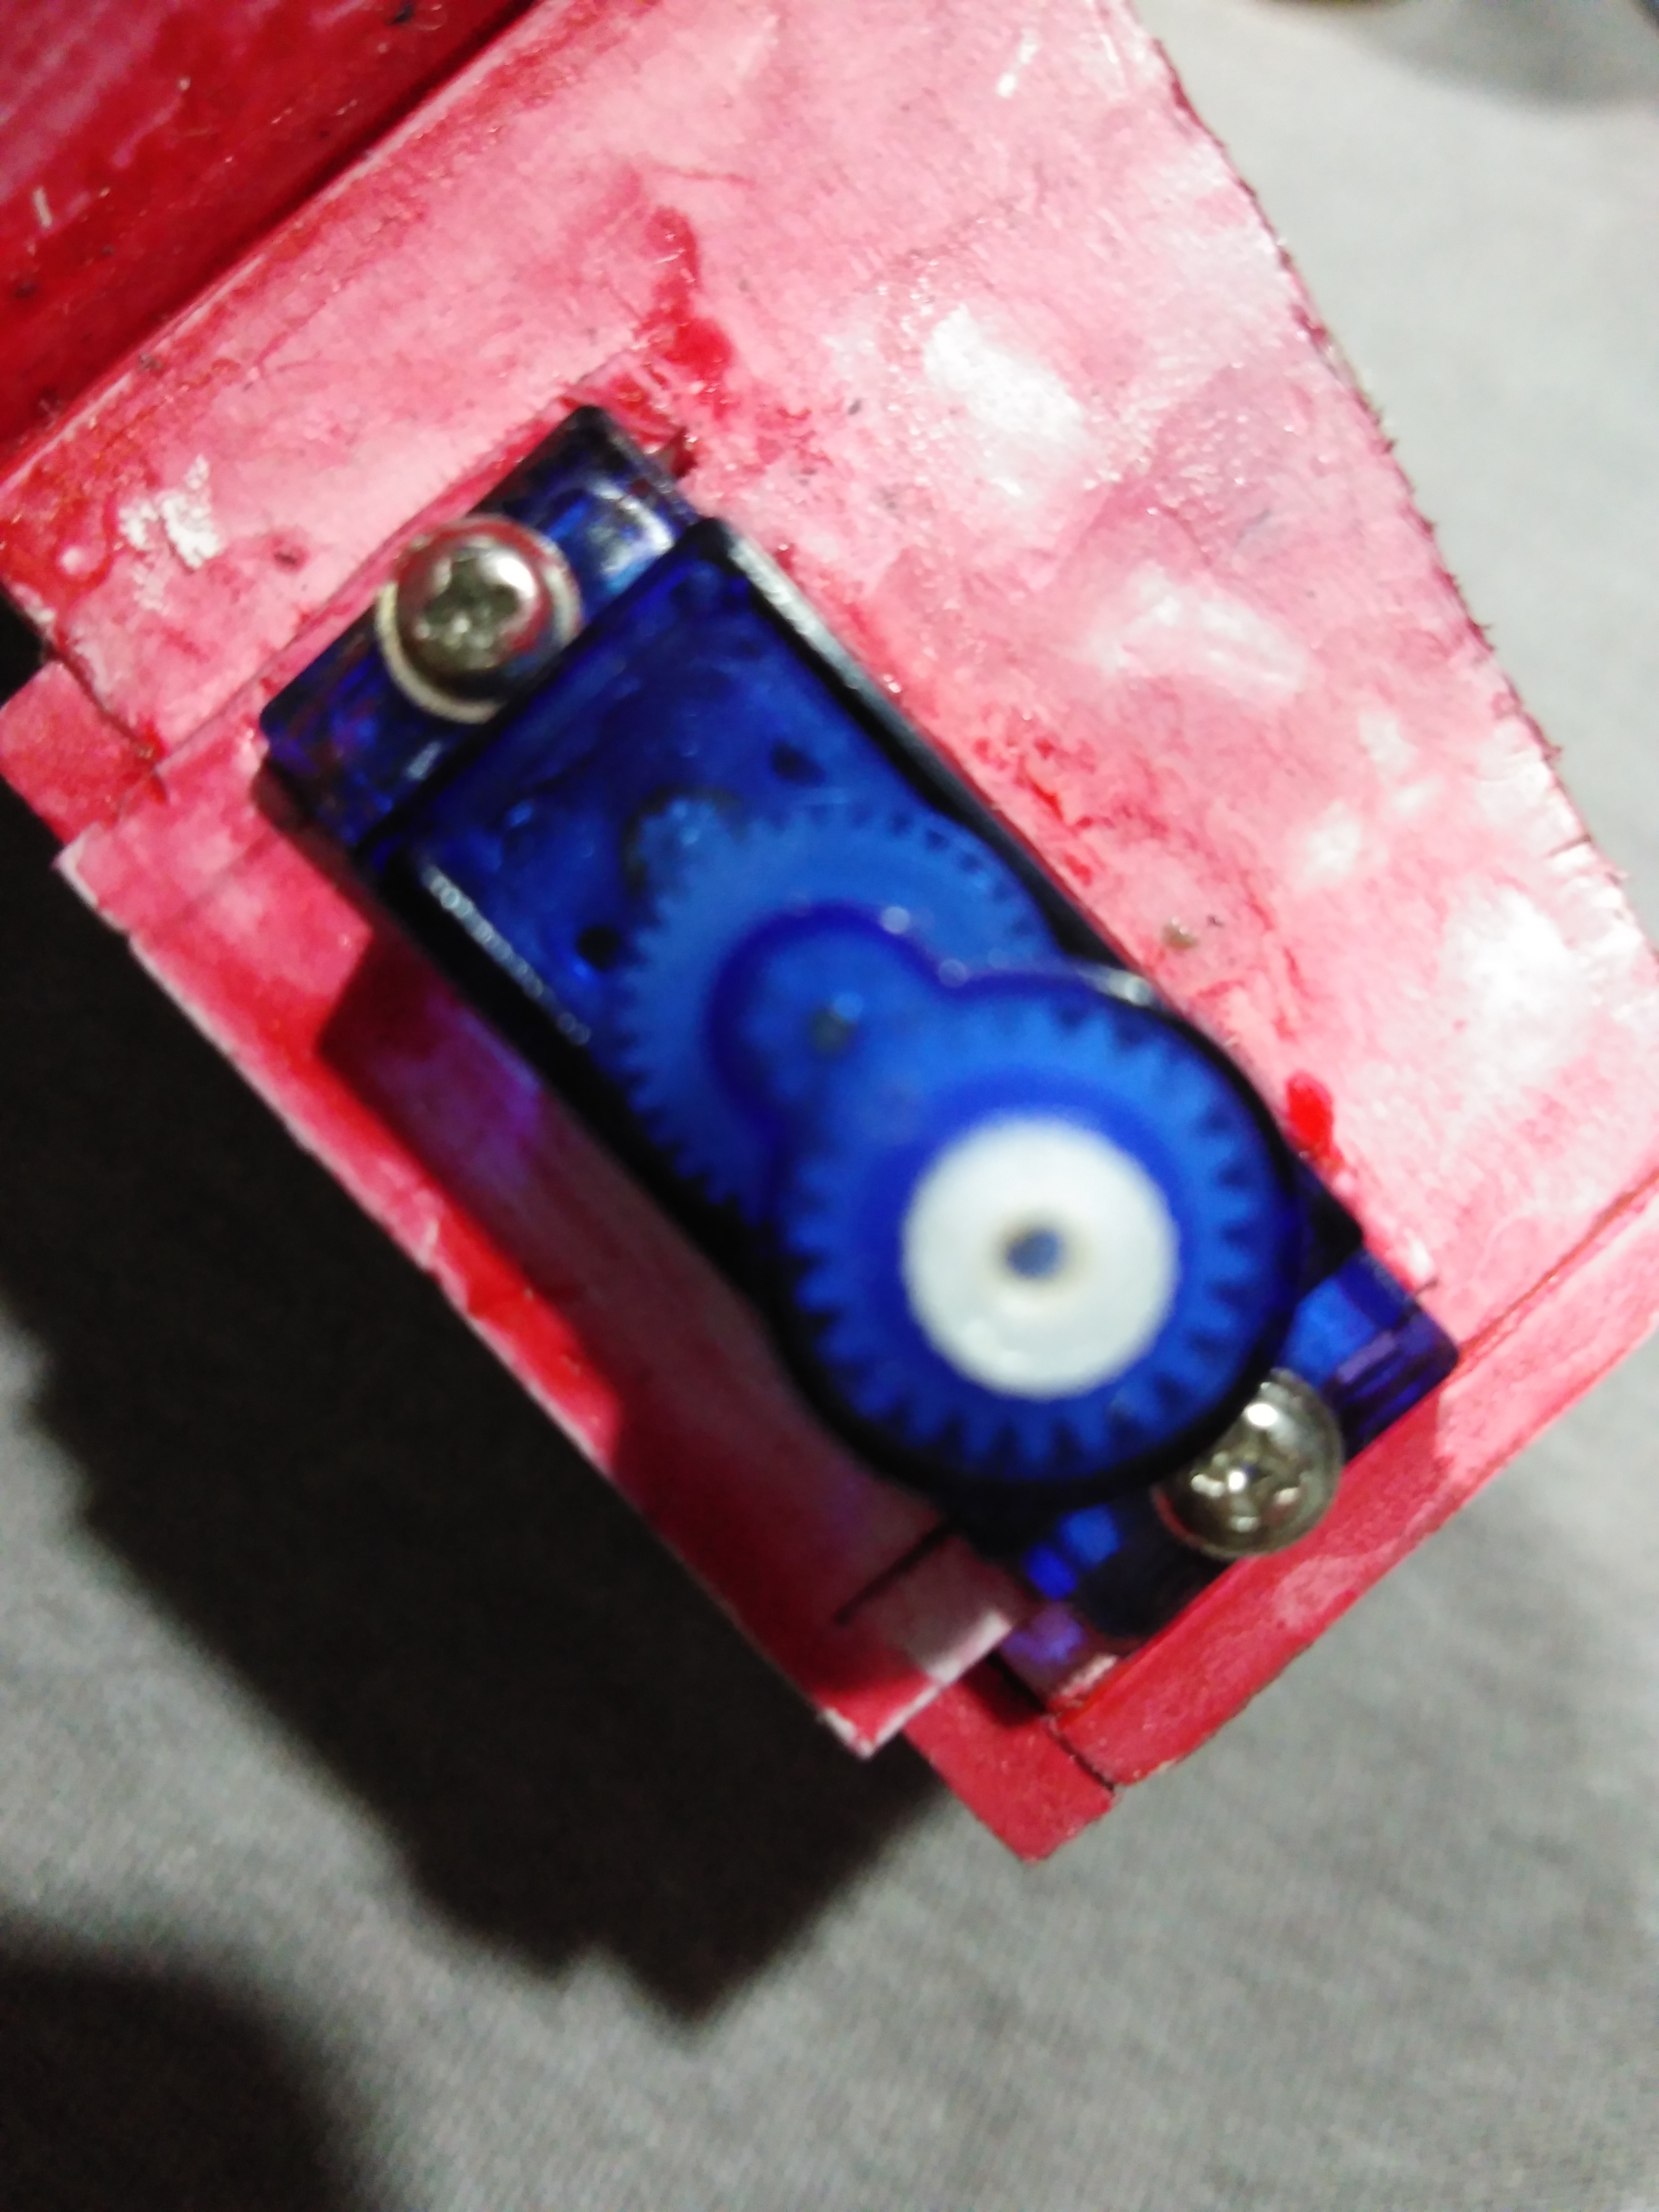
First thing I did was to insert the servo motors at the front part of the base. The servo motors in front were used to operate the wheel of the robot.
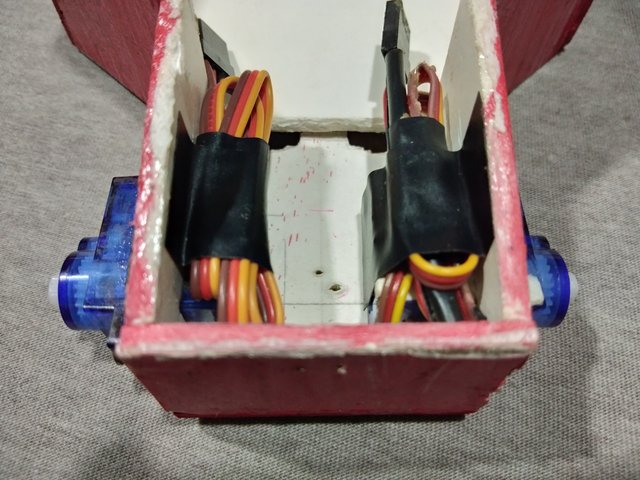
Next, I arranged the wires using electrical tapes to avoid octopus wiring inside the base.
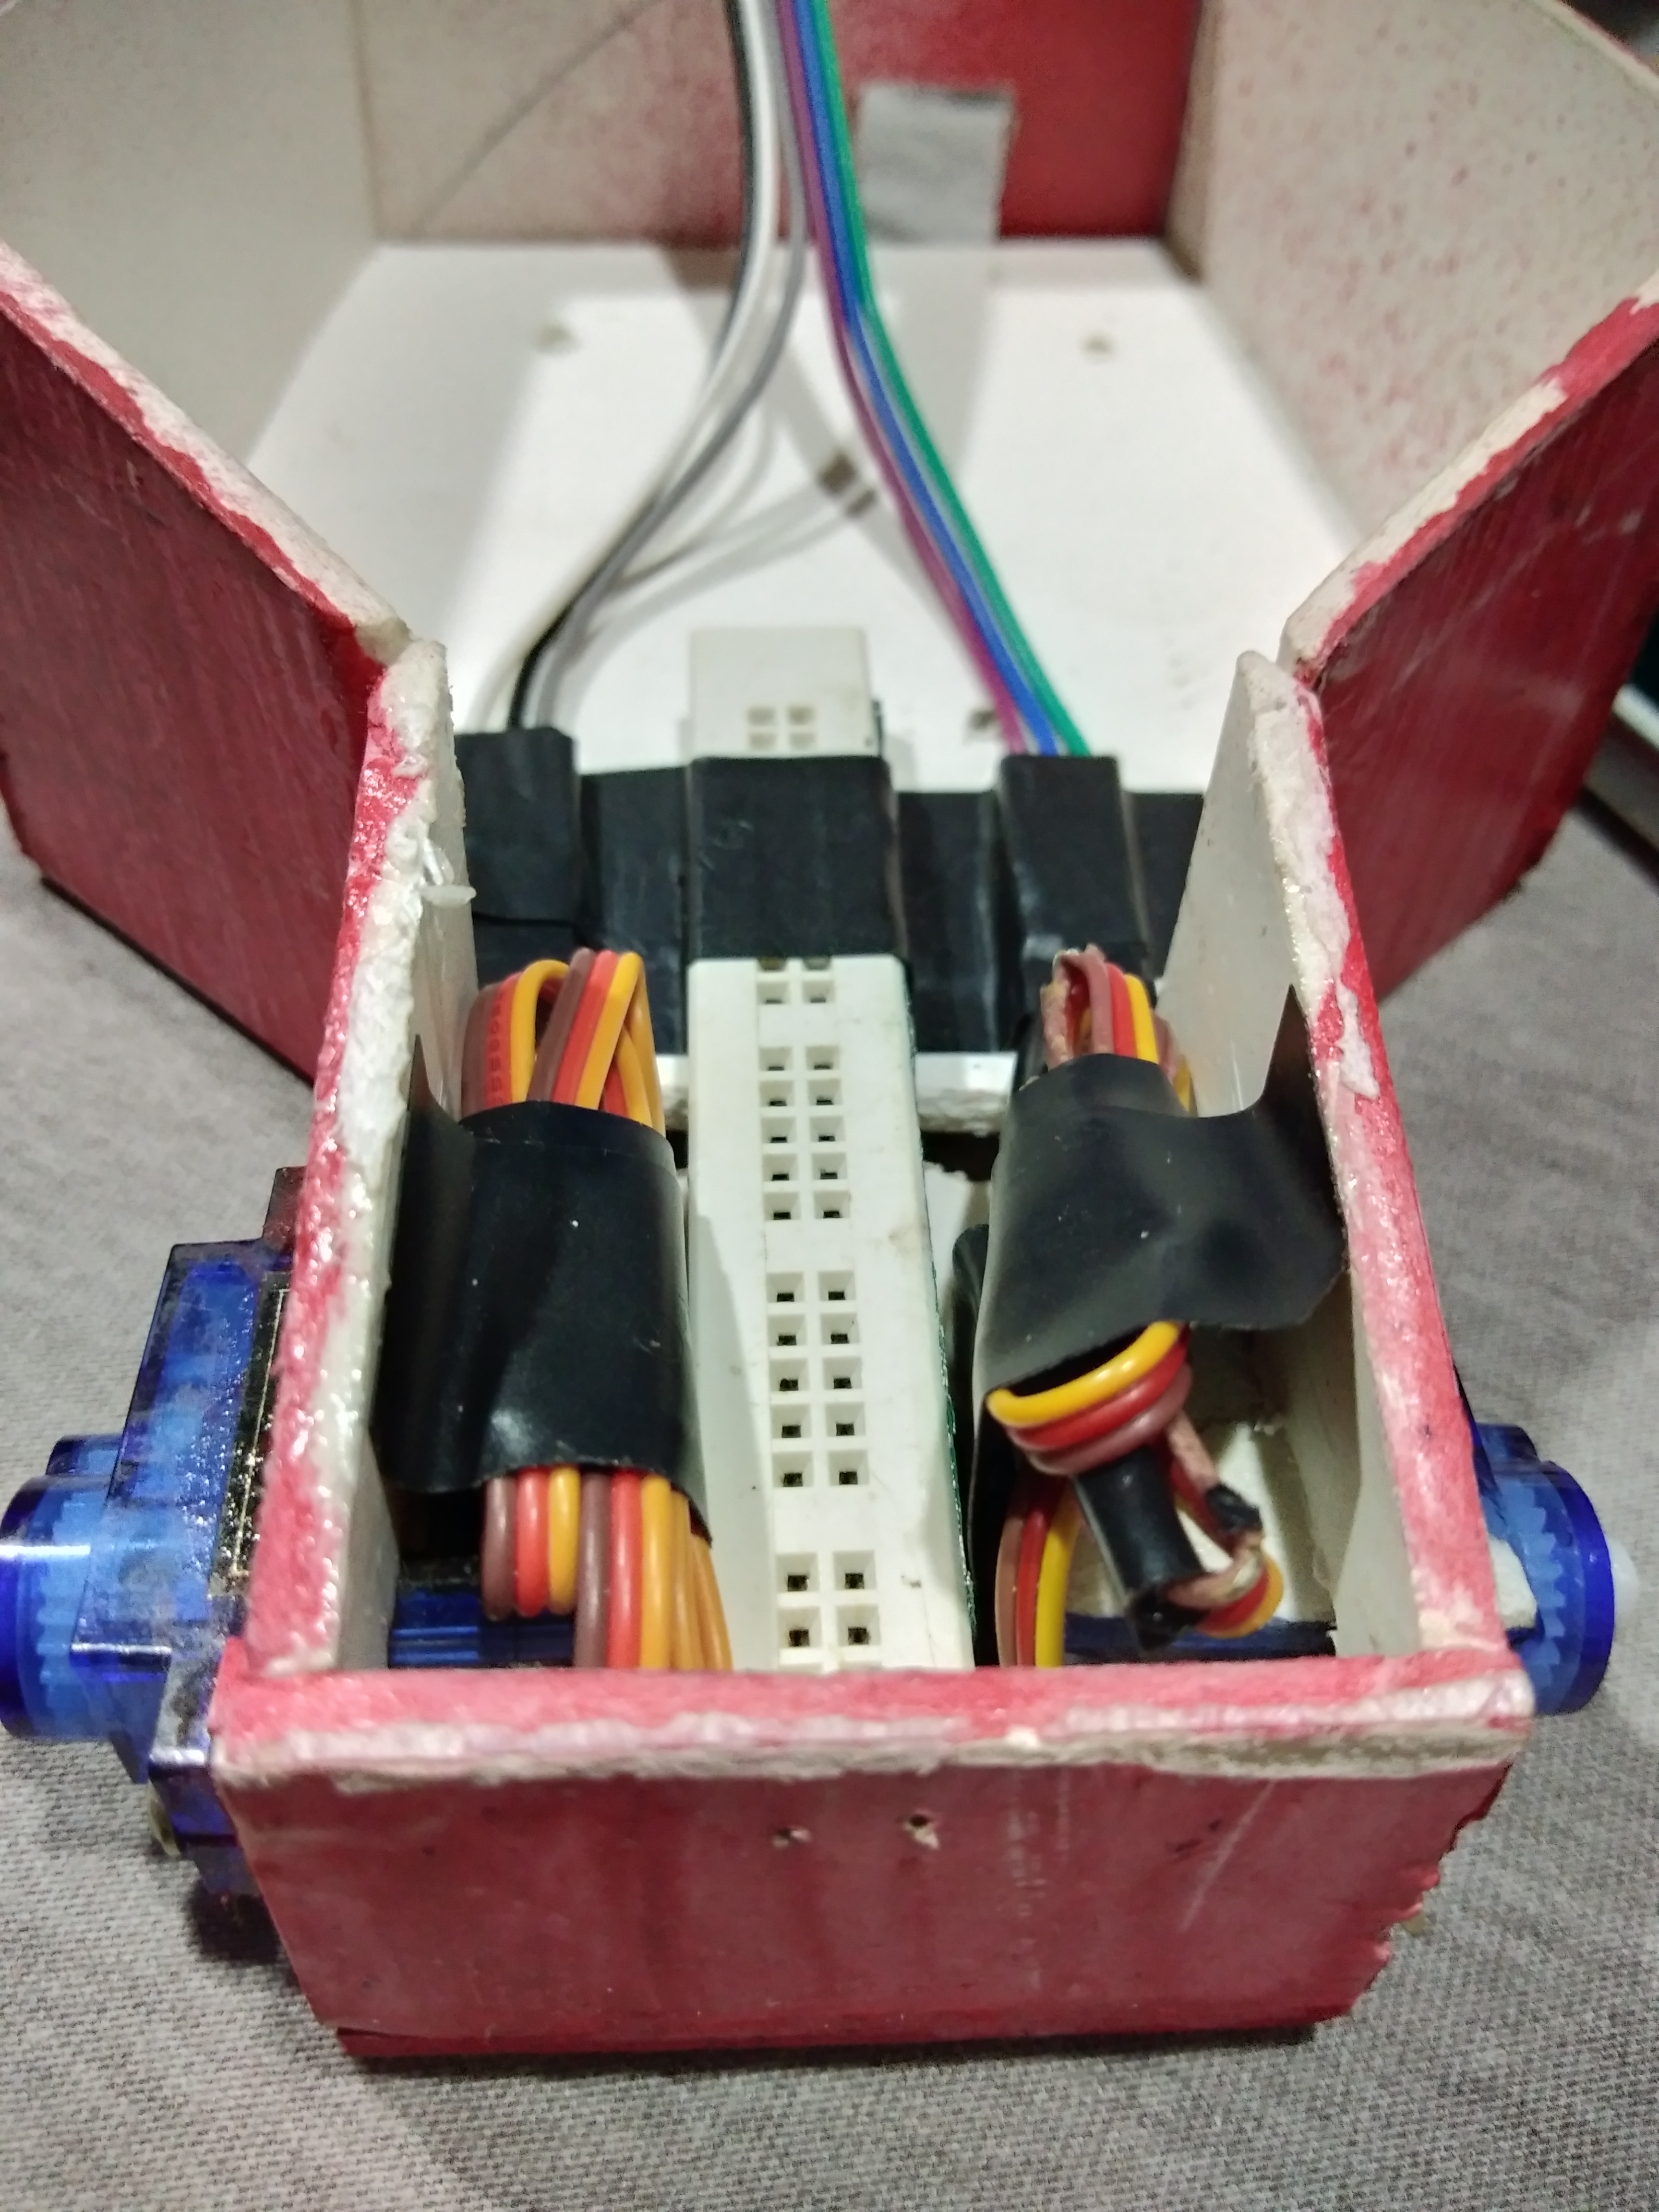
Then, I cut a small piece of breadboard and put it at the center in the front of the base to use it as the port of all the connections of the robot.
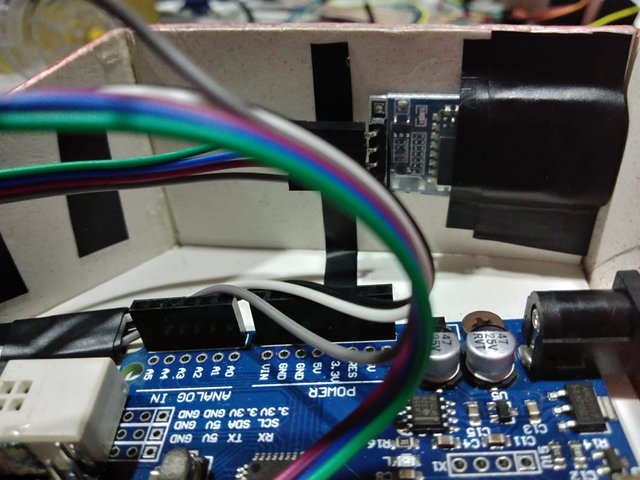
After, I then placed the bluetooth module at the side of the base using electrical tape.
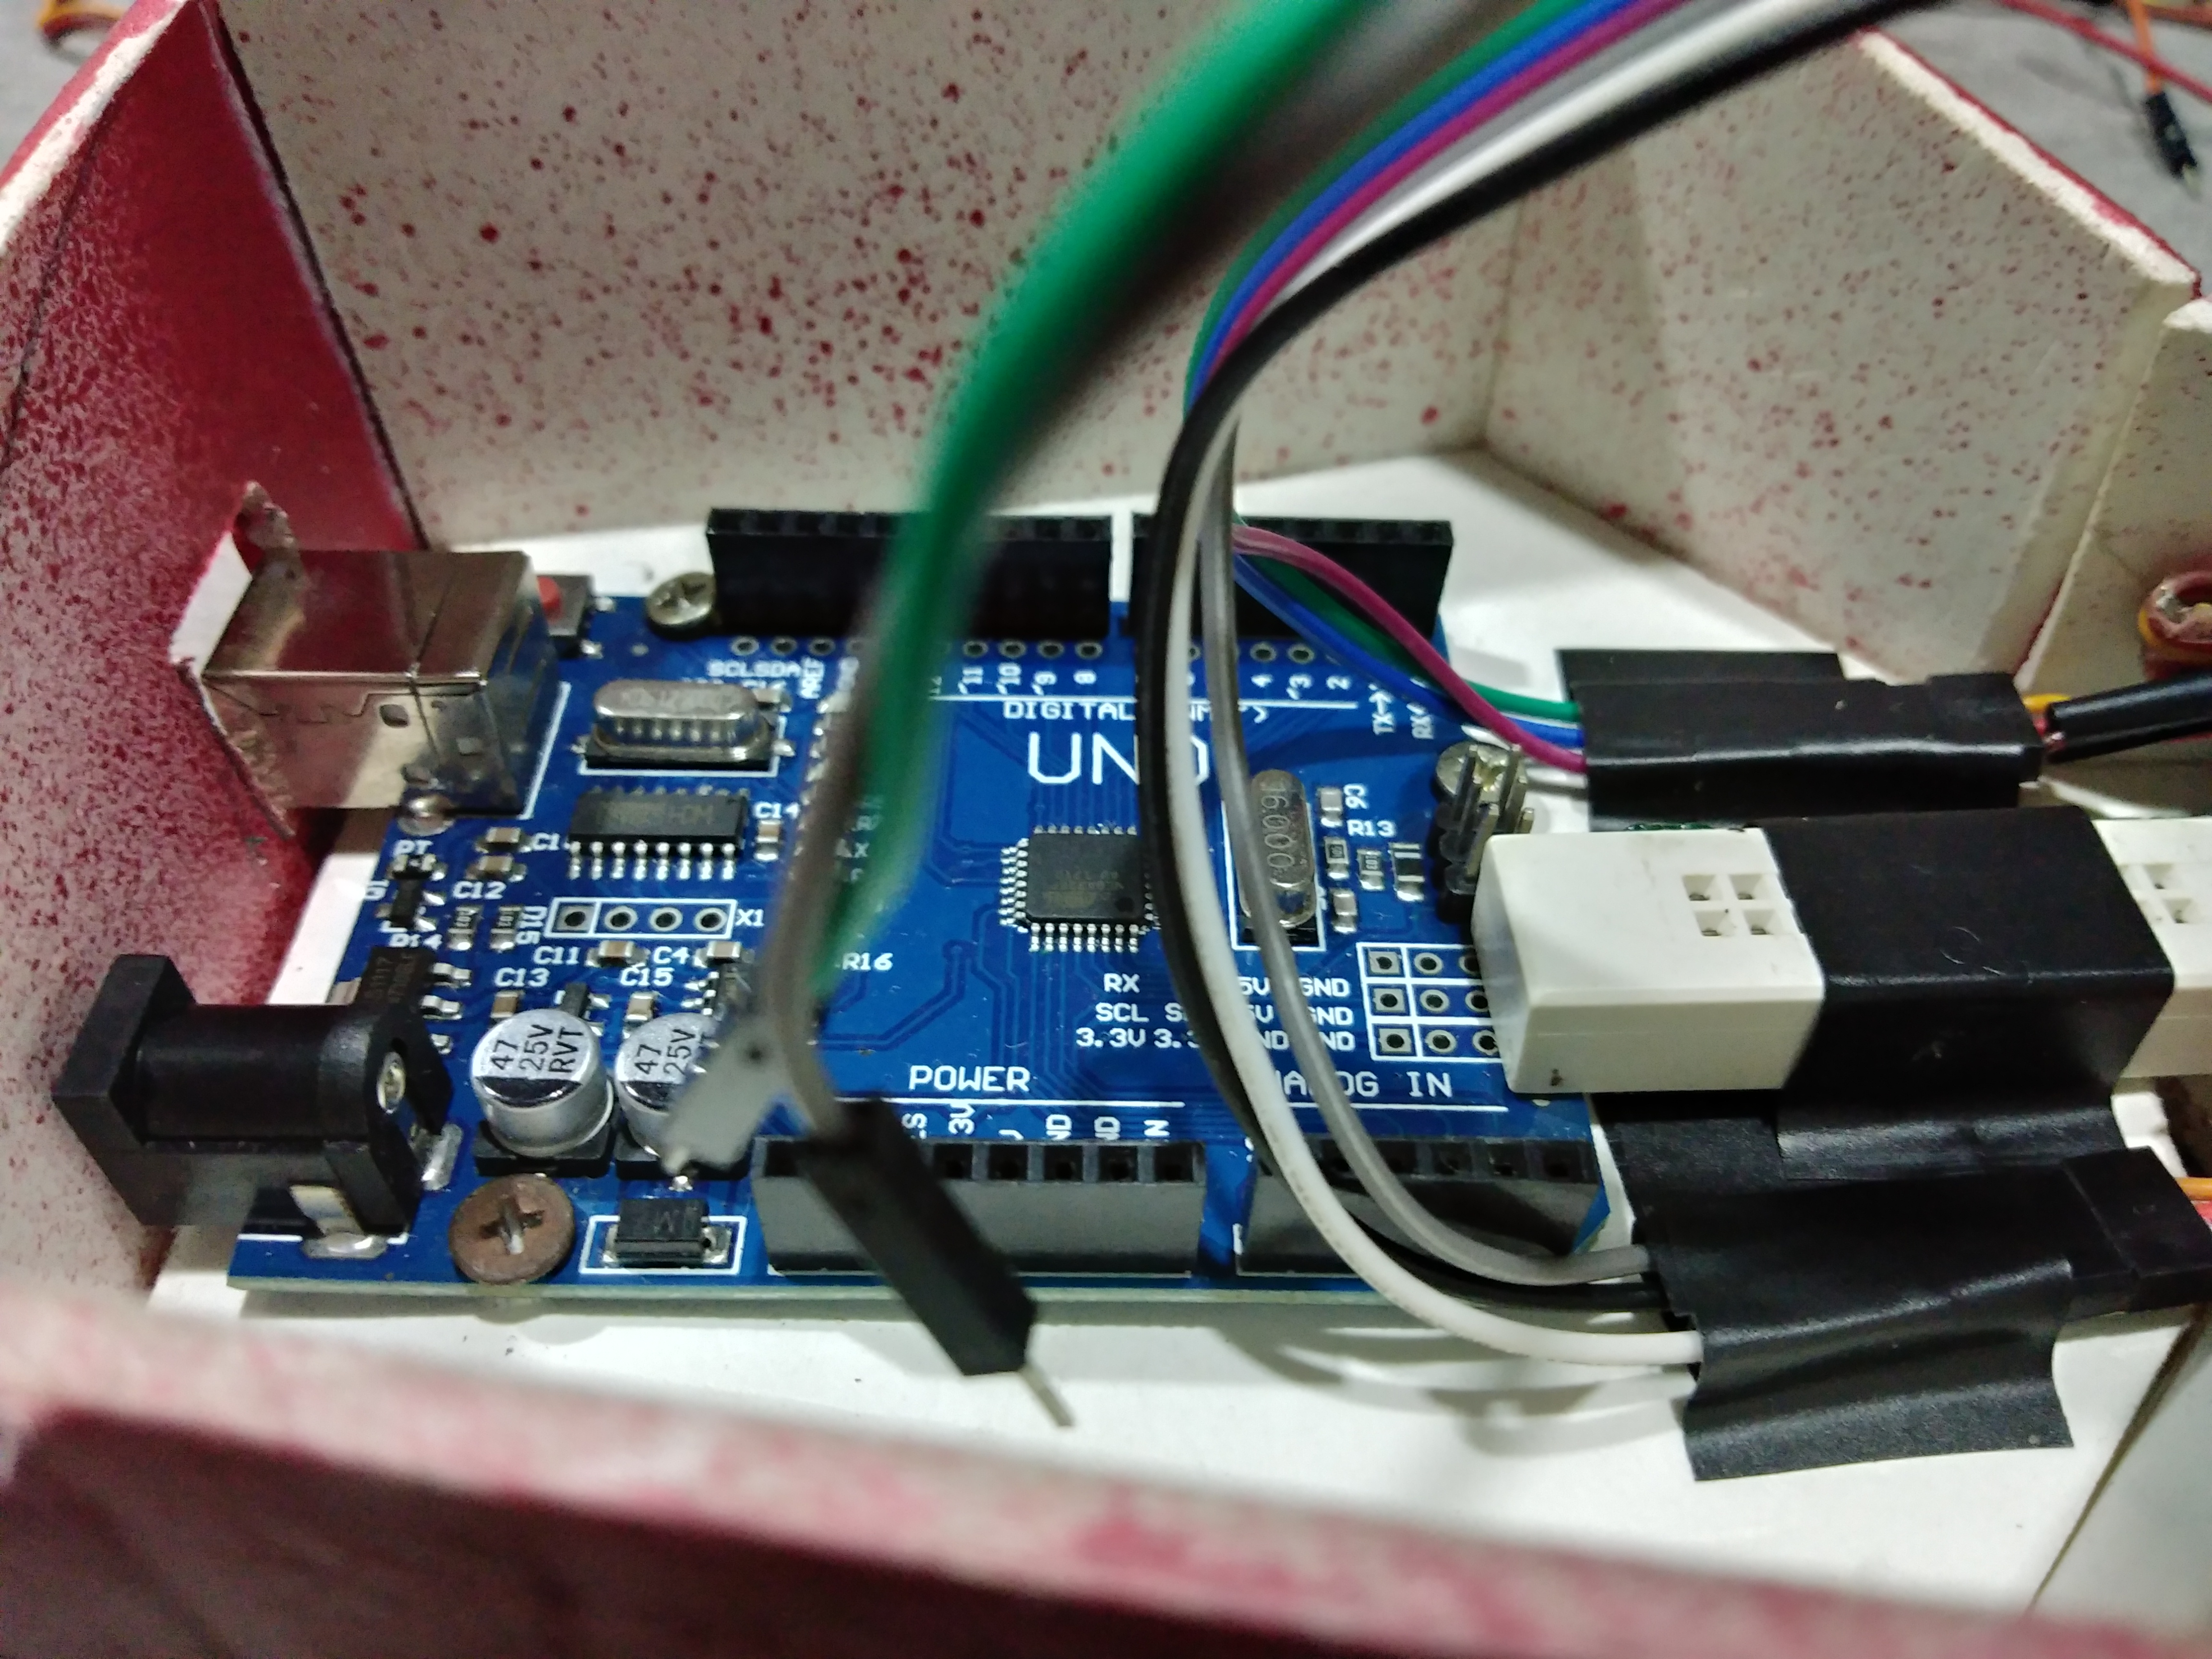
Then, I immediately inserted the wirings of the components to the arduino.
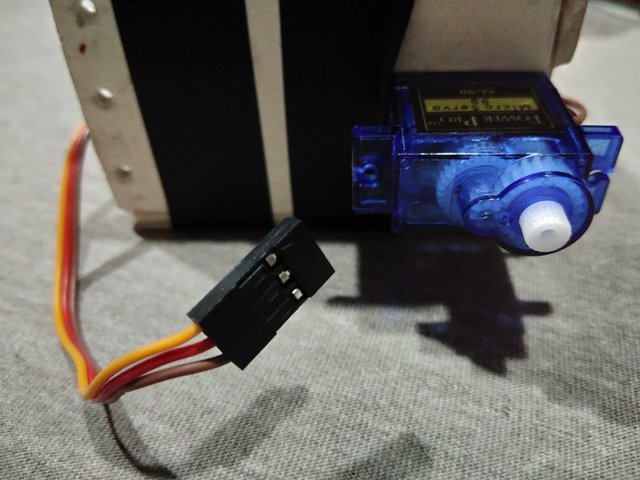
Last thing I did was to place the servo motor (180 operation) at the front of the base positioned side-ward. This servo serves as the kicker of the ball. It moves up and down as it operates in 180 degrees cycle. This is the most important part of the construction aside from the wheels.
Programming Process
Using the ArduinoDroid Mobile Application I simulated my codes for the soccer robot. To show you the whole codes, here they are:
#include <SoftwareSerial.h>
#include <Servo.h>
SoftwareSerial bt(10, 11);

Servo ServoA ;
Servo ServoL ;
Servo ServoR ;
char Q;
int c=180;
int d =0;
int y =0;
int x=0;
int e=90;
int f=180;

void setup (){

 Serial.begin (9600);
 bt.begin(9600);

}

void forward (){

ServoL.attach(5);
ServoR.attach(6);
ServoL.write(d);
ServoR.write(c);

}

void reverse (){

ServoL.attach(5);
ServoR.attach(6);
ServoL.write(c);
ServoR.write(d);

}

void turnright (){

ServoL.attach(5);
ServoR.attach(6);
ServoL.write(c);
ServoR.write(c);

}

void turnleft (){

ServoL.attach(5);
ServoR.attach(6);
ServoL.write(d);
ServoR.write(d);

}

void attack1 (){
    ServoA.attach(9);
    ServoA.write(e);
    ServoA.write(d);
}
void attack2 (){
    ServoA.attach(9);
    ServoA.write(d);
    ServoA.write(f);
}

void loop (void){

 if (Serial.available())
    {
      Q = Serial.read();

      if (Q =='F') {
    x++;

   Serial.print("T"+String("Forward!")+"");
   Serial.print("G"+String(x)+"");

        }

 else  if (Q =='B') {
       x++;
    Serial.print("T"+String("Backward!")+"");
    Serial.print("G"+String(x)+"");
        }

else if (Q =='R') {
       x++;
   Serial.print("T"+String("Right!")+"");
    Serial.print("G"+String(x)+"");
        }
else if (Q =='L') {
       x++;
    Serial.print("T"+String("Left!")+"");
   Serial.print("G"+String(x)+"");
        }

 else if (Q =='A') {
  Serial.print("Y"+String("Attack!")+"");

        }

else {
    Serial.print("T"+String("         ")+"");

Serial.print("Y"+String("         ")+"");

Serial.print("V"+String("        ")+"");

x=0;
        }
}
if (bt.available()){

   Q = bt.read();

  if(Q =='F')
    {forward();}

else  if(Q =='A')
  { attack1();}
  else  if(Q =='C')
  { attack2();}

else  if(Q =='B')
  {reverse();}
 else  if(Q =='R')
  { turnright(); }
else   if(Q =='L')
   {turnleft();    }

else{
 ServoL.detach();
 ServoR.detach();
 ServoA.detach();
    }
}
}
Coding Functions
To understand more the functions of the code, here are the informations of the coding.
void forward (){

ServoL.attach(5);
ServoR.attach(6);
ServoL.write(d);
ServoR.write(c);
In this code, the arduino was programmed to operate the two servos serves as the wheel to move in forward motion. Without the bluetooth application downloaded in your mobile phones you cannot perform the controls of the project. So as you press the forward button in your app then the robot will perform the forward running.
void reverse (){

ServoL.attach(5);
ServoR.attach(6);
ServoL.write(c);
ServoR.write(d);
In this code, the arduino tells the servo to turn in reverse so it means that the movement of the robot is in backward motion. To perform it using the application, you must press the backward button in order to run backward.
void turnright (){

ServoL.attach(5);
ServoR.attach(6);
ServoL.write(c);
ServoR.write(c);
In this code, the arduino tells the left servo to rotate forward while the right servo rotates in backward motion. So the robot turns at its right. In the app, just press the button facing at the right in your phone.
void turnleft (){

ServoL.attach(5);
ServoR.attach(6);
ServoL.write(d);
ServoR.write(d);
In this code, the arduino tells the right servo to rotate forward while the left servo rotates in backward motion. So the robot turns at its left. In the app, just press the left button to let your robot turn left.
void attack1 (){
    ServoA.attach(9);
    ServoA.write(e);
    ServoA.write(d);
}
void attack2 (){
    ServoA.attach(9);
    ServoA.write(d);
    ServoA.write(f);
}
In this code, the arduino tells the servo motor located at the front of the base as the kicker to attack by moving upward and downward. This servo only operates in 180 degrees upon moving.
void loop (void){

if (Serial.available())
   {
     Q = Serial.read();

     if (Q =='F') {
   x++;

  Serial.print("T"+String("Forward!")+"");
  Serial.print("G"+String(x)+"");

       }

else  if (Q =='B') {
      x++;
   Serial.print("T"+String("Backward!")+"");
   Serial.print("G"+String(x)+"");
       }

else if (Q =='R') {
      x++;
  Serial.print("T"+String("Right!")+"");
   Serial.print("G"+String(x)+"");
       }
else if (Q =='L') {
      x++;
   Serial.print("T"+String("Left!")+"");
  Serial.print("G"+String(x)+"");
       }

else if (Q =='A') {
 Serial.print("Y"+String("Attack!")+"");

       }

else {
   Serial.print("T"+String("         ")+"");

Serial.print("Y"+String("         ")+"");

Serial.print("V"+String("        ")+"");

x=0;
       }
}
if (bt.available()){

  Q = bt.read();

 if(Q =='F')
   {forward();}

else  if(Q =='A')
 { attack1();}
 else  if(Q =='C')
 { attack2();}

else  if(Q =='B')
 {reverse();}
else  if(Q =='R')
 { turnright(); }
else   if(Q =='L')
  {turnleft();    }
With this complex code, it is the operation between the bluetooth module and the bluetooth control app in sending string messages in the arduino. So to be exact, this is how you build the control functions of your robot in order to have a proper operation as it operates.
Example video of the movements of the robots.
You can see the movement of the robot upon pressing the designated buttons for its motion. So the movement of the robot was truly accurate based on what button I pressed.
Video of my robot playing soccer
> It's a goal!
In the submission date of our project, our professor organized a tournament among all the groups. There were 6 robots participating on the tournament. We were separated in two teams. So sad that we were defeated, but still we enjoy very much as the tournament goes. The robots of my classmates have different techniques in attacking. One thing we should think before doing a soccer robot is to create a technique on how you control the ball in the field. Somewhat like the robot of our classmates has the ability to hold the ball and then kick it in the goal that's why we lost the game.
To show you the video of the entire game, feel free to click play icon.
Note: You should have complete materials to be used in making the soccer robot especially the applications used like the Bluetooth Control App and ArduinoDroid App.
Thank you for giving time in reading and enjoying my project blog. I hope I have given you guys many learnings base on the project I posted. May you create your own designs and techniques for this project. Have a fruitful day everyone!
Your co-Steemian,
You Learn More From Failure Than From Success. Don't Let It Stop You. Failure Builds Character.
Downvoting a post can decrease pending rewards and make it less visible. Common reasons:
Submit
Definitely sir. I thought everything was done after those failure but I never tried to surrender rather fought back all fsilures I've been. I am so happy above the success wherein all those failures were covered.
Downvoting a post can decrease pending rewards and make it less visible. Common reasons:
Submit
This is actually an awesome project. well done.
Downvoting a post can decrease pending rewards and make it less visible. Common reasons:
Submit
Thank you sir. Happy to share it to all of you
Downvoting a post can decrease pending rewards and make it less visible. Common reasons:
Submit
You are welcome.
Downvoting a post can decrease pending rewards and make it less visible. Common reasons:
Submit
Cool robots :)
Downvoting a post can decrease pending rewards and make it less visible. Common reasons:
Submit
yeah definitely sir..thank you
Downvoting a post can decrease pending rewards and make it less visible. Common reasons:
Submit