I would like to start this tutorial by showing the interface and showing what the client has to offer us. After switching on and selecting the Unreal Engine tab, a window will appear showing the latest information from engine manufacturers. After clicking the Library tab you will see a window like this:
Client Epic Games
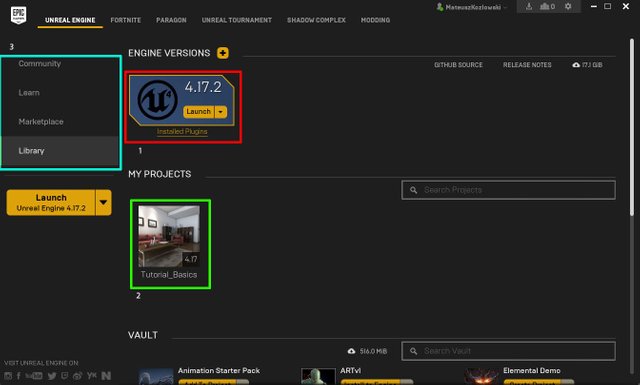
- The currently downloaded version of the engine.
- Projects that have been created at the moment.
- Bookmarks responsible for:
- Comunity: The latest information about the engine and the company creating the graphics engine.
- Learn: Tutorials developed by the creators of the Unreal Engine
- Marketplace: The asset shop for Unreal Engine, here you will also find free learning assets
Project browser
After switching on the engine, the customer will show us all the projects that can be opened. You can also create a completely new project.
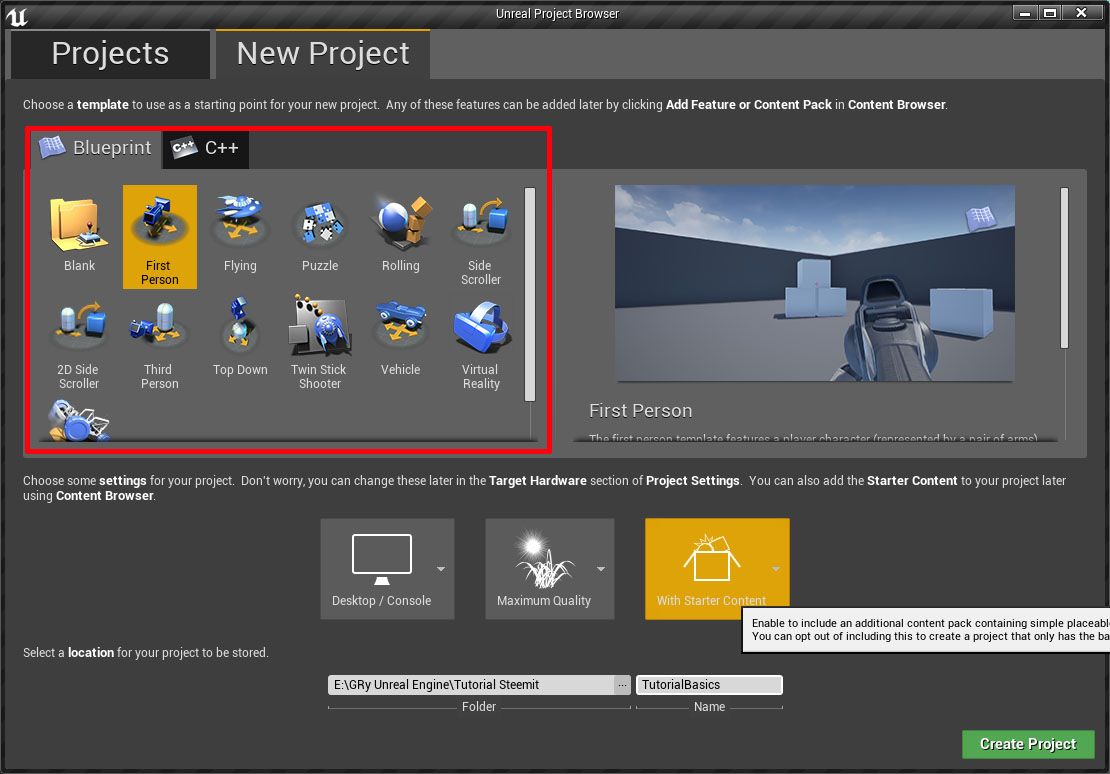
When creating a new project, we have a lot of sample templates that we can use for your game. We find here the most recognizable patterns for games.
These are for example:
- A view from the first person
- A view from the third person
- Isometric view
- 2D game template
- game template with the use of machines (e.g. cars and others)
- and many other templates.
We can also choose whether to use Blueprints in templates as the main script or C ++. Below we have a choice if we want to create a game for computers / consoles or tablets / mobile phones, set the quality of graphics and whether we want to have starter assets to create the game. At the very bottom, set the location and name of the project
The Unreal Engine Editor 4
After loading the editor, you will see a window like this:
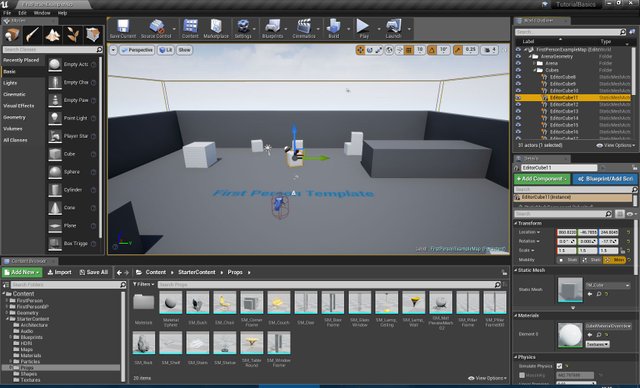
The editor is divided into 6 default windows that can be moved by dragging with the mouse.
The default windows is:
- Viewport
- Modules
- Toolbar
- Content Browser
- World Outliner
- Details
Viewport
A window showing the appearance of the game in the editor.
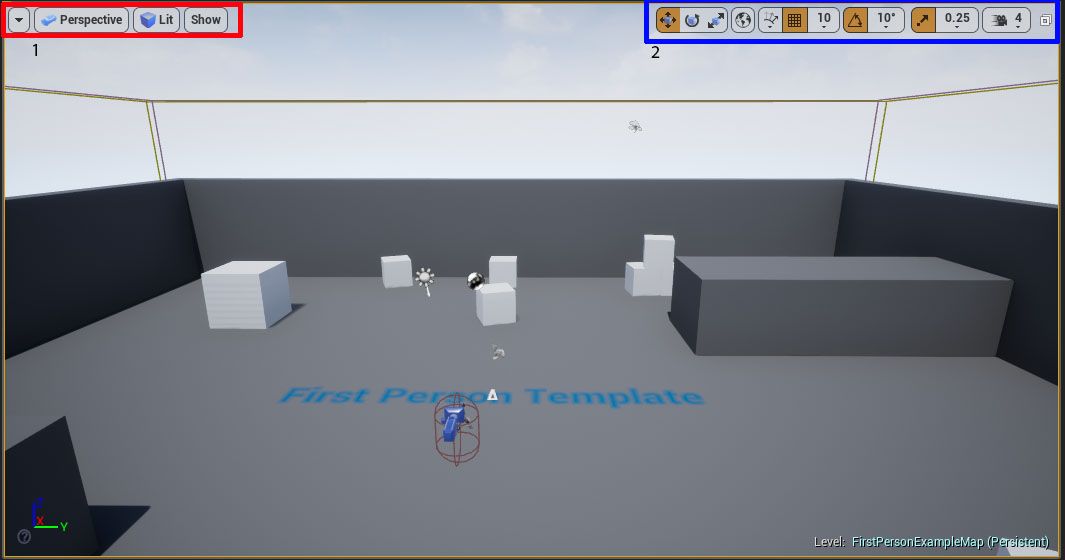
1 Viewport options:
- Changing the view mode
- Changing the light and shadow mode,
- showing and hiding elements in the game
2 Options for transforming objects:
- Changing the location of the object,
- Changing the size of the object,
- Object rotation
In this part of the window It is possible to set how much the object will move, increase and rotate. You can also set the camera's movement speed.
Toolbar

- Level Record
- Adding a draft to the version control eg Git or Subversion
- After clicking, the Content Browser will appear
- After clicking, Marketplace will appear
- Project settings
- Clicking opens the Blueprint window in which you can create scripts
- Creating Cinematics
- Building a project.
- Turning the game inside the editor
- Building the entire game project.
Modules
 "
"
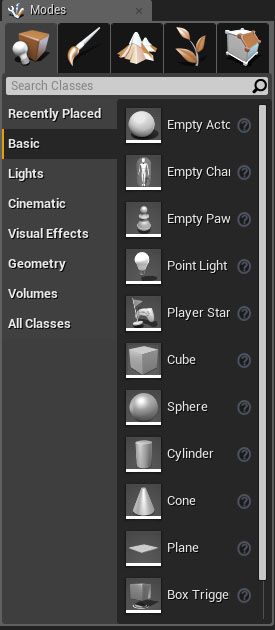
The Modules window is responsible for modules that are components of the engine. Starting from the left in the first tab there is a Place tab that is responsible for inserting basic elements such as basic solids such as a cube, cylinder. You can also find bookmarks such as Lights, Cinematics, Visual Effects, Geometry and Volumes. In the next parts of the tutotrial I will show you how to use them most effectively. Another tab is responsible for painting elements with other textures, colors. The third tab is responsible for creating the terrain and applying materials to the site. The fourth tab is responsible for group inserting objects in which you can set the size of objects and frequency. allows faster placement of elements without moving the objects. The fifth and last tab allows you to edit basic solids at your own discretion. This option allows you to quickly edit solids to create objects without using other programs to create 3D objects, such as a blender.
Content Browser

This window shows us all the files in the project. In the startup project you can find such elements as:
- Materials
- Textures
- Audio files
- Cinematics movies
- 3D models
- Maps
- Visual effects
- C ++ and Blueprint scripts
World Outliner

This window shows all objects that are currently at the selected level. It shows us the name of the object and its type.
Details
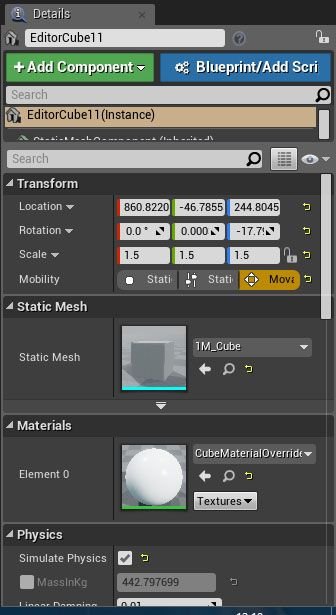
In the Details window There are details of the selected object. We will find there, among others: the location of the object, the exact name of the 3D model, the material that has been used for it, the physics settings of the object, the settings of light. When writing a script, you can share more options for different objects related to, for example, effects.
Summary
I have listed here the most important interface elements of the Unreal Engine 4 editor. While learning, it will definitely be useful for beginners who do not know this editor. More features of the function will be discussed during the next tutorial. P
Good luck in getting to know the editor.
How do you want to come to my blog matsite.pl
Polski
Ten tutorial chciałbym zacząć od pokazania interfejsu jak i pokazanie co sam klient ma nam do zaoferowania. Po włączeniu i wybraniu zakładki Unreal Engine pojawi się nam okno przedstawiający najnowsze informacje od producentów silnika. Po kliknięciu w zakładkę Library pokaże się nam takie okno:
Klient Epic Games

- Aktualnie pobrana wersja silnika.
- Projekty które aktualnie zostały stworzone.
- Zakładki odpowiadające za :
- Comunity : Najnowsze informacje na temat silnika i firmy tworzącej silnik graficzny.
- Learn : Tutoriale opracowane przez twórców silnika Unreal Engine
- Marketplace: Sklep z assetami do Unreal Engine , tutaj znajdziesz również darmowe assety do nauki
Przeglądarka projektów
Po włączeniu silnika klient pokaże nam wszystkie projekty możliwe do otwarcia. Można również stworzyć całkowicie nowy projekt.

Przy tworzeniu nowego projektu mamy do wyboru wiele przykładowych szablonów których możemy użyć do swojej gry. Znajdziemy tutaj najbardziej rozpoznawalne wzory do gier .
Są nimi na przykład :
- Widok z pierwszej osoby
- Widok z trzeciej osoby
- Widok izometryczny
- szablon do gier 2D
- szablon do gier z użyciem maszyn (na przykład samochody i inne)
- i wiele innych szablonów.
Możemy także wybrać czy chcemy używać Blueprintów w szablonach jako główny skrypt czy C ++. Poniżej mamy do wyboru czy chcemy tworzyć grę na komputery/konsole albo tablety/telefony komórkowe , ustawić jakość grafiki i czy chcemy mieć startowe assety do tworzenia gry. Na samym dole ustawiamy lokalizacje i nazwę projektu.
Edytor Unreal Engine 4
Po wczytaniu sie edytora pojawi się nam takie okno:

Edytor dzieli się na 6 okien domyślnych które można przenosić za pomocą przeciągnięcia myszą.
Okna domyśle to :
- Viewport
- Modules
- Toolbar
- Content Browser
- World Outliner
- Details
Viewport
Okno pokazująca wygląd gry w edytorze.

1 Opcje Viewportu:
- Zmianę trybu widoku
- Zmianę trybu światła i cieni,
- pokazywanie i ukrywanie elementów w grze
2 Opcje transformacji obiektów:
- Zmiana lokalizacji obiektu,
- Zmiana wielkości obiektu,
- Rotacja obiekktu
W tej części okna Jest możliwość ustawienia o ile dany obiekt będzie się przesuwać, zwiększać i obracać. Także można ustawić szybkość poruszania kamery.
Toolbar

- Zapis Poziomu
- Dodanie projektu do kontroli wersji np Git albo Subversion
- Po kliknięciu pojawi się Content Browser
- Po kliknięciu pojawi się Marketplace
- Ustawienia projektu
- Po kliknięciu otwiera się okno Blueprint w którym można tworzyć skrypty
- Tworzenie Cinematics
- Budowanie projektu.
- Włączenie gry wewnątrz edytora
- Budowanie Całego projektu gry.
Modules

Okno Modules odpowiada za moduły które są składnikami silnika. Zaczynając od lewej strony w pierwszej zakładce znajduje się zakładka Place która odpowiada za wstawianie podstawowych elementów jakimi są podstawowe bryły jak na przykład sześcian, cylinder. Można w niej także znaleźć zakładki takie jak Lights, Cinematics, Visual Effects, Geometry i Volumes. W kolejnych częściach tutotriala będe pokazywać jak z nich najefektywniej korzystać. Kolejna zakładka odpowiada za malowanie elementów innymi teksturami, kolorami. Trzecia zakładka odpowiada za tworzenie terenu i nakładanie materiałów na teren. Czwarta zakładka odpowiada za grupowe wstawianie obiektów w którym można ustawić wielkość obiektów i częstotliwość. pozwala na szybsze rozmieszczenie elementów bez pojedynczego przesuwania obiektów. Piąta i ostatnia zakładka pozwala edytować podstawowe bryły według własnego uznania. Ta opcja pozwala na szybkie edycje brył do tworzenia obiektów bez użycia innych programów do tworzenia obiektów 3D na przykład blender.
Content Browser

Te okno przedstawia nam wszystkie pliki znajdujące się w projekcie. W projekcie startowym można znaleśc takie elementy jak :
- Materiały
- Tekstury
- Pliki audio
- filmy Cinematics
- Modele 3D
- Mapy
- Efekty wizualne
- Skrypty C++ i Blueprint
World Outliner
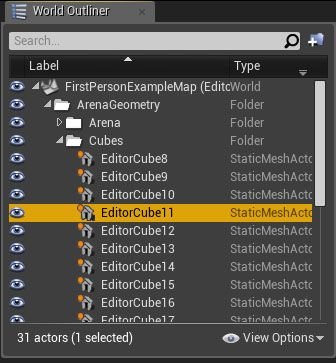
Te okno pokazuje wszystkie obiekty które w tej chwili znajdują się na wybranym poziomie. Pokazuje nam nazwę obiektu i jego typ.
Details

W oknie Details Znajdują się detale wybranego obiektu. Znajdziemy tam miedzy innymi: lokalizacje obiektu, dokładna nazwa modelu 3D, materiał jaki został do niego użyty, ustawienia fizyki obiektu, ustawienia światła. Podczas pisania skryptu można udostępniać więcej opcji dla różnych obiektów związanych np z efektami.
Podsumowanie
Wymieniłem tutaj najważniejsze elementy interfejsu edytora Unreal Engine 4. Podczas nauki na pewno przyda się dla początkujących którzy nie znają tego edytora. Więcej funkcji funkcji omówię podczas następnego tutoriala. P
Powodzenia w poznawaniu edytora .
Jak chcesz wpadnij na mojego bloga matsite.pl
Pozdrawiam!
Downvoting a post can decrease pending rewards and make it less visible. Common reasons:
Submit