Repository
https://github.com/django/django
What Will I Learn?
I intend to cover the following concepts in this part of the tutorial, which gives the user a basic understanding of Django.
- You will learn to build the models required.
- You will learn to create required forms to take inputs from user.
- You will learn to create different class-based views for doing operations such as
Creation, Updation, Listing, Viewing, and Deletion.
In the upcoming parts, you will learn:
- Custom operations in views.
- User creation and authentication.
- Sharing To-Dos with other users.
- Deploying the web app.
Requirements
State the requirements the user needs in order to follow this tutorial.
- Basic knowledge of Python
- Basic knowledge about Django
- A text editor or IDE preferred by the user
Difficulty
- Basic difficulty.
Tutorial Contents
Through this series of tutorials, I intend to give you the basic idea on how to develop web applications using Django
Introduction
We use the Django framework which is built with Python in this tutorial for creating the To-Do app.
Django is a very fast growing and popular framework used for creating complex, scalable web apps, easily. Django is
powered by a very large and supportive community, which makes it a very good choice for creating web apps.
So let's begin.
1. Setting up the environment.
It is a very good practice for creating a virtual environment for each app you develop in python. It helps you isolate the packages required for your project from the system-wide packages. Also, it is easy to create requirements.txt which is used to install the requirements in a separate pc or environment in which you deploy or test the app.
First of all, install virtualenv using the following command in the terminal,
pip install virtualenv
Create a folder for your project. I'm gonna call this RemindMe, so create a folder named RemindMe. and cd into it
mkdir RemindMe
cd RemindMe
then create a virtualenv in the directory. Name it what you like.
virtualenv mind-env
Activate it
source mind-env/bin/activate
We are gonna need some libraries including Django to start developing. So install them.
pip install django django-widget-tweaks
Django widget tweaks is a cool library which helps us in creating the forms easily.
Wait for them to get installed.
Now our environment is ready. The above procedure may be common for any app you create using python.
2. Creating the project
To create the project django gives us a terminal command 'startproject' which can be used with django-admin which is a CLI app.
django-admin startproject RemindMe .
Mind the dot '.' after RemindMe. This prevents the creation of a separate project folder, which we have already created.
Now we have the following directory structure inside our Project directory
RemindMe            //Project directory
.
|-- RemindMe
|-- manage.py
`-- mind-env
Now we have to do some migrations to initialise some prebuilt apps in django, like auth, admin, contentypes etc. Further commands are given using the file manage.py.
./manage.py migrate
This will do all the migrations.
Now to ensure everything went well, start the development server.
./manage.py runserver
This will start the development server in http://127.0.0.1:8000. Open it in any web browser to see it yourself.
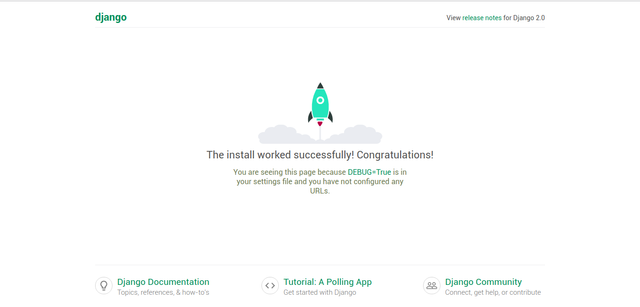
If you see this, then everything went well and you're good to go to the next step, else please go through the above instructions once again.
3. Creating the app.
Django introduced an app concept to encapsulate related operations into a single portable module. So we use it to implement the operations we want. To create an app,
./manage.py startapp todo
After creating the app you have to add it to the INSTALLED_APPS list in settings.py.
# RemindMe/settings.py

INSTALLED_APPS = [
    '...', # Other apps
    'widget_tweaks', # Django widget tweaks
    'todo', # app we just created
]
4. Creating models for To-Do
Models are used to create tables and perform operations in records in the tables on an SQL database in Django. So we don't have to explicitly write the SQL queries for the operations. The default database used in Django is SQLite.
To create a new To-Do, we need the basic details such as a title, a description and an optional deadline for it. So we can create the model as shown below.
Edit the models.py file in todo folder to add the below lines, to create a basic model for todo.
# todo/models.py

from django.db import models
from django.urls import reverse

class Todo(models.Model):
    title = models.CharField(max_length=200)
    description = models.CharField(max_length=500)
    deadline = models.DateTimeField(blank=True, null=True)

    class Meta:
        ordering = ['deadline']  # To oder the records in ascending order of deadline

    def __str__(self):
        """
        Used to return string representation of the object
        """
        return self.title

    def get_absolute_url(self):
        """
        Used to return success url when object is created or edited
        """
        return reverse('view-todo', kwargs={'pk': self.id}) # reverse returns the url associated with a name, here 'detail'
5. Creating the Views.
Views are interfaces given to the end user to interact with the data. HTML templates are created for this purpose. There are two ways to create views in Django, function-based views and class-based views.
Django provides some prebuilt classes called generic views from which you can inherit to implement basic operations like View, Create, Update and Delete etc.
So here we are using class-based views for easy implementations of the above operations.
The code below will list all the Todos.
# todo/views.py

from todo.models import Todo
from django.views.generic import ListView

class ReminderList(ListView):
    model = Todo
    template_name = 'index.html'
That's it. the above class-based view will return the HTML template index.html with a context variable object_list which you can iterate through to display each of the existing todo objects in the template.
We need to create the HTML template now.
Create a templates folder inside the app directory, todo/templates
Django is configured default to look into the templates folder in inside the app directories.
Now create index.html inside the templates folder.
{# todo/templates/index.html #}

<!DOCTYPE html>
<html lang="en">
<head>
    <meta charset="UTF-8">
    <title>Remind Me</title>
    <link href="https://stackpath.bootstrapcdn.com/bootstrap/4.1.1/css/bootstrap.min.css" type="text/css" rel="stylesheet">
    <script src="https://stackpath.bootstrapcdn.com/bootstrap/4.1.1/js/bootstrap.min.js"></script>
    <style>
        .top-buffer { margin-top:20px; }
    </style>
</head>
<body style="width: 100%">
<nav class="navbar navbar-dark bg-primary">
    <a class="navbar-brand" href="/">RemindMe</a>
</nav>
<div class="container top-buffer">
{% block body %}
    <a class="btn btn-success float-right" href="{% url 'new-todo' %}">New Todo</a>
    <div class="row">
        <h1 class="col-md-12">Todo List</h1>
        <div class="col-md-12 row">
        {% for todo in object_list %}  {#  Iterating through the object_list  #}
            <div class="col-md-3">
                <div class="card">
                    <div class="card-header">
                        {{ todo }} {#  Displays Title  #}
                    </div>
                    <div class="carcodesd-body">
                        <div>{{ todo.deadline }}</div> {#  Displays deadline of todo  #}
                    </div>
                    <div class="card-footer">
                    <div class="row">
                        <div class="col-md-6">
                            <a class="btn btn-primary" href="{% url 'view-Todo' Todo.id %}">View</a> {# We will create the detail view shorly, 'view-Todo' is the 'name' assigned in the path function in the urls.py #}
                        </div>
                        <div class="col-md-6 float-right">
                            <a class="btn btn-danger" href="{% url 'del-Todo' Todo.id %}">Delete</a>  {# We will create the delete view shorly,  'del-Todo' is the 'name' assigned in the path function in the urls.py #}
                        </div>
                    </div>
                    </div>
                </div>
            </div>
        {% empty %}
            <p>No todos, Add one using <b>New Todo</b> button</p>
        {% endfor %}
        </div>
    </div>
{% endblock %}
</div>
</body>
</html>
If you check the above code you might encounter some lines that doesn't look anything like HTML tags. They are django template tags.
You can learn what each of them does in here : Built in template tags. Also you can create custom ones with desired functionality. The library
django-widget-tweaksactually provides us with some custom template tags which is helpful in rendering forms, we'll see it shortly.
I'll explain the tags used above here,
{# Comments here #}: Used for commenting in templates.{% block block_name %} {% endblock %}: These are useful to extend templates. You can reuse the existing templates by extending them using an{% extends 'template_name.html' %}in other templates. An implementation of this can be viewed increate.html.{% for object in object_list %} {% endfor %}: Used for iterating through a list or an iterator.{% empty %}: Used in for loop tags to display something when the iterator or list is empty.{{ todo }}: Used to render the context variables, (here todo is a context variable)
We will now create the view for creating a new Todo.
Before creating the view, we need a form to be displayed in the template, which receives the user input to create the todo such as title, description, and deadline. To create the forms, add a new file forms.py in the app directory.
Code below shows the form class for our todo model. You just have to specify the model and fields you need to include in the form inside the metaclass to simply create a form from a model, all other operations are encapsulated into the parent class ModelForm. Inheritance is good, ain't it?
# todo/forms.py

from django import forms
from todo.models import Todo

class TodoForm(forms.ModelForm):
    class Meta:
        model = Todo
        fields = ['title', 'description', 'deadline']
Now in the generic create view, specify the form_class
# todo/views.py

from todo.forms import TodoForm
from django.views.generic import CreateView

class TodoCreate(CreateView):
    model = Todo
    form_class = TodoForm # form we just created
    template_name = 'create.html'
Let's create the template create.html, see how it extends the
{# todo/templates/create.html #}

{% extends 'index.html' %} {# Extending index.html #}
{% load widget_tweaks %} {# Loading custom tags from django-widget-tweaks #}
{% block body %} {# Overriding block body, now the contents in index.html is replaced with new content #}
<h2>New Todo</h2>
<form method="post">
    {% for field in form %}
    <div class="form-group">
    <label>{{ field.label }}</label>
        {% if field.label == "Date" %}
        {% render_field field class="form-control" placeholder="mm/dd/yyyy hh:mm:ss" %} {% Custom template tag from django-widget-tweaks %}
        {% else %}
        {% render_field field class="form-control" placeholder=field.label %}
        {% endif %}
    </div>
    {% endfor %}
    {% csrf_token %} {# Cross Site Reference Forgery Token (Django Inbuilt) #}
    <button type="submit" class="btn btn-success">Submit</button>
</form>
{% endblock %}
A
{% csrf_token %}tag is used to add an hidden input along with form to prevent Cross Site Reference Forgery Attacks,
luckily it is prebuilt in Django and we don't have to bother about it. You need to use everytime you create a form in
django.
Similarly an update view can also be created.
from django.views.generic import UpdateView

class TodoUpdate(UpdateView):
    model = Todo
    form_class = TodoForm
    template_name = 'create.html'
Update view utilizes the same template as create, as it requires only the form as in case f creation of a new todo.
Note: The update, detail, and delete views requires a unique identifier to identify the object we indend
to edit. We usually pass a primary key or id along with the URL inorder to identify the desired object.
We will see this shortly while allocating urls to the views.
We need a detail view to display a expanded todo details along with the description. For that we will create a detail view.
from django.views.generic import DetailView

class TodoDetail(DetailView):
    model = Todo
    template_name = 'detail.html'
Create detail.html in todo/templates
{% extends 'index.html' %}
{% block body %}
<div>
    <h2>{{ todo.title }}</h2>
    <table class="table">
        <tr>
            <th>Description</th>
            <td>{{ todo.description }}</td>
        </tr>
        <tr>
            <th>Date</th>
            <td>{{ todo.deadline|date:'m/d/y' }}</td>
        </tr>
        <tr>
            <th>Time</th>
            <td>{{ todo.deadline|time }}</td>
        </tr>
    </table>
    <a href="{% url 'edit-todo' reminder.id %}" class="btn btn-warning">Edit</a>
    <a href="{% url 'del-todo' reminder.id %}" class="btn btn-danger">Delete</a>
</div>
{% endblock %}
Now the Delete View,
# todo/views.py

from django.urls import reverse
from django.views.generic import DeleteView

class TodoDelete(DeleteView):
    model = Todo
    template_name = 'delete.html'

    def get_success_url(self):
        return reverse('index') # reverse returns the url associated with name 'index'
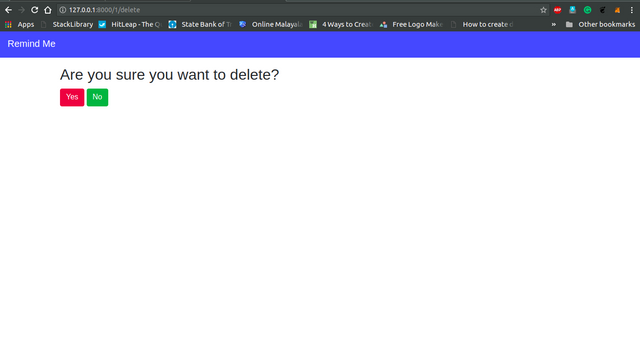
Now the template for delete, The template expects to have a confirmation form for the action delete.
{% extends 'index.html' %}
{% block body %}
<div class="content">
    <form method="post">
        <h2>Are you sure you want to delete?</h2>
        {% csrf_token %}
        <button class="btn btn-danger" type="submit">Yes</button>
        <button class="btn btn-success" type="button" onclick="goBack()">No</button>
    </form>
</div>
<script>
    // Javascript function to go back, incase if user clicks 'No'
    function goBack() {
        window.history.back();
    }
</script>
{% endblock %}
6. Assigning URLs to the Views
We need to assign a URL for each view, such that the user can access them through a web browser. For that, we will create a new file urls.py in the app directory.
# todo/urls.py

from django.urls import path

# Import all views
from todo.views import TodoList, TodoCreate, TodoDetail, TodoUpdate, TodoDelete

urlpatterns = [
    # Todo list view is used here as the index (the page at '/')
    path('', TodoList.as_view(), name='index'),

    # Create view ('/new')
    path('new', TodoCreate.as_view(), name='new-todo'),

    # Detail View ('/1')
    path('<pk>', TodoDetail.as_view(), name='view-todo'),

    # Update View ('/1/edit')
    path('<pk>/edit', TodoUpdate.as_view(), name='edit-todo'),

    # Delete View ('/1/delete')
    path('<pk>/delete', TodoDelete.as_view(), name='del-todo')
]
The user is redirected to the object's detail view is also when the object gets created or updated. This is done by
overriding the get_absolute_url method of the Model (Todo). Refer the model creation section.
Each URL is assigned a name in order to access them easily in templates using the {% url 'view-name' %} tag.
If you look closely, you might notice that there is a <pk> in some of the URLs of detail view, update view and delete view,
As I have mentioned before, we need to uniquely identify the object we are applying operation in these views. These classes expect
the primary key or pk as a keyword argument in the url.
So here I am passing
the 'pk' or Primary key, which is inbuilt for the models in django and is auto-incremented each time an object is created
The pk can be passed inside the {% url %} tag like this:
{% url 'detail' todo.id %} as shown in the index.html (as the href attribute of the View button)
Finally we need to include this urls.py in the global urls.py inside RemindMe directory. Add this line in the urlpatterns list path('', include('todo.urls')).
Now RemindMe/urls.py looks like this
# RemindMe/urls.py

from django.contrib import admin
from django.urls import path, include

urlpatterns = [
    path('admin/', admin.site.urls),
    path('', include('todo.urls')),
]
We have successfully created a todo web app. Run it by starting the development server:
./manage.py runserver
Goto http://127.0.0.1:8000 to view your app.
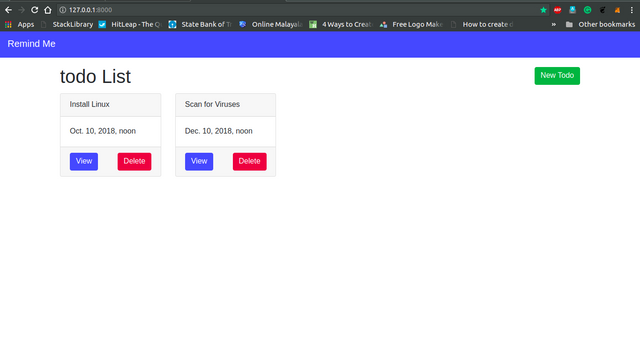
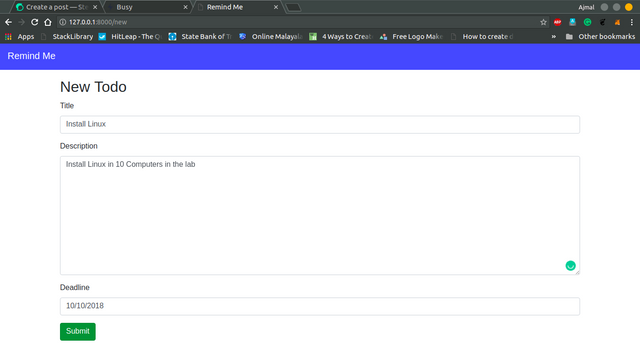
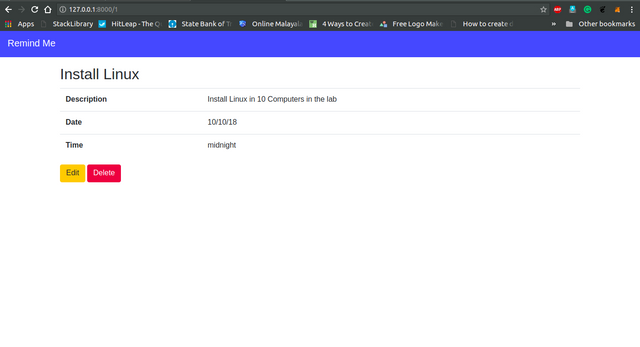
Following are the different views.
Index (List of todos)
Creating a new todo
Details view of todo
Deleting a todo
I am concluding this part of my tutorial here, On the upcoming parts I intend to include User authentication and sharing the To-Dos with other users in the app. Stay tuned, Thanks.
Proof of Work Done
Remind Me Github Repo link: https://github.com/ajmaln/RemindMe
Thank you for your contribution.
Need help? Write a ticket on https://support.utopian.io/.
Chat with us on Discord.
[utopian-moderator]
Downvoting a post can decrease pending rewards and make it less visible. Common reasons:
Submit
Thanks for the tip. I'll try to bring something innovative next time.
Downvoting a post can decrease pending rewards and make it less visible. Common reasons:
Submit
Congratulations! This post has been upvoted from the communal account, @minnowsupport, by ajmaln from the Minnow Support Project. It's a witness project run by aggroed, ausbitbank, teamsteem, theprophet0, someguy123, neoxian, followbtcnews, and netuoso. The goal is to help Steemit grow by supporting Minnows. Please find us at the Peace, Abundance, and Liberty Network (PALnet) Discord Channel. It's a completely public and open space to all members of the Steemit community who voluntarily choose to be there.
If you would like to delegate to the Minnow Support Project you can do so by clicking on the following links: 50SP, 100SP, 250SP, 500SP, 1000SP, 5000SP.
Be sure to leave at least 50SP undelegated on your account.
Downvoting a post can decrease pending rewards and make it less visible. Common reasons:
Submit
wow! a very detail tutorial, I might need to start off with a python tutorial since i dont have any basic
Downvoting a post can decrease pending rewards and make it less visible. Common reasons:
Submit
Do learn. It's fun and easy as well.
Downvoting a post can decrease pending rewards and make it less visible. Common reasons:
Submit