Repository
https://github.com/facebook/react
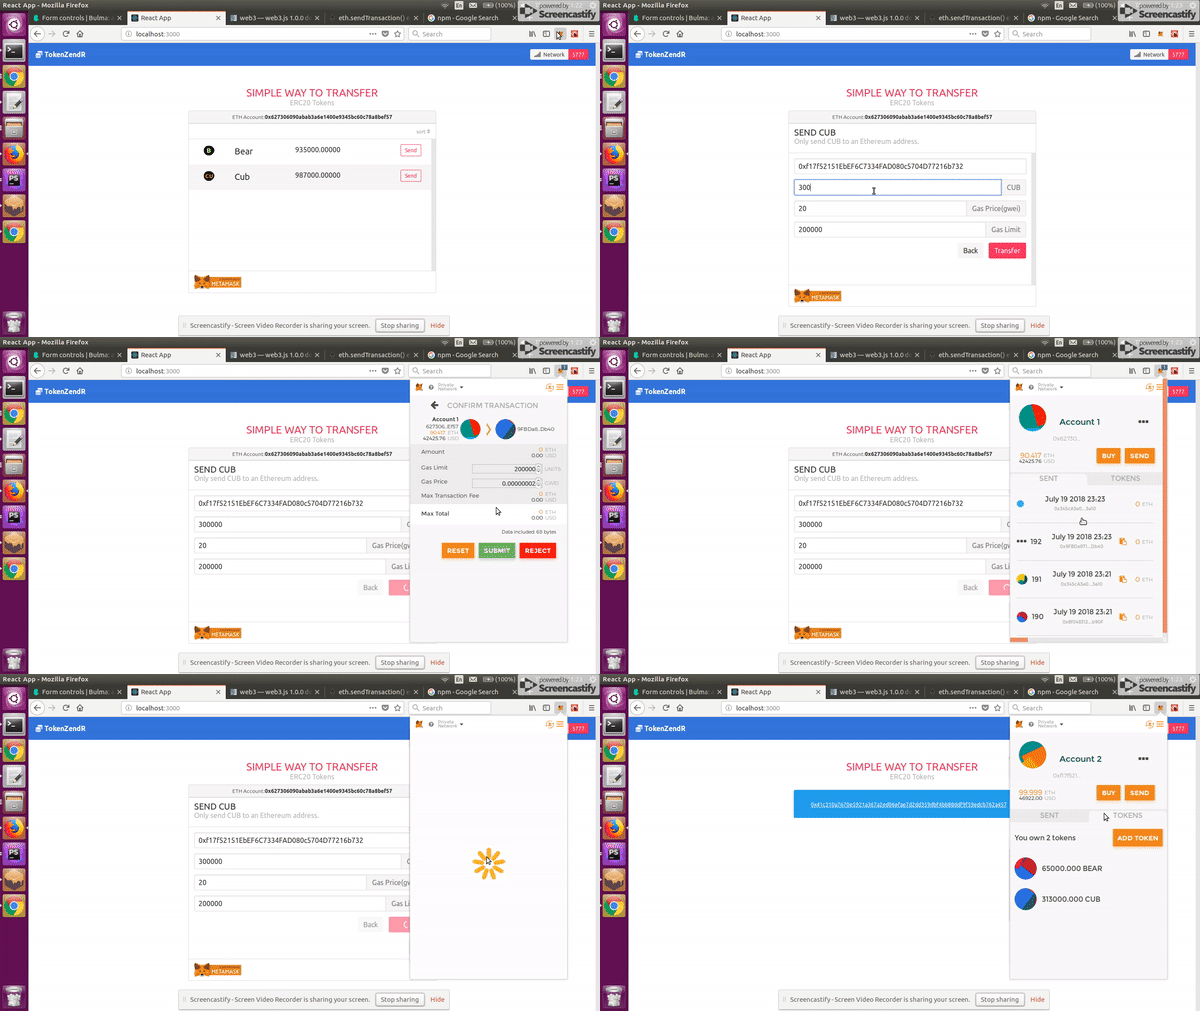
Overview
In my last Post i wrote a tutorial on how you can code a smart contract that helps you transfer any of your ERC20 compatible token to another address, be it exchange wallet , metamask or MEW. And we were able to write tests to assert that our smart contract works the way we want it to, also interact with it via the truffle console. If you have not checked it out yet, you probably should.
This tutorial is a second part where we would build a clean interface using React together with Truffle Contract ,web3js and Bulma for UI, that a user visiting our application can use to interact with the smart contract on the blockchain.
What Will I Learn?
In the second part of this tutorial, you will learn how to:
- Build standard Dapps interfaces using React
- Architecting And Workflow for easily building an interface for Dapps, built with truffle
- Using Truffle Contract in combination with Web3 to interact with our contract on the blockchain
Requirements
For this tutorial, it's required for you to clone the repository from the previous tutorial, although it's not a requirement to read the first tutorial before you jump right into this one, as each tutorial address two different aspects of building an Ethereum Dapps and therefore can be considered self-contained.
- Clone the token-zender smart contract https://github.com/slim12kg/tokenzendr-contract
- Trufflesuite installed installation guide here
- Ganache installed private blockchain server
- Metamask installed install for chrome,firefox,opera
- npx installed (npx comes with with npm 5.2+)
- Basic knowledge of React
This tutorial assumes you are using a UNIX operating system
Difficulty
- Intermediate
Tutorial Contents
To start with, create a new react app
npx create-react-app token-zendr
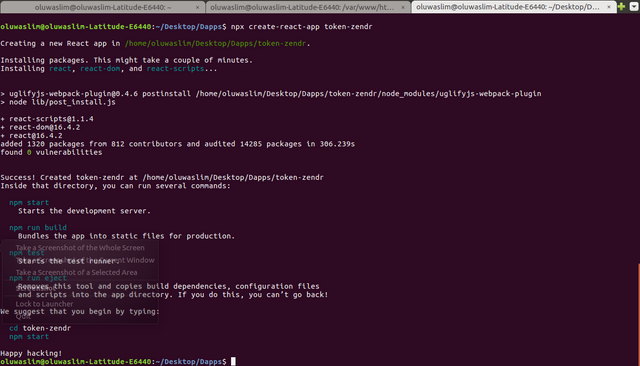
Remeber ealier we mention we will be using web3js, bulma & truffle contract. Now is the time to install them, to do so replace your project package.json with what you see below, then run npm install
{
  "name": "token-zendr",
  "version": "0.1.0",
  "private": true,
  "dependencies": {
  "bulma-start": "0.0.2",
  "react": "^16.4.2",
  "react-dom": "^16.4.2",
  "react-scripts": "1.1.4",
  "truffle-contract": "^3.0.6",
  "web3-js": "^1.0.5-beta.26"
  },
  "scripts": {
  "start": "react-scripts start",
  "build": "react-scripts build",
  "test": "react-scripts test --env=jsdom",
  "eject": "react-scripts eject"
  }
}
After successfull installation of the packages, fire up your app with npm start, your default browser will automatically fire up a new tab with the default react screen showing. Leave the tab open.
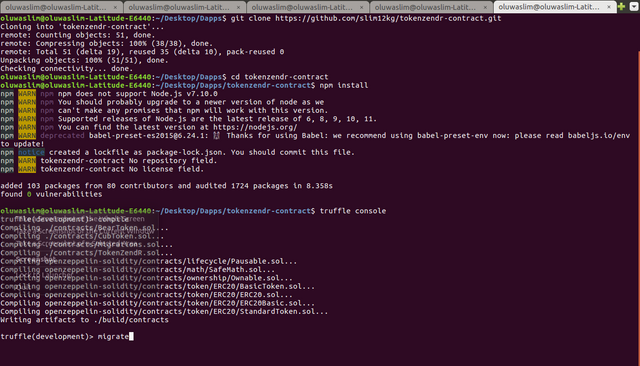
Before we proceed forward i need you to clone the smart contract that handles the transfer and deploy it on a your private blockchain (Ganache).
Note : Ganache must have been started on your machine before you run the following commands
git clone https://github.com/slim12kg/tokenzendr-contract.git

cd tokenzendr-contract

npm install

truffle console

truffle(development)> compile

truffle(development)> migrate
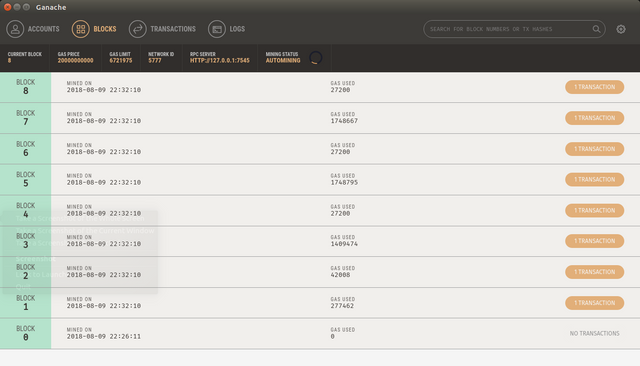
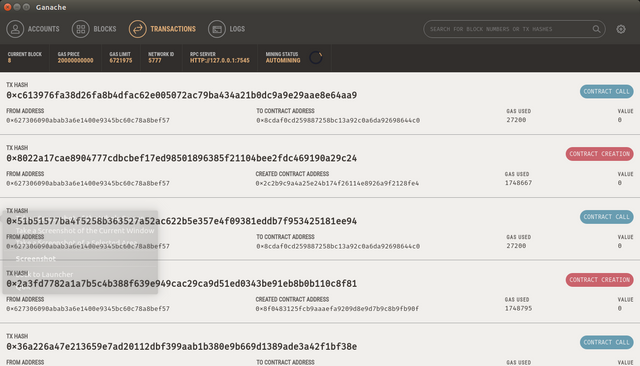
If you open your Ganache, you should see the transactions mined and new blocks created similar to the images below
8 Blocks Mined
Transactions Log Showing Contract Creation & Call
One of the challenges, developers new to building ethereum Dapps faces is to have to always edit the address of the contract in thier code anytime the contract is redeployed. To solve the issue, my approach is to create a soft link of the build directory in the token tokenzendr-contract to the src directory of our new project.
This ensures that anytime the contract is redeployed we will be referencing the updated contract address. Genuis !!
From your command line run this command, substituiting your project path in the command as it applies to your project
//Remember to substituite your project path as it applies to you
ln -s ~/Desktop/Dapps/tokenzendr-contract/build/ ~/Desktop/Dapps/token-zendr/src!
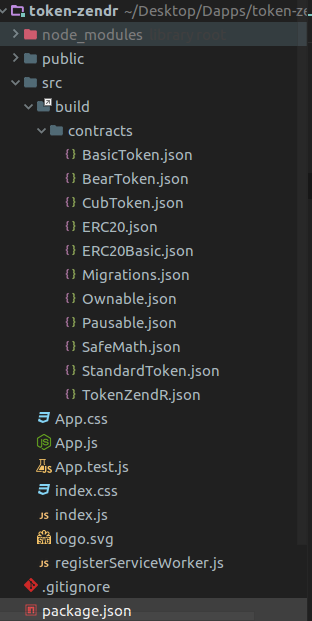
If your screenshot looks like what we have above then you should carry on with the tutorial, else check that you specified the correct directory path and have substituited correctly the directory path that applies to you.
As a autonomous smart developer, we want to only support to transfer some vetted tokens or maybe the token creator will have to pay us to support the transfer of their token on our platform. The smart contract already have a method to add or remove supported tokens, but on our frontend we want to also do the same thing, but this time just list them in a json file with the token address, name, symbol, decimal.
Looking back on the smart contract we deployed to our private blockchain, one important thing to realise is that we did not only deploy the smart contract that handles the token transfer but also two ERC20 tokens (BearToken, CubToken) contract that we will be using for testing purpose in this tutorial. We will be transfering them between two addresses in our wallet which will be connected to the same same network they were deployed to.
Now that i've mentioned about two token been deployed alongside our transfer contract, you need to connect your metamask to custom RPC. Click on mainnet a dropdown will drop with the available option to select custom RPC, click this option and enter the address http://127.0.0.1:7545 for new RPC.
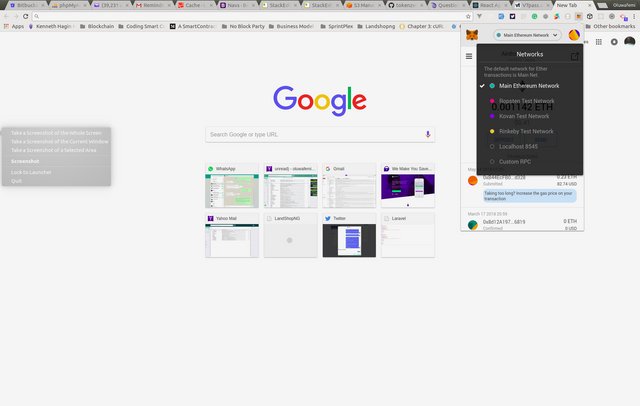
Enter new RPC URL
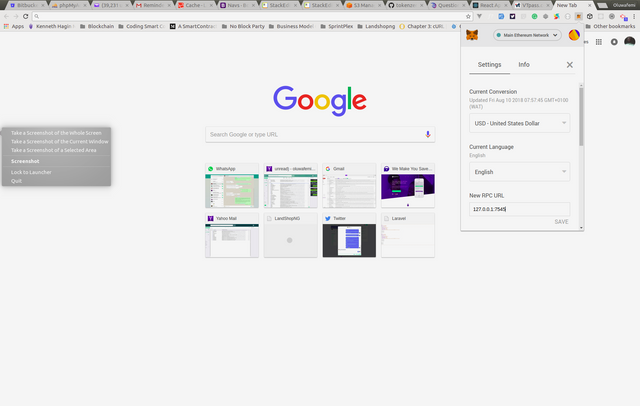
See the first address same as the one in Ganache show up with the same balance
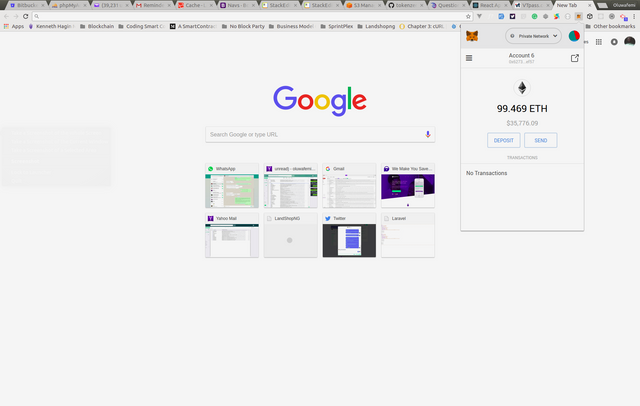
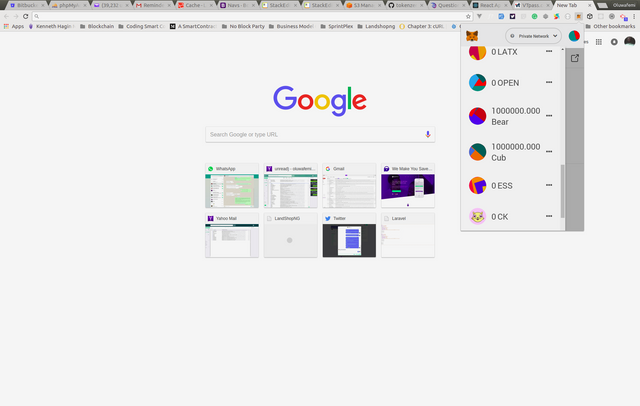
When the two tokens contract was deployed, it assigns all the total token supply to the address that was used to deploy the contract, in our own case the first account. We want the token balances to show in our wallet, this way you see your balance history as you make transfers, to do this simply open the contract directory of the build folder we created soft link for ealier, you would see files BearToken.json and CubToken.json files. Under the networks section copy the address (contact address) value and add them as new tokens to metamask.
...
"networks": {
  "5777": {
  "events": {},
  "links": {},
  "address": "0x8f0483125fcb9aaaefa9209d8e9d7b9c8b9fb90f",
  "transactionHash": "0x2a3fd7782a1a7b5c4b388f639e949cac29ca9d51ed0343be91eb8b0b110c8f81"
  }
},
...
We will begin by start writing our react components. This tutorial is a not beginners post therefore we won't be coding all from scratch as this will obviously take a longer time. Instead i will pick at each component at a time and mention the role each play while relating it to the App.js file.
Oh, one quick addition to the setup process, create a Tokens directory in the src directory of the project, add three files all.js, Bear.js and Cub.js. The Bear.jsand Cub.jswill carry the information of the each tokens such as the address, decimal, name, symbol, icon and most importantly the abi and this will be the process of adding a new supported token. You can get the address, decimal and abi from the json file of each tokens in the build directory, usually on mainnet you can always get this information from etherscan.io
Finally create icons folder in the public folder and add the cub and bear token icons. You can find them here https://github.com/slim12kg/token-zendr-react-interface/tree/master/public/icons
In actual sense, the ABI (Application Baniary Interface) will contain much more information than displayed below.
export default {
  address: "0x8f0483125fcb9aaaefa9209d8e9d7b9c8b9fb90f",
  decimal: 5,
  name: "BearToken",
  symbol: "Bear",
  icon: "bear_x28.png",
  abi: [
     {
        "constant": true,
        "inputs": [],
        "name": "name",
        "outputs": [
            {
                "name": "",
                "type": "string"
             }
        ],
       ...,
       "name": "Transfer",
      "type": "event"
      }
     ]
 }
Create a Components folder in the src directory, add the following components
//InstallMetamask.js
import React from 'react';

function InstallMetamask() {
  return (
 <div className="modal is-active">
     <div className="modal-background"></div>
     <div className="modal-content">
         <p className="image download-metamask">
             <a href="https://metamask.io/" rel="noopener noreferrer" target="_blank">
             <img src="https://metamask.io/img/metamask.png" alt=""></img>
             </a>
         </p>
     </div>
     <button className="modal-close is-large" aria-label="close"></button>
 </div>
 )}

export default InstallMetamask;
This is a notification component that shows up when a user doesn't have metamask installed.
//UnlcokMetaMask.js
import React from 'react';

function UnlockMetamask(props) {
  return (
     <div className="column is-4 is-offset-4">
         <div className="notification is-danger">
             <button className="delete"></button>
             {props.message}
         </div>
     </div>
 )}

export default UnlockMetamask;
This is also a notification component that displays a warning if the user metamask account is locked.
//Nav.js
import React, { Component } from 'react';
class Nav extends Component {
render(){
return (
<nav className="navbar is-link" aria-label="main navigation">
<div className="navbar-brand">
<a className="navbar-item" href="/">
<strong><i className="fa fa-coins"></i> {this.props.appName}</strong>
</a>
<a role="button" className="navbar-burger" aria-label="menu" aria-expanded="false">
<span aria-hidden="true"></span>
<span aria-hidden="true"></span>
<span aria-hidden="true"></span>
</a>
</div>
<div className="navbar-menu">
<div className="navbar-end">
<a className="navbar-item">
<div className="tags has-addons">
<span className="tag">
<i className="fa fa-signal"></i> Network
</span>
<span className="tag is-danger">{this.props.network}</span>
</div>
</a>
</div>
</div>
</nav>
)
}
}
export default Nav;
This component purpose is to serve as our application nav. Its is passed the value of the network we are curretly connect to.
//Description.js
import React from 'react';

function Description(props) {
  return (
     <section className="container">
         <div className="has-text-centered content">
             <br/>
             <h1 className="title is-4 is-uppercase has-text-danger">Simple Way To Transfer</h1>
             <h2 className="subtitle is-6 has-text-grey-light">ERC20 Tokens</h2>
         </div>
     </section>
 )}

export default Description;
Simply a component to add a descripion for our application. I used Easy Way To Transfer ERC20 Tokens, you can modify it to whatever suites you
//Container.js

import React, { Component } from 'react';
import AddressBar from './AddressBar';
import TokenBlock from './TokenBlock';
import TradeMarkBlock from './TradeMarkBlock';
import SortTokenBlock from './SortTokenBlock';
import TransferToken from './TransferToken';
import TransferHeader from './TransferHeader';
import SuccessTransaction from './SuccessTransaction';

class Container extends Component {
  render(){
      return (
         <section className="container">
             <div className="columns">
                <div className="is-half is-offset-one-quarter column">
                         <div className="panel">
                         {  this.props.tx ?
                         <SuccessTransaction tx={this.props.tx} /> :
                          ''
                          }

                     <AddressBar account={this.props.account} tx={this.props.tx}/>
                     {
                         this.props.transferDetail.hasOwnProperty('name') ?
                         <div>
                             <TransferHeader token={this.props.transferDetail} />
                             <TransferToken closeTransfer={this.props.closeTransfer}
                                          transferDetail={this.props.transferDetail}
                                          fields={this.props.fields}
                                          account={this.props.account}
                                          Transfer={this.props.Transfer}
                                          inProgress={this.props.inProgress}
                                          defaultGasPrice={this.props.defaultGasPrice}
                                          defaultGasLimit={this.props.defaultGasLimit}
                                          onInputChangeUpdateField={this.props.onInputChangeUpdateField}/>
                     </div> :
                     <div className={this.props.tx ? 'is-hidden' : ''}>
                         <SortTokenBlock />
                         <TokenBlock newTransfer={this.props.newTransfer} tokens={this.props.tokens} />
                     </div>
                     }
                     <TradeMarkBlock tx={this.props.tx}/>
                     </div>
                 </div>
             </div>
         </section>
         )
     }
 }

export default Container;
This Container component holds several other components , toggles some components display as state changes and passes down their respectives props to them passed from app.js to it.
AddressBar Component displays the address of the active account
TokenBlock Component list the supported tokens available in a user wallet
TradeMarkBlock Component card footer shows images of badges
SortTokenBlock Component to sort list of only supported tokens in a wallet ASC/DESC
TransferToken Component contains the form to make transfer. It takes the address, amount to transfer and gas limit
TransferHeader Component shows information of token initiated for transfer, its name and description
SuccessTransaction Component displays notification message that shows right after a successfull transfer
Finally is our App.js that handle our state and event and passes data to the Container component. I will be commenting each section of the code to shed more light.
import React, { Component } from 'react';
import Web3 from 'web3'
import TruffleContract from 'truffle-contract'
import Tokens from './Tokens/all';
import Nav from './Components/Nav';
import Description from './Components/Description';
import Container from './Components/Container';
import InstallMetamask from './Components/InstallMetamask';
import UnlockMetamask from './Components/UnlockMetamask';
import TokenZendR from './build/contracts/TokenZendR.json';

class App extends Component {
  constructor(){
      super();

      this.tokens = Tokens;  //list of supported tokens by token-zendr contract
      this.appName = 'TokenZendR';
      this.isWeb3 = true; //If metamask is installed
      this.isWeb3Locked = false; //If metamask account is locked

      //bind this methods to enable them change state from children components
      this.newTransfer = this.newTransfer.bind(this);
      this.closeTransfer = this.closeTransfer.bind(this);
      this.onInputChangeUpdateField = this.onInputChangeUpdateField.bind(this);

      this.state = {
          tzAddress: null,          //address of the token-zendr contract
          inProgress: false,        //if a transfer action is in progress
          tx: null,                 //tx returned after a successfull transaction
          network: 'Checking...',   //default message to show while detecting network
          account: null,            //address of the currently unlocked metamask
          tokens: [],               //list of supported tokens owned by the user address
          transferDetail: {},
          fields: {                 //form fields to be submitted for a transfer to be initiated
              receiver: null,
              amount: null,
              gasPrice: null,
              gasLimit: null,
         },
         defaultGasPrice: null,
         defaultGasLimit: 200000
      };

      let web3 = window.web3;

      //set web3 & truffle contract
      if (typeof web3 !== 'undefined') {
          // Use Mist/MetaMask's provider
          this.web3Provider = web3.currentProvider;
          this.web3 = new Web3(web3.currentProvider);

          this.tokenZendr = TruffleContract(TokenZendR);
          this.tokenZendr.setProvider(this.web3Provider);

          if (web3.eth.coinbase === null) this.isWeb3Locked = true;

     }else{
      this.isWeb3 = false;
     }
 }

  //switch statement to check the current network and set the
  //value to be displayed on the nav component
  setNetwork = () => {
      let networkName,that = this;

      this.web3.version.getNetwork(function (err, networkId) {
      switch (networkId) {
      case "1":
          networkName = "Main";
          break;
      case "2":
          networkName = "Morden";
          break;
      case "3":
          networkName = "Ropsten";
          break;
      case "4":
          networkName = "Rinkeby";
          break;
      case "42":
          networkName = "Kovan";
          break;
      default:
          networkName = networkId;
     }

     that.setState({
          network: networkName
       })
    });
 };

 //When a new transfer is initiated
 //set details of the token to be
 //transfered such as the address, symbol.. etc
  newTransfer = (index) => {
      this.setState({
      transferDetail: this.state.tokens[index]
     })
 };

  //Called at the end of a successful
  //transfer to cclear form fields & transferDetails
  closeTransfer = () => {
      this.setState({
          transferDetail: {},
          fields: {},
     })
 };

  setGasPrice = () => {
      this.web3.eth.getGasPrice((err,price) => {
          price = this.web3.fromWei(price,'gwei');
          if(!err) this.setState({defaultGasPrice: price.toNumber()})
     });
 };

  setContractAddress = ()=> {
      this.tokenZendr.deployed().then((instance) => {
      this.setState({tzAddress: instance.address});
     });
 };

 //Reset app state
  resetApp = () => {
      this.setState({
          transferDetail: {},
          fields: {
              receiver: null,
              amount: null,
              gasPrice: null,
              gasLimit: null,
         },
         defaultGasPrice: null,
     })
  };

  Transfer = () => {
      //Set to true to allow some component disabled
      //and button loader to show transaction progress
      this.setState({
          inProgress: true
      });

      //Use the ABI of a token at a particular address to call its methods
      let contract = this.web3.eth.contract(this.state.transferDetail.abi)
                          .at(this.state.transferDetail.address);
      let transObj = {
      from: this.state.account,
      gas: this.state.defaultGasLimit,
      gasPrice: this.state.defaultGasPrice
      };
      let app = this;
      //Use the decimal places the token creator set to get actual amount of tokens to transfer
      let amount = this.state.fields.amount + 'e' + this.state.transferDetail.decimal;
      let symbol = this.state.transferDetail.symbol;
      let receiver = this.state.fields.receiver;

  amount = new this.web3.BigNumber(amount).toNumber();

  //Approve the token-zendr contract to spend on your behalf
  contract.approve(this.state.tzAddress, amount ,transObj, (err,response)=>{
      if(!err) {
          app.tokenZendr.deployed().then((instance) => {
              this.tokenZendrInstance = instance;
              this.watchEvents();

              //Transfer the token to third party on user behalf
              this.tokenZendrInstance.transferTokens(symbol, receiver, amount, transObj)
                 .then((response,err) => {
                      if(response) {
                          app.resetApp();

                          app.setState({
                              tx: response.tx,
                              inProgress: false
                          });
                     }else{
                      console.log(err);
                     }
                 });
             })
         }else{
          console.log(err);
         }
     });
 };

 /**
 * @dev Just a console log to list all transfers
 */
 watchEvents() {
  let param = {from: this.state.account,to: this.state.fields.receiver,amount: this.state.fields.amount};

  this.tokenZendrInstance.TransferSuccessful(param, {
      fromBlock: 0,
      toBlock: 'latest'
  }).watch((error, event) => {
      console.log(event);
     })
 }

  onInputChangeUpdateField = (name,value) => {
      let fields = this.state.fields;

      fields[name] = value;

      this.setState({
          fields
      });
 };

  componentDidMount(){
      let account = this.web3.eth.coinbase;
      let app = this;

      this.setNetwork();
      this.setGasPrice();
      this.setContractAddress();

      this.setState({
          account
      });

      //Loop through list of allowed tokens
      //using the token ABI & contract address
      //call the balanceOf method to see if this
      //address carries the token, then list on UI
      Tokens.forEach((token) => {
          let contract = this.web3.eth.contract(token.abi);
          let erc20Token = contract.at(token.address);

      erc20Token.balanceOf(account,function (err,response) {
          if(!err) {
              let decimal = token.decimal;
              let precision = '1e' + decimal;
              let balance = response.c[0] / precision;
              let name = token.name;
              let symbol = token.symbol;
              let icon = token.icon;
              let abi = token.abi;
              let address = token.address;

              balance = balance >= 0 ? balance : 0;

              let tokens = app.state.tokens;

              if(balance > 0) tokens.push({
                  decimal,
                  balance,
                  name,
                  symbol,
                  icon,
                  abi,
                  address,
             });

              app.setState({
                  tokens
              })
            }
         });
     });
 }

  render() {
      if(this.isWeb3) {
          if(this.isWeb3Locked) {
          return (
             <div>
                 <Nav appName={this.appName} network={this.state.network} />
                 <UnlockMetamask message="Unlock Your Metamask/Mist Wallet" />
             </div>
         )
         }else {
          return (
             <div>
                 <Nav appName={this.appName} network={this.state.network} />
                 <Description />
                 <Container onInputChangeUpdateField={this.onInputChangeUpdateField}
                              transferDetail={this.state.transferDetail}
                              closeTransfer={this.closeTransfer}
                              newTransfer={this.newTransfer}
                              Transfer={this.Transfer}
                              account={this.state.account}
                              defaultGasPrice={this.state.defaultGasPrice}
                              defaultGasLimit={this.state.defaultGasLimit}
                              tx={this.state.tx}
                              inProgress={this.state.inProgress}
                              fields={this.state.fields}
                              tokens={this.state.tokens} />
             </div>
            )
        }
    }else{
         return(
            <InstallMetamask />
         )
        }
     }
 }

export default App;
Rename the app.css in src folder and replace it with the style below.
img.meta-trademark {
  width: 20%;
}

#token-lists {
  height: 300px;
  overflow-y: scroll;
}

#token-lists div.token:nth-child(even) {
  background: #f5f5f5;
}

#token-lists div.token {
  cursor: pointer;
}

.sortby {
  font-weight: 300;
  cursor: pointer;
}

.token-icon {
  width: 28px;
  height: 28px;
}

.download-metamask {
  height: 30%;
  cursor: pointer;
  width: 70%;
  margin: auto;
}

.is-ellipsis {
  overflow: hidden;
  text-overflow: ellipsis;
}
Add font-awesome library CDN to your public/index.html
<!DOCTYPE html>
<html lang="en">
<head>
 <meta charset="utf-8">
 <meta name="viewport" content="width=device-width, initial-scale=1, shrink-to-fit=no">
 <meta name="theme-color" content="#000000">
 <script defer
 src="https://use.fontawesome.com/releases/v5.1.0/js/all.js"></script>
  (html comment removed:
 manifest.json provides metadata used when your web app is added to the homescreen on Android. See https://developers.google.com/web/fundamentals/engage-and-retain/web-app-manifest/ )  <link rel="manifest" href="%PUBLIC_URL%/manifest.json">
 <link rel="shortcut icon" href="%PUBLIC_URL%/favicon.ico">
 <title>React App</title>
</head>
<body>
<noscript>
  You need to enable JavaScript to run this app.
</noscript>
<div id="root"></div>
</body>
</html>
By now the application will be displaying but without bulma styling, to fix this problem we need to include bulma in the src/index.js file. Simply replace your index.js with this
import React from 'react';
import ReactDOM from 'react-dom';
import App from './App';
import '.././node_modules/bulma-start/css/main.css'
import './app.css';


ReactDOM.render(<App />, document.getElementById('root'));
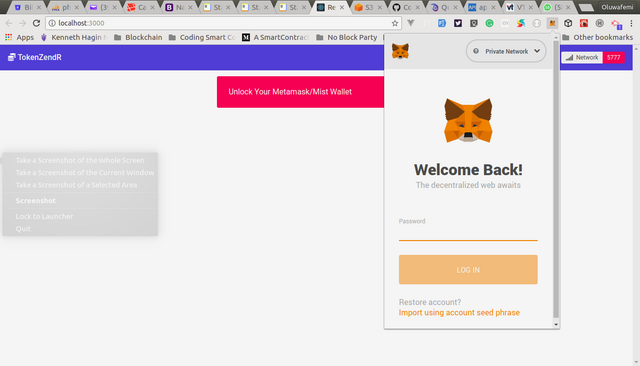
Run npm start or refresh the application if its already opened. When i do so the first screen am presented with because my metamask account is locked is this screenshot below.
Then i enter my metamask password, refresh the application and Voila!!
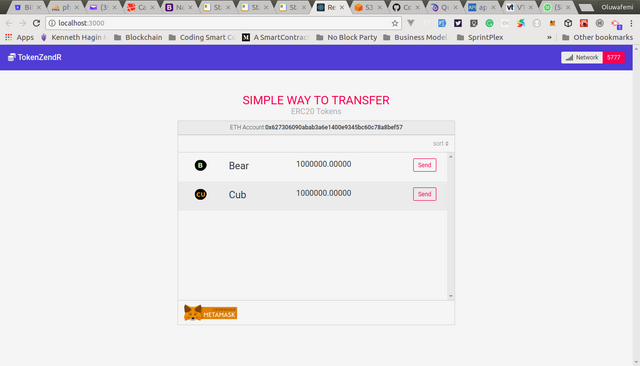
Interact with the application and see what else you can add. I hope you find this tutorial well explained, very educative with quality content. Let me hear your thought in the comment section.
Curriculum
- Part A - Create A Smart Contract That Transfers ERC20 Tokens To Any ERC20 Compliant Address
- Part B - Ethereum Dapps With ReactJS + Truffle Contract + Web3, Building A UI For TokenZendR A Smart Contract That Transfers ERC20 Tokens To Other Addresses
Proof of Work Done
https://github.com/slim12kg/tokenzendr-contract.git
https://github.com/slim12kg/token-zendr-react-interface
Thank you for your contribution.
While I liked the content of your contribution, I would still like to extend one advice for your upcoming contributions:
Your contribution has been evaluated according to Utopian policies and guidelines, as well as a predefined set of questions pertaining to the category.
To view those questions and the relevant answers related to your post, click here.
Need help? Write a ticket on https://support.utopian.io/.
Chat with us on Discord.
[utopian-moderator]
Downvoting a post can decrease pending rewards and make it less visible. Common reasons:
Submit
Thank's for your review @portugalcoin.
Downvoting a post can decrease pending rewards and make it less visible. Common reasons:
Submit
Thank you for your review, @portugalcoin!
So far this week you've reviewed 8 contributions. Keep up the good work!
Downvoting a post can decrease pending rewards and make it less visible. Common reasons:
Submit
Hey @alofe.oluwafemi
Thanks for contributing on Utopian.
We’re already looking forward to your next contribution!
Want to chat? Join us on Discord https://discord.gg/h52nFrV.
Vote for Utopian Witness!
Downvoting a post can decrease pending rewards and make it less visible. Common reasons:
Submit
Congratulations @alofe.oluwafemi! You have completed the following achievement on Steemit and have been rewarded with new badge(s) :
Click on the badge to view your Board of Honor.
If you no longer want to receive notifications, reply to this comment with the word
STOPDownvoting a post can decrease pending rewards and make it less visible. Common reasons:
Submit
Congratulations @alofe.oluwafemi! You have completed the following achievement on Steemit and have been rewarded with new badge(s) :
Click on the badge to view your Board of Honor.
If you no longer want to receive notifications, reply to this comment with the word
STOPDo not miss the last post from @steemitboard:
SteemitBoard and the Veterans on Steemit - The First Community Badge.
Downvoting a post can decrease pending rewards and make it less visible. Common reasons:
Submit
Congratulations @alofe.oluwafemi! You have completed the following achievement on the Steem blockchain and have been rewarded with new badge(s) :
Click here to view your Board of Honor
If you no longer want to receive notifications, reply to this comment with the word
STOPDo not miss the last post from @steemitboard:
Downvoting a post can decrease pending rewards and make it less visible. Common reasons:
Submit
Congratulations @alofe.oluwafemi! You received a personal award!
You can view your badges on your Steem Board and compare to others on the Steem Ranking
Do not miss the last post from @steemitboard:
Vote for @Steemitboard as a witness to get one more award and increased upvotes!
Downvoting a post can decrease pending rewards and make it less visible. Common reasons:
Submit
Downvoting a post can decrease pending rewards and make it less visible. Common reasons:
Submit
Downvoting a post can decrease pending rewards and make it less visible. Common reasons:
Submit