Introduction:
In this tutorial I will show you how to setup Linux Operating System Ubuntu (Lubuntu variant) Inside Windows Operating System. This will enable you to use Linux application without building a new computer or reformatting your existing computer. I will keep this tutorial as short and simple as possible so no to waste your time.
Software Requirements:
- Oracle VirtualBox Emulation Software
- Lubuntu ISO installation image 32-bit version
- Windows OS 64-bit version
Hardware Requirements:
Network requirement:
- Internet connection
Procedure:
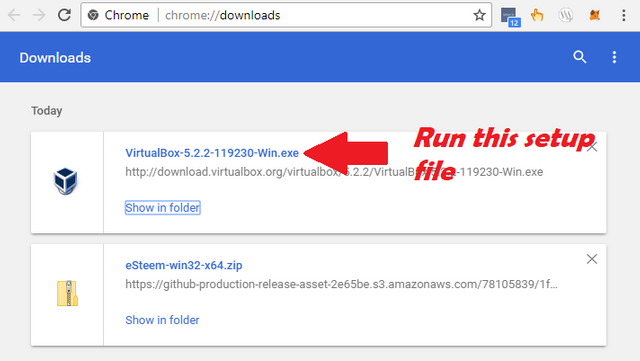
Step 1/3 Installation of Oracle VirtualBox. This is a Free Open-Source Program that enables your computer to run an Operating Systems as an application in your existing Operating system. Download a Free copy of VirtualBox here. After downloading run the setup file. Press CRTL+J to bring you to the chrome downloads page:
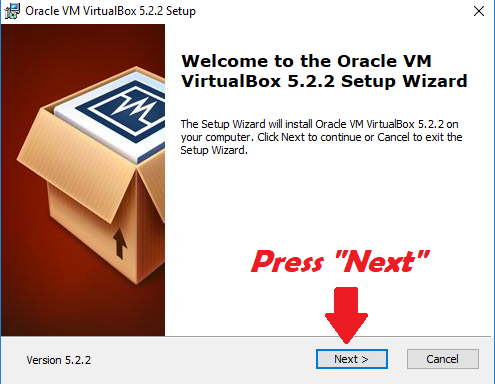
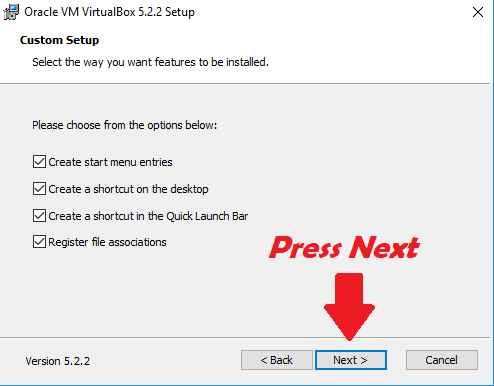
Double click on the setup file to start VirtualBox installation. After double clicking on the setup file you will see this pop-up installation window. Click on Next to commence setup.
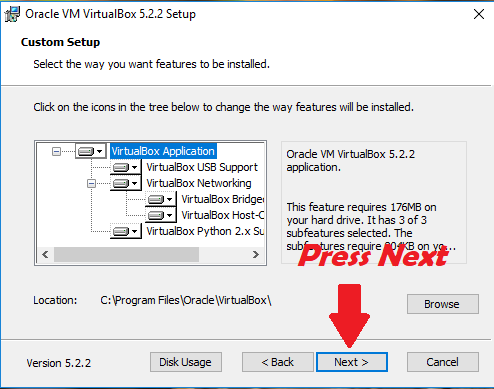
Don't change anything for the next two windows. Just continue with the installation by clicking on the button "next."
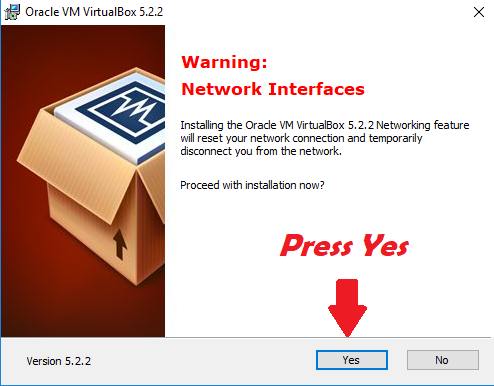
Just click "Yes" button This will install network features.
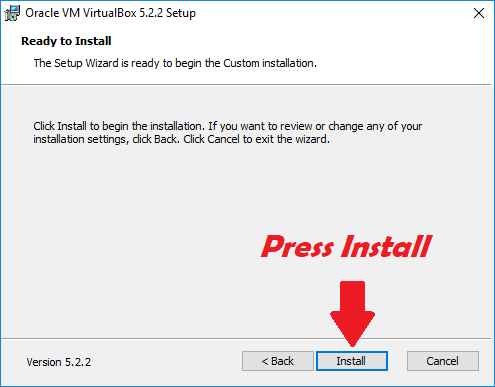
Click "install" button to install the other components of the Virtual computer.
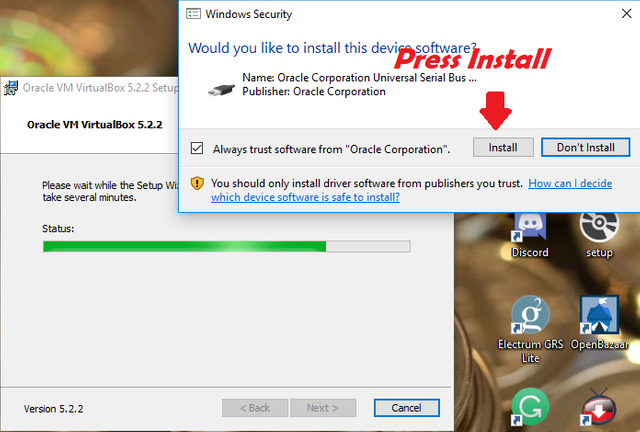
Just click "install" button to install additional features.
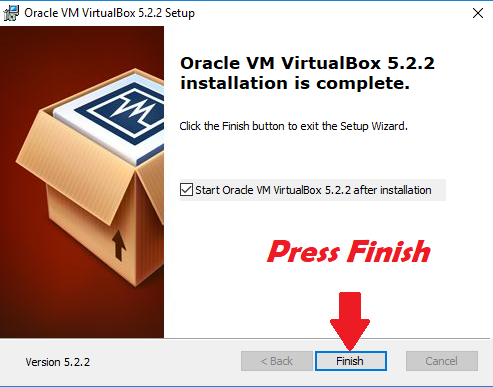
This is the last page of the installation. Once you reach this page you can finish the installation by clicking on "Finish" button. Make sure you have ticked the ticker box to automatically start VirtualBox right after you click on "Finish" button.
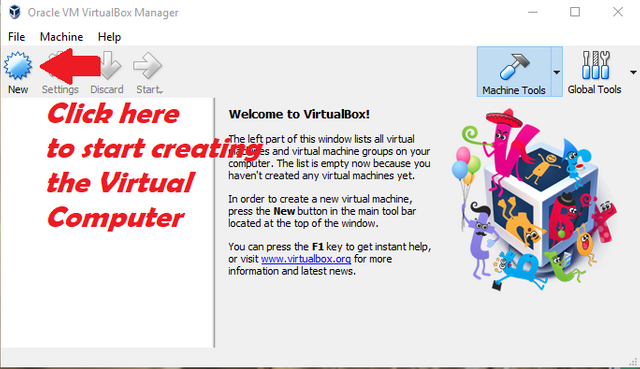
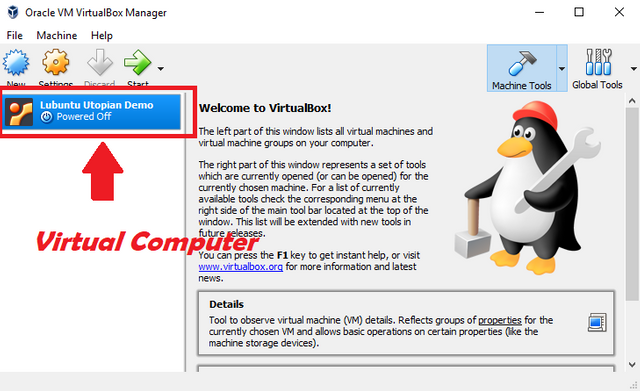
Upon clicking on the "Finish" button, the VirtualBox will open. We can now start creating the Virtual Computer. Click on the "New icon" to start.
STEP 2/3 After installation of the VirtualBox we staring creating the Virtual Computer where we will install the Linux Operating System (Ubuntu-Lubuntu).
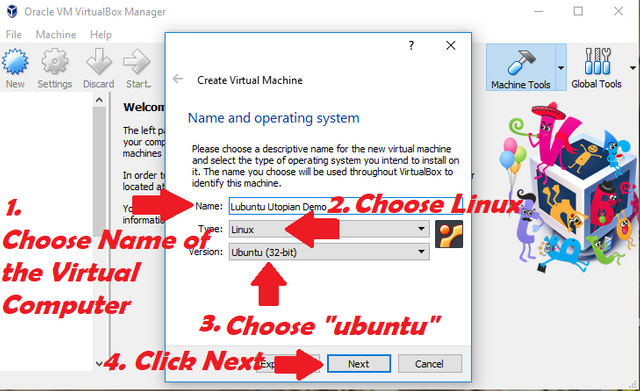
After clicking "New" It will bring you to this page where it will ask you to Input the desired name of your Virtual Computer as well at the Type and Specific Operating System you will use. After Inputting the name and selecting the type and version click "Next" button.
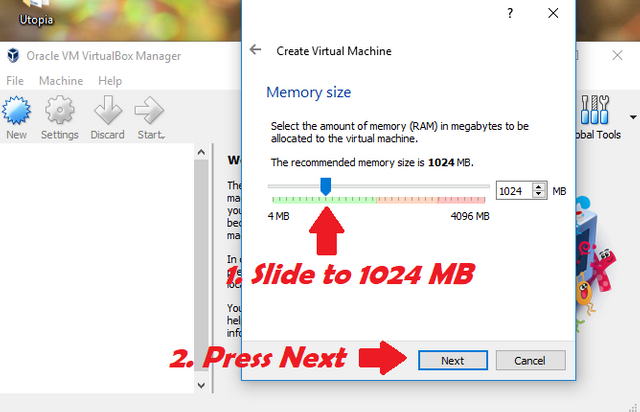
We allocate the amount of RAM the Virtual Computer will use at this page. For demonstration purposes I chose 1GB only or 1024MB.
We will allocate around 10GB of Hard disk space for our virtual computer. Choose "Create virtual hard disk now" then click "Next" button.
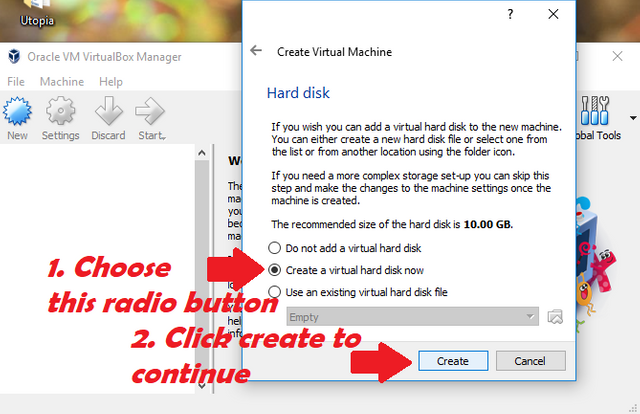
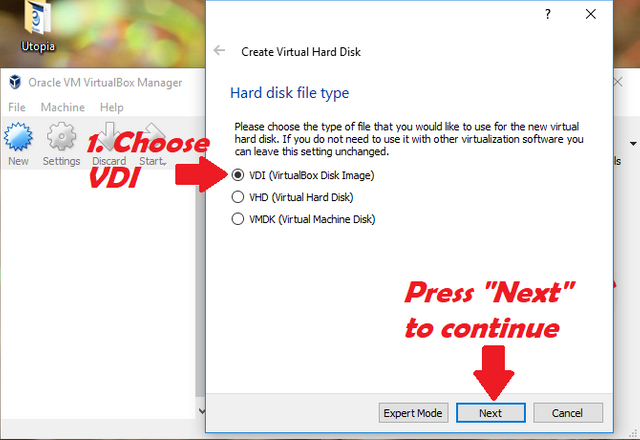
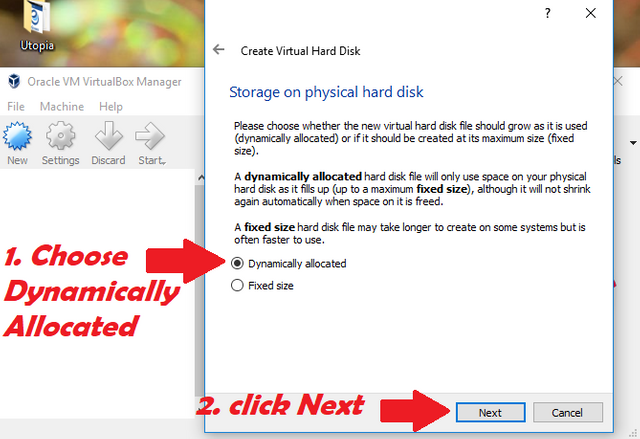
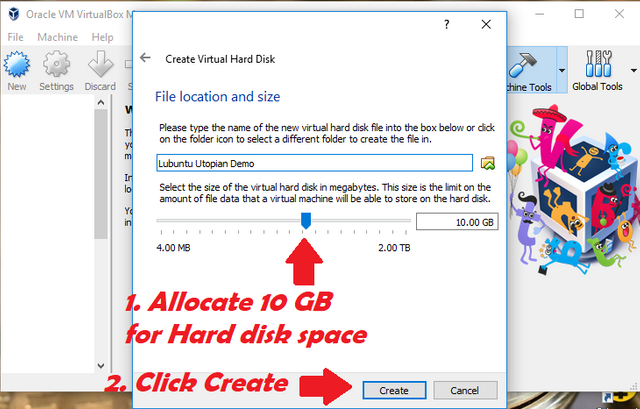
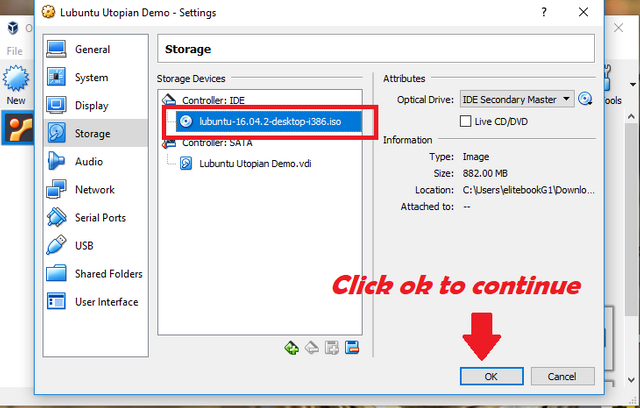
The VirtualBox app will create the Virtual Computer/Machine once we are done creating the Virtual Hard disk. We need to "Right-Click" on the the Lubuntu Utopian Demo virtual computer to configure Lubuntu ISO installation location, display and video card settings.
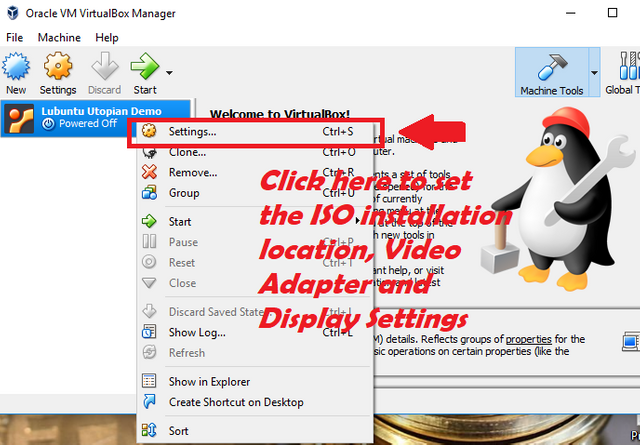
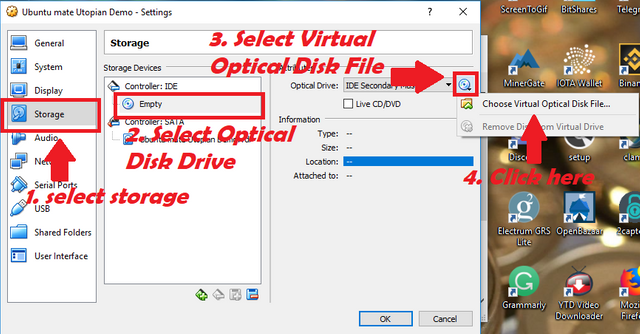
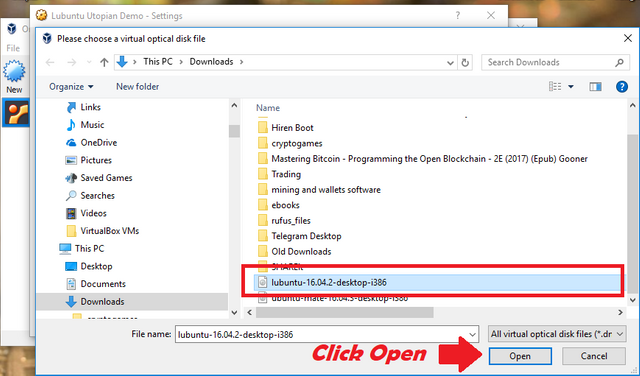
First we select the the Optical Disk File which i will be the installation source of our Virtual Operating System.
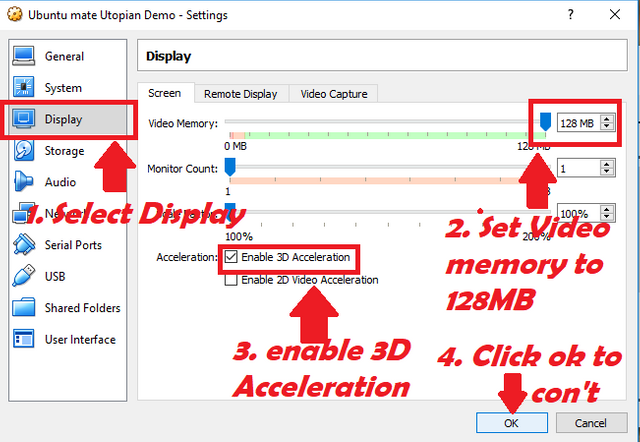
Now we setup the display and video graphics specification.
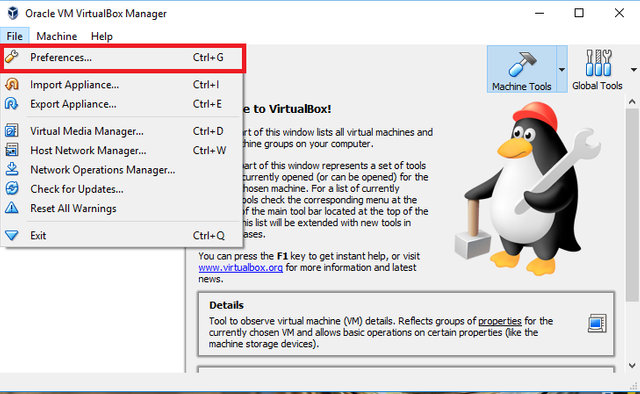
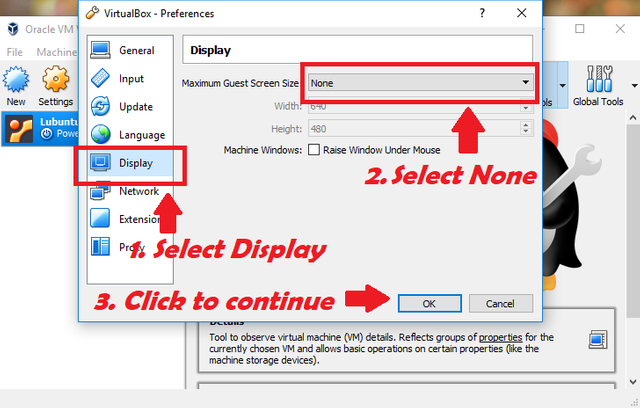
After the configuration we are now ready to install the Ubuntu/Lubuntu in our Virtual Computer. To do this we need to start the Virtual Computer by pressing the "Start" button.
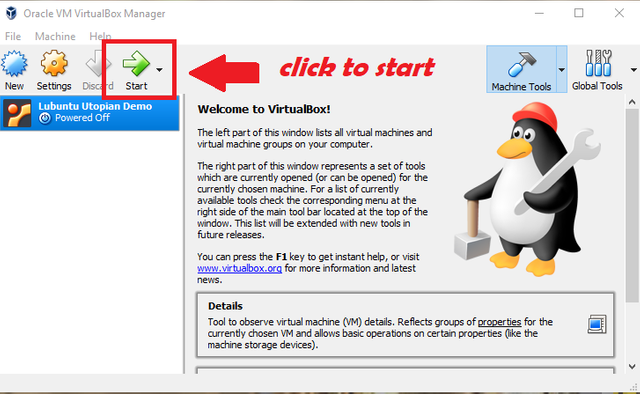
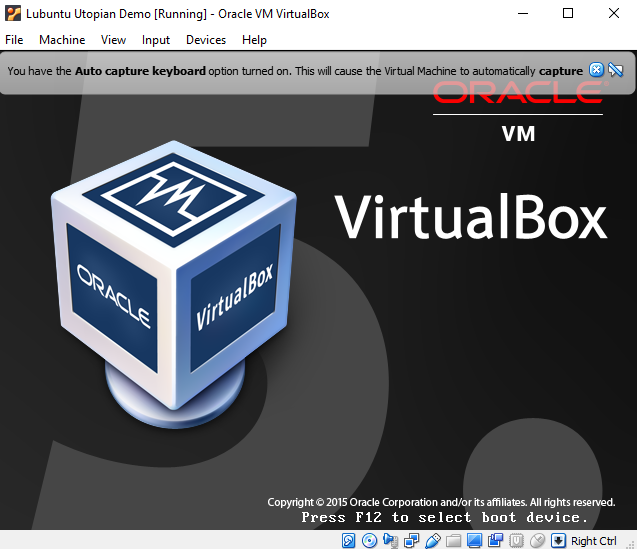
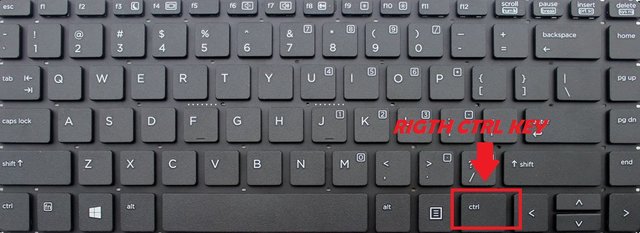
Step 3/3 In this section we start the process of installing the Guess operating system into the Virtual Computer/Machine that we have just created. Please note the at first when you click inside the program your mouse and keyboard and keyboard will be captured inside the virtual computer. You can release the mouse and keyboard by pressing the right Crtl key (sample picture shown below).
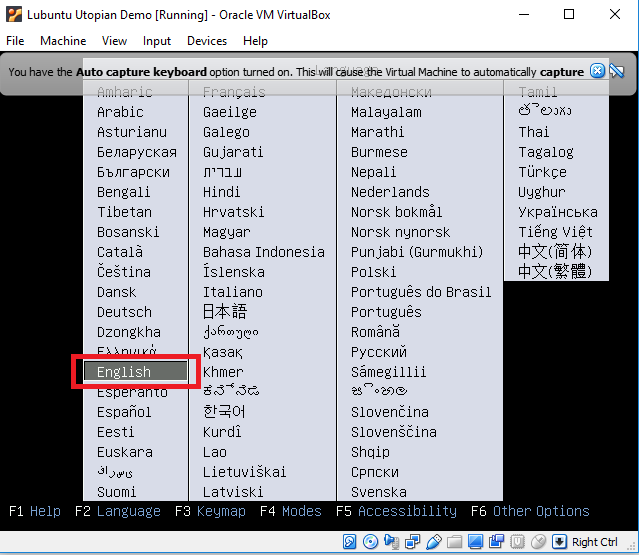
When you reach this point in the installation process, we are asked if we want to "Ubuntu/Lubuntu" without installing or install Lubuntu and other testing options. The first option is a viable option if we just want to take a peak of the operating system. The second options is the best option if we want to test and use the guess operating system and make some files using it. We choose install to proceed with the installation.
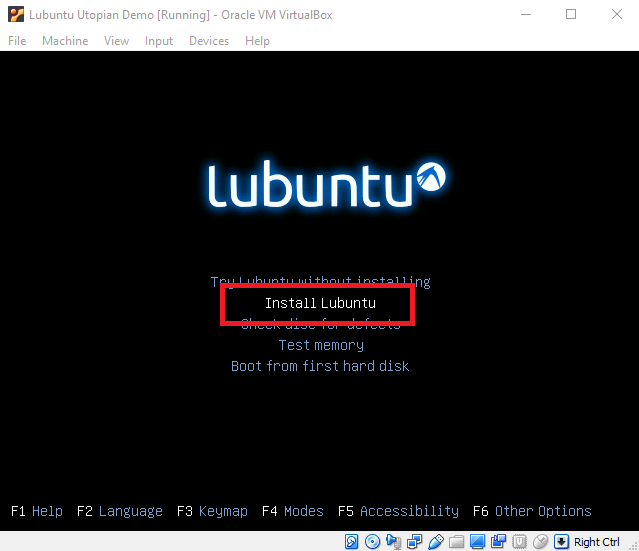
Choose the language and proceed with the installation by clicking on the "Continue" button.
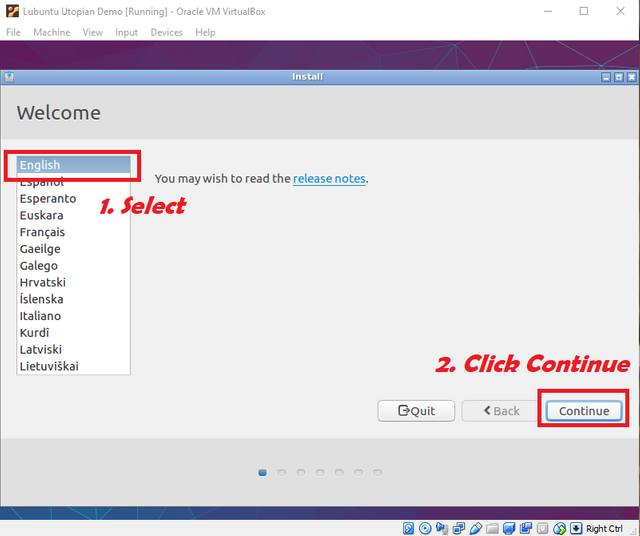
On this screenpage we do not need to select any selection here to hasten the installation process. What ever packaged or additional files needed for the smooth operation of the guest operating system can be done later.
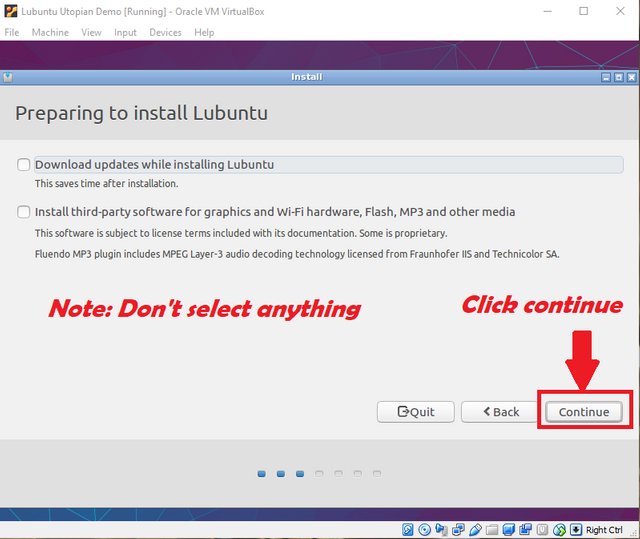
The next page will ask you the installation type. Just Choose "Erase disk and install Lubuntu." No worries there is nothing to erase since there is the no files on the Virtual Hard disk that we created moments ago. After selecting "Erase disk and install Lubuntu" click "install now" and a pop up menu will come up. just click "continue." to proceed
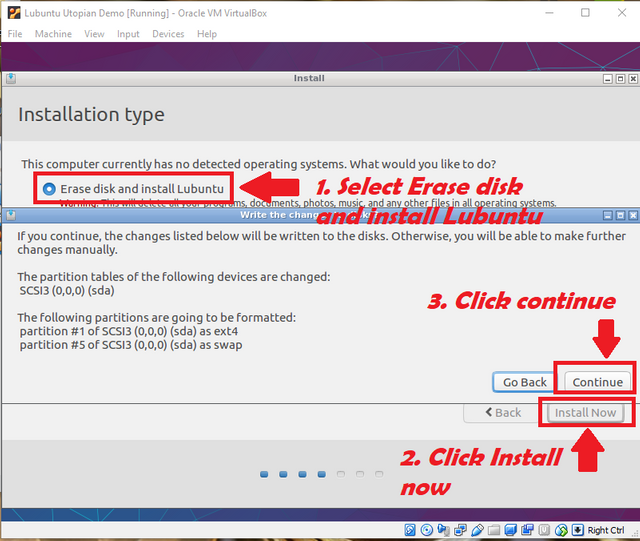
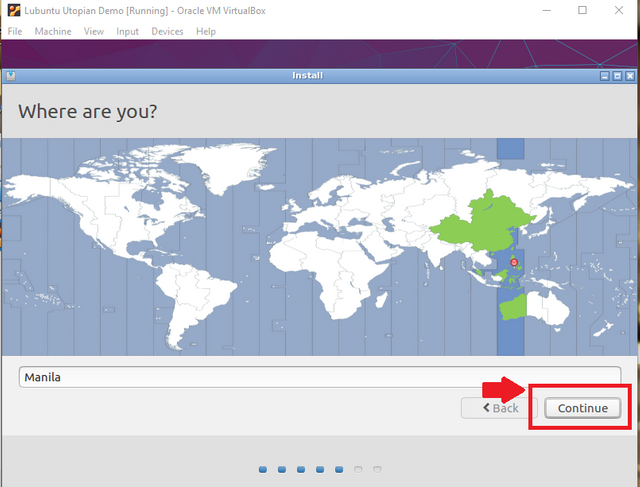
This page will ask you your location. Just click continue as this can be set later. In our installation it automatically chooses "Manila"as our location.
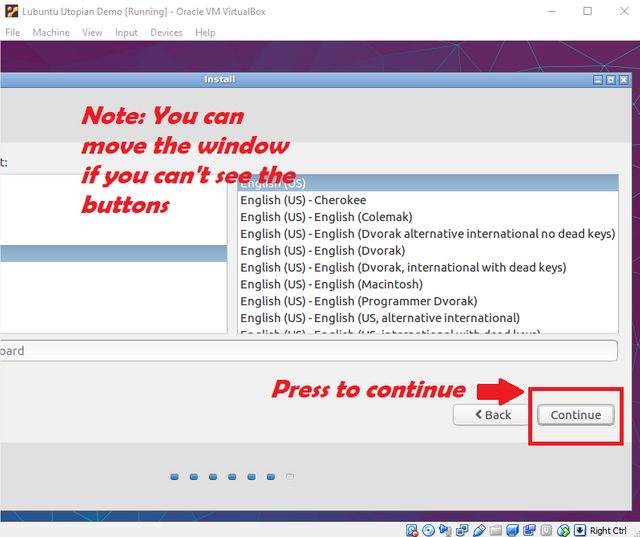
The next page will ask you to indicate the type of keyboard you are using. Usually we don't change the default values and*** just click on "continue" button***. Please note that the screen size of the Virtual computer might not fit the window selection just move the click on the top border of the window and move it to the left to see the buttons. Click "continue" to proceed with the installation.
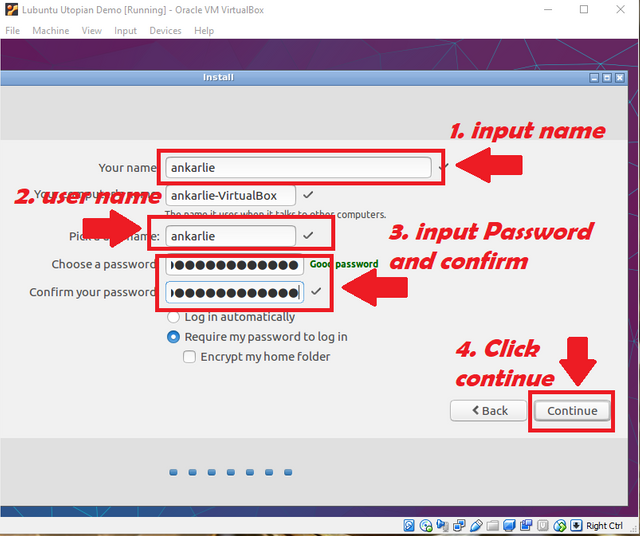
The next installation page will ask you your desired login details. For demonstration purposes I use "ankarlie" in the "Your name" field and "Pick a name" Field. Then I inputted the desired password twice (for verification). After which click the "Continue" button to continue with our installation.
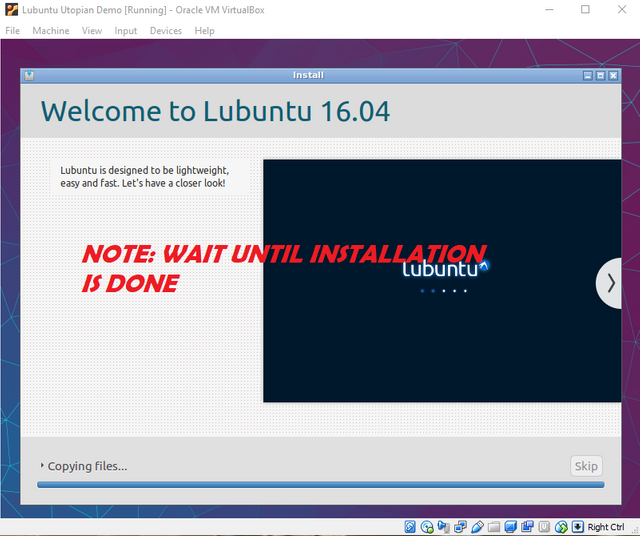
When you reach this page you will be asked to restart your Virtual Computer to finalized the installation. Just click the "Restart Now" to commence this procedure. The next page will ask you to remove installation medium. Just ignore this and Press "enter" to restart as the process will be automatic under the VirtualBox environment.
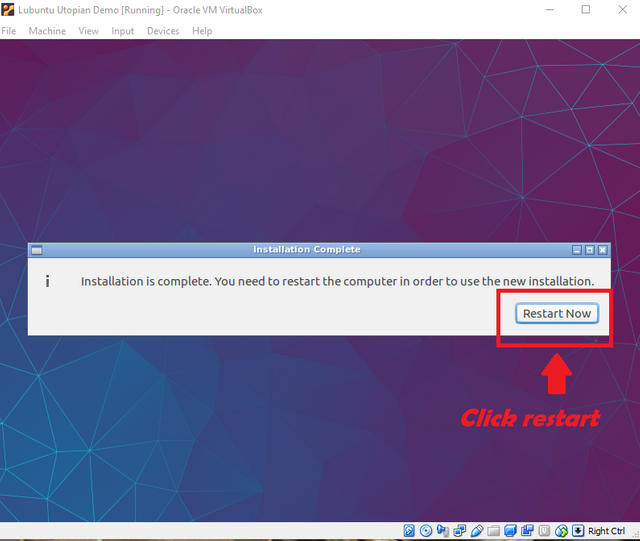
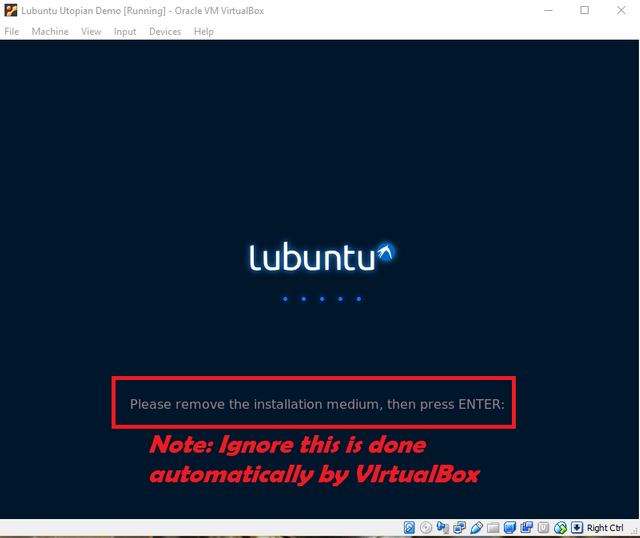
After restarting you will be brought to the login page. Just enter your login details then press the "login" button
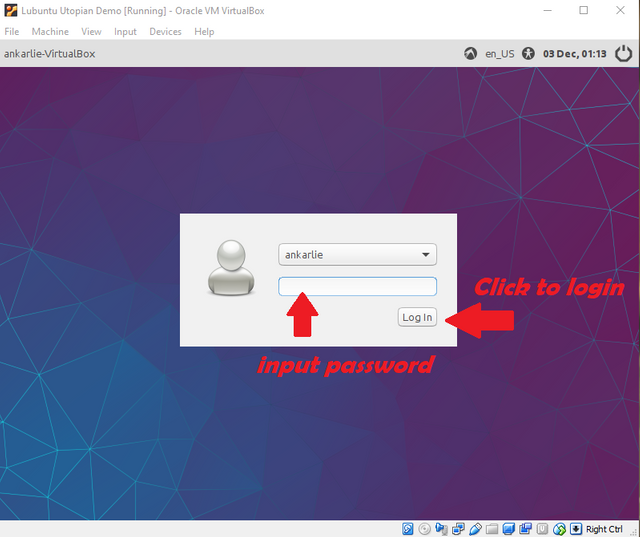
Congratulations you are now login with your new Ubuntu/Lubuntu Linux operating system!
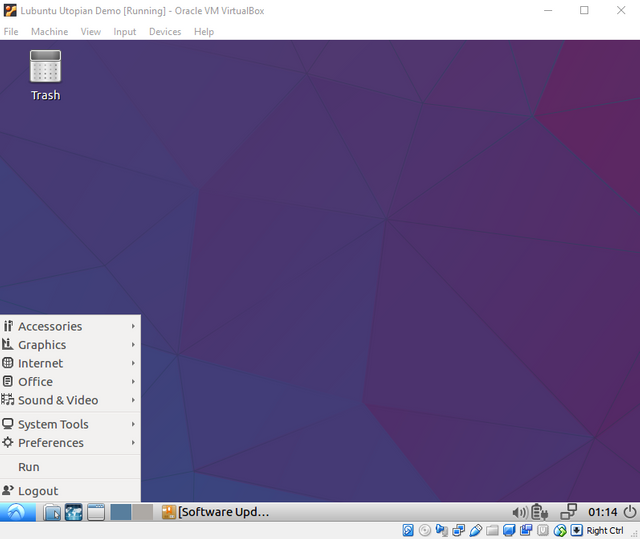
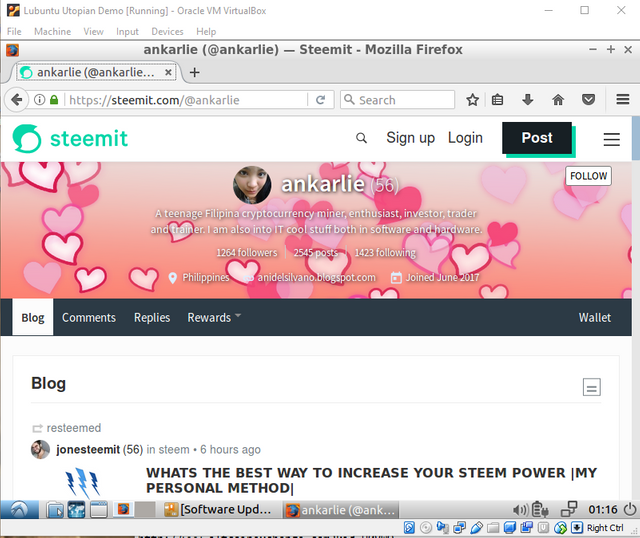
To test our newly installed virtual operating system we run firefox web browser and nativigate to Steemit.com. Everything went on without a glitch.
Thanks for reading and enjoy your new linux operating system.
Posted on Utopian.io - Rewarding Open Source Contributors
Alright @ankarlie , I finally got people on board internally!
Just change the repo to https://github.com/torvalds/linux (like you suggested), and reply to me if you are done (on Discord please via a DM, @scipio there as well).
Thx, @scipio
NB: self-upvoted this comment for visibility
Downvoting a post can decrease pending rewards and make it less visible. Common reasons:
Submit
@scipio Wow that is great thank you so much for helping me out :) I will remember this. I already change the repository.. again thank you so much hug This will inspire me to work harder and do better contributions next time :)
Downvoting a post can decrease pending rewards and make it less visible. Common reasons:
Submit
Great! That's how I like it! I feel you make valid tutorials, and that it wasn't your fault the Ubuntu repo was and is missing on GitHub. However, we could (in the near future) allow for non-GitHub repos as well, but currently that isn't the case. For now, we will allow the Linus Thorvalds repo on GitHub, but keep checking - on future tuts - what would be the proper repo per article.
You could always DM me at Discord (@scipio as well) so we can consult.
Downvoting a post can decrease pending rewards and make it less visible. Common reasons:
Submit
good morning my sugar candy, i voted and resteemed your post... thank you
Downvoting a post can decrease pending rewards and make it less visible. Common reasons:
Submit
Thank again red you are so reliable.
Downvoting a post can decrease pending rewards and make it less visible. Common reasons:
Submit
nice post
Downvoting a post can decrease pending rewards and make it less visible. Common reasons:
Submit
Thanks for vising my post :)
Downvoting a post can decrease pending rewards and make it less visible. Common reasons:
Submit
Hey @ankarlie I am @utopian-io. I have just upvoted you!
Achievements
Community-Driven Witness!
I am the first and only Steem Community-Driven Witness. Participate on Discord. Lets GROW TOGETHER!
Up-vote this comment to grow my power and help Open Source contributions like this one. Want to chat? Join me on Discord https://discord.gg/Pc8HG9x
Downvoting a post can decrease pending rewards and make it less visible. Common reasons:
Submit
Excellent! Glad to see that you are promoting Linux. A Virtualbox VM is a great way to get started with Linux.
Downvoting a post can decrease pending rewards and make it less visible. Common reasons:
Submit
Yeah trying out the different open sources supported in utopian.io I wanted to learn more about it that is why I am doing tutorials :) Best way of learning IMHO :) Trying to run windows in Andriod using Limbo can't seem to run it properly :(
Downvoting a post can decrease pending rewards and make it less visible. Common reasons:
Submit
@originalworks
Downvoting a post can decrease pending rewards and make it less visible. Common reasons:
Submit
The @OriginalWorks bot has determined this post by @ankarlie to be original material and upvoted(1.5%) it!
To call @OriginalWorks, simply reply to any post with @originalworks or !originalworks in your message!
Downvoting a post can decrease pending rewards and make it less visible. Common reasons:
Submit
very beautifull post you today.I like it!!!
You visit my id friend!!
Downvoting a post can decrease pending rewards and make it less visible. Common reasons:
Submit
Thanks :)
Downvoting a post can decrease pending rewards and make it less visible. Common reasons:
Submit
what I can set up Linux? My Hardware Requirements: 2 GB ram
Downvoting a post can decrease pending rewards and make it less visible. Common reasons:
Submit
Yes you can setup linux as an application in windows using the virtualbox emulation software. Use the linux distribution i recommended it only requires 512mb RAM
Downvoting a post can decrease pending rewards and make it less visible. Common reasons:
Submit
Your contribution cannot be approved yet because it is attached to the wrong repository.
However: your tutorial is good, but Ubuntu Core is not hosted at GitHub. That is not your fault. We are discussing what to do.
@scipio
You can contact us on Discord.
[utopian-moderator]
Downvoting a post can decrease pending rewards and make it less visible. Common reasons:
Submit
@scipio I see how about i change the repository to https://github.com/torvalds/linux ?
Downvoting a post can decrease pending rewards and make it less visible. Common reasons:
Submit
Still the wrong repo. Again, this is not your fault. Ubuntu Core is not at GitHub and currently Utopian has no option to include non-Gitub repos. But we are discussing a solution for your post. Don't worry, we will figure out a solution, and remember, it is not your fault.
Downvoting a post can decrease pending rewards and make it less visible. Common reasons:
Submit
Okay sir thanks
Downvoting a post can decrease pending rewards and make it less visible. Common reasons:
Submit
Please DO change it to https://github.com/torvalds/linux now! Then I can accept it, I did it! Look at the top comment of mine!
Downvoting a post can decrease pending rewards and make it less visible. Common reasons:
Submit
Already did sir thank you :)
Downvoting a post can decrease pending rewards and make it less visible. Common reasons:
Submit
Congratulations! This post has been upvoted from the communal account, @minnowsupport, by ankarlie from the Minnow Support Project. It's a witness project run by aggroed, ausbitbank, teamsteem, theprophet0, someguy123, neoxian, followbtcnews/crimsonclad, and netuoso. The goal is to help Steemit grow by supporting Minnows and creating a social network. Please find us in the Peace, Abundance, and Liberty Network (PALnet) Discord Channel. It's a completely public and open space to all members of the Steemit community who voluntarily choose to be there.
If you would like to delegate to the Minnow Support Project you can do so by clicking on the following links: 50SP, 100SP, 250SP, 500SP, 1000SP, 5000SP. Be sure to leave at least 50SP undelegated on your account.
Downvoting a post can decrease pending rewards and make it less visible. Common reasons:
Submit
Thank you for the contribution. It has been approved.
You can contact us on Discord.
[utopian-moderator]
Downvoting a post can decrease pending rewards and make it less visible. Common reasons:
Submit
@minnowpond1 has voted on behalf of @minnowpond.
If you would like to recieve upvotes from minnowponds team on all your posts, simply FOLLOW @minnowpond.
Downvoting a post can decrease pending rewards and make it less visible. Common reasons:
Submit
Great post!
It is well written and very informative.
Downvoting a post can decrease pending rewards and make it less visible. Common reasons:
Submit
Thanks for you! :)
Downvoting a post can decrease pending rewards and make it less visible. Common reasons:
Submit