What you will learn
In this tutorial, I'm going to start a new curriculum to;
- Set up your own Linux system
Requirements
- 512MB of memory
- 20GB of hard disk space
Difficulty
- Basic
Tutorial Contents
Step 1: Prepare your environment.
The very first step is, of course, to download and execute the installation file for VirtualBox, which can be found on this page. On that page, choose the top link 'Windows hosts' if you are now running on Windows, under the heading 'VirtualBox (version here) platform packages'. The installation is not very complicated, but there is a focus point: because an extra network adapter is installed, the Internet connection will be interrupted briefly on your system, so keep this in mind.
Start VirtualBox after the installation so that we can start creating a VM. You now see this:
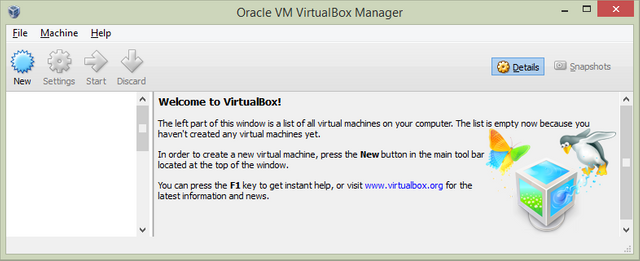
This is the main screen of VirtualBox where we will be able to manage our VM. As you can read on the screen, the left-hand box is now completely empty because no VMs have been created. Let's do something about this, click on the blue 'New' button to create a new VM.
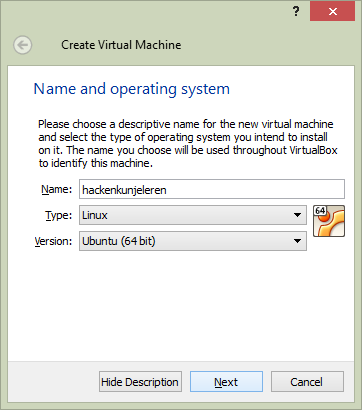
We give our new VM a name and already filled in that we are going to install Linux, namely the distribution 'Ubuntu (64-bit)'. If this option is not there, choose 'Ubuntu (32-bit)'. Click on 'Next'.
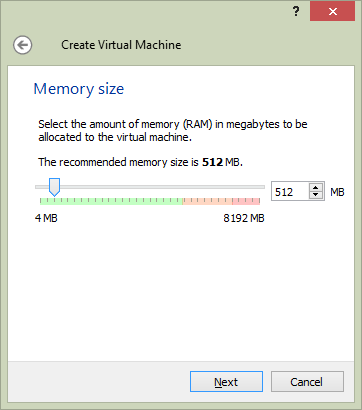
We can now set the hardware specifications of our VM, starting with the internal memory. For us, 512MB is enough memory, but if you have a lot of memory on your computer, you can also easily make 1 or 2 GB of this if you want. Click on 'Next'.
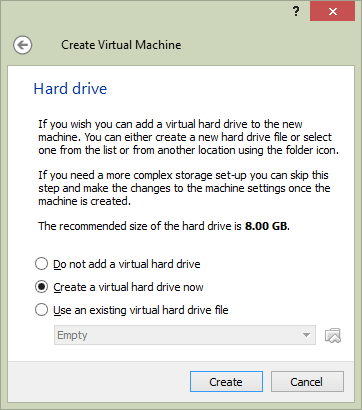
Then we create a hard disk, make sure that 'Create a virtual hard drive now' is selected and click on 'Create'.
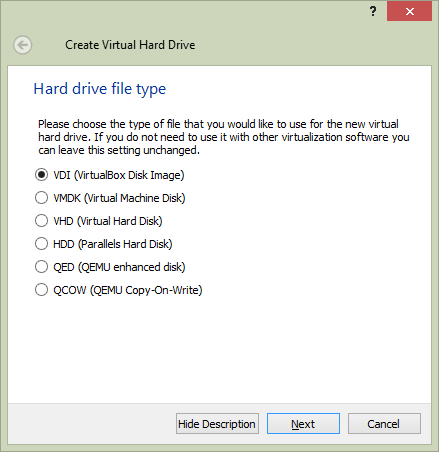
There are different types of virtual hard disks, for us, the type 'VDI (VirtualBox Disk Image)' is a good choice. Click on 'Next'.
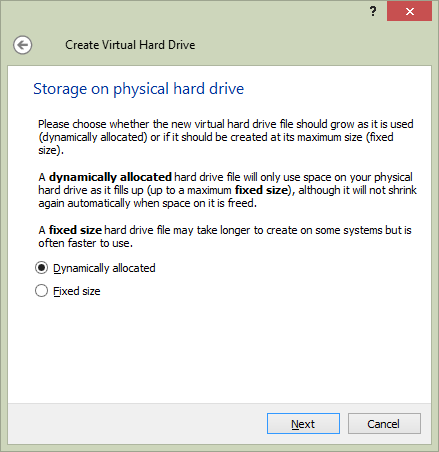
We can reserve the space for the virtual disk in 1 time on our real hard disk (Fixed size), or let it grow as and when more is needed (Dynamically allocated). Unless you expect to completely fill your hard disk while you are working on this virtual machine, it is not so important to us what we choose here, so leave it at the default value. Click on 'Next'.
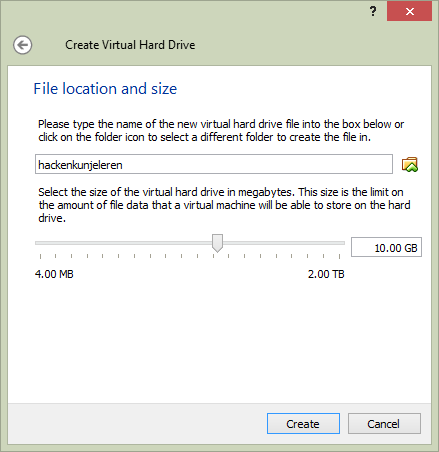
To finalize the drive, we choose how big it can be, 10GB is more than sufficient for what we are going to do with this VM so put that here. This can be done by moving the slider or by entering the size on the right. Click on 'Create' to create the disk and return to the main screen.
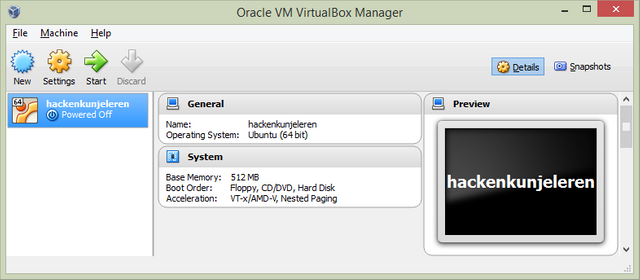
Our VM has now been created and is off. Let's click on the green 'Start' button and see what happens!
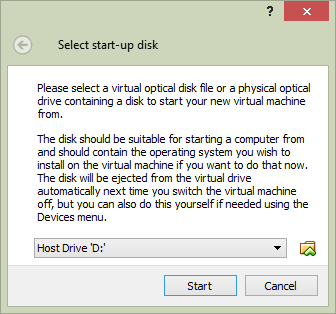
Since there is nothing on the hard disk of the VM, and we have not loaded a file into the virtual DVD / CD player, there is no operating system to start. VirtualBox, therefore, asks us from which disk we have to start.
We will load an installation disk into our VM so that we can install Linux.
Step 2 : Installation of Ubuntu
There are many different types of Linux available and in a different tutorial we will go deeper into these types (these are called 'distributions'), but we opt for a commonly used and accessible distribution to start with called Ubuntu. More specifically, we choose Ubuntu Server 16.04 LTS. Download the last installation file on this site, identified by the name 'Ubuntu-16.04. [Version] -server-amd64.iso'. Put it in a folder where you can find it later.
After downloading this file we return to VirtualBox, where we will place it in our virtual DVD / CD player. Click on your VM in the main window and then on the yellow 'Settings' button. The following window opens:
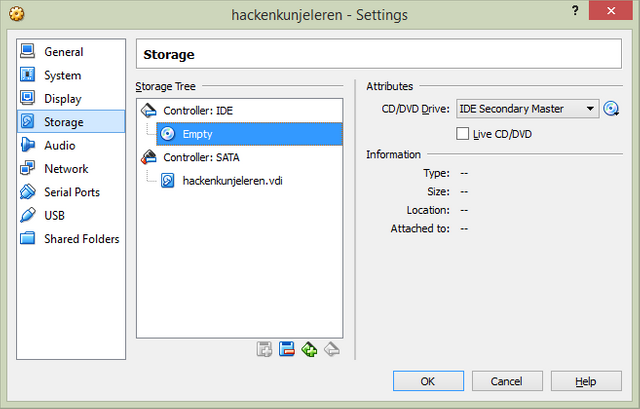
Click on 'Storage' in the Settings window on the left and then on the CD icon where 'Empty' is next. On the right, a different CD icon appears with a small arrow on it, click on it and choose 'Choose a virtual CD / DVD disk file'. You will now see an explorer window from Windows, navigate to your downloaded Ubuntu file and double click on it. Click on 'OK' to return to the main screen.
If we start the VM again by clicking on the green 'Start' button, it will end up in the Ubuntu installer just as if we had inserted a physical Ubuntu CD into a physical computer. This looks like this:
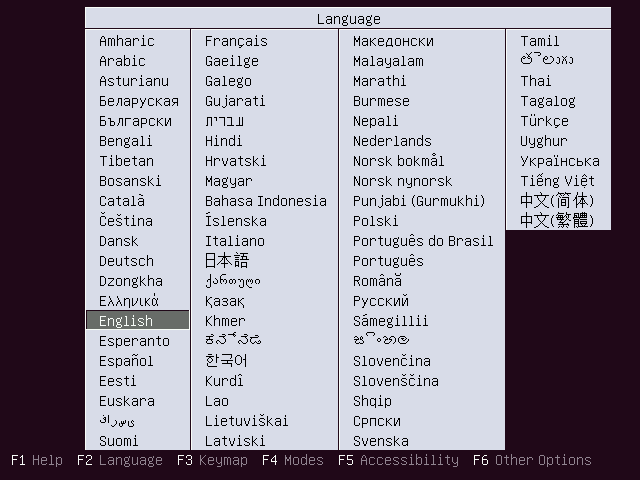
If you do not see this, but get an error message like "This kernel requires an x86-64 CPU, but only i686 CPU." then you probably have a somewhat older computer and you have to use the 32-bit version of Ubuntu Server. This can also be found on the ubuntu site, but then you must have the file 'Ubuntu-16.04. [Version] -server-i386.iso', and repeat the above steps since the download.
**Note **: as soon as you click on the console of the VM, your mouse cursor will disappear and you will not be able to use your mouse until you have pressed a special key. Which test this is a state at the bottom right of the window where you see the above screen. For example, this can be the right or left Alt key, or on an Apple computer the left or right cmd key.
We will now go through the screens that follow, a screenshot has not always been made of this. There may be a waiting time between some steps, so be patient! Make the choices according to the list below and always press Enter to confirm. The choices where '(default)' is behind are already given as the first option and therefore you do not have to adjust.
- Language: 'English' (default)
- Ubuntu installer main menu: 'Install Ubuntu Server' (default)
- Select a language: 'English - English' (default)
- Select your location: 'other'
- Select your location: 'Europe'
- Select your location: 'Netherlands'
- Configure locales: 'United States - en_US.UTF-8' (default)
- Configure the keyboard: "No" (default)
- Configure the keyboard: 'English (US)' (default)
- Configure the keyboard: 'English (US) - English (the US, international with dead keys)' (default)
- Configure the network: 'ubuntu' (default) Note: If you see 'Network autoconfiguration failed' here, then your VM has not received an IP address from the virtual network and it is very likely that something went wrong with the creation of the VM.
- Set up users and passwords: Choose a username, for example, your first name
- Set up users and passwords: Leave the username you entered here
- Set up users and passwords: Choose a password for your account, and remember this!
- Set up users and passwords: Repeat the password to check for typing errors
- Set up users and passwords: 'No' (default)
- Configure the clock: 'Yes' (default) Note: if you do not see this step at all, your VM probably does not have an internet connection. Does your guest system still have internet? Then something may have gone wrong with the creation of your VM.
- Partition disks: 'Guided-use entire disk and set up LVM' (standard)
- Partition disks: 'SCSI (0,0,0) (sda) - 10.7 GB ATA VBOX HARD DISK' (standard)
- Partition disks: 'Yes'
- Partition disks: 'Continue' (default)
- Partition disks: 'Yes'
- Configure the package manager: 'Continue' (default)
- Configuring tasksel: 'No automatic updates' (default)
- Software selection: 'Continue' (default)
- Install the GRUB boot loader on a hard disk: 'Yes' (default)
- Finish the installation: 'Continuous' (standard)
The VM will now restart and display a blinking cursor next to "ubuntu login:". We have a working Ubuntu server!
Important tasks that we need to perform
There are some important tasks that we need to perform with this VM before we can work with it safely, which I will explain in this tutorial article.
Sleep mode
Let's grab our VM, and if it's good, you'll still see an Ubuntu login screen. Suppose we want to shut down our own computer, then this VM will suddenly shut down as if you pull the plug out. This is because a PC running Linux can not just be pulled out of the stream (this has to do with caching information in memory before it is written to the hard disk) we will have to solve this in a slightly more elegant way.
If we want to keep the current state of the VM and want to put it into 'sleep mode' as it were, then this can be done with VirtualBox. Click on the cross in the top right corner of the window and then choose 'Save the machine state'. It may take a few seconds, but then the state of the virtual disk and memory is recorded and there is 'Saved' on our VM in the VirtualBox main screen. The computer you are currently working on can be safely locked, and no more memory is reserved for the VM.
Make a snapshot
A snapshot can be seen as a snapshot of what the hard disk and the internal memory of a VM look like at the moment. This is very useful for making a backup that you can use if something has gone wrong with your Linux system and you do not know exactly how to fix it. You can make an unlimited number of snapshots, but remember that every snapshot can take up quite a few gigabytes.
We will now take a snapshot of immediately after installation, as nothing has been done on the system. In the VirtualBox main screen, after selecting a VM on the right, a 'Snapshots' button appears. If you click on this you will only see 'Current State' and nothing else. Click on the camera icon above 'Current State' to take a snapshot. You can give every snapshot a name so that you know what the machine was in. Now let's fill in something like 'Clean Ubuntu installation'. If you have made several snapshots later, you will see them here in chronological order, and you can click on a snapshot and reset the VM to the state of the chosen snapshot, or delete the chosen snapshot if it is no longer needed.
Start up and shut down
Just like a regular computer, you can start up and shut down a VM. Our current VM is still in the 'Saved' state and it can only be started. Select the VM and click 'Start' to return to the Ubuntu login screen.
To close the VM neatly, we click again on the cross and choose 'Send the shutdown signal'. This is, in fact, the same as once briefly pressing the power button of a PC. Ubuntu will neatly shut down and the VM will be 'Powered Off'.
Posted on Utopian.io - Rewarding Open Source Contributors
Your contribution cannot be approved because it does not follow the Utopian Rules.
You can contact us on Discord.
[utopian-moderator]
Downvoting a post can decrease pending rewards and make it less visible. Common reasons:
Submit
wow! i supposed this was actually it.
Downvoting a post can decrease pending rewards and make it less visible. Common reasons:
Submit
Congratulations! This post has been upvoted from the communal account, @minnowsupport, by beulahlandeu from the Minnow Support Project. It's a witness project run by aggroed, ausbitbank, teamsteem, theprophet0, someguy123, neoxian, followbtcnews, and netuoso. The goal is to help Steemit grow by supporting Minnows. Please find us at the Peace, Abundance, and Liberty Network (PALnet) Discord Channel. It's a completely public and open space to all members of the Steemit community who voluntarily choose to be there.
If you would like to delegate to the Minnow Support Project you can do so by clicking on the following links: 50SP, 100SP, 250SP, 500SP, 1000SP, 5000SP.
Be sure to leave at least 50SP undelegated on your account.
Downvoting a post can decrease pending rewards and make it less visible. Common reasons:
Submit