
Running MySQL directly in Windows has never been easier!
In 2016, Microsoft released the Windows Subsystem for Linux (WSL) which allows us to run Linux binaries natively within Windows. At first, this was a developers feature that required a fair amount of effort to test, but today the entire process has been completely simplified.
What Will I Learn?
- How to enable WSL in Windows 10
- How to install Ubuntu in the WSL
- How to install and configure MySQL
- How to test and verify our install
Target Audience
This is primarily for developers running a local web environment who want to connect to a local MySQL instance, rather than a remote server.
Requirements
We are running Windows 10 for everything outlined here. Any edition, including Windows 10 Home will work.
Difficulty
While the WSL is inherently complex, our implementation here is entirely straightforward.
- Basic
Tutorial Contents
Here's an overview of the areas we'll cover in this tutorial.
- Why WSL?
- Enable WSL
- Windows Features
- Powershell
- Install Ubuntu
- Login to Ubuntu
- Install MySQL
- Connect to MySQL
Why WSL?
There are a variety of ways to solve the question of a local MySQL instance, such as installing the regular Windows version of MySQL, using some virtualization tools such as VirtualBox, or even Docker.
Each of these have their own shortcomings, particularly complexity and over-utilization of local resources. The WSL addresses both of these points and allows us to easily run Linux without any hit on performance.
Enable WSL
By default, WSL is not enabled in Windows. I'll cover two ways to enable WSL, but you only need to complete one of these two.
Windows Features
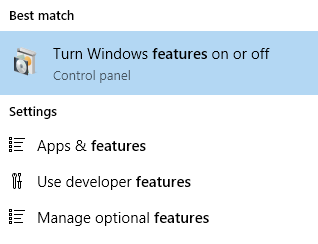
We can look at the Windows Features to get a list of available Options.
- Press the Window key (or click Window button) and type 'features' (without quotes) and select
Turn Windows features on or off
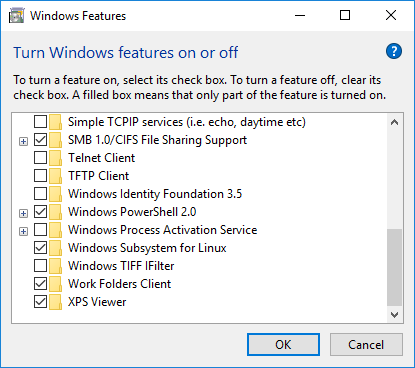
Then, simply check the Windows Subsystem for Linux box.
Powershell
The more technical among live by the CLI (command line interface) and can't be bothered to click their way through. For those, we have the Windows PowerShell.
Again, hit the Window key or click the Window button and type 'powershell' to search. However, we want to open this as an Administrator so we right-click and select Run as administrator
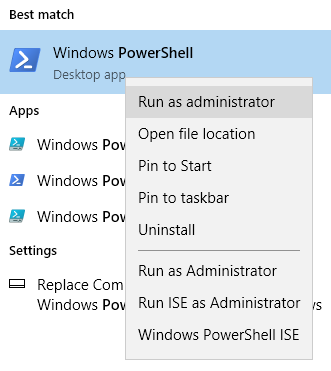
Then, simply copy and paste this command:
Enable-WindowsOptionalFeature -Online -FeatureName Microsoft-Windows-Subsystem-Linux
You'll see it quickly installs:

Reboot
After either method, you will need to reboot before WSL is enabled.
Install Ubuntu
Not long ago, this part was a clunky mess involving downloading ISOs and other frustrations. However, Microsoft has simplified this and now we can just go to the Microsoft Store:
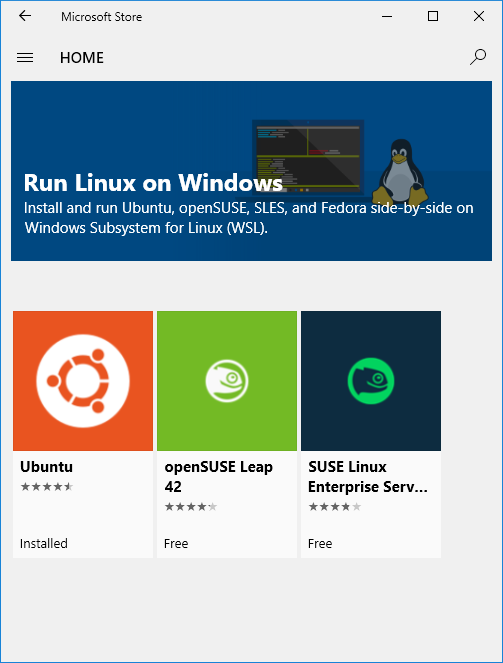
There is a Microsoft Store app already installed so just open that up and search for 'ubuntu' and you'll quickly find the app.
Obviously, I've completed my install but you can just click Install and follow through the process. The only thing of note is that you will create a Linux user, so be sure to remember the password you set.
Login to Ubuntu
After the install, an icon for Ubuntu will appear in your start menu like any other program:

Once you open this, you will login to a local bash shell.
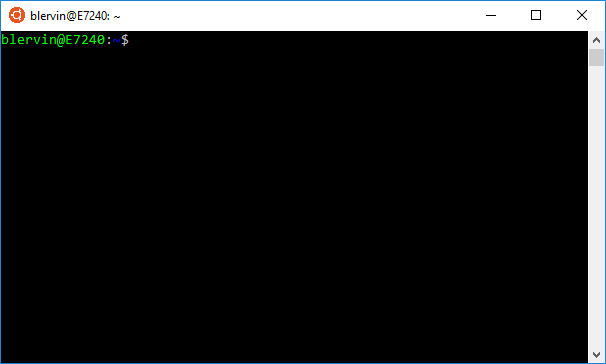
Then, let's sudo to root:
sudo su -
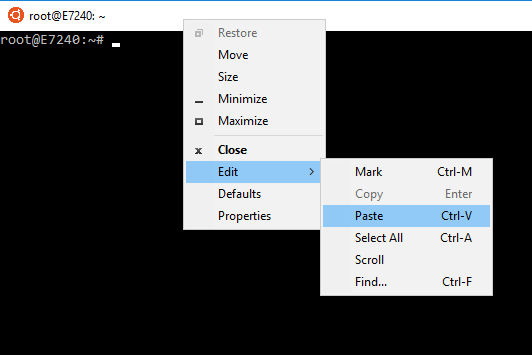
Quick tip. To copy/paste in Ubuntu you'll need to right click on the title bar to show the context menu and select Edit > Paste
Install MySQL
Before we get started installing MySQL, we want to do a quick update of the Ubuntu environment. Run this command quick to check for any updates:
apt-get update
Then, install MySQL:
apt-get install mysql-server
Again, be sure to note the password you set for the root user during the install. After the install is complete, we can start the service:
/etc/init.d/mysql start
Basically, you should run this with start or stop when you're doing work with MySQL. It would be possible to start MySQL automatically at boot, but given the transient nature of this environment the manual start and stop works best.
Connect to MySQL
This Ubuntu environment is is accessible on localhost and 127.0.0.1
While most commonly you'll likely be connecting in your code, for our testing and validation we want to make a direct connection. There are a variety of tools available but my preference is HeidiSQL which is free to download.
Simply enter the host, user, and password to connect:
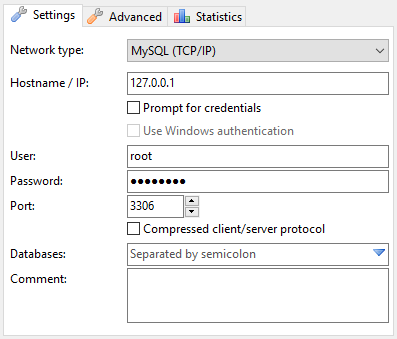
host: 127.0.0.1 (or localhost)
user: root
pass: {as_set_during_install}
port: 3306
And like that our local MySQL instance is ready!
To start, this is a base install so you'll need to CREATE or restore your databases to get started.
Posted on Utopian.io - Rewarding Open Source Contributors
Hey @blervin I am @utopian-io. I have just upvoted you!
Achievements
Suggestions
Get Noticed!
Community-Driven Witness!
I am the first and only Steem Community-Driven Witness. Participate on Discord. Lets GROW TOGETHER!
Up-vote this comment to grow my power and help Open Source contributions like this one. Want to chat? Join me on Discord https://discord.gg/Pc8HG9x
Downvoting a post can decrease pending rewards and make it less visible. Common reasons:
Submit
Thank you for the contribution. It has been approved.
You can contact us on Discord.
[utopian-moderator]
Downvoting a post can decrease pending rewards and make it less visible. Common reasons:
Submit
Very helpful post !!
Downvoting a post can decrease pending rewards and make it less visible. Common reasons:
Submit
Thanks, I hope it works well for you!
Downvoting a post can decrease pending rewards and make it less visible. Common reasons:
Submit