Source: dribble.com
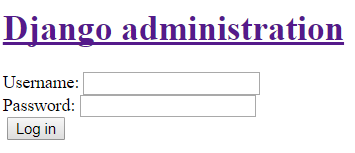
If you have finished the previous tutorial and tried to access the admin site that we deployed, it would look something like this.

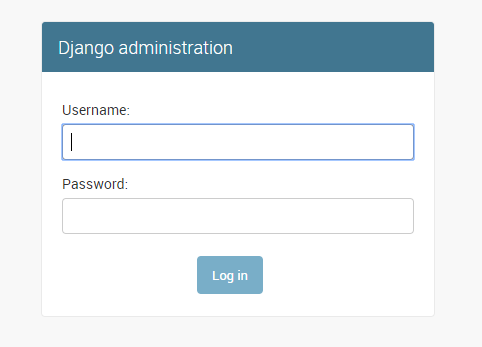
Oh no! We expected something like the UI below. Where did we go wrong?

What Will I Learn?
At the end of this tutorial, we are going to be able to:
- Define what are static assets and explain its use on a web application
- Collect and compile static files in the Django project
- Upload and manage static files in Heroku
- Enable or disable the collection of static assets in our Heroku app
Requirements
- Python (latest version)
- Heroku CLI
- Project deployed to Heroku (see previous lesson)
- Any text editor or Integrated Development Environment (IDE) of your choice
Difficulty
This tutorial will discuss very basic concepts. As long as you are able to follow instructions and know the basics of HTML, CSS, and Javascript, then you are good to go.
Tutorial Contents
What was the main cause of the UI problem?
The screen was not able to render properly because the static assets were not uploaded. In python, an asset is any file not within the Python source code. This includes any image, CSS, and javascript files that are used by the app. And the term static means unchanging or non dynamic. When put together, static assets just means files used by the app that will never be changed. In web development, Hypertext Markup Language or HTML is just a placeholder of the content. Cascading Style Sheets or CSS, on the other hand, is used to describe the look and feel of a web page. In this case, the admin module of Django was not able to locate the required CSS files since it was not uploaded to the Heroku server. This is the main reason why the page looks different.
How do I collect the static files?
Open settings.py and add the snippet below at the end of the file.
STATIC_ROOT = os.path.join(BASE_DIR, 'staticfiles')
STATICFILES_DIRS = (
    os.path.join(BASE_DIR, 'static'),
)
Create a folder named 'static' in the project root .
Launch the command line and activate virtualenv. Change the directory to the project's root and enter the command below.
$ python manage.py collectstatic
If a message like the one below is seen, then the collection of static files is a success.
118 static files copied to 'D:\hello_world\staticfiles'
How do I upload my static assets to Heroku?
Uploading the static files is as simple as pushing the updates to Heroku. After collecting the assets locally, enter the following commands. This should update the UI and will make the page look presentable.
$ git add .
$ git commit -m "Added static files"
$ git push heroku master
How do I disable or enable the collection of static files in my app?
For disabling the collection of static files. Enter the command below.
$ heroku config:set DISABLE_COLLECTSTATIC=1
For enabling, enter the following command.
$ heroku config:set DISABLE_COLLECTSTATIC=0
I am still experiencing some problems, how can I debug this?
To debug, order the Heroku server to debug the collect static command by running the command below.
$ heroku config:set DEBUG_COLLECTSTATIC=1
Curriculum
This is part 4 of the ongoing tutorial of building a single page application by using both Django and ReactJS. Next time, we will tackle Restful API, install Django Rest Framework, and include OAuth2 authorization for our API.
Part 1: Installing Django with Virtual Env
Part 2: Django Deployment to Heroku Cloud
Part 3: Using the Django Admin + PostgreSQL
Posted on Utopian.io - Rewarding Open Source Contributors
Hey @burdagay I am @utopian-io. I have just upvoted you!
Achievements
Suggestions
Get Noticed!
Community-Driven Witness!
I am the first and only Steem Community-Driven Witness. Participate on Discord. Lets GROW TOGETHER!
Up-vote this comment to grow my power and help Open Source contributions like this one. Want to chat? Join me on Discord https://discord.gg/Pc8HG9x
Downvoting a post can decrease pending rewards and make it less visible. Common reasons:
Submit
Thank you for the contribution. It has been approved.
I recommend making your tutorial a little bit longer and maybe a bit more in-depth next time.
You can contact us on Discord.
[utopian-moderator]
Downvoting a post can decrease pending rewards and make it less visible. Common reasons:
Submit
Hi! This is noted. Although the topic by nature is short, I will try to increase the content next time. Thanks!
Downvoting a post can decrease pending rewards and make it less visible. Common reasons:
Submit