What Will I Learn?
This tutorial is designed to give you the tools to start experimenting with 3D graphics on the web.
- You will learn how to set up a local web server on your computer to run html5 and javascript code
- you will learn how to set up a basic html index.html file
- You will learn how to use the three.js api within a webpage to display basic 3D graphics
Requirements
- Basic knowledge of programming concepts (variables, functions etc. No specific language necessary)
- Google Chrome
Difficulty
- Basic
Tutorial Contents
This tutorial will show you how to set up a a webpage with a three.js window using nothing except google chrome, and display a basic 3D spinning cube. Consider this the 'Hello World' of 3D programming on the web.
I will walk you through:
- Downloading and using a text editor
- Setting up a local server to run your application
- Making an index file to run on your server
- Using the three.js api to display to display a spinning cube
As everything is within chrome itself this tutorial should work on any platform (Windows, Mac, ChromeOS), unfortunately I do not have a Mac to test on so I can only verify that it works on Windows and ChromeOS.
Downloading Text Editor and Web Server
Before beginning we will need two tools. The first is a text editor. You can skip this step if you already have one you prefer to use. In order to keep all dependencies inside Chrome, we will be useing the Caret text editor from the Chrome Store. You can find it here
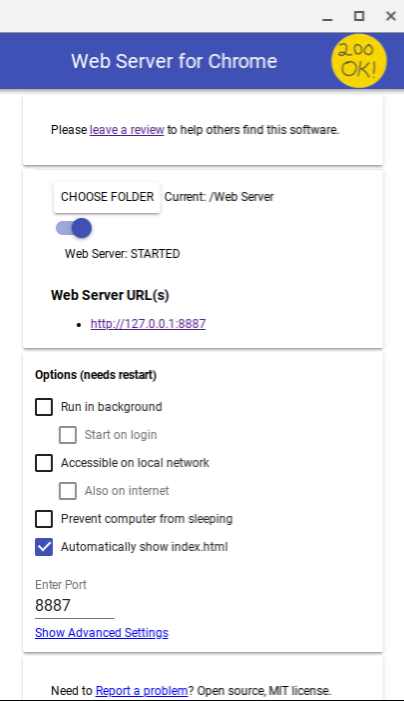
Next we will be downloading something to launch an offline web server. This way we can run and view web content from the comfort of our own computer. For this tutorial we will be using Web Server for Chrome
In ChromeOS these apps can be found in your apps bar. In Windows 10 they are found in the start menu under the folder 'Chrome Apps'.
Setup index.html file
First, open Caret. Since this is not a tutorial on html we will just copy the basic example from threejs.org found here.
<html>
    <head>
        <title>My first three.js app</title>
        <style>
            body { margin: 0; }
            canvas { width: 100%; height: 100% }
        </style>
    </head>
    <body>
        <script src="js/three.js"></script>
        <script>
            var scene = new THREE.Scene();
            var camera = new THREE.PerspectiveCamera( 75, window.innerWidth/window.innerHeight, 0.1, 1000 );

            var renderer = new THREE.WebGLRenderer();
            renderer.setSize( window.innerWidth, window.innerHeight );
            document.body.appendChild( renderer.domElement );

            var geometry = new THREE.BoxGeometry( 1, 1, 1 );
            var material = new THREE.MeshBasicMaterial( { color: 0x00ff00 } );
            var cube = new THREE.Mesh( geometry, material );
            scene.add( cube );

            camera.position.z = 5;

            var animate = function () {
                requestAnimationFrame( animate );

                cube.rotation.x += 0.1;
                cube.rotation.y += 0.1;

                renderer.render(scene, camera);
            };

            animate();
        </script>
    </body>
</html>
Here is an article on html if you are interested in learning more about it.
This code is enough for us to get started and display something. Copy and paste it into your new file in Caret and then click 'file' in the top right-hand corner and select 'Save File As' here you will save the file in your directory of choice.
Now, navigate to the directory you have just saved the file in and create a folder called 'js'. In this folder you will save the three.js file which you can download here navigate to this webpage and then right click on the page and select 'Save As'
Now we will get this running before walking through what the code is doing.
Run application
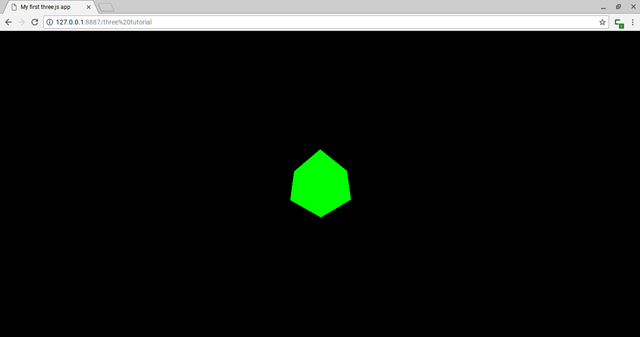
To run our application we start by running our local web server. To do so we launch the application and select the folder where our index.html file is saved. This way when the server runs it will open our index file by default. Once we have selected the folder, you can either open a web page in chrome and navigate to the page http://127.0.0.1:8887 in your browser or you can click the link in Web Server for Chrome.

Your application should then be displayed and should look something like this

The Code
<script src="js/three.js"></script>
We include three.js itself by defining a reference to it in a script block. After doing this we can access three.js member functions and definitions by prefacing them with THREE.
var scene = new THREE.Scene();
var camera = new THREE.PerspectiveCamera( 75, window.innerWidth/window.innerHeight, 0.1, 1000 );
camera.position.z = 5;
Here we initialize our Scene. A scene is how three.js organizes all the things we want to render as well as other properties such as fog or background color. In the first line we initialize the scene. In the second line we initialize a Camera. Lastly we move the camera back so that 5 units away from the origin point.
var renderer = new THREE.WebGLRenderer();
renderer.setSize( window.innerWidth, window.innerHeight );
document.body.appendChild( renderer.domElement );
Here we initialize the renderer, set its size to the size of our window and add the renderer to the window. The renderer will utilize the camera and scene in order to draw our scene.
var geometry = new THREE.BoxGeometry( 1, 1, 1 );
var material = new THREE.MeshBasicMaterial( { color: 0x00ff00 } );
var cube = new THREE.Mesh( geometry, material );
scene.add( cube );
The above is the basic structure to add objects in three.js. You begin by
creating your BoxGeometry which is a type of Geometry. Geometrys define the shape of objects. Three.js has a number of built in geometry types.
You then define a MeshBasicMaterial which is a type of Material. Materials define how the program should color objects, in this case we will be coloring the cube a flat green color.
You combine the two into a Mesh, which is the type of object three.js likes to deal with for rendering. You then add the object to your scene.
var animate = function () {
    requestAnimationFrame( animate );

    cube.rotation.x += 0.1;
    cube.rotation.y += 0.1;

    renderer.render(scene, camera);
};

animate();
This last block is where the drawing actually happens. We define a function called animate. The first line of the animate function requests that animate be called on the next frame, we do this in order to re-draw our scene every frame.
The next two lines are how we interact with objects in our scene. Here we utilize the properties of the cube mesh we defined earlier and increment the rotation of the cube in the x and y directions by 0.1 radians every frame.
Finally we utilize our renderer. We pass in our camera and our scene and call render in order to draw the scene. After defining our animate function we call it once in order to begin drawing.
Conclusion
Thats it. Its all very simple once you have it up and running. If you want to experiment a bit try changeing the object being drawn. Head on over to the documentation and play around with some of the other geometry types.
In another post I would like to go into more details on drawing specific things such as terrain or in advanced usage of the three.js api.
If you have any questions or requests for specific tutorials let me know in the comments!
Posted on Utopian.io - Rewarding Open Source Contributors
Your contribution cannot be approved because it does not follow the Utopian Rules.
You can contact us on Discord.
[utopian-moderator]
Downvoting a post can decrease pending rewards and make it less visible. Common reasons:
Submit
Hey @roj, I just gave you a tip for your hard work on moderation. Upvote this comment to support the utopian moderators and increase your future rewards!
Downvoting a post can decrease pending rewards and make it less visible. Common reasons:
Submit
Which documentation are you referring to? I am unaware of something that teaches new users how to get up and running. The purpose of this article was to teach new users how to set up a local server and get started programming. Is the issue that I reused a code example from the documentation?
Downvoting a post can decrease pending rewards and make it less visible. Common reasons:
Submit