Introduction
I have recently found Tiddlywiki and I have to say I am delighted with it. It's kind of what I've been looking for for many years: a note taking app that just works and lets you do anything with your content, specially in terms of managing your data with programming.
I've tried it in the local and straightforward manner but I didn't like to save the file and carry it around in an usb or downloading it from some online storage application. I already have a cloud server so I figured there must be a way to run this great app online by myself.
It turns out this already has a simple server module in node.js, so I went and threw a docker container with it.
One flaw of this system is that it's size is more than 4MB (perhaps 2MB if you dont put any plugins). I don't usually have a high speed network connection, so it usually takes me ~20 seconds to load the notebook. In the next post I'll teach you how to put it behind and nginx proxy to enable compression and reduce a bit this loading time.
The logout button
For now I want to show you how to put a logout button in the sidebar. Node.js tiddlywiki server is very raw. It uses basic http auth (the browser asks you for your user and password) and there is no way to logout. I found out that you must attempt to login with bad credentials so the browser forgets your basic auth session login. So it is as easy as making a link to, say, "//bad:[email protected]"
Since my first encounters with tiddlywiki I was very interested on hacking it :). So I made a logout button and learned a lot in the process.
First of all, everything in the core of tiddlywiki is already quite complex and you can learn a lot from its source code about all the classes, the macros and the functions it already has (lots of lines of code).
After many trials and errors I got an acceptable logout button in my notebook. By looking at system and shadow tiddlers, you can really understand the "everything is a tiddler" principle. For instance, when you configure the page toolbar to show the "Home" button, when you enable the checkbox in the configuration panel, it's actually setting the content of the tiddler titled $:/config/PageControlButtons/Visibility/$:/core/ui/Buttons/home to show. There are also tags and fields for each tiddler so most functions in the system depend on these data sources.
To add a page toolbar button you need one tiddler tagged "$:/tags/PageControls". This will automatically be included in the toolbar, but, at this point, as an empty button with no icon and no text. This tiddler can be titled as you want. However, to keep things organized I named with a user namespace: "$:/usr/functions/LogoutButton". I found an svg logout icon in the noun project and included it in my notebook with the title "$:/usr/images/button-logout.svg. The button tiddler also needs to have 2 fields, caption and description, which are used in the configuration panel where you will be able to hide and change its position. I basically copied some of the code in the Home button definition and hardcoded some stuff. For now hardcoding does the job for me, but things can be properly done with language tiddlers that may be transladed or perhaps a better icon that allows to use the color given by the css in the theme.
This is the button definition:
<button title="Logout" aria-label="Logout" class=<<tv-config-toolbar-class>>>

<$list filter="[<tv-config-toolbar-icons>prefix[yes]]">

<a href="//:@server" style="text-decoration: none;" style="display: inline-block; width:20px;">{{$:/usr/images/button-logout.svg}}</a>

</$list>

<$list filter="[<tv-config-toolbar-text>prefix[yes]]">

<span class="tc-btn-text"><$text text="Logout" /></span>

</$list>

</button>
This introduces some basic concepts. The button's class is being set with a variable, which will be set in some external tiddler that will include this button definition. Then, the $list element will check whether the tv-config-toolbar-icons variable is set to yes in order to show or hide icons. Next, there is a similar $list macro but for show/hide toolbar texts. To include the svg button, we use the {{}} operator which embeds the referenced tiddler content. Captions have these values:
caption:  "<span style="display: inline-block; width:20px;">{{$:/usr/images/button-logout.svg}}</span> Logout"

description:    "To log out from nodejs served tiddlywiki."
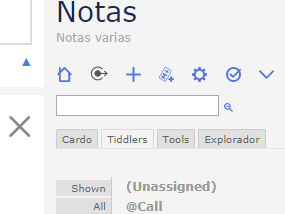
The svg button was just drag&dropped to the notebook, imported and renamed. I just tweaked its colours and its view box in order to make it fit better with the rest of the buttons. The final result looks like this (the logout button is near the home button).

You can import this to your tiddlywiki notebook by dragging and dropping this link with the two tiddlers in json format. If you use it in your wiki, change the button's link to you server name.
Anyway, this is a very small project that teached me some basic things about TW development.
I'm already working on some other extensions for personal use and I will be posting those next. Tiddlywiki's hackability is one of its best features.
Posted on Utopian.io - Rewarding Open Source Contributors
Hey @elguille I am @utopian-io. I have just super-voted you at 14% Power!
Achievements
Up-vote this comment to grow my power and help Open Source contributions like this one. Want to chat? Join me on Discord https://discord.gg/Pc8HG9x
Downvoting a post can decrease pending rewards and make it less visible. Common reasons:
Submit
Thank you for the contribution. It has been approved.
[utopian-moderator]
Downvoting a post can decrease pending rewards and make it less visible. Common reasons:
Submit