What Will I Learn
This is the second and concluding part in the series of tutorial posts on how to build a landing page using MaterializeCSS.
In the first part we were able to cover the design process for some of the page components and features.
In this tutorial we will learn how we can create the following
Fullwidth Carousel
Preloader
Pricing Layout
Text Input Forms and Layout
Requirements
- Code Editor
- Latest version of any web browser
- Ionicons Library For Icons
- JQuery Library
- MaterializeCSS Framework
- You can download the full source code for this tutorial on Github
Difficulty
- Intermediate
Tutorial Contents
If you have read through the first part of this series you should be able to setup materializecss and jquery already, in case you don't know how to do that the steps are included in the introductory part of the first tutorial in this series.
To read more on how to setup the materializecss framework using other alternatives you can check the official documentation.
In the first part of this series I also included all the CSS styles used throughout this tutorial series. You will need to check that out to get the most out of this post.
After all that is setup we can move on to creating our components
1. Fullwidth Carousel
In this section we'll be implementing a slider-like carousel which will hold text information and allow the users to scroll through to read all.
We'll also be adding a preloader in this section directly below the carousel.
HTML
<section  id="features">


<div  class="carousel carousel-slider center">

<div  class="carousel-item indigo darken-4 white-text"  href="#one!"  style="padding-top: 100px;">

<h5>WordPress Development</h5>

<p>

Lorem ipsum dolor sit amet, consectetur adipiscing elit. Suspendisse pretium pulvinar sem, non malesuada magna laoreet id. Nam ligula risus, commodo vel libero quis, fringilla posuere nulla. Morbi et scelerisque nisi. Vivamus at nibh nisi. Quisque aliquam enim id dolor aliquam, a vehicula turpis vulputate. Cras lacinia lacus elit, eget porta elit dignissim eu. In tincidunt posuere est vitae elementum. Integer a elit suscipit, iaculis tortor id, tempus nunc.

</p>

</div>

<div  class="carousel-item indigo darken-4 white-text"  href="#one!"  style="padding-top: 100px;">

<h5>App Development</h5>

<p>

Lorem ipsum dolor sit amet, consectetur adipiscing elit. Suspendisse pretium pulvinar sem, non malesuada magna laoreet id. Nam ligula risus, commodo vel libero quis, fringilla posuere nulla. Morbi et scelerisque nisi. Vivamus at nibh nisi. Quisque aliquam enim id dolor aliquam, a vehicula turpis vulputate. Cras lacinia lacus elit, eget porta elit dignissim eu. In tincidunt posuere est vitae elementum. Integer a elit suscipit, iaculis tortor id, tempus nunc.

</p>

</div>

<div  class="carousel-item indigo darken-4 white-text"  href="#one!"  style="padding-top: 100px;">

<h5>Search Engine Optimization</h5>

<p>

Lorem ipsum dolor sit amet, consectetur adipiscing elit. Suspendisse pretium pulvinar sem, non malesuada magna laoreet id. Nam ligula risus, commodo vel libero quis, fringilla posuere nulla. Morbi et scelerisque nisi. Vivamus at nibh nisi. Quisque aliquam enim id dolor aliquam, a vehicula turpis vulputate. Cras lacinia lacus elit, eget porta elit dignissim eu. In tincidunt posuere est vitae elementum. Integer a elit suscipit, iaculis tortor id, tempus nunc.

</p>

</div>

<div  class="carousel-item indigo darken-4 white-text"  style="padding-top: 100px;">

<h5>Website Templates</h5>

<p>

Lorem ipsum dolor sit amet, consectetur adipiscing elit. Suspendisse pretium pulvinar sem, non malesuada magna laoreet id. Nam ligula risus, commodo vel libero quis, fringilla posuere nulla. Morbi et scelerisque nisi. Vivamus at nibh nisi. Quisque aliquam enim id dolor aliquam, a vehicula turpis vulputate. Cras lacinia lacus elit, eget porta elit dignissim eu. In tincidunt posuere est vitae elementum. Integer a elit suscipit, iaculis tortor id, tempus nunc.

</p>

</div>

<div  class="carousel-item indigo darken-4 white-text"  href="#one!"  style="padding-top: 100px;">

<h5>Content Writing</h5>

<p>

Lorem ipsum dolor sit amet, consectetur adipiscing elit. Suspendisse pretium pulvinar sem, non malesuada magna laoreet id. Nam ligula risus, commodo vel libero quis, fringilla posuere nulla. Morbi et scelerisque nisi. Vivamus at nibh nisi. Quisque aliquam enim id dolor aliquam, a vehicula turpis vulputate. Cras lacinia lacus elit, eget porta elit dignissim eu. In tincidunt posuere est vitae elementum. Integer a elit suscipit, iaculis tortor id, tempus nunc.

</p>

</div>

<div  class="carousel-item indigo darken-4 white-text"  href="#one!"  style="padding-top: 100px;">

<h5>Product Development</h5>

<p>

Lorem ipsum dolor sit amet, consectetur adipiscing elit. Suspendisse pretium pulvinar sem, non malesuada magna laoreet id. Nam ligula risus, commodo vel libero quis, fringilla posuere nulla. Morbi et scelerisque nisi. Vivamus at nibh nisi. Quisque aliquam enim id dolor aliquam, a vehicula turpis vulputate. Cras lacinia lacus elit, eget porta elit dignissim eu. In tincidunt posuere est vitae elementum. Integer a elit suscipit, iaculis tortor id, tempus nunc.

</p>

</div>

</div>


<div  class="row grey lighten-2">

<div  class="container">

<div  class="col l12 m1 s12">

<h4  class="indigo-text text-darken-4 center-align"  style="margin-top: 50px;">OUR SKILLS</h4>

</div>

<div  class="col l6 m6 s12">

<p  class="valign-wrapper"  style="margin-top: 50px;">

Lorem ipsum dolor sit amet, consectetur adipiscing elit. Suspendisse pretium pulvinar sem, non malesuada magna laoreet id. Nam ligula risus, commodo vel libero quis, fringilla posuere nulla. Morbi et scelerisque nisi. Vivamus at nibh nisi. Quisque aliquam enim id dolor aliquam, a vehicula turpis vulputate. Cras lacinia lacus elit, eget porta elit dignissim eu. In tincidunt posuere est vitae elementum. Integer a elit suscipit, iaculis tortor id, tempus nunc.

Lorem ipsum dolor sit amet, consectetur adipiscing elit. Suspendisse pretium pulvinar sem, non malesuada magna laoreet id. Nam ligula risus, commodo vel libero quis, fringilla posuere nulla. Morbi et scelerisque nisi. Vivamus at nibh nisi. Quisque aliquam enim id dolor aliquam, a vehicula turpis vulputate. Cras lacinia lacus elit, eget porta elit dignissim eu. In tincidunt posuere est vitae elementum. Integer a elit suscipit, iaculis tortor id, tempus nunc.

</p>

</div>

<div  class="col l6 m6 s12"  style="margin-top: 50px;">

<div  class="row">

<div  class="col l12 m12 s12 progress-bar">

<h5  class="indigo-text text-darken-4">HTML: 90%</h5>

<div  class="progress white">

<div  class="determinate indigo darken-4"  style="width: 90%;"></div>

</div>

</div>

<div  class="col l12 m12 s12 progress-bar">

<h5  class="indigo-text text-darken-4">CSS: 90%</h5>

<div  class="progress white">

<div  class="determinate indigo darken-4"  style="width: 90%;"></div>

</div>

</div>

<div  class="col l12 m12 s12 progress-bar">

<h5  class="indigo-text text-darken-4">WordPress: 70%</h5>

<div  class="progress white">

<div  class="determinate indigo darken-4"  style="width: 70%;"></div>

</div>

</div>

<div  class="col l12 m12 s12 progress-bar">

<h5  class="indigo-text text-darken-4">JavaScript: 65%</h5>

<div  class="progress white">

<div  class="determinate indigo darken-4"  style="width: 65%;"></div>

</div>

</div>

<div  class="col l12 m12 s12 progress-bar">

<h5  class="indigo-text text-darken-4">SEO: 80%</h5>

<div  class="progress white">

<div  class="determinate indigo darken-4"  style="width: 80%;"></div>

</div>

</div>

</div>

</div>

</div>

</div>

<div  class="row outer">

<div  class="col l6 m6 s12 white inner"  style="width: 50%; height: 50%;">

<div  class="container">

<h4  class="indigo-text text-darken-4"> Get Maxium benifits by working with our experts.</h4>

<p>

Maecenas sed diam eget risus varius blandit sit amet non magna. Morbi leo orta felis euismod semper.Maecenas sed diam eget risus varius blandit sit amet non magna. Morbi leo orta felis euismod semper.

</p>

<p>

Lorem ipsum dolor sit amet, consectetur adipiscing elit. Suspendisse pretium pulvinar sem, non malesuada magna laoreet id. Nam ligula risus, commodo vel libero quis, fringilla posuere nulla. Morbi et scelerisque nisi

</p>

</div>

</div>

<div  class="col l6 m6 s12"  style="width: 50%; height: 50%;">


</div>

<div  class="col l6 m6 s12"  style="width: 50%; height: 50%;">


</div>

<div  class="col l6 m6 s12 white inner"  style="width: 50%; height: 50%;">

<div  class="container">

<h4  class="indigo-text text-darken-4"> Get Maxium benifits by working with our experts.</h4>

<p>

Maecenas sed diam eget risus varius blandit sit amet non magna. Morbi leo orta felis euismod semper.Maecenas sed diam eget risus varius blandit sit amet non magna. Morbi leo orta felis euismod semper.

</p>

<p>

Lorem ipsum dolor sit amet, consectetur adipiscing elit. Suspendisse pretium pulvinar sem, non malesuada magna laoreet id. Nam ligula risus, commodo vel libero quis, fringilla posuere nulla. Morbi et scelerisque nisi

</p>

</div>

</div>

</div>

</section>
Analysis
The opening tag for this section is the
<section id="features"></section>id="features"will allow the navigation link tag withhref="#features"to point to this section.Inside the section tag we create a new carousel using the following tag
<div class="carousel carousel-slider center"></div>class="carousel carousel-slider center"will tell the browser to implement the styles and scripts set forcarousel,carousel-sliderandcenterwill align the contents of the carousel to the middle.We'll be creating the contents of the carousel slider now, this section contains six carousel items in one carousel with different contents, each carousel item has the same structure.
To create a carousel item, we used
<div class="carousel-item indigo darken-4 white-text" href="#one!" style="padding-top: 100px;"></div>.carousel-itemwill create a new carousel layout,indigo darken-4will give the carousel a background of indigo andwhite-textwill set the color of the text content to white.padding-top: 100px;will give a100pxlong padding in the top area of the carousel-itemInside the carousel item we have a
<h5></h5>tag creating a level 5 header and below it we have a<p></p>tag creating a new paragraph with some filler text.To initialize the carousel using Jquery we use the following code
$('.carousel.carousel-slider').carousel({

fullWidth:  true,

indicators:  true

});
The above block of code tells the document to pick the element with class
carouselandcarousel-sliderand apply the functioncarousel()to themWe further specify two values as function parameters.
fullWidth: truewill specify the carousel as a full-width carousel whileindicators: truewill create bullet links that will enable the user to scroll through carousel content.
Snapshot

2. Preloader
Let's create our preloader.
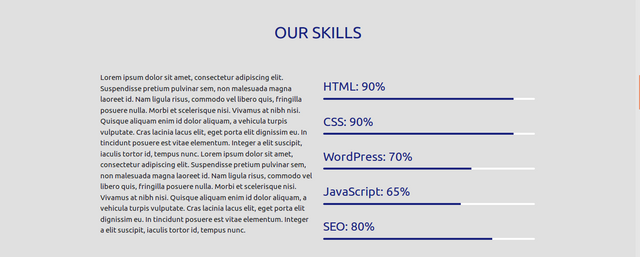
MaterializeCSS preloaders can be used to measure the progress of an action with percentage values.
We open our preloader area as a row with the following tag
<div class="row grey lighten-2"></div>rowcrates a new row,grey lighten-2gives the row a background of light-grey.Inside the new row we have another
<div class="container"></div>used to enclose the contents of the row into a container.We go ahead to create a new column using
<div class="col l12 m12 s12"></div>wherecol l12 m12 s12will make the area full-width for all screen sizesThe new column contains a level 4 header
<h4 class="indigo-text text-darken-4 center-align" style="margin-top: 50px;"></h4>indigo-text text-darken-4 center-alignwill set the text color to indigo, darken the text color and align it to the center in that order.We then create two new columns
<div class="col l6 m6 s12"></div>and in the first column we add a new<p></p>tag with some filler text.In the second column we create a new row with
<div class="row"></div>Our new row will contain five columns, each column has the same structure.
The columns are created using
<div class="col l12 m12 s12 progress-bar"></div>.col l12 m12 s12will make column area full-width whileprogress-barindicates that the are will hold a preloader.Each column contains a level 5 header
<h5 class="indigo-text text-darken-4"></h5>,indigo-text text-darken-4will make the text content of the header appear in indigoBelow the header we have a
<div class="progress white"></div>tag, whereprogress whitewill set styles that will enable the loader and give it a white background.Inside our newly created
<div>we add another new<div class="determinate indigo darken-4" style="width: 90%;"></div>determinate indigo darken-4specifies this area as the preloader and give the area a background ofindigo.
Snapshot

3. Pricing Layout
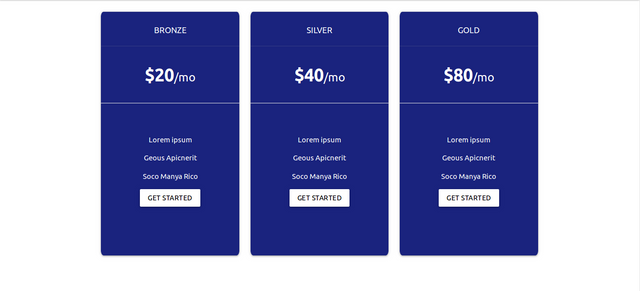
In this section we'll be creating a row of cards that will contain the pricing information for services.
HTML
<section  id="pricing"  class="price-area">

<div  class="container">

<div  class="row">

<div  class="col l4 m4 s12">

<div  class="card indigo darken-4 white-text center-align price-card">

<div  class="card-action">

<h6>BRONZE</h6>

</div>

<div  class="card-action">

<p><span  style="font-size: 36px;"><b>$20</b></span><span  style="font-size: 24px;">/mo</span></p>

</div>

<section  class="divider"></section>

<div  class="card-content"></div>

<p>Lorem ipsum</p>

<p>Geous Apicnerit</p>

<p>Soco Manya Rico</p>

<a  class="waves-effect waves-light white black-text btn">GET STARTED</a>

</div>

</div>

<div  class="col l4 m4 s12">

<div  class="card indigo darken-4 white-text center-align price-card">

<div  class="card-action">

<h6>SILVER</h6>

</div>

<div  class="card-action">

<p><span  style="font-size: 36px;"><b>$40</b></span><span  style="font-size: 24px;">/mo</span></p>

</div>

<section  class="divider"></section>

<div  class="card-content"></div>

<p>Lorem ipsum</p>

<p>Geous Apicnerit</p>

<p>Soco Manya Rico</p>

<a  class="waves-effect waves-light white black-text btn">GET STARTED</a>

</div>

</div>

<div  class="col l4 m4 s12">

<div  class="card indigo darken-4 white-text center-align price-card">

<div  class="card-action">

<h6>GOLD</h6>

</div>

<div  class="card-action">

<p><span  style="font-size: 36px;"><b>$80</b></span><span  style="font-size: 24px;">/mo</span></p>

</div>

<section  class="divider"></section>

<div  class="card-content"></div>

<p>Lorem ipsum</p>

<p>Geous Apicnerit</p>

<p>Soco Manya Rico</p>

<a  class="waves-effect waves-light white black-text btn">GET STARTED</a>

</div>

</div>

</div>

</div>

</section>
Analysis
We open a new section using
<section id="pricing" class="price-area"></section>class="price-area"will help set the height of the pricing area.In order to make the section appear in a container we create a
<div class="container"></div>tagWe then add a new row using the tag
<div class="row"></div>, whererowwill add a new row section.The row contains three columns and each column was created using the same structure.
To add a new column we use
<div class="col l4 m4 s12"></div>.Inside the new column we add cards using
<div class="card indigo darken-4 white-text center-align price-card"></div>cardwill create a new card area,indigo darken-4will set the background of the card to indigo,white-textwill give the text content color of the card to white,center-alignwill align the text content of the card to the center and finallyprice-cardwill set thez-index,border-radius,margin-topandheightfor each card.Inside each card we add a new
<div class="card-action"></div>which contains a<h6></h6>tag serving as the header for each price card.We add another
<div class="card-action"></div>and inside the<div>we add a new<p></p>which will hold the price for each offered package.Below the price we add a
<section class="divider"></section>tag in order to create a divider between the upper part and the remainder of the card.Below the divider we add a
<div class="card-content"></div>which will contain the main card content.Inside the new
<div>we create three new<p></p>tags containing some filler text and a button<a class="waves-effect waves-light white black-text btn"></a>For the newly created button
waves-effect waves-lightwill add a wave effect to the button,whitewill set a white background for the button,black-textwill set the text color to black andbtnwill indicate the tag as a button.
Snapshot

4. Text Input Form
In this section we will add a new text input form and a button which website visitors can use to opt-in to a mailing list.
HTML
<section  id="subscribe"  class="indigo darken-4 white-text center-align sub-area">

<div  class="container">

<div  class="row">

<div  class="col l12 m12 s12 sub-area-content">

<h5>SUBSCRIBE TO OUR NEWSLETTER</h5>

</div>

<div  class="col l12 m12 s12 sub-area-content">

<h6>GET FREQUENT PRODUCTS AND SERVICES UPDATES FROM US</h6>

</div>

<div  class="col l12 m12 s12 sub-area-content">

<div  class="input-field">

<input  placeholder="Enter Your Email Address"  id="sub-email-address"  type="text"  class="validate sub-form white-text">

<span><a  class="waves-effect waves-light btn-large white indigo-text text-darken-4"><i  class="ion-email right"></i>SUBSCRIBE</a></span>

</div>

</div>

</div>

</div>

</section>
Analysis
The opening tag for this area
<section id="subscribe" class="indigo darken-4 white-text center-align sub-area"></section>id="subscribe"will link the section to the navigation link withhref="#subscribe"class="indigo darken-4 white-text center-align sub-area"will set background to indigo, text color to white, text alignment to center whilesub-areawill set the height and top padding for the section.Inside the section we add a
<div class="container"></div>tag to enclose the content of the section in a container.We then create a new row using
<div class="row"></div>.We add three new fullwidth columns to our row using the tag
<div class="col l12 m12 s12 sub-area-content"></div>sub-area-contentwill set the margin for each column.The first column contains a
<h5></h5>tag serving as the main headerThe second column holds the
<h6></h6>tag serving as the sub-header for that section.In the third column we add a new
<div class="input-field"></div>which sets the style for materializecss form in that area.We then create a new text input using
<input placeholder="Enter Your Email Address" id="sub-email-address" type="text" class="validate sub-form white-text">validatewill allow the form to validate its content before sending to the to the server,sub-formwill set the width for the input form andwhite-textwill set the text color for the text input to white.Beside the text input we add a button using
<span><a class="waves-effect waves-light btn-large white indigo-text text-darken-4"><i class="ion-email right"></i></a></span>waves-effect waves-lightwill add a wave effect to the button when clicked,btn-largewill allow set the size of the button to large, white will give the button a white background andindigo-text text-darken-4will set the text color for the button to indigo.
Snapshot

For other MaterializeCSS tutorial
Posted on Utopian.io - Rewarding Open Source Contributors
This is another nice tutorial from you. Trust me, I don't want to upvote this post with less than 100% voting power. I will come back to reward good content!
Downvoting a post can decrease pending rewards and make it less visible. Common reasons:
Submit
Thanks for the constant support, it is always appreciated
Downvoting a post can decrease pending rewards and make it less visible. Common reasons:
Submit
Hey @gotgame! Thank you for the great work you've done!
We're already looking forward to your next contribution!
Fully Decentralized Rewards
We hope you will take the time to share your expertise and knowledge by rating contributions made by others on Utopian.io to help us reward the best contributions together.
Utopian Witness!
Vote for Utopian Witness! We are made of developers, system administrators, entrepreneurs, artists, content creators, thinkers. We embrace every nationality, mindset and belief.
Want to chat? Join us on Discord https://discord.me/utopian-io
Downvoting a post can decrease pending rewards and make it less visible. Common reasons:
Submit
Congratulations @gotgame! You have completed some achievement on Steemit and have been rewarded with new badge(s) :
Click on any badge to view your own Board of Honor on SteemitBoard.
For more information about SteemitBoard, click here
If you no longer want to receive notifications, reply to this comment with the word
STOPDownvoting a post can decrease pending rewards and make it less visible. Common reasons:
Submit
Thank you for the contribution It has been approved.
Need help? Write a ticket on https://support.utopian.io.
Chat with us on Discord.
[utopian-moderator]
Downvoting a post can decrease pending rewards and make it less visible. Common reasons:
Submit
Waw! I wish I understood programming. Thanks for creating this awesome platform where developers can express themselves.
Downvoting a post can decrease pending rewards and make it less visible. Common reasons:
Submit
Congratulations @gotgame! You have completed some achievement on Steemit and have been rewarded with new badge(s) :
Click on any badge to view your own Board of Honor on SteemitBoard.
For more information about SteemitBoard, click here
If you no longer want to receive notifications, reply to this comment with the word
STOPDownvoting a post can decrease pending rewards and make it less visible. Common reasons:
Submit