What Will I Learn?
- You will learn How to implement tableview in your app
- You will learn How to create scrolling list using UITableview
- You will learn What table view delegates and data sources do
- You will learn How to show array data in tableview
- You will learn What is tableview cell and how to customise it
Requirements
- Mac
- Xcode
- Basic Knowledge of programming in Swift Programming Language
Difficulty
- Basic
Tutorial Contents
Hello and welcome to a new series of Swift 4 Tutorials, in which i will introduce you to Swift 4 language and teach you how to make fabulous iOS app in Swift 4 Language. Today's tutorial is first tutorial of the series and in this tutorial we will learn about a class UITableView by implementing UITableView in a project. So let's start the tutorial.
First of all create a new single view application in your Xcode.
Now open your storyboard,
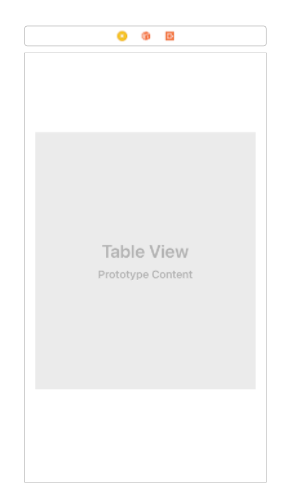
Main.storyboardand drag a table view object from object library inside the view controller like this :-

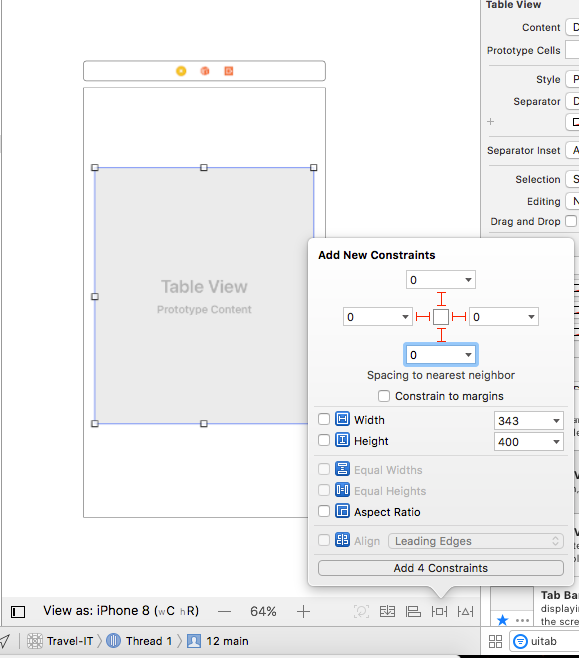
Now we need to set constraints of our tableview according to view controller. If you want to show your tableview in full size then set the top, bottom, leading and trailing constraints to 0 like this :-

Now we need to set outlet for our tableview. So, Open the
ViewController.swiftclass and add a new tableview instance variable below the class declaration.
@IBOutlet var tableView: UITableView!
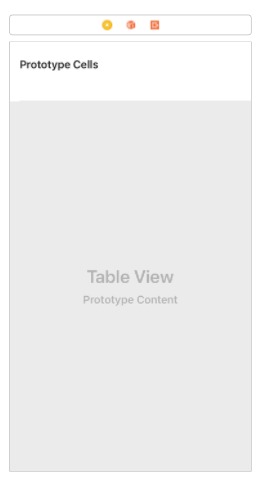
- As our tableview is set on our view controller, now we need to add a cell on our tableview to show data in tableview. So drag a table view cell object from object library inside the table view like this :-

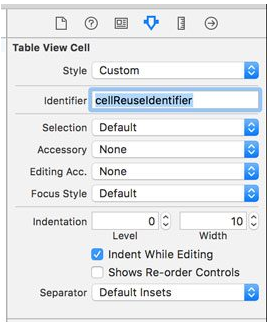
- Now we need to set cell identifier for our tableview cell so that we can re-use the cell within cell delegate methods. To set cell identifier, go inside the attributes inspector and set the identifier.

- Our half of work is done, let's see what we did yet is working or not. So run the app and you see tableview is successfully added in your app. But currently there is not data in your tableview. So to load data in our tableview we need to add UITableViewDataSource in our view controller. First confirm the
UITableViewDataSourceto view controller like this :-
class ViewController: UIViewController, UITableViewDataSource, UITableViewDelegate
- Now add the following line in your view controller
viewDidLoadto confirm tableview data source to view controller like this :-
tableView.dataSource = self
- Now you seeing error in your view controller saying viewcontroller does not conform to protocol 'UITableViewDataSource', don't that's because we didn't add datasource methods yet. So let's add the methods in your controller file.
- Method 1 - This method used to set number of sections in our tableview. Currently we are making tableview with only one section, so add the method in your view controller file :-
func numberOfSections(in tableView: UITableView) -> Int {
    return 1
}
- Method 2 :- This method used to set number of rows in section of our tableview. This method basically used to show the rows according to data we want to show in our tableview. Before proceeding to this method, first make a array with some random data in viewcontroller :-
var radomData: [String] = ["2", "1", "4", "3", "6", "A", "B", "C", "D", "E", "F", "G", "H", "I", "J", "K", "L", "M", "N", "O", "P", "Q", "R", "S", "T", "U", "V", "W", "X", "Y", "Z"]
Now we have some random data to show in our tableview. Let's proceed and add numberOfRowsInSection method (method 2) in your view controller file :-
func tableView(_ tableView: UITableView, numberOfRowsInSection section: Int) -> Int {
     return radomData.count
}
- Method 3 :- This method is the main method for our tableview. This method is used for creating cells in tableview. To create cells in tableview one by one just add the following method in your view controller file :-
func tableView(_ tableView: UITableView, cellForRowAt indexPath: IndexPath) -> UITableViewCell {
     let cell = tableView.dequeueReusableCell(withIdentifier: "cellReuseIdentifier")!
     let text = randomData[indexPath.row]
    var label = UILabel(frame: CGRect(x:0, y: 5, width:100, height: 30))
    label.text = text
    label.tag = indexPath.row
    cell.contentView.addSubview(label)
     return cell
}
Above code analysis :-
So what we did in above method is we start creating cell for our view controller one by one and along with cells we also create a label of some height and width for every cell and add that to label to cell. The text of the label is fetch from our ramdomData Array. When this method method run i will create a cell, add a label on it and then set text of the label from ramdomData Array. This process of creating runs till every element from ramdomData Array is added on cells.
Now run the app and you will see a simple tableview with list of some random data. There are more other methods in tableview class which can work differently. We explore them also but in our next tutorial. So in our next tutorial we learn the following things :-
Customise tableview cell
Customise tableview header and footer
Perform some action on cell selection
So stay tuned for next part, till then enjoy coding in swift. If you have any doubts you can reply in comments or can contact me direct on my discord @iamankit#4227.
Posted on Utopian.io - Rewarding Open Source Contributors
Your contribution cannot be approved because it does not follow the Utopian Rules.
Unfortunately, you can find longer, more descriptive tutorials on this issue with a simple google search, like this one.
You can contact us on Discord.
[utopian-moderator]
Downvoting a post can decrease pending rewards and make it less visible. Common reasons:
Submit
ok i will take care of this.
Downvoting a post can decrease pending rewards and make it less visible. Common reasons:
Submit