Repository
https://github.com/googlesamples/android-architecture-components/
What Will I Learn?
- How to create a ToDo Listing Application using Room database.
Requirements
- Java knowledge
- IDE for developing android applications(Android Studio or IntelliJ)
- An Android Emulator or device for testing
Other Resource Materials
- Software Design Patterns
- The Singleton Pattern
- Google Room CodeLabs: https://codelabs.developers.google.com/codelabs/android-room-with-a-view/#11
- Datatypes in SQLite
- https://guides.codepath.com/android/Room-Guide
Difficulty
- Intermediate
Tutorial Duration
30 - 35 Minutes
TUTORIAL CONTENTS
In this tutorial, we are going to be creating a ToDo Listing application using the Android Architecture Components. According to developer.android.com Android Architecture Components is a collection of libraries that help you design robust, testable, and maintainable applications. Start with classes for managing your UI component lifecycle and handling data persistence.
The purpose of Architecture Components is to provide guidance on app architecture, with libraries for common tasks like lifecycle management and data persistence. Architecture components help you structure your app in a way that is robust, testable, and maintainable with less boilerplate code. Architecture Components provide a simple, flexible, and practical approach that frees you from some common problems so you can focus on building great experiences.
Since this Tutorial is in parts, of which this is the first part, we are going to be considering the Room Database for data persistence. Our Todo task will be saved locally to phone using Room.
Why Room
The Room persistence library provides an abstraction layer over SQLite to allow fluent database access while harnessing the full power of SQLite. The library helps you create a cache of your app's data on a device that's running your app. This cache, which serves as your app's single source of truth, allows users to view a consistent copy of key information within your app, regardless of whether users have an Internet connection.
Step 1 : Create a New Project
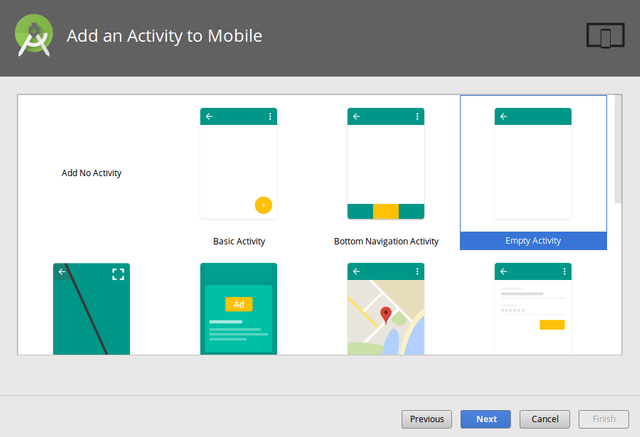
Open Android Studio and create a new project with an Empty activity.
Step 2 : Update Gradle Files
You have to add the component libraries to your gradle files. Add the following code to your build.gradle (Module: app) file, below the dependencies block.
implementation "android.arch.persistence.room:runtime:1.0.0"

annotationProcessor "android.arch.persistence.room:compiler:1.0.0"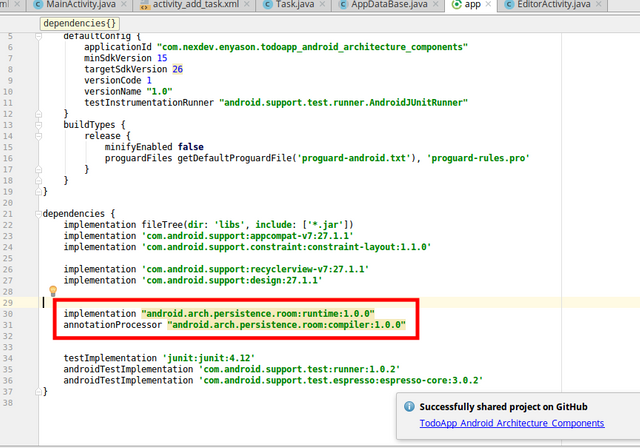
Step 3 : Create the MainActivity Layout

layout source code here github
Step 4 : Create the Add Task Layout
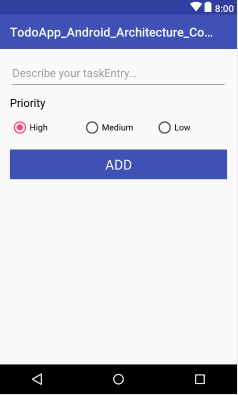
layout source code here github
Step 5 : Create the Custom Row View Layout
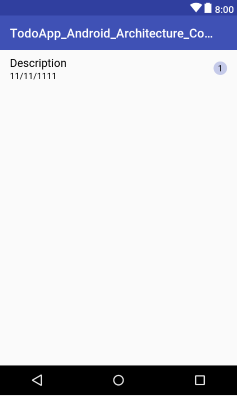
layout source code here github
Step 6 : Create An Entity
Create a class called Task that describes a task Entity.
Here is the code
@Entity(tableName = "task")
public class Task {

    @PrimaryKey(autoGenerate = true)
    private int id;

    private String description;

    private int priority;

    @ColumnInfo(name = "updated_at")
    private Date updatedAt;

    public Task(String description, int priority, Date updatedAt) {

        this.description = description;

        this.priority = priority;

        this.updatedAt = updatedAt;

    }

    public int getId() {

        return id;

    }

    public String getDescription() {

        return description;

    }

    public int getPriority() {

        return priority;

    }

    public Date getUpdatedAt() {

        return updatedAt;

    }

    public void setId(int id) {

        this.id = id;

    }

    public void setDescription(String description) {

       this.description = description;

  }

    public void setPriority(int priority) {

        this.priority = priority;

    }

    public void setUpdatedAt(Date updatedAt) {

        this.updatedAt = updatedAt;

    }

}
To make the Task class meaningful to a Room database, you need to annotate it. Annotations identify how each part of this class relates to an entry in the database. Room uses this information to generate code.
- Entity(tableName = "task")
Each Entity class represents an entity in a table. Annotate your class declaration to indicate that it's an entity. Specify the name of the table if you want it to be different from the name of the class. - PrimaryKey
Every entity needs a primary key. To keep things simple, each Task acts as its own primary key. - ColumnInfo(name = "updated_at")
Specify the name of the column in the table if you want it to be different from the name of the member variable.
Step 6 : Create The DAO
What is the DAO?
In the DAO (data access object), you specify SQL queries and associate them with method calls. The compiler checks the SQL and generates queries from convenience annotations for common queries, such as Insert. The DAO must be an interface or abstract class. By default, all queries must be executed on a separate thread. Room uses the DAO to create a clean API for your code.
Implement the DAO
The DAO for this tutorial provides queries for getting all the task, inserting a task, and deleting a task.
- Create a new Interface and call it TaskDataAccessObject.
- Annotate the class with DAO to identify it as a DAO class for Room.
- Declare a method to insert one task: void insertTask(Task task);
- Annotate the method with Insert. You don't have to provide any SQL! (There are also Delete and Update annotations for deleting and updating a row)
- Declare a method to delete a task: void deleteTask(Task task);
- Create a method to get all the task: loadAllTask();.
Have the method return a List of Task.
List<Task> loadAllTask(); - Annotate the method with the SQL query:
Query("SELECT * FROM task ORDER BY priority")
here is the code
@Dao
public interface TaskDataAccessObject {

    @Query("SELECT * FROM task ORDER BY priority")
    List<Task> loadAllTask(); // returns a list of task object

    @Insert
    void insertTask(Task task);

    @Update(onConflict = OnConflictStrategy.REPLACE)
    void updateTask(Task task);

    @Delete
    void deleteTask(Task task);

}
Step 7 : Add a Room Database
What is a Room database?
Room is a database layer on top of an SQLite database. Room takes care of mundane tasks that you used to handle with an SQLiteOpenHelper
- Room uses the DAO to issue queries to its database.
- By default, to avoid poor UI performance, Room doesn't allow you to issue database queries on the main thread.
- Room provides compile-time checks of SQLite statements.
- Your Room class must be abstract and extend RoomDatabase.
Implement the Room database
- Create a public abstract class that extends RoomDatabase .
- Annotate the class to be a Room database, declare the entities that belong in the database and set the version number. Listing the entities will create tables in the database.
- Define the DAOs that work with the database. Provide an abstract "getter" method for each Dao.
- Make the class a singleton to prevent having multiple instances of the database opened at the same time.
- Add the code to get a database. This code uses Room's database builder to create a RoomDatabase object in the application context from the class.
Here is the complete code for the class:
@Database(entities = {Task.class},version = 1,exportSchema = false)
@TypeConverters(DateConverter.class)
public abstract class AppDataBase extends RoomDatabase {

    public static final String LOG_TAG = AppDataBase.class.getSimpleName();
    public static final Object LOCK = new Object();
    public static final String DATABASE_NAME = "todo_list";
    private static AppDataBase sInstance;

    public static AppDataBase getsInstance(Context context){
        if (sInstance== null) {
            synchronized (LOCK){
                Log.d(LOG_TAG,"creating new database");

                sInstance = Room.databaseBuilder(context.getApplicationContext(),
                      AppDataBase.class,AppDataBase.DATABASE_NAME)
                        .allowMainThreadQueries()
                       .build();
            }
        }

        Log.d(LOG_TAG,"getting the database instance");

        return sInstance;

   }

   public abstract TaskDataAccessObject taskDao();

}
Note:
The annotation TypeConverters(DateConverter.class) is used to provide room with a converter of the Date Type. This is beacause the Date DataType is not supported by SQlite. A class DateConverter is created to implement this conversion.
here is the code:
public class DateConverter {

    @TypeConverter
    public static Date toDate(Long timeStamp) {
        return timeStamp == null ? null : new Date(timeStamp);
    }

    @TypeConverter
    public static Long toTimeStamp(Date date) {
        return date == null ? null : date.getTime();
    }
}
Step 8 : Add A List using a RecyclerView
Add a TodoListAdapter that extends RecyclerView.Adapter.
public class ToDoListAdapter extends RecyclerView.Adapter<ToDoListAdapter.TaskViewHolder> {

    // Constant for date format<
    private static final String DATE_FORMAT = "dd/MM/yyy";

    // Class variables for the List that holds task data and the Context
    private List<Task> mTaskEntries;

    private Context mContext;

    // Date formatter
    private SimpleDateFormat dateFormat = new SimpleDateFormat(DATE_FORMAT, Locale.getDefault());

// the adapter constructor
    public ToDoListAdapter(Context context) {

        mContext = context;

    }

    @Override
    public TaskViewHolder onCreateViewHolder(ViewGroup parent, int viewType) {
        // Inflate the task_layout to a view

        View view = LayoutInflater.from(mContext)
               .inflate(R.layout.layout_row_item, parent, false);

        return new TaskViewHolder(view);

    }

    @Override
    public void onBindViewHolder(TaskViewHolder holder, int position) {

       // Determine the values of the wanted data

        Task taskEntry = mTaskEntries.get(position);
        String description = taskEntry.getDescription();
        int priority = taskEntry.getPriority();
        String updatedAt = dateFormat.format(taskEntry.getUpdatedAt());
//        Toast.makeText(mContext,description,Toast.LENGTH_LONG).show();
        //Set values
        holder.taskDescriptionView.setText(description);
        holder.updatedAtView.setText(updatedAt);
        // Programmatically set the text and color for the priority //TextView
        String priorityString = "" + priority; // converts int to String
        holder.priorityView.setText(priorityString);
        GradientDrawable priorityCircle = (GradientDrawable) holder.priorityView.getBackground();
        // Get the appropriate background color based on the priority
        int priorityColor = getPriorityColor(priority);
        priorityCircle.setColor(priorityColor);

    }
    private int getPriorityColor(int priority) {

        int priorityColor = 0;
        switch (priority) {
            case 1:
               priorityColor = ContextCompat.getColor(mContext, R.color.materialRed);
                break;
            case 2:               priorityColor = ContextCompat.getColor(mContext, R.color.materialOrange);
                break;
            case 3:
               priorityColor = ContextCompat.getColor(mContext, R.color.materialYellow);
                break;
            default:
                break;
       }
        return priorityColor;
    }
    @Override
    public int getItemCount() {
        if (mTaskEntries == null) {
          return 0;
        }

        return mTaskEntries.size();
    }
    /**

    * When data changes, this method updates the list of taskEntries
     * and notifies the adapter to use the new values on it
     */
    public void setTasks(List<Task> taskEntries) {
        mTaskEntries = taskEntries;
     notifyDataSetChanged();
    }
    // Inner class for creating ViewHolders
    class TaskViewHolder extends RecyclerView.ViewHolder {
       // Class variables for the task description and priority TextViews
        TextView taskDescriptionView;
        TextView updatedAtView;
        TextView priorityView;
        public TaskViewHolder(View itemView) {
          super(itemView);
          taskDescriptionView = itemView.findViewById(R.id.taskDescription);
           updatedAtView = itemView.findViewById(R.id.taskUpdatedAt);
            priorityView = itemView.findViewById(R.id.priorityTextView);
      }
   }
}
Code Explanation
- The TodoListAdapter is a custom adapter that populates the RecyclerView with the data model from the database.
- The Adapter class Constructor takes a Context as a paramenter. This context is to enabled the adapter determine the class where the adpter Object is being created. E.g The TodoListAdapter is instantiated in the MainActivity.
- In the OncreateViewHolder Method, we inflate the custom row view item layout we are using to display each entity and then return a new viewHolder object with this view as its parameter.
- In the OnbindViewHolder, we get each entity an set the atrributes to text the getPriority method is to return a color based on the task priority
- getCount method returns the size of the list
- the setTask methods provides the adapter wwith data from the database and then notify adapter for change
Add the RecyclerView in the onCreate() method of MainActivity.
recyclerView = findViewById(R.id.recycler_view_main);

layoutManager = new LinearLayoutManager(this);

recyclerView.setLayoutManager(layoutManager);

toDoListAdapter = new ToDoListAdapter(this);

recyclerView.setAdapter(toDoListAdapter);
Step 9 : Add a Task to the DataBase
In the Editor activity, set an onClick listener to the button add then include the following code:
buttonAdd.setOnClickListener(new View.OnClickListener() {
    @Override
    public void onClick(View v) {
      String text =  etTask.getTet().toString().trim();
       int priority = getPriorityFromViews();
       Date date = new Date();
     Task task  = new Task(text,priority,date);
       mdb.taskDao().insertTask(task);
     finish();
    }

});
NOTE: Remember we said Room does not allow DB operations on the UI thread, but for simplicity of this first part, we allowed operations on the UI thread to allow Db operations without having to create a separate thread. To disable this restriction, include this line:
In later part of this tutorial series, we will execute our db operations on a separate thread.
.allowMainThreadQueries()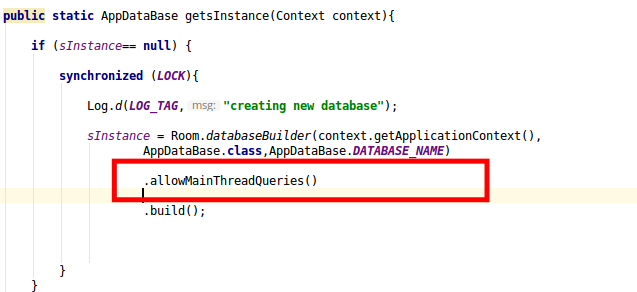
Step 10 : Display Task in MainActivity
@Override
protected void onResume() {
    super.onResume();
    toDoListAdapter.setTasks(appDataBase.taskDao().loadAllTask());
}
Code Explanation
In android activity life cycle, onResume method is called when an inactive activity becomes active. So in order to update our UI after adding a new task we have to call .loadAllTask from the OnResume method of the main ativity then notify the adapter to refresh the UI.
Proof of Work Done
The Complete code can be found here github
https://github.com/enyason/TodoApp_Android_Architecture_Components
Apllication Demo
Thanks for the contribution. The code were easy to read which is great. I also liked the video at the end because we don't often get to see videos in tutorial category. There are parts of post that were not explained comprehensively and utopian expects every part of your post to be explained in detail. In the step 8 you have almost not explained the big block of code and in the step 10, you have not explained what you are doing in the code. In the code for class, the spacing is not good which makes us feel like tutorial in long, even though it isn't. I have also noticed that you are adding "@" before words that makes us feel you are pointing towards the user of Steemit. I have done some research so I can assure you that content is not copy-pasted and is indeed made by the creator.
Utopian Helper
Downvoting a post can decrease pending rewards and make it less visible. Common reasons:
Submit
I too did notice that one, in his code "@" is actually written. maybe he need to avoid using that one in his next contributions @anonfiles.
Downvoting a post can decrease pending rewards and make it less visible. Common reasons:
Submit
Thanks i will correct it @josephace135
Downvoting a post can decrease pending rewards and make it less visible. Common reasons:
Submit
Hey @anonfiles
Here's a tip for your valuable feedback! @Utopian-io loves and incentivises informative comments.
Contributing on Utopian
Learn how to contribute on our website.
Want to chat? Join us on Discord https://discord.gg/h52nFrV.
Vote for Utopian Witness!
Downvoting a post can decrease pending rewards and make it less visible. Common reasons:
Submit
thanks for the correction @anonfiles i will edit this post right away.
Downvoting a post can decrease pending rewards and make it less visible. Common reasons:
Submit
@anonfiles i have edited the post to include the explanation for those block of codes. please go through my contribution again
Downvoting a post can decrease pending rewards and make it less visible. Common reasons:
Submit
Hi @ideba,
The code next to this texts are bit to spacious, does it require to be space that much? It's quiet confusing whether it is necessary for the code to be separated that much.
Downvoting a post can decrease pending rewards and make it less visible. Common reasons:
Submit
Hey @josephace135
Here's a tip for your valuable feedback! @Utopian-io loves and incentivises informative comments.
Contributing on Utopian
Learn how to contribute on our website.
Want to chat? Join us on Discord https://discord.gg/h52nFrV.
Vote for Utopian Witness!
Downvoting a post can decrease pending rewards and make it less visible. Common reasons:
Submit
I think i had issue with the Editor @josephace135 i will get it fixed. Thanks
Downvoting a post can decrease pending rewards and make it less visible. Common reasons:
Submit
Well i like your post , but the problem is that you have used long space between coding, and i think that if there is small spacing between coding the post will be more beautiful


well in picture you can see that there is long spacing between coding.I hope you will keep my point in your mind and make great post.
Downvoting a post can decrease pending rewards and make it less visible. Common reasons:
Submit
Thanks i will fix it
Downvoting a post can decrease pending rewards and make it less visible. Common reasons:
Submit
@helpers i have removed those excess spaces...
Downvoting a post can decrease pending rewards and make it less visible. Common reasons:
Submit
@utopian-io i will edit this post right away...
Downvoting a post can decrease pending rewards and make it less visible. Common reasons:
Submit
Hi @ideba,
The code next to step 8 is still spacious. Please try reviewing it again so that moderators and Community Manager (CM) for tutorials category will have an easier and straightforward review/moderation of your contribution.
Downvoting a post can decrease pending rewards and make it less visible. Common reasons:
Submit
ok thanks @josephace135
i will do that now
Downvoting a post can decrease pending rewards and make it less visible. Common reasons:
Submit
@josephace135 i have done as you have said. I have successfully removed all the spacing.
please the moderators can now review/moderate my contribution.
Thanks!
Downvoting a post can decrease pending rewards and make it less visible. Common reasons:
Submit
@utopian-io i have done all the necessary correction as advised.
The moderators can now proceed to review/moderate my contribution
Downvoting a post can decrease pending rewards and make it less visible. Common reasons:
Submit