
Repository
https://github.com/enyason/OhmsLawExperiment
What Will I Learn?
- How to Implement Ohms law experiment with android studio
- How to create custom views
- How to do simple animation with the canvas class
Requirements
- System Requirements : Java JDK, Android Studio
- OS Support for Java : Windows, mac OS, Linux
- Required Knowledge : A fair knowledge of Java and use of Android Studio
Resources for this Tutorial
Canvas Android Documentation : https://developer.android.com/reference/android/graphics/Canvas
Java Docs : http://www.oracle.com/technetwork/java/javase/documentation/api-jsp-136079.html
Java Interfaces : https://www.tutorialspoint.com/java/java_interfaces.htm
Ohms law : http://ohmlaw.com/ohms-law-lab-report/
Difficulty
- Basic
Tutorial Duration 40- 50 Minutes
Tutorial Content
This tutorial series covers how to implement physics laboratory experiment on android using android studio. For this first part of the series, we are going to implement "Ohms Law" experiment. Before we delve into the coding aspect of the tutorial, first i will like us to understand what the experiment is all about.
What is Ohms Law?
Ohm’s law is the fundamental law of Electrical Engineering. It relates the current flowing through any resistor to the voltage applied to its ends. According to the statement: The current flowing through a constant resistor is directly proportional to the voltage applied to its ends. For the set up we are going to implement, the objective will be to verify that voltage and current are directly proportional using a 1kΩ resistor.
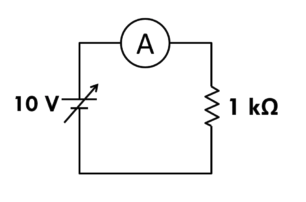
For more information on ohms law, check out http://ohmlaw.com/ohms-law-lab-report/
For the purpose of this tutorial and to realize the objectives of the experiment, we are going to take the following steps towards implementing the virtual experiment
STEP 1 : Create a new Android Studio Project
Open a new android studio an create a new project and add an empty activity to it
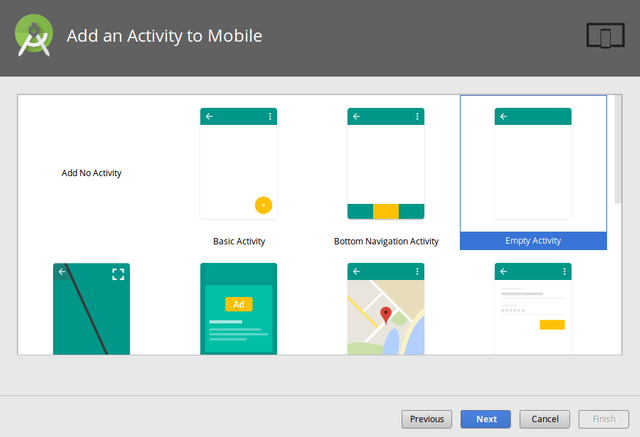
STEP 2 : Create two Fragments with their respective layout files
We'll need two fragments to handle the experiment view it'self and the
Fragment for ohms law experiment

Fragment for ohms law experiment result

STEP 3 : Create a Custom View for the Experiment Implementation
To achieve this , we are going to extend the view class of the android framework
- Extend View Class
public class CanvasOhmsLaw extends View {

    public CanvasOhmsLaw(Context context) {
        super(context);
    }

    }
Code explanation
Here we extend the view class then we implement it's constructor
- Implement the virtual experiment in CanvasOhmsLaw.java
public class CanvasOhmsLaw extends View {

    Paint xyGraphPaint, slopePaint;
    public Bitmap bitmapVoltage, bitmapAmmeter, bitmapResistor;

    Paint paint;
    Path path, pathXYGraph, pathSlope;


    public CanvasOhmsLaw(Context context) {
        super(context);
        init(context);

    }

 public CanvasOhmsLaw(Context context, AttributeSet attrs) {
        super(context, attrs);
        init(context);
    }

    public CanvasOhmsLaw(Context context, AttributeSet attrs, int defStyle) {
        super(context, attrs, defStyle);
        init(context);
    }

    private void init(Context context) {

        bitmapResistor = getBitmapFromDrawable(context, R.drawable.ic_resistor);
        bitmapVoltage = getBitmapFromDrawable(context, R.drawable.ic_voltmeter);
        bitmapAmmeter = getBitmapFromDrawable(context, R.drawable.ic_ammeter);

        int halfHeightAmmeter = bitmapAmmeter.getHeight() / 2;
        int halfWidthVoltmeter = bitmapAmmeter.getWidth() / 2;

        paint = new Paint();
        paint.setColor(Color.RED);
        paint.setStrokeWidth(5);
        paint.setStyle(Paint.Style.STROKE);

        xyGraphPaint = new Paint();
        xyGraphPaint.setColor(Color.BLACK);
        xyGraphPaint.setStyle(Paint.Style.STROKE);
        xyGraphPaint.setStrokeWidth(8);

        slopePaint = new Paint();
        slopePaint.setColor(Color.RED);
        slopePaint.setStyle(Paint.Style.STROKE);
        slopePaint.setStrokeWidth(8);

        path = new Path();
        path.moveTo(100, 100 + halfHeightAmmeter);
        path.lineTo(200, 100 + halfHeightAmmeter);
        path.moveTo(200 + bitmapAmmeter.getWidth(), 100 + halfHeightAmmeter);
        path.lineTo(400 + bitmapResistor.getWidth() / 2, 100 + halfHeightAmmeter);
        path.moveTo(400 + bitmapResistor.getWidth() / 2, 100 + halfHeightAmmeter);
        path.lineTo(400 + bitmapResistor.getWidth() / 2, 250);
        path.moveTo(400 + bitmapResistor.getWidth() / 2, 250 + bitmapResistor.getHeight());
        path.lineTo(400 + bitmapResistor.getWidth() / 2, 400);

        path.moveTo(100, 100 + halfHeightAmmeter);
        path.lineTo(100, 250);
        path.moveTo(100, 250 + bitmapVoltage.getHeight());
        path.lineTo(100, 400);
        path.moveTo(100, 400);
        path.lineTo(380 + bitmapAmmeter.getWidth(), 400);

        pathXYGraph = new Path();
        pathXYGraph.moveTo(100, 600);
        pathXYGraph.lineTo(100, 1100);
        pathXYGraph.moveTo(100, 1100);
        pathXYGraph.lineTo(600, 1100);

        pathSlope = new Path();
        pathSlope.moveTo(100,1100);
        pathSlope.lineTo(600,1100);
    }


    @Override
    protected void onDraw(Canvas canvas) {
        super.onDraw(canvas);

        canvas.drawBitmap(bitmapResistor, 400, 250, null);
        canvas.drawBitmap(bitmapAmmeter, 200, 100, null);
        canvas.drawBitmap(bitmapVoltage, 100 - bitmapVoltage.getWidth() / 2, 250, null);

        canvas.drawPath(path, paint);
        canvas.drawPath(pathXYGraph, xyGraphPaint);
        canvas.drawPath(pathSlope, slopePaint);


    }
    ...
    }
Code explanation
We define paint brushes for the paths we are going to use for drawing the objects. The Paint object is used for this.
In the init method, we first get bitmap drawable for resistor, voltage an ammeter
Next we build the paint brushes for: The circuit, the X and Y axis and the slope
Now we make the drawing itself of the circuit, the X and Y axis and the slope.
path = new Path();is used for drawing the circuit.pathXYGraph = new Path();is used to draw the X an Y axis.pathSlope = new Path();is used to draw the slope for the graphIn the onDraw method we use the Canvas object to draw the bitmaps to screen, as well as the paths we defined in the init method.
- Include CanvasOhmsLaw as a view in the layout_ohms_law_experiment file we created earlier
<?xml version="1.0" encoding="utf-8"?>
<RelativeLayout xmlns:android="http://schemas.android.com/apk/res/android"
    android:layout_width="match_parent"
    android:layout_height="match_parent">

    <com.nexdev.enyason.ohmslawexperiment.CanvasOhmsLaw
        android:layout_width="wrap_content"
        android:layout_height="wrap_content" />

</RelativeLayout>
Code explanation
All we did here is to include the CanvasOhmsLaw as a view in the layout file. Below is the output of what we have done in this step
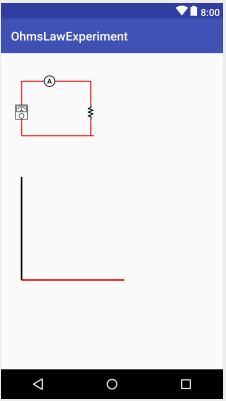
STEP 4: Add the two Fragment into the activity using a TabLayout and View Pager
- Set Up the Fragment Pager Adapter
public class MyPagerAdapter extends FragmentStatePagerAdapter{

    private final CharSequence[] title = {"Experiment","Result"};

    public MyPagerAdapter(FragmentManager fm) {
        super(fm);
    }
    @Override
    public Fragment getItem(int position) {
        switch (position) {
            case 0:
                return new FragmentOhmsLawExperiment();
            case 1:
                return new FragmentOhmsLawResult();
            default:
                return null;
        }
    }

    @Override
    public int getCount() {
        return 2;
    }

    // Returns the page title for the top indicator
    @Override
    public CharSequence getPageTitle(int position) {
        return title[position];
    }

}
Code explanation
- This adapter class will help set up our view pager with two fragment
- We declare titles for our tabs using an array of ChaSequence
- The constructor accepts a Fragment Manager from the Main Activity, which is then passed unto the the parent class (FragmentStatePagerAdapter)
- Set Up ViewPager and TabLayout in MainActivity
 @Override
    protected void onCreate(Bundle savedInstanceState) {
        super.onCreate(savedInstanceState);
        setContentView(R.layout.activity_main);

        viewPager = findViewById(R.id.vpPager);
        pagerAdapter = new MyPagerAdapter(getSupportFragmentManager());
        viewPager.setAdapter(pagerAdapter);

        tabLayout = findViewById(R.id.view_pager_tab);
        tabLayout.setupWithViewPager(viewPager);


    }
Code explanation
Basically we reference the the view pager and the tab layout from the activity_main layout file then attach with our pager adapter
With everything done correctly, we should have something like this
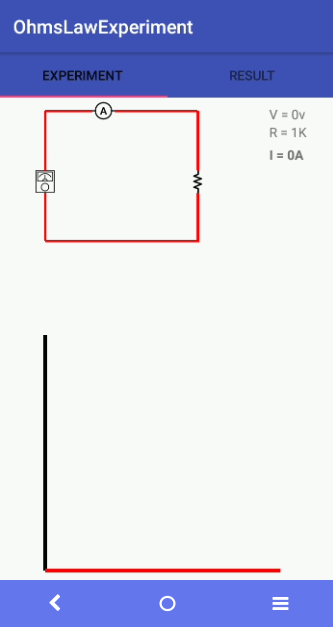
STEP 5: Communicate Between the Two Fragments to Send Result
To effectively communicate between these fragments, we are going to define an interface then implement it via our main activity.
- Create A POJO an call it OhmsLawResult
public class OhmsLawResult {

    String voltage,current;

    public OhmsLawResult(String voltage, String current) {
        this.voltage = voltage;
        this.current = current;
    }

    public String getVoltage() {
        return voltage;
    }

    public String getCurrent() {
        return current;
    }
}
- Create an Interface
public interface CommunicatorOhmsLaw {
    void result(OhmsLawResult result);
}
This interface will be implemented by our Main Activity
- Implement interface created above in main activity
public class MainActivity extends AppCompatActivity implements CommunicatorOhmsLaw{

    ...

    @Override
    public void result(OhmsLawResult result) {

    }
}
This method will be called whenever the Fragment sending the message triggers it
- Set Up Communicator in The First Fragment
public class FragmentOhmsLawExperiment extends Fragment {

    ...
    CommunicatorOhmsLaw communicatorOhmsLaw;

    @Override
    public void onAttach(Context context) {
        super.onAttach(context);

        communicatorOhmsLaw = (CommunicatorOhmsLaw)context;
    }

    ...

    }
STEP 6: Implement UI interaction between the First Fragment and the CanvasOhmsLaw class created earlier
Now we need to update the UI when the voltage value of the circuit changes
- Create a method in the canvas class to update the UI on users interaction with the circuit
 public void invalidateCanvas(Context context, int drawable, float x, float y) {

        if (drawable != 0) {
            bitmapAmmeter = getBitmapFromDrawable(context, drawable);

        }


        pathSlope.reset();

        pathSlope.moveTo(100,1100);

        pathSlope.lineTo(x,y);

        invalidate();

    }
code expalnation
This method is called from the First fragment passing the x and y position to be used by the path
pathSlope.reset();this reset the slope positionpathSlope.moveTo(100,1100);this moves the path to the origin of the graphpathSlope.lineTo(x,y);this draws the slope to the points as defined by the x and y positioninvalidate();this is called to redraw the canvas, with the new update
- Update code in FragmentOhmsLawExperiment
 public class FragmentOhmsLawExperiment extends Fragment {

 @Override
    public void onViewCreated(@NonNull View view, @Nullable Bundle savedInstanceState) {
        super.onViewCreated(view, savedInstanceState);

        imageView = view.findViewById(R.id.image_view_voltmeter);

        imageView.setOnClickListener(new View.OnClickListener() {


            @Override
            public void onClick(View v) {

                setUpAlertDialog();
            }
        });


 }
}
code explanation
we refence the image view for the voltage that will be clicked to update the voltage input
set an OnClickListener to the image view and the call
setUpAlertDialog();
 public void setUpAlertDialog(){


        View editTextView = LayoutInflater.from(getContext()).inflate(R.layout.alert_dialog_view,null);

        final AlertDialog.Builder builder = new AlertDialog.Builder(getContext());

        builder.setTitle("Change Voltage Value");

        builder.setView(editTextView);

        final EditText textVoltage = editTextView.findViewById(R.id.editText_voltage);
        textVoltage.setText("2");


        builder.setPositiveButton("Add", new DialogInterface.OnClickListener() {


            @Override
            public void onClick(DialogInterface dialog, int which) {

                valVoltage = Float.parseFloat(textVoltage.getText().toString());
                float current = valVoltage/valResistance;

                if (valVoltage > 10) {
                    Toast.makeText(getContext(), "Voltage Entry Exceeded!", Toast.LENGTH_SHORT).show();
                    dialog.dismiss();
                    return;
                }


                if (listCurrent.isEmpty() && listVoltage.isEmpty()) {

                    listVoltage.add(valVoltage);
                    listCurrent.add(current);


                    communicatorOhmsLaw.result(new OhmsLawResult(valVoltage+"",""+current));


                } else {

                    if (listVoltage.get(listVoltage.size() - 1) > valVoltage || (listVoltage.get(listVoltage.size()-1) == valVoltage)) {
                        Toast.makeText(getContext(), "Voltage Entry failed!", Toast.LENGTH_SHORT).show();
                        dialog.dismiss();
                        return;
                    } else {

                        listVoltage.add(valVoltage);
                        listCurrent.add(current);
                        communicatorOhmsLaw.result(new OhmsLawResult(valVoltage+"",""+current));

                    }


                }


                tvVoltage.setText("V = " + valVoltage + "v");
                tvCurrent.setText("I = "+current+"A");

                yPointGraph = 1100 - (50 * valVoltage);
                xPointGraph = 100 + (50000*current);

                int drawable;
                if (valVoltage > 0) {
                    drawable = R.drawable.ic_ammeter_current;

                } else {
                    drawable = R.drawable.ic_ammeter;

                }


                canvasOhmsLaw.invalidateCanvas(getActivity(), drawable,xPointGraph,yPointGraph);

                Toast.makeText(getContext(),"Added to table",Toast.LENGTH_SHORT).show();

                dialog.dismiss();


            }
        }).show();


    }
code explanation
- basically what this method does is to get voltage input from the user and then update the UI accordingly using
canvasOhmsLaw.invalidateCanvas(getActivity(), drawable,xPointGraph,yPointGraph); - we also check if the voltage is greater than 0 to pass the appropriate current drawable.
drawable = R.drawable.ic_ammeter_current;is to indicate voltage > 0drawable = R.drawable.ic_ammeter;is to indicate voltage = 0
with the above implemented, our app should behave like below
STEP 7: Update Result Fragment with data passed from the First Fragment
Since we are going to display our result in a tabular format, we are going to make use of a list view
- Create a row item layout for our list
<?xml version="1.0" encoding="utf-8"?>
<RelativeLayout xmlns:android="http://schemas.android.com/apk/res/android"
    android:layout_width="match_parent" android:layout_height="match_parent">


    <LinearLayout
        android:layout_marginLeft="20dp"
        android:layout_width="wrap_content"
        android:layout_height="wrap_content"
        android:orientation="horizontal">


        <TextView
            android:id="@+id/tv_ohms_laww_result_voltage"
            android:layout_width="wrap_content"
            android:layout_height="wrap_content"
            android:text="10v"
            android:textSize="14sp" />

        <TextView
            android:id="@+id/tv_ohms_laww_result_current"

            android:layout_width="wrap_content"
            android:layout_height="wrap_content"
            android:layout_marginLeft="50dp"
            android:text="0.01mA"
            android:textSize="14sp" />

    </LinearLayout>


</RelativeLayout>
This layout file will handle display of each row entry unto the list.
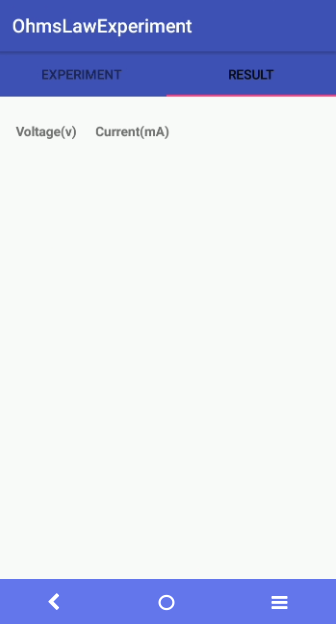
- Add a list view to the ohms law result layout
<?xml version="1.0" encoding="utf-8"?>
<RelativeLayout xmlns:android="http://schemas.android.com/apk/res/android"
    android:layout_width="match_parent"
    android:layout_height="match_parent">


<LinearLayout
        android:orientation="vertical"
        android:layout_marginTop="75dp"
        android:layout_width="match_parent"
        android:layout_height="match_parent">


    <LinearLayout
        android:gravity=""
        android:id="@+id/linearLayout_header_ohms_law"
        android:layout_width="wrap_content"
        android:layout_height="wrap_content"
        android:orientation="horizontal">

        <TextView
            android:layout_width="wrap_content"
            android:layout_height="wrap_content"
            android:layout_marginLeft="20dp"
            android:text="Voltage(v)"
            android:textStyle="bold" />

        <TextView
            android:layout_width="wrap_content"
            android:layout_height="wrap_content"
            android:layout_marginLeft="20dp"
            android:text="Current(mA)"
            android:textStyle="bold" />

    </LinearLayout>


    <ListView

        android:id="@+id/list_ohms_law_result"
        android:layout_width="wrap_content"
        android:layout_height="wrap_content"
        android:layout_marginLeft="10dp"
        android:layout_marginRight="180dp"
        tools:listitem="@layout/row_item_ohms_law_result"></ListView>


    </LinearLayout>

</RelativeLayout>
the above code should reproduce this
- Create an adapter to handle the List of items
public class OhmsLawArrayAdapter extends ArrayAdapter {

    List<OhmsLawResult> results;
    Context ctx;

    TextView tvVoltage, tvCurrent;
    public OhmsLawArrayAdapter(@NonNull Context context, @NonNull List<OhmsLawResult> objects) {
        super(context, 0, objects);
        results = objects;
        ctx = context;
    }


    @NonNull
    @Override
    public View getView(int position, @Nullable View convertView, @NonNull ViewGroup parent) {

        if (convertView == null) {
            convertView = LayoutInflater.from(ctx).inflate(R.layout.row_item_ohms_law_result,parent,false);
        }

        tvVoltage = convertView.findViewById(R.id.tv_ohms_laww_result_voltage);

        tvCurrent = convertView.findViewById(R.id.tv_ohms_laww_result_current);

        OhmsLawResult ohmsLawResult = results.get(position);

        tvVoltage.setText(ohmsLawResult.getVoltage()+"v");

        tvCurrent.setText(ohmsLawResult.getCurrent()+"mA");


        return convertView;
    }


    @Override
    public int getCount() {
        return results.size();
    }
}
This adapter will handle the population of our Listview with the results passed from the First fragment
- Set Up the Listview and Adapter in the FragmentOhmsLawResult class
arrayAdapter = new OhmsLawArrayAdapter(getContext(),ohmsLawResults);

        listView = view.findViewById(R.id.list_ohms_law_result);

        listView.setAdapter(arrayAdapter);
The above code blocks goes to the onViewCreated method of FragmentOhmsLawResult. Basically what it does is to intialized the adapter and set it to the list view
- Update the List view From the result passed from the main activity
 public  static void updateTableInfo(OhmsLawResult result){
        arrayAdapter.add(result);
        arrayAdapter.notifyDataSetChanged();

    }
Basically what happens here is that we add a new OhmsLawResult object to the adapter and then call notifyDataSetChanged() to update the UI.
- Pass the Data from main activity to the FragmentOhmsLawResult class
@Override
    public void result(OhmsLawResult result) {

        FragmentOhmsLawResult.updateTableInfo(result);

    }
From our main activity, we add FragmentOhmsLawResult.updateTableInfo(result); to the result method. This will pass the OhmsLawResult object to FragmentOhmsLawResult, which will then update the UI accordingly
With all these steps taken, we should have something like this
Proof of Work
The complete source code can be found on github
I thank you for your contribution. Here are my thoughts;
What you really have shown is doing it by yourself, not teaching. You can avoid this by approaching more theoretical/technical to the subject. If you need examples, there are sites which offer professional tutorials. I won't include them because I don't want to advertise them, but checking them might change your approach to the tutorials.
Instead of showing how to do something specific (virtual physics lab application), you can show concepts in general(for example, viewports), then use examples to show what can be done with them. This approach would reach more people not by only the content, but also by the topic.
Titles show what your post is about, so use them wisely. When defining titles, positioning words is essential to gain the user's attention. Giving general words priority than the rest is the key to achieve that. So, consider putting "android studio" ahead of the title.
Your contribution has been evaluated according to Utopian policies and guidelines, as well as a predefined set of questions pertaining to the category.
To view those questions and the relevant answers related to your post, click here.
Need help? Write a ticket on https://support.utopian.io/.
Chat with us on Discord.
[utopian-moderator]
Downvoting a post can decrease pending rewards and make it less visible. Common reasons:
Submit
Thanks @yokunjon for moderating my content. I'll consider your advice and improve on my future contributions... Thanks!
Downvoting a post can decrease pending rewards and make it less visible. Common reasons:
Submit
Thank you for your review, @yokunjon!
So far this week you've reviewed 1 contributions. Keep up the good work!
Downvoting a post can decrease pending rewards and make it less visible. Common reasons:
Submit
I upvoted your post.
Keep steeming for a better tomorrow.
@Acknowledgement - God Bless
Posted using https://Steeming.com condenser site.
Downvoting a post can decrease pending rewards and make it less visible. Common reasons:
Submit
Hi @ideba!
Your post was upvoted by @steem-ua, new Steem dApp, using UserAuthority for algorithmic post curation!
Your post is eligible for our upvote, thanks to our collaboration with @utopian-io!
Feel free to join our @steem-ua Discord server
Downvoting a post can decrease pending rewards and make it less visible. Common reasons:
Submit
Hey, @ideba!
Thanks for contributing on Utopian.
We’re already looking forward to your next contribution!
Get higher incentives and support Utopian.io!
Simply set @utopian.pay as a 5% (or higher) payout beneficiary on your contribution post (via SteemPlus or Steeditor).
Want to chat? Join us on Discord https://discord.gg/h52nFrV.
Vote for Utopian Witness!
Downvoting a post can decrease pending rewards and make it less visible. Common reasons:
Submit