What Will I Learn?
- With this tutorial, you will learn how to control the DC Motor via Bluetooth Connection
- You will learn how to interface your Arduino UNO to your smart phones
- You will learn the basic parameters of the DC Motors and L293D IC (replaceable with H Bridge)
Requirements
This instructional blog/tutorial needs the following materials:
- Arduino UNO
- DC Motor
- Smartphone (any android phone will do , no brand requirement)
- Bluetooth Module (HC-05 or HC-06)
- L293D IC
- Basic Materials such as Breadboard and Jumping wires
- Open-Source Arduino Software (IDE) / Arduino IDE
- BlueTerm Application
Difficulty
- Intermediate
Tutorial Proper
Step 1: HARDWARE CONNECTION between the components.
The connections that will be shown below must be strictly followed for the codes we have here also corresponds on the pins connected.
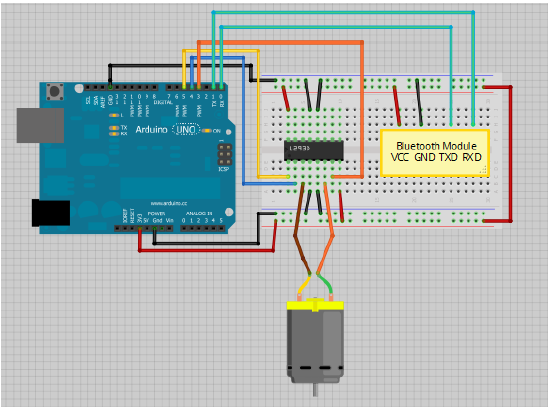
However, be mindful that the TX and RX of the Arduino UNO must be connected on the Bluetooth module after the code has been uploaded to the Arduino ( This must be strictly followed to avoid any disruptions upon sending data to the involved modules)
The Physical Connections
Arduino UNO Board:
-GRND and 3.3V must be connected accordingly to the breadboard and is denoted by black and red , respectively.
-pins TX and RX must be connected to the bluetooth module's RXD and TXD , respectively. (Note : be mindful on the connections for people mistakenly connects the two pins to the other. Strictly follow the connections or else the whole thing won't work.)
-pins 3, 4 and 5 are connected to the L293D IC's pins 7, 2 and 1 , respectively.
L293D IC :
Other pins' connections have been discussed prior so the remaining pins should be connected by the following manner:
- Since L293D IC is a motor driver which allows to drive the motor on either direction hence, we can connect the pins of the DC Motor on either pins 3 and 6 of the IC.
- pins 4, 5, 12 and 13 must be connected to the GRND.
Bluetooth Module :
- VCC and GND pins must be connected appropriately.
Step 2: SOFTWARE CONNECTION between the components.
- Open your Arduino IDE Software for the uploading of the codes to the Arduino UNO. And go to Tools > Board > Arduino/Genuino UNO . Change your board to Arduino UNO.
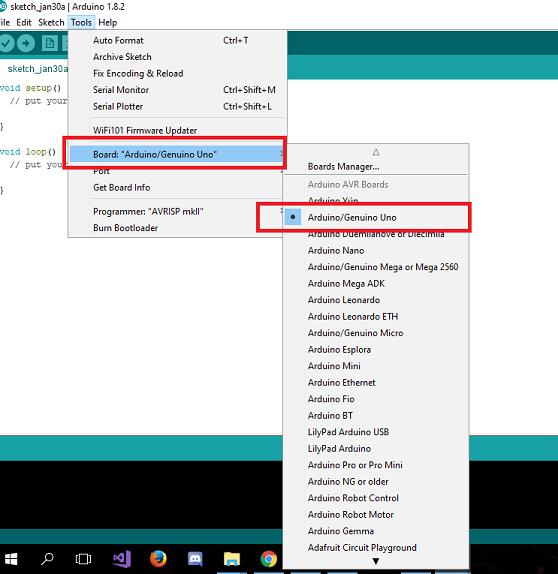
-After interfacing your appropriate board to your IDE software the copy the codes below on your IDE Interface and Verify/Compile or Upload to your Arduino Board.
//Strictly follow the pins we connected on the physical interface
int motorPin1 = 3;
int motorPin2 = 4;
int enablePin = 5;
int state;  // sets the initial state
int flag=0;        // serial only prints once the state
void setup() {
   //motor driver or L293D IC
    pinMode(motorPin1, OUTPUT); //This sets the output pins
    pinMode(motorPin2, OUTPUT);
    pinMode(enablePin, OUTPUT);
    digitalWrite(enablePin, HIGH);
    Serial.begin(9600); //set the baud rate
}
void loop() {
   //The loop will run as long as the condition will satisfy
    if(Serial.available() > 0){
      state = Serial.read();
      flag=0;
    }
    // if '0' the DC motor will turn off
    if (state == '0') {
        digitalWrite(motorPin1, LOW); // set pin 2 on L293D low
        digitalWrite(motorPin2, LOW); // set pin 7 on L293D low
        if(flag == 0){
          Serial.println("Motor: off");
          flag=1;
        }
    }
    // if '1' the DC motor will turn right
    else if (state == '1') {
        digitalWrite(motorPin1, LOW); // set pin 2 on L293D low
        digitalWrite(motorPin2, HIGH); // set pin 7 on L293D high
        if(flag == 0){
          Serial.println("Motor: right");
          flag=1;
        }
    }
    // if '2' the DC motor will turn left
    else if (state == '2') {
        digitalWrite(motorPin1, HIGH); // set pin 2 on L293D high
        digitalWrite(motorPin2, LOW); // set pin 7 on L293D low
        if(flag == 0){
          Serial.println("Motor: left");
          flag=1;
        }
    }
}- Copy the code on the Arduino IDE and Verify/Compile , simply go to Sketch>Verify/Compile or Ctrl+R .
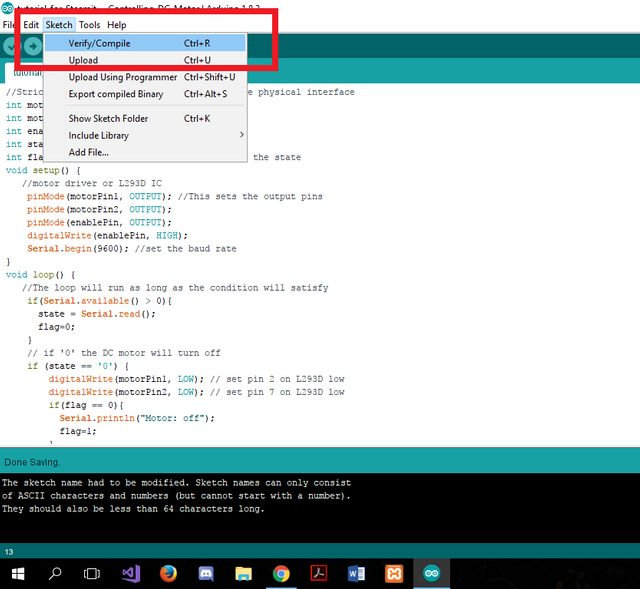
- To check if there are no errors, there will be notification below otherwise this will appear on your screen.
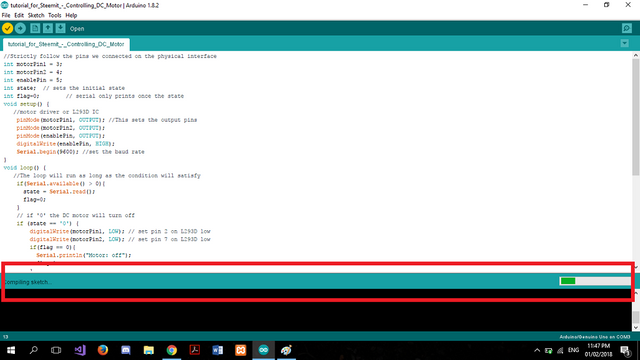
-Then upload your code on the Arduino UNO , simply go to Sketch > Upload or Ctrl+U or click the upper button which is shown on the image below.
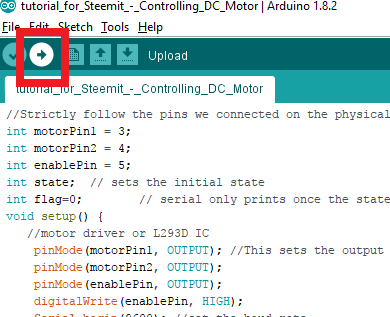
- After it has been uploaded on your Arduino Board (Note: Remove TX and RX connections first before uploading the codes to your board) then we are now ready on interfacing our program and physical output to the Bluetooth.
Step 3: BLUETOOTH CONNECTION between the components.
- On this step, we will be using a free application for bluetooth which has the capability of communicating from your smart phone down to your bluetooth module. We will be using the BlueTerm Application. On downloading and installing, just simply follow the instructions below.
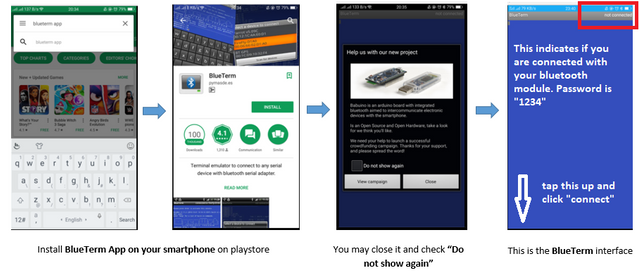
Step 4: ACTUAL Tutorial.
After we had set up the bluetooth connections then let us proceed to the actual tutorial. The image below shows the set up on actual. Connections are portrayed below.
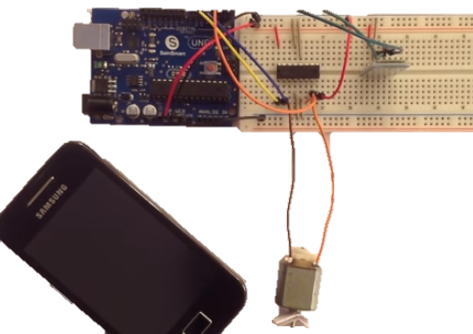
Then after that, established the connections between your smartphone to your set-up. By connecting to your bluetooth module. Note: if any case the module ask for a password then it will be "1234"
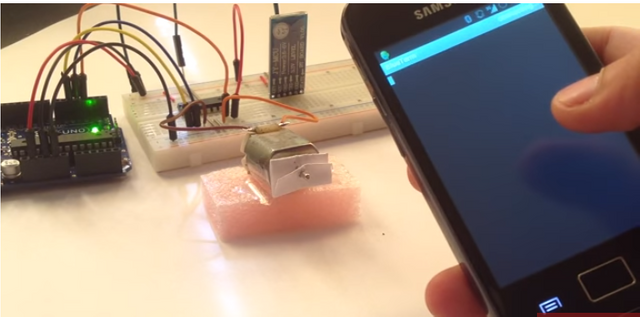
- If connected then you may input the command you specify on your program: "0" for turning off the motor, "1" for the DC Motor rotates to the right and "2" for the DC Motor rotates to the left. This will give signal to the motor on its action.
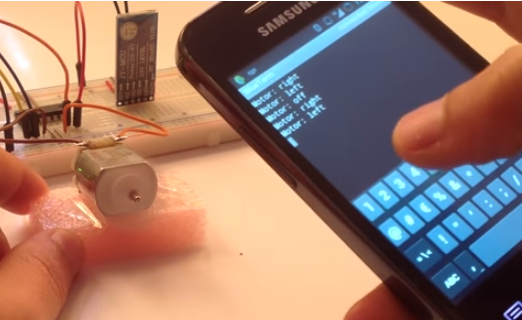
Follow the procedure above then we can have our desired output, you can also modify the number keys as you wanted for the motor actions.
Curriculum
- Do It Yourself : ESP8266 WiFi Module connected on Arduino UNO with the step-by-step process.
- Do It Yourself : Real Time Clock DS1307 connected on Arduino UNO | Step-by-step process | in Arduino IDE Dipslay
- Do It Yourself : HC-SR04 Ultrasonic Sensor utilization using Arduino UNO Board | Step-By-Step process | Using Arduino IDE for display
sources
Posted on Utopian.io - Rewarding Open Source Contributors
Wow! that is an awesome project @leryam12 and it is very well documented! I feel that I can make this project now. Keep it up my friend :)
Downvoting a post can decrease pending rewards and make it less visible. Common reasons:
Submit
Thank You @ted7 , hoping that this can benefit those who are into thia project.
Downvoting a post can decrease pending rewards and make it less visible. Common reasons:
Submit
Your contribution cannot be approved because it does not follow the Utopian Rules.
You can contact us on Discord.
[utopian-moderator]
Downvoting a post can decrease pending rewards and make it less visible. Common reasons:
Submit
Okay Sir. But would it be called as plagiarism if you had sighted the sources for the very first place?
Downvoting a post can decrease pending rewards and make it less visible. Common reasons:
Submit
modified
Downvoting a post can decrease pending rewards and make it less visible. Common reasons:
Submit