Learn Extended Ping and modification of parameters using ping.
What Will I Learn?
- You will learn about Extended Ping.
- You will learn to modify parameters using extended ping.
- You will learn to define any IP address as Source address and ping from any defined address from a single port.
Requirements
- Windows 7(32 bit) or more, Any Linux Distro - Debian/ Ubuntu are provided and supported
- Cisco IOS device images.
- GNS3 Software.
Resources
- Website http://www.gns3.com/
- Github Code Link: https://github.com/GNS3/gns3-gui
- Installation: https://gns3.com/support/docs
- License: GNU General Public License
About GNS3
Graphical Network Simulator-3 (shortened to GNS3) is a network software emulator first released in 2008. It allows the combination of virtual and real devices, used to simulate complex networks. It uses Dynamips emulation software to simulate Cisco IOS.
GNS3 is used by many large companies including Exxon, Walmart, AT&T and NASA, and is also popular for preparation of network professional certification exams. As of 2015, the software has been downloaded 11 million times.
Source
Difficulty
Difficulty is at an Intermediate level.
Description
GNS3 or Graphical Network Simulator is a simulator used for virtual network designs, This software is an open source software and supports Cisco routers and switches by using an emulator known as dynamips. In this video Tutorial we will learn to use extended ping commands which give us the option to modify many parameters and helps in testing the accessibility of the devices on a network. Now i will write down the various steps which will help to explain the video tutorial in a better way.
Step 1
Before you could start using the extended ping commands you will have to form a network. In the video I have started with a network which consists of four routers R1, R2, R3, R4 and four switches SW1, SW2, SW3 ,SW4 where SW2 is connected to R1, SW1 to R4, SW4 to R3. SW3 to R2. So simply drag and drop the routers and switches that you need and form a network by connecting them with serial and straight cables. Serial for Router to Router and Straight for switches to router connections. The network design is also shown below with an image below.

Step 2
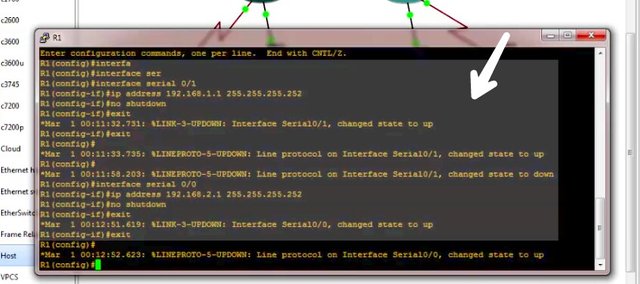
The next step will be to configure IP address to the ports connected to R1 and similarly to all other ports of other routers have to be configured. The ports of the R1 to be configured are interface serial 0/0, interface serial 0/0 and interface fastethernet 0/0.
- The configuration of Serial port 0/1 is shown below.
 interface serial 0/1
ip address 192.168.1.1 255.255.255.252
no shutdown
exit
do wr
- The configuration of Fastethernet port 0/0 is shown below.
interface fastethernet 0/0
ip address 192.168.3.1 255.255.255.0
no shutdown
exit
do wr
- The Configuration for serial port 0/0 is shown below.
interface serial 0/0
ip address 192.168.2.1 255.255.255.252
no shutdown
exit
do wr
The configuration for this step is also shown below with the help of an image.

Step 3
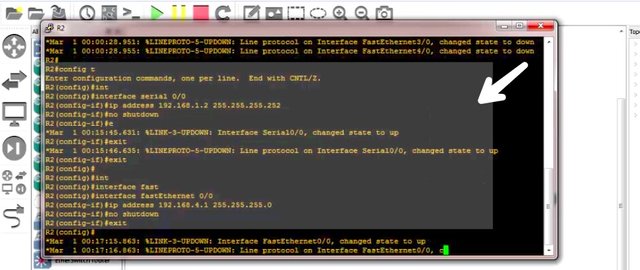
The next step will be to configure interfaces of the router 2 (R2), the ports configured here are serial port 0/0 and fastethernet port
- The configuration for serial port 0/0 is shown below
interface serial 0/0
ip address 192.168.1.2 255.255.255.252
no shutdown
exit
do wr
- The configuration of the fastethernet port 0/0 is shown below
 interface fastethernet 0/0
ip address 192.168.4.1 255.255.255.0
no shutdown
exit
do wr
The configuration for this step is also shown below with the help of an image.

Similarly R3 and R4 must be configured.
Step 4
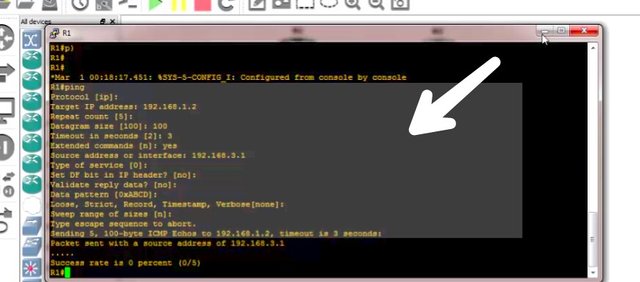
The final step of the tutorial will be to run extended ping command on one the configured routers. The extended ping command is used in the privilege mode by typing ping and pressing Enter.
R1# ping
Following parameters can be modified.
Protocol [ip]
Specify the protocol, such as appletalk, clns, novell, apollo, vines, decnet, or xns. The default is ip protocol.
Target IP address
Specify the IP address or hostname of the host you wish to ping.
Repeat count
We must specify the number of ping packets that will be sent to the destination address. The default is 5.
Datagram size
We must specify the size of the ping packet (in bytes). The default is 100 bytes.
Timeout in seconds
We must specify the timeout interval. The default is 2 seconds. The echo reply needs to be received before the timeout expires, in order for ping to be successful.
Extended commands
We must specify whether or not a series of additional commands will appear. The default is set to no.
Source address or interface
We must specify the interface or IP address of the router to use as a source address for the ping packets. We can choose any interface to ping from by using this parameter.
Type of service
It specifies the Type of Service (ToS). This is the Internet service's quality selection. The default is 0.
Set DF bit in IP header?
We must specify whether or not the Don't Fragment (DF) bit will be set on the ping packet sent. If yes is entered, the Don't Fragment option does not allow this packet to be fragmented. The default is set to no.
Validate reply data?
We must specify whether or not to validate the reply data. The default is set to no.
Data pattern
We must specify the data pattern. Data patterns are used to troubleshoot framing errors and clocking problems on serial lines.
Sweep range of sizes
We must specify the sizes of the ping echo packets that are sent. This parameter is used to determine the minimum sizes of the MTUs configured on the nodes sent along the path to the destination address. The default is set to no.
The configuration for modification of parameters is also shown below with an image.

Video Tutorial
Curriculum
Learn networking with the help of gns3 simulator. Follow the tutorial.
GNS3- Basic Router Configuration (Part 1)
GNS3- Basic Router Configuration (Part 2)
GNS3- Basic Router Configuration (Part 3)
GNS3- Basic Router Configuration (Part 4)
GNS3- Basic Router Configuration (Part 5)
GNS3- Basic Router Configuration (Part 6)
GNS3- Basic Router Configuration (Part 7)
Posted on Utopian.io - Rewarding Open Source Contributors

Hello @neemanbhat, I see great improvement in this video tutorial. It is very encouraging as I see you implementing the suggestions and guidelines given to you a few days ago.
You have added a more comprehensive outline to the tutorial. This is very important for learners to follow.
You have also taken the time to write out the steps in the tutorial. This makes it easy for learners to follow along as they watch the video.
You have also put the outline in a format that adds great teaching presentation because the learners now can focus on the important features that you want to draw their attention to.
A few suggestions for you as you continue to improve in the quality of your video tutorial:
Since this is a video tutorial, you need to work on the oral presentation. You use a lot of 'okay' in your audio. Some of these words actually become distraction when they are used too much.
A lot of video teaching requires us to write an initial script. Not too many people are good at teaching on screen. So if you have a draft script in front of you with all the steps laid out, your presentation will be more succint.
Audio plays a very important part in video tutorials. In your video, you had some coughing sounds. Use Audacity to edit the coughing sounds out. For learners these sounds can be very annoying to their ears esp when they are listening with their ear phones.
If you have further questions, you can contact us at Discord Channel at Utopian.
Need help? Write a ticket on https://support.utopian.io.
Chat with us on Discord.
[utopian-moderator]
Downvoting a post can decrease pending rewards and make it less visible. Common reasons:
Submit
Thankyou i will try to improve more.
Downvoting a post can decrease pending rewards and make it less visible. Common reasons:
Submit
Hey @neemanbhat! Thank you for the great work you've done!
We're already looking forward to your next contribution!
Fully Decentralized Rewards
We hope you will take the time to share your expertise and knowledge by rating contributions made by others on Utopian.io to help us reward the best contributions together.
Utopian Witness!
Vote for Utopian Witness! We are made of developers, system administrators, entrepreneurs, artists, content creators, thinkers. We embrace every nationality, mindset and belief.
Want to chat? Join us on Discord https://discord.me/utopian-io
Downvoting a post can decrease pending rewards and make it less visible. Common reasons:
Submit