Repository
React
https://github.com/facebook/react
Graphql
https://github.com/graphql/graphql-js
Apollo
https://github.com/apollographql/apollo-client
Express
https://github.com/expressjs/express
My Github Address
This Project Github Address
What Will I Learn?
- You will learn how to create a database and database user on mlab.
- You will learn how to make mlab connection with graphql application.
- You will learn how to use Mongoose packages.
- You will learn the concept of mutation in Graphql.
- You will learn how to add data to the mongoDB database with Graphql mutation.
Requirements
- text editor (I used visual studio code editor)
- Basic javascript information
- Basic react information
Difficulty
- Basic
Tutorial Contents
Hello to everyone.
In this tutorial, we will contact the library application with mLab, the cloud system of the mongodb database.
We will create a database using mLab and add users to this database for use in the application.We will install mongoose packages after making the connection. We will produce mongoose models to access the database from the application and send the book and author data to the database with the help of these models.
We will use mutation types in graphql and we will add the authors to the database with mutation. So we will add our first data to the mongodb database with GraphiQL
I have divided this tutorial into sections as follows:
- Make A mLab Connection
- Mongoose Model Creation
- Adding Authors With Mutation
1- Make A mLab Connection
We are ready to connect mLab with our library application. In this section we will talk about what mLab is and build a database on mLab. We will also connect the database we created on mLab with the application.
mLab is a cloud system that provides mongoDB database online and provides the necessary transactions automatically. In fact mLab is a mongoDb that we can use anywhere on the internet and not on local devices.
In order to use mLab in our application, we must first enter the mLab website and become a member. After signing up, we can use the mLab tools and perform database operations.
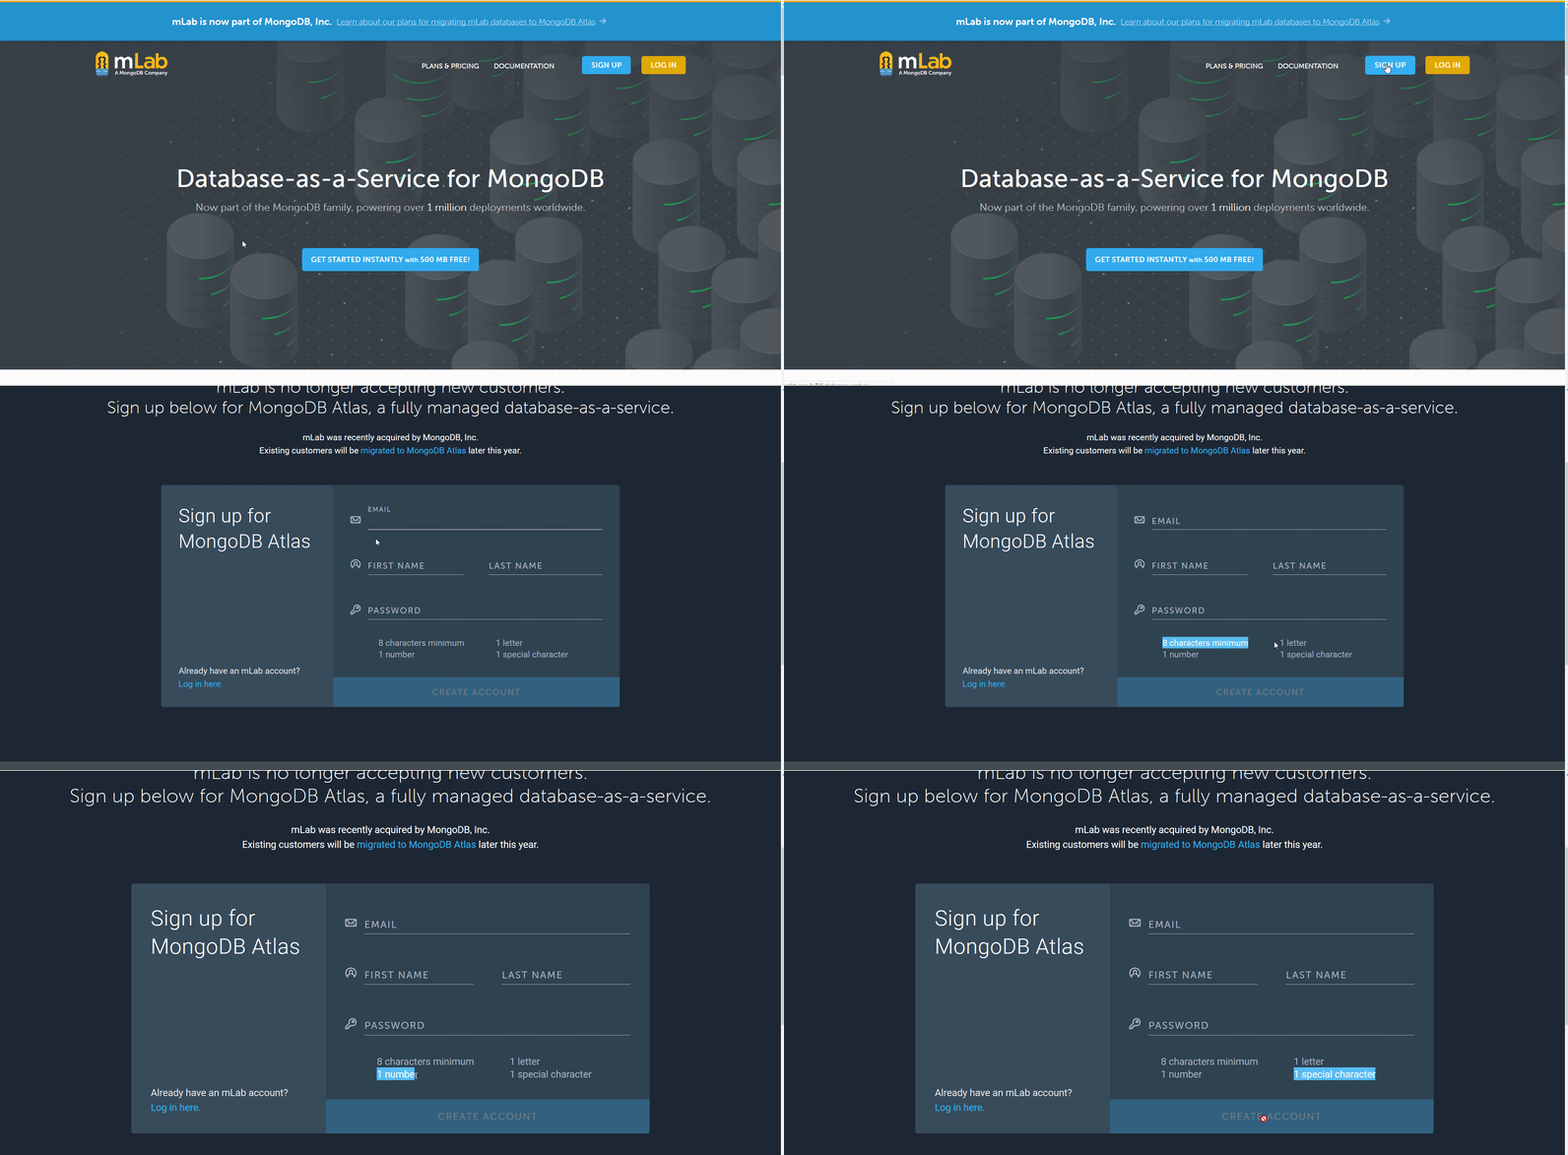
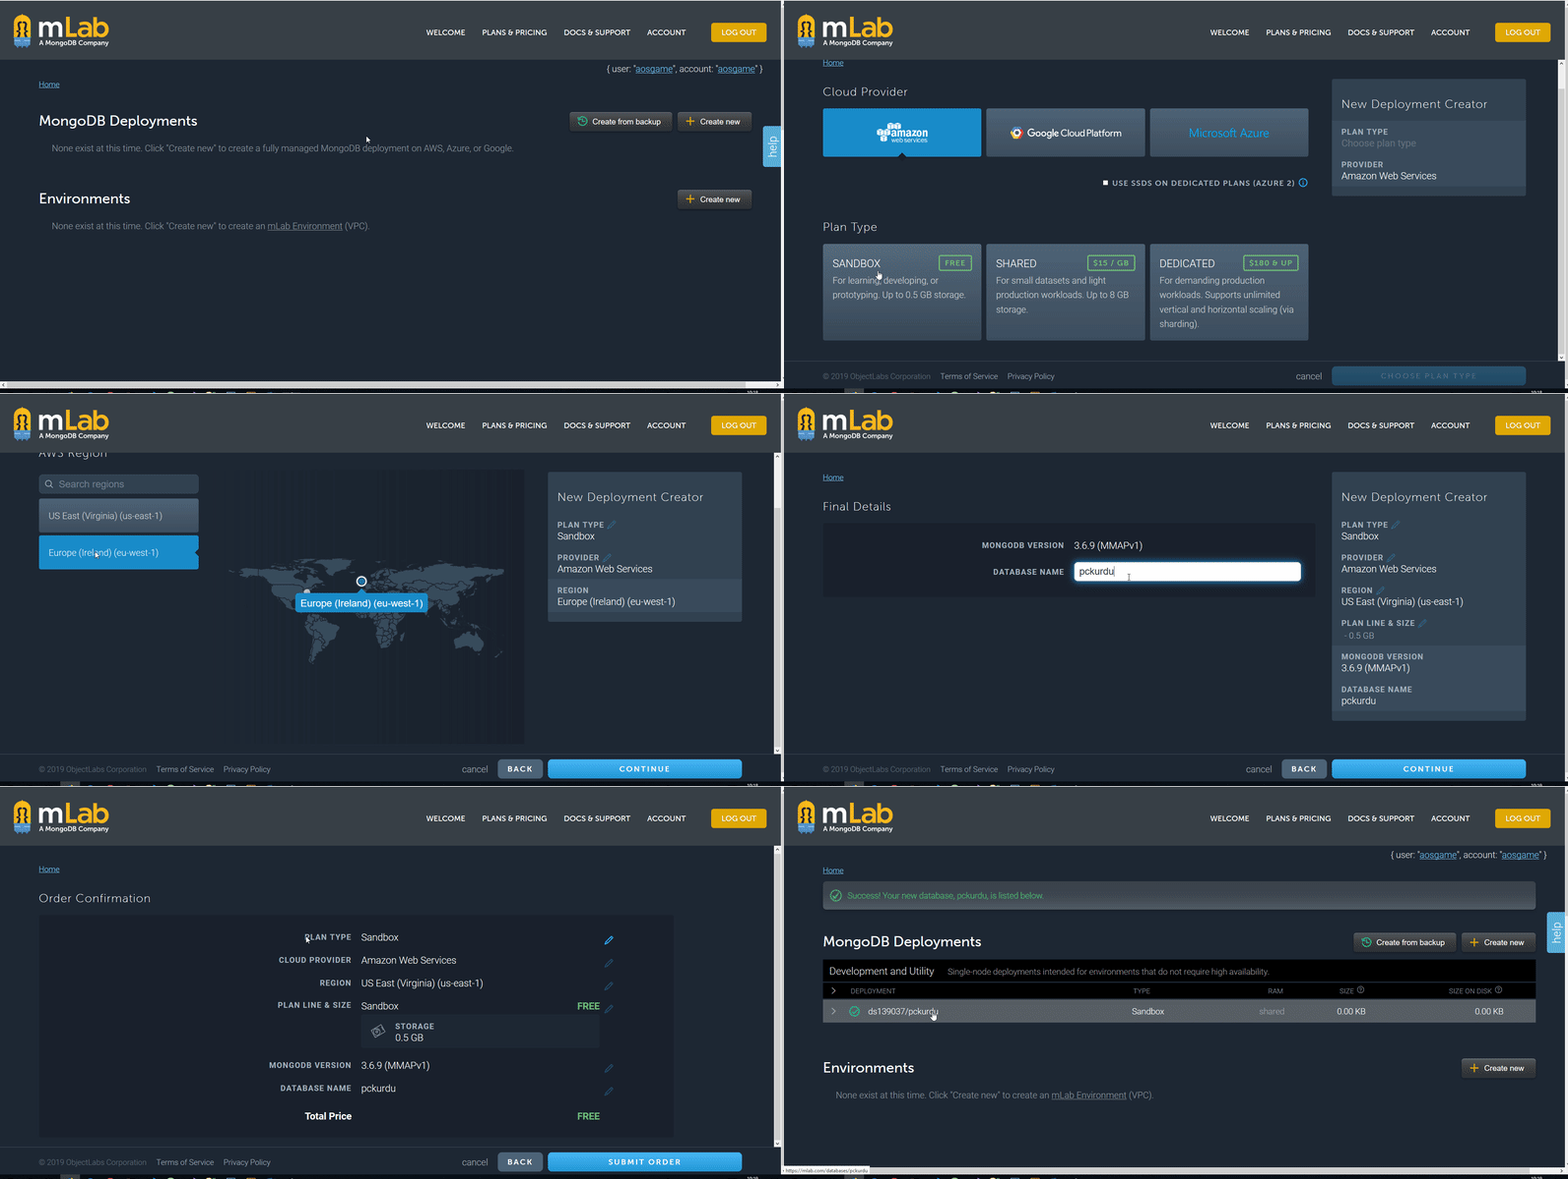
We can create the database after performing the membership process. The following gif shows how to create a database.
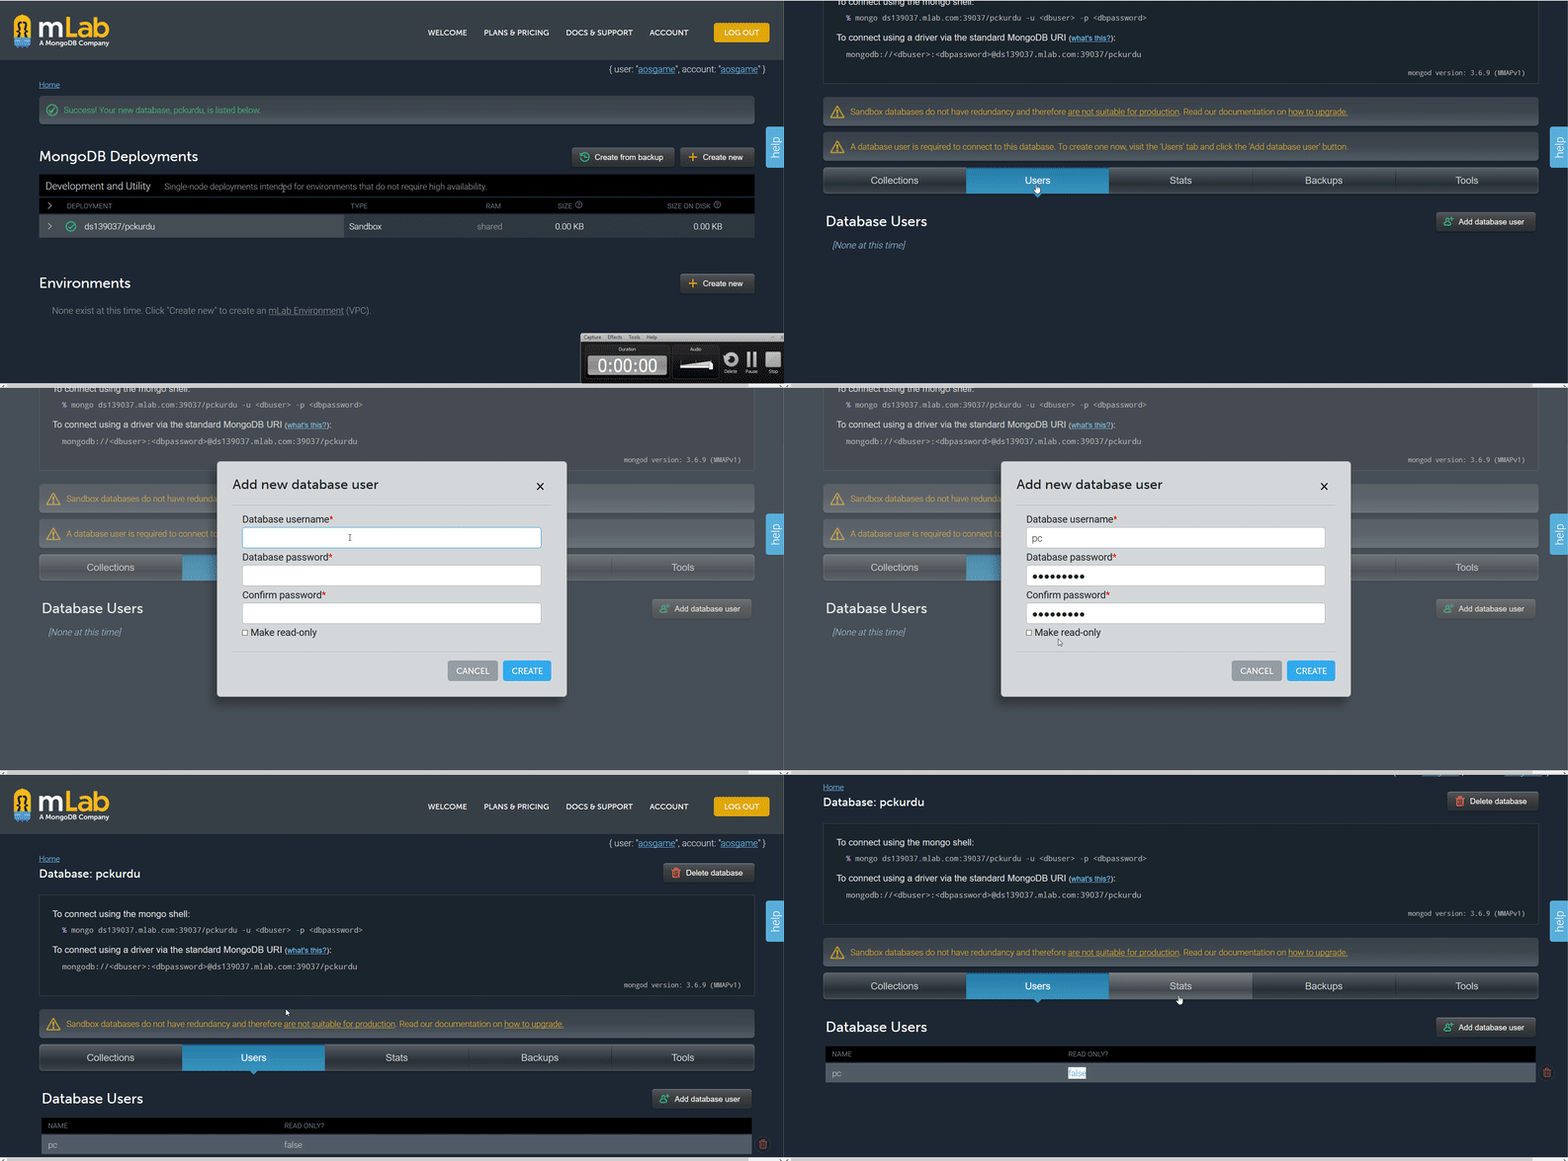
After creating the database, we need to define user in order to use this database. We will identify this user's information within the application and link the application to the database.
Now that we have created a database and a user, we can proceed to the application process. In order to use mongoDB tools in the application, we must use mongoose packages.
First download these mongoose packages for use in the application. Here we have to remember that we need to download mongoose packages into the server folder.
npm install mongoose
After downloading the packages, we need to enable mongoose in the app.js file.
//for mongoose packages
const mongoose=require('mongoose');
We will connect to the database using the connect() function. The connect () function allows us to check whether there are permissions required to connect to the database. We need to use the information of the user we created here.
//generated user information is used.
mongoose.connect('mongodb://<dbuser>:<dbpassword>@ds139037.mlab.com:39037/pckurdu');
You must type the user name that you created in the dbuser field and the user's password in the dbpassword field.
If the entered values are correct, we can now make the connection. Using connection.once (), let's manage the connection and print the mLab connection to the console for success.
//Connecting with mLab.
mongoose.connection.once('open',()=>{
    console.log('mLab conncetion success');
})
Console picture is as follows

2- Mongoose Model Creation
Now that we have created the database we can create models that we will use.
In this section we will create book and author models for the library application using mongoose. We will perform database operations with these models and we will not need the fake data we have created because we will bring the book and author data from the database we created in mLab.
Let's create a separate folder to create mongoose models. We will create a folder named models under the server folder and create the author.js and book.js files under the models folder.
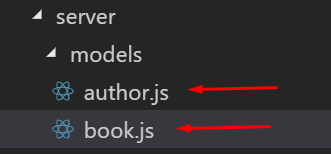
We can now create our models. Let's create the book model.
In models>book.js
//for mongoose tools
const mongoose=require('mongoose');

//for create mongoose schema
const Schema=mongoose.Schema;

//create schema
const bookSchema=new Schema({

    name:String,
    type:String,
    authorId:String
});

//export the schema
module.exports=mongoose.model('Book',bookSchema);
We should use Schema to create mongoose model with schema, we can set which fields to use in the model. We need the name of the book, the type of book, and the authorId of the book to create a book model, we set them as a string.
After creating schema, we need to export this schema to use it as a model. We can export using the model() function in mongoose.
Let's do the same in the author and create the author model.
//for mongoose tools
const mongoose=require('mongoose');

//for create mongoose schema
const Schema=mongoose.Schema;

//create schema
const authorSchema=new Schema({

    name:String,
    age:Number,
});

//export the schema
module.exports=mongoose.model('Author',authorSchema);
So we created models and we don't need fake data because we'll access the data using the model.
Then let's delete all the fake data we have created. We can no longer access fake data using lodash because we have deleted the fake data. Since we will use a model, delete all lodash functions.
After performing deletions, let us define the models we created in schema.js file.
//models
const Book=require('../models/book');
const Author=require('../models/author');
3- Adding Authors With Mutation
In this section, we will create mutation and and add authors to the database with mutation. So what is this mutation?
We use mutation structure in graphql to add, update and delete data. Let's create one mutation and write the code for the adding author process.
In schema.js
//Creating a mutation using GraphQLObjectType
const Mutation=new GraphQLObjectType({

});
We use GraphQLObjectType to create the mutation. In order for our query to see this type as mutation, we must enter the name we defined in the mutation field when exporting the schema.
//we export the schema with root query.
module.exports=new GraphQLSchema({
    query:RootQuery,
    mutation:Mutation
});
Thus we have created the first mutation. What we need to do now is to define the area we want this mutation to do.
//Creating a mutation using GraphQLObjectType
const Mutation=new GraphQLObjectType({
    name:'Mutation',
    fields:{
        //field required to add author
        addAuthor:{
            //author add operations
        }
    }
});
In the addAuthor field, we must set the fields that we will make changes using the author type.
//field required to add author
addAuthor:{
   //author add operations
   type:authorType,
   args:{
      name:{type:GraphQLString},
      age:{type:GraphQLInt}
  },
  resolve(parent,args){
  //mongoDB codes
  }
}
We can access the author's fields using the args field we created. When we create the author object to add to the mongodb field and run the author.save () command, we add the author to the database.
resolve(parent,args){
  //mongoDB codes
  let author=new Author({
    name:args.name,
    age:args.age
});
   return author.save();
}
Then let's test the mutation field and add the first author.
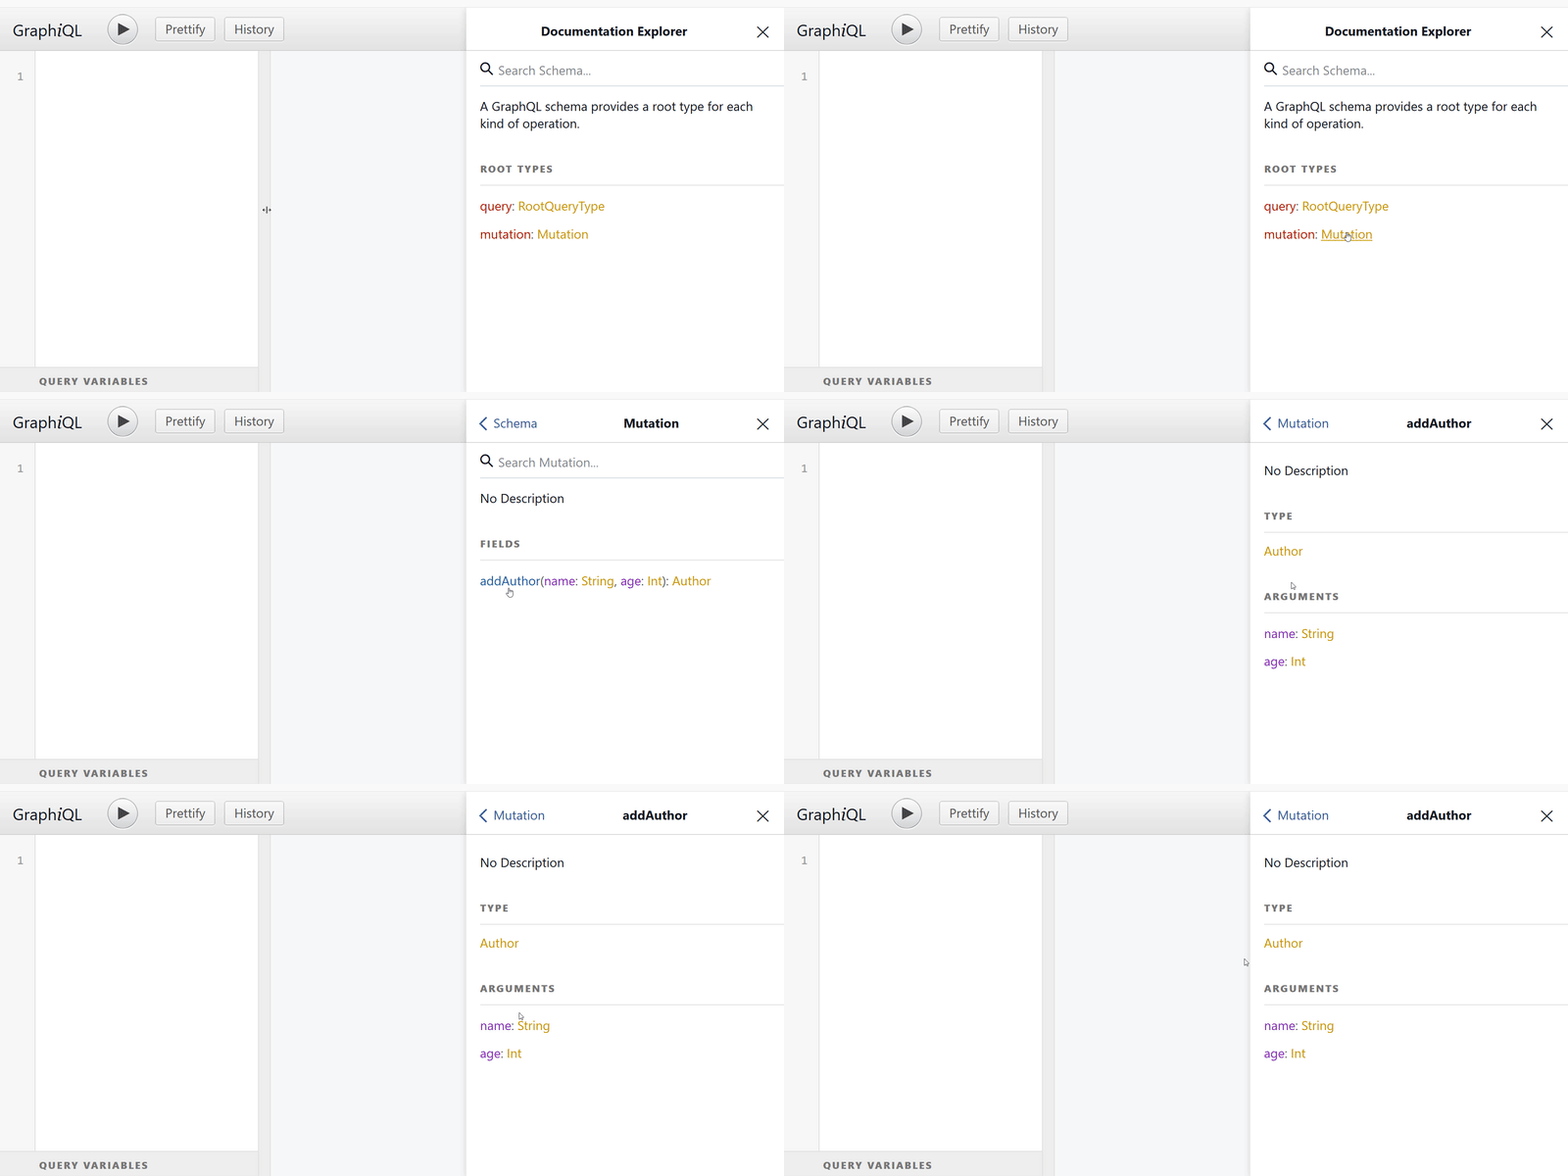
The GraphiQL field now includes the mutation field in the schema
Let's add author using mutation in GraphiQL field.
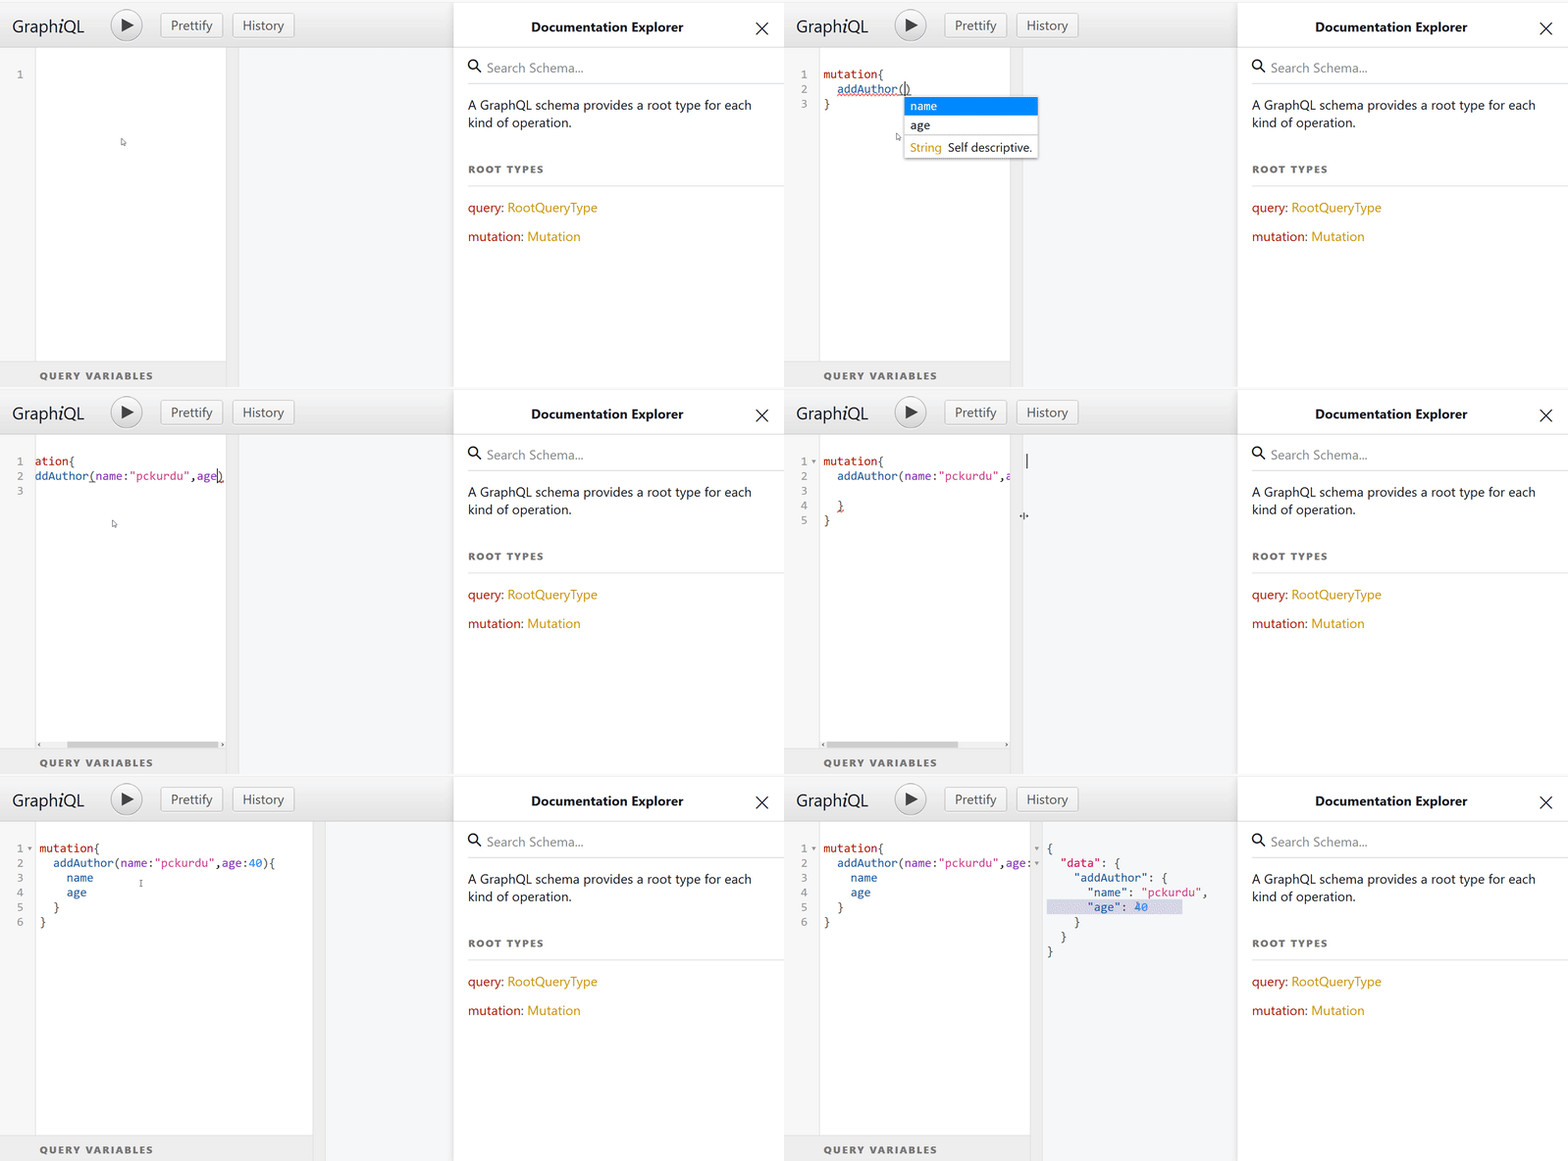
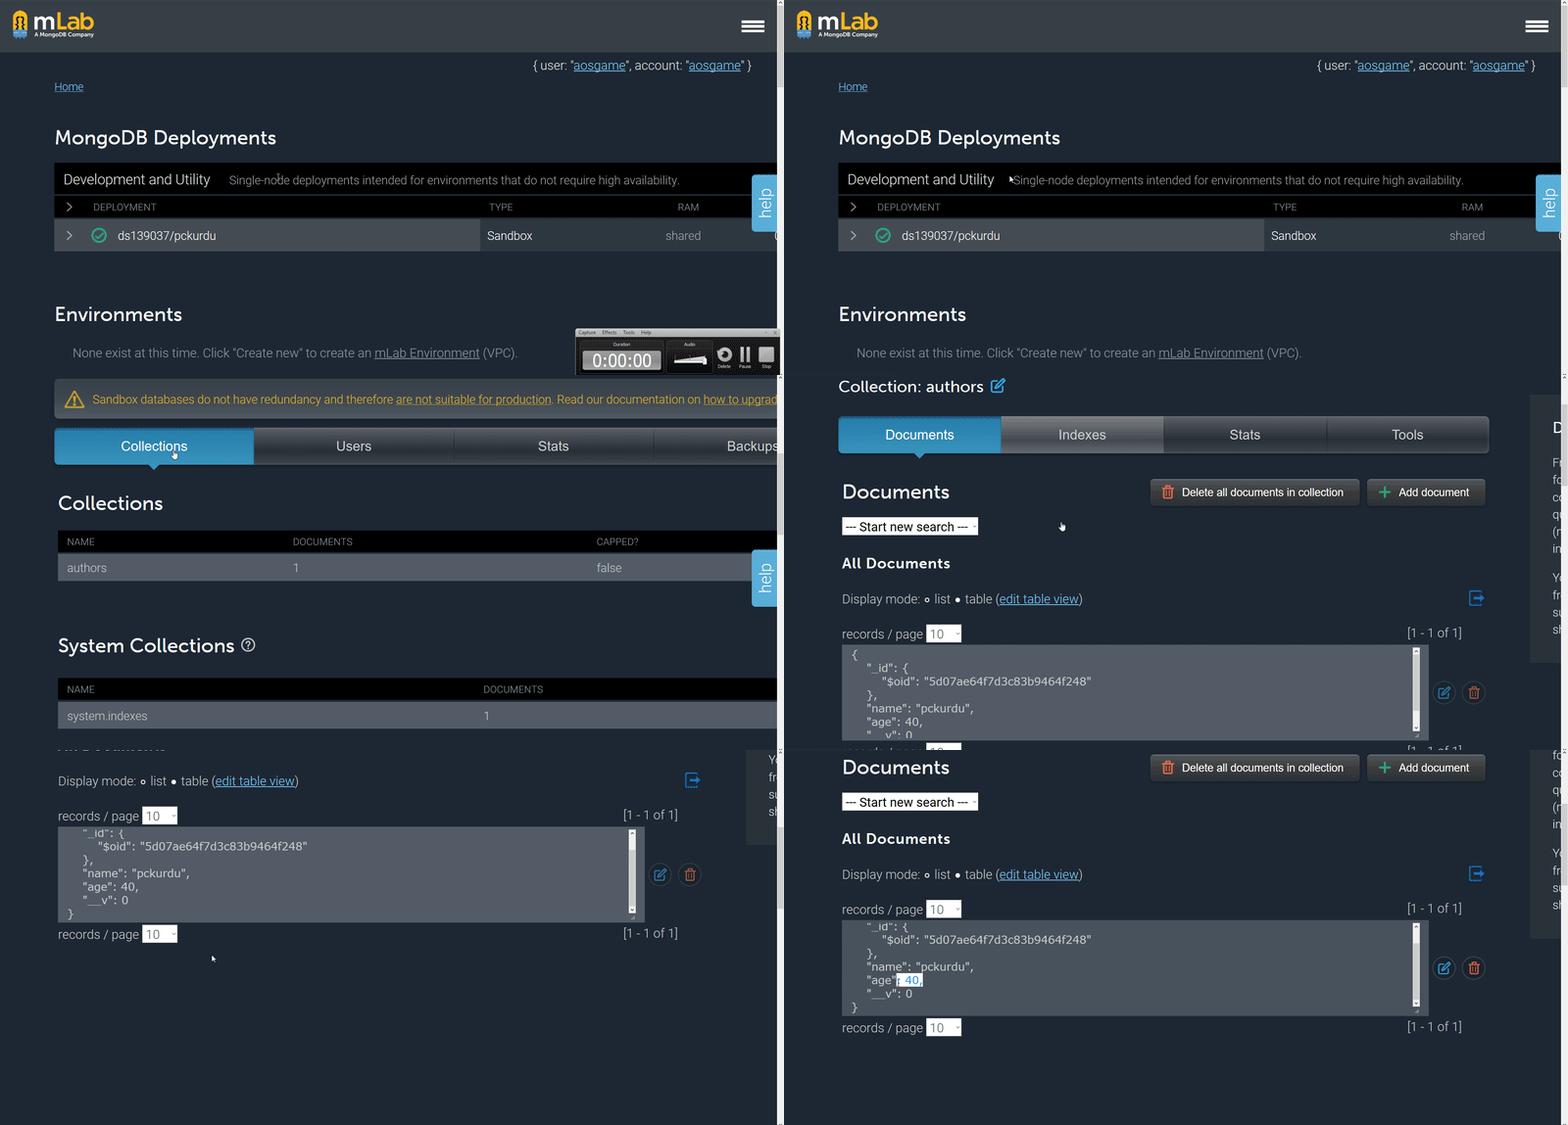
Now we have added our first author. Let's look at the mLab page.
Thank you for your contribution @pckurdu.
After reviewing your tutorial we suggest the following points listed below:
Excellent tutorial, very well structured and explained. Good job!
Using GIFs to show results is definitely better than standard still images.
Thanks for following our suggestions we gave in previous tutorials.
Looking forward to your upcoming tutorials.
Your contribution has been evaluated according to Utopian policies and guidelines, as well as a predefined set of questions pertaining to the category.
To view those questions and the relevant answers related to your post, click here.
Need help? Chat with us on Discord.
[utopian-moderator]
Downvoting a post can decrease pending rewards and make it less visible. Common reasons:
Submit
Thank you for your review, @portugalcoin! Keep up the good work!
Downvoting a post can decrease pending rewards and make it less visible. Common reasons:
Submit
Hi @pckurdu!
Your post was upvoted by @steem-ua, new Steem dApp, using UserAuthority for algorithmic post curation!
Your post is eligible for our upvote, thanks to our collaboration with @utopian-io!
Feel free to join our @steem-ua Discord server
Downvoting a post can decrease pending rewards and make it less visible. Common reasons:
Submit
Hey, @pckurdu!
Thanks for contributing on Utopian.
We’re already looking forward to your next contribution!
Get higher incentives and support Utopian.io!
Simply set @utopian.pay as a 5% (or higher) payout beneficiary on your contribution post (via SteemPlus or Steeditor).
Want to chat? Join us on Discord https://discord.gg/h52nFrV.
Vote for Utopian Witness!
Downvoting a post can decrease pending rewards and make it less visible. Common reasons:
Submit
Hi bro, I have some tasks related to vue and react all on Github and utopian approved. Can you help me with some? I have some steem bounty too and the bounty isn’t big as I am really short on funds but I will love to tip additional steem especially where contributions are timely. I really need help basically.
Here is a list:
https://steemit.com/utopian-io/@surpassinggoogle/in-dire-need-of-help-are-you-ready-to-make-your-picks-1500-steem-and-20-000-teardrops-shared-among-a-collection-of-development
Most of the assigned tasks havent really been taken yet as those who were assigned became unavailable.
The projects are steemgigs.org and ulogs.org
Downvoting a post can decrease pending rewards and make it less visible. Common reasons:
Submit