What will I learn?
- What is firebase
- Adding firebase in your android application
- Signing up the user to firebase database
- Adding user data to firebase database
Requirement
- A PC/laptop with any Operating system such as Linux, Mac OSX, Windows OS
- Preinstalled Android Studio, Android SDK and JDK
Note: This tutorial is performed in Android Studio on the laptop with Windows 10 Home, 64 bit OS
Difficulty
Anybody with basic knowledge of Android can grasp the tutorial
Tutorial Content
In this series, we will be creating a chatting application which shows the list of users registered in firebase database and on can chat with any of the users registered. We will also be showing chats and total contacts and we will also work on sending push notification if the user is not online while chatting.
There are many scenarios for the Android developer where they want to make their application dynamic and in most of the scenarios, the Android developer needs to learn web development to store their user’s data in the server. Hence in order to make the task of developers easy, Google launched Firebase so that the users do not have to worry about the server, data storage etc. The developer simply has to add firebase to their project and they can get multiple features like real time storage, real-time database, crash analytics and so on. This lead to the development of more qualitative apps, good user experience and so on. Hence firebase is a mobile platform which helps us to develop a qualitative application without having to be worried about the server, database etc and so on.
Why Firebase?
There are many alternatives for firebase like Deployd, Socket.io, AWS, Back4App etc and so on. But firebase has gained huge popularity for its many features like:
Huge Developer support: The community of firebase is growing day by day and there are tons of developers out there to help if you got stuck in the middle
Easy to implement: Firebase is very easy to implement and it does not need any server-side configuration
Multi-features: FIrebase provides tons of features like the multi-authentication system, real-time storage, real-time database, push notification, user crash analytics and so on. Hence it provides many features which make application development more easy and fun.
Free: We can get access to firebase database for free if we have a Gmail account.
Setting up the firebase in our Android project
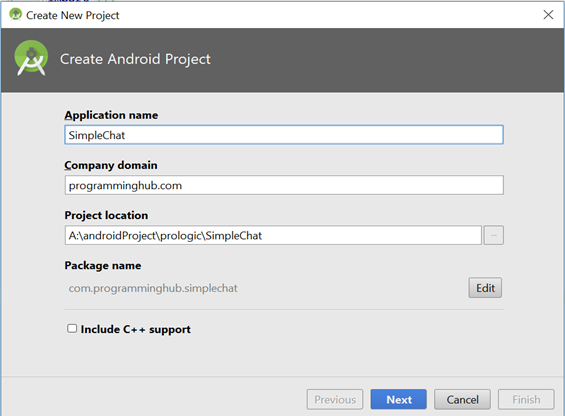
We will name out project SimpleChat
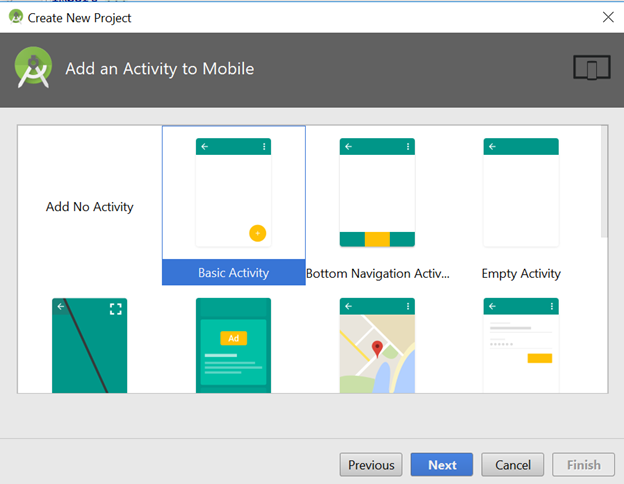
We will be selecting BasicActivity and naming our Activity MainActivity
After that project opens up and now let us start integrating firebase in our project. Before setting up firebase we should add permission in our manifest to le our application get access to the Internet. So open AndroidManifest.xml and add the permission right above tag:
<uses-permission android:name="android.permission.INTERNET" />
Now as out app has permission to access Internet now let us setup firebase. Click on Tools Firebase to open up FIrebase Assistant window on your right side.
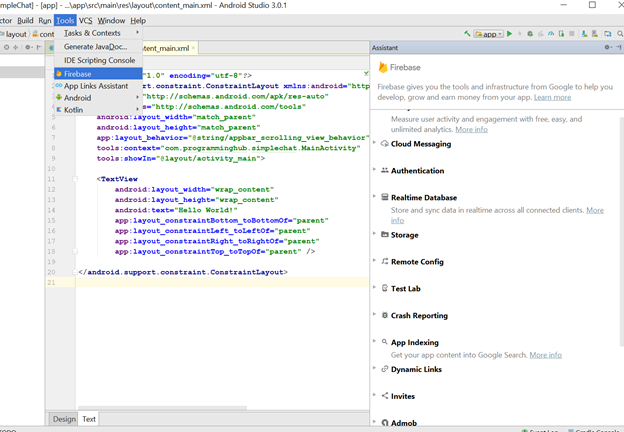
After that expand the authentication tab

And click on an email and password authentication after that you will see the connection to firebase button.
Simply click on that button

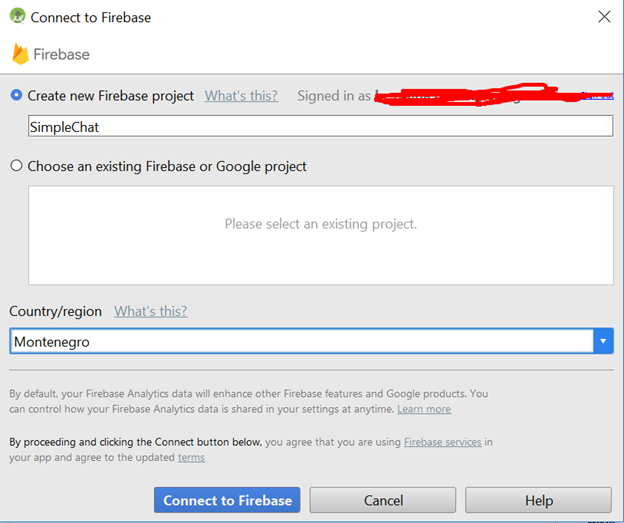
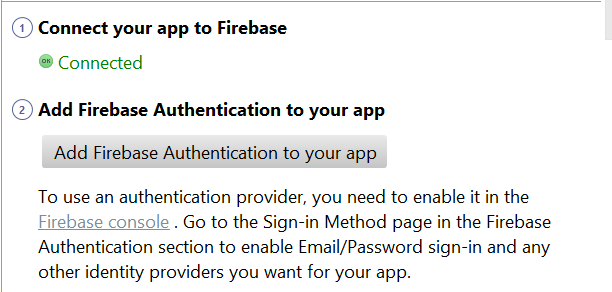
Now click on Create new firebase project and click connect to firebase. It will take some time to register the application on firebase and after that click on add firebase authentication to your application.
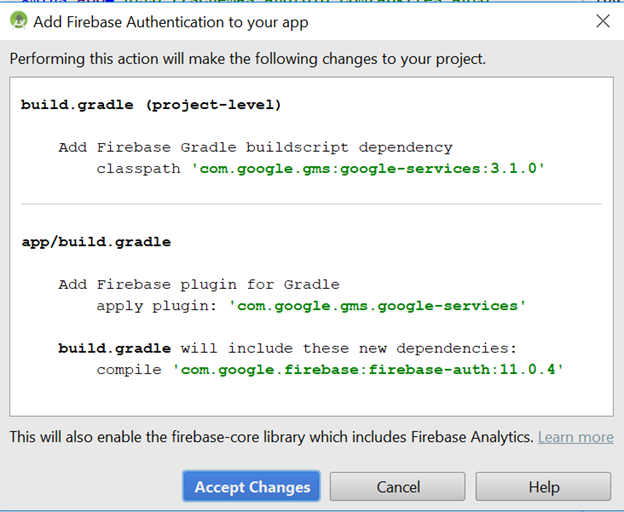
It will show you a popup dialog like this one. Click on accept changes
After that expand cloud messaging and click set up firebase cloud messaging

And click add FCM to your app. This will add cloud messaging feature to your application. Similarly, repeat the same process for Real-time database and storage. Now we are all set to go. As we have added 4 features of a firebase in our application that is authentication, real-time database, cloud messaging and cloud storage.
Now create a new Activity named SignUpActivity in order to make our user sign up to the server.
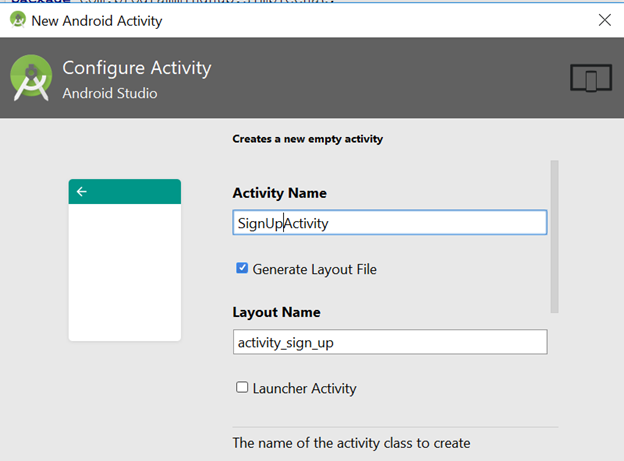
Now open activity_sign_up.xml and write the following code:
<?xml version="1.0" encoding="utf-8"?>
<LinearLayout xmlns:android="http://schemas.android.com/apk/res/android"
   xmlns:app="http://schemas.android.com/apk/res-auto"
   xmlns:tools="http://schemas.android.com/tools"
   android:layout_width="match_parent"
   android:layout_height="match_parent"
   android:orientation="vertical"
   tools:context="com.programminghub.simplechat.SignupActivity">

   <EditText
       android:id="@+id/email_et"
       android:hint="Email"
       android:layout_width="match_parent"
       android:layout_height="wrap_content" />
   <EditText
       android:id="@+id/password_et"
       android:hint="Password"
       android:layout_width="match_parent"
       android:layout_height="wrap_content" />

   <Button
       android:id="@+id/signup_btn"
       android:text="Sign up"
       android:layout_width="match_parent"
       android:layout_height="wrap_content" />
</LinearLayout>
Here we have two EditText to make user input their email and password respectively and we have a Button to make the user signup.
Now let us open SignUpActivity.java. We will be performing signup if the user presses the signup button. So we have added some validation which ensures us that the email and passwords field is not empty.
Now in order to register user to firebase we have to write the following code:
FirebaseAuth auth=FirebaseAuth.getInstance();
private void registerUserToDatabse(){

auth.createUserWithEmailAndPassword(email,password).addOnCompleteListener(SignupActivity.this, new OnCompleteListener<AuthResult>() {
       @Override
       public void onComplete(@NonNull Task<AuthResult> task) {
           Toast.makeText(SignupActivity.this, "succesfully created user::email is:"+ task.getResult().getUser().getEmail(), Toast.LENGTH_SHORT).show();
          //task.getResult().getUser();
       }
   });

}
We can register user in firebase by simply calling createUserWithEmailAndPassword() method. Here onComplete is called if the user creation is successful. In order to make our SignUpActivity execute first we will have to open AndroidManifest.xml and make our SIgnupActivity execute first. So we just have to move our <intent-filter> to achieve this. The manifest looks like this:
<?xml version="1.0" encoding="utf-8"?>
<manifest xmlns:android="http://schemas.android.com/apk/res/android"
   package="com.programminghub.simplechat">
<uses-permission android:name="android.permission.INTERNET"
   <application
       android:allowBackup="true"
       android:icon="@mipmap/ic_launcher"
       android:label="@string/app_name"
       android:roundIcon="@mipmap/ic_launcher_round"
       android:supportsRtl="true"
       android:theme="@style/AppTheme">
       <activity
           android:name=".MainActivity"
           android:label="@string/app_name"
           android:theme="@style/AppTheme.NoActionBar">

       </activity>
       <activity android:name=".SignupActivity">
           <intent-filter>
               <action android:name="android.intent.action.MAIN" />

               <category android:name="android.intent.category.LAUNCHER" />
           </intent-filter>
       </activity>
   </application>
</manifest>
We already have added the function for signing up in our application but we should also allow the permission to sign up using email in our developer console of the firebase. So open
(https://console.firebase.google.com)
Login to the account you created your project. Open the project and you will see something like this:
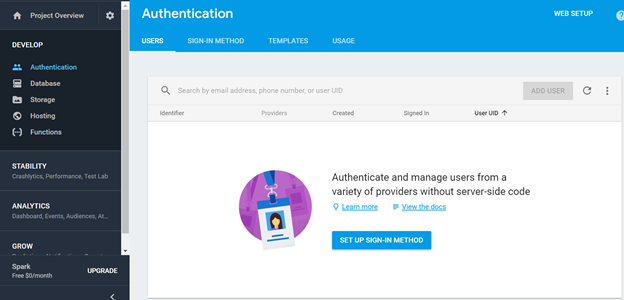
Now click on setup sign-in method and it will show you a list of authentication mode available in firebase. For now, we are only using email/password sign-in method.

Click the edit button and enable this authentication
And click on save button

Now let us run the application and see what happens
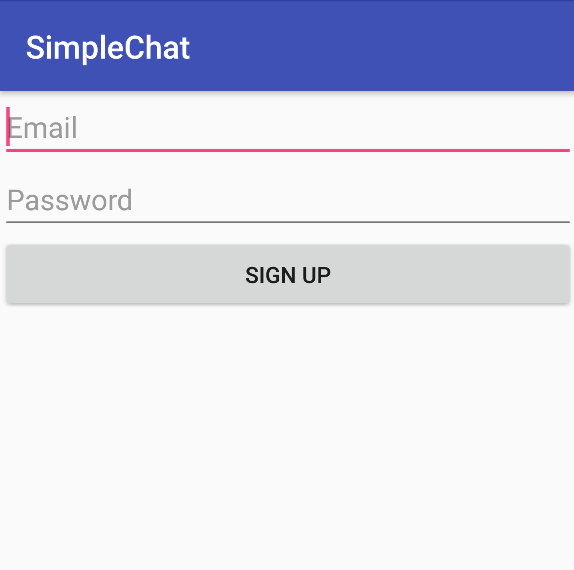
It showed up SignupActivity as expected. Now let us try adding email and password to see if registration works or not.
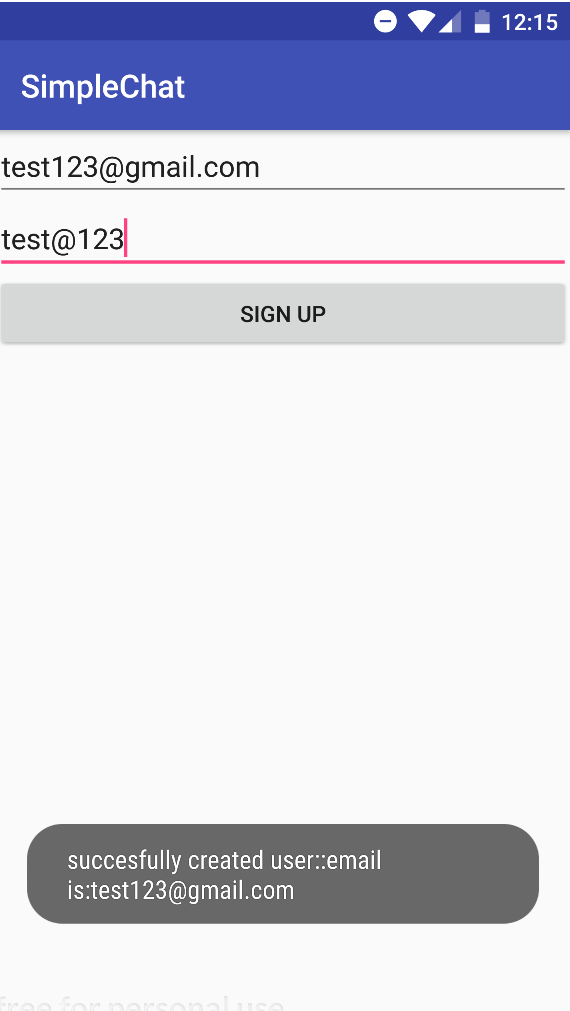
It worked as we can see the toast message being printed. Now go to your firebase developer console and view under user section. Here you can see the user we created from our app being saved.

Now as we successfully created a user we also have to save the user in our database so that we can, later on, make the user chat with other people and we can uniquely identify the user. In order to add the user to our firebase database we will be using FirebaseDatabase feature:
private void addUserInDatabse(FirebaseUser user){
   FirebaseDatabase.getInstance().getReference().child("simpleChat").child("users")
           .child(user.getUid()).setValue(user);
}
By using Firebase database we can store and retrieve our data in real time. Firebase stores data in JSON format so that we can easily access the data. Here FirebaseDatabaes.getInstance().getReference() get the database reference for the database root node. The child “simpleChat” will be the main parent of our database which will contain many childs like users, chats which we will be using to get the data. And finally, we will push our user object to the user_id so that it will prevent overriding of the data.
The final code of SignupActivity looks like this:
public class SignupActivity extends AppCompatActivity {

    EditText emailEt,passwordEt;
    Button signUp;
    String email,password;
    FirebaseAuth auth;
    @Override
    protected void onCreate(Bundle savedInstanceState) {
        super.onCreate(savedInstanceState);
        setContentView(R.layout.activity_signup);
        initView();
        defineView();
        addCLicklistener();
    }

    private void defineView(){
        emailEt=findViewById(R.id.email_et);
        passwordEt=findViewById(R.id.password_et);
        signUp=findViewById(R.id.signup_btn);

    }
    private void initView(){
        auth=FirebaseAuth.getInstance();

    }

    private boolean validate(){
        boolean isValid=false;
        email=emailEt.getText().toString();
        password=passwordEt.getText().toString();
        if(TextUtils.isEmpty(email))
            emailEt.setError("Required");
        else if(TextUtils.isEmpty(password))
            passwordEt.setError("Required");
        else
            isValid=true;
        return isValid;
    }
    private void addCLicklistener(){
        signUp.setOnClickListener(new View.OnClickListener() {
            @Override
            public void onClick(View view) {
                if(validate())
                    registerUserToDatabse();
            }
        });
    }
    private void registerUserToDatabse(){
        auth.createUserWithEmailAndPassword(email,password).addOnCompleteListener(SignupActivity.this, new OnCompleteListener<AuthResult>() {
            @Override
            public void onComplete(@NonNull Task<AuthResult> task) {
                Toast.makeText(SignupActivity.this, "succesfully created user::email is:"+ task.getResult().getUser().getEmail(), Toast.LENGTH_SHORT).show();

                addUserInDatabse(task.getResult().getUser());
            }
        });

    }

    private void addUserInDatabse(FirebaseUser user){
        FirebaseDatabase.getInstance().getReference().child("simpleChat").child("users")
                .child(user.getUid()).setValue(user);
    }
}
Here initially we are getting the instance of Firebase Database. “simpleChat” will be our main database name and we will be adding users to the “users” header. We will be executing this method after the user is successfully created. Now let us run the application again:
Now select the Database tab on your right-hand side of firebase console and there you can your data being inserted into the database.
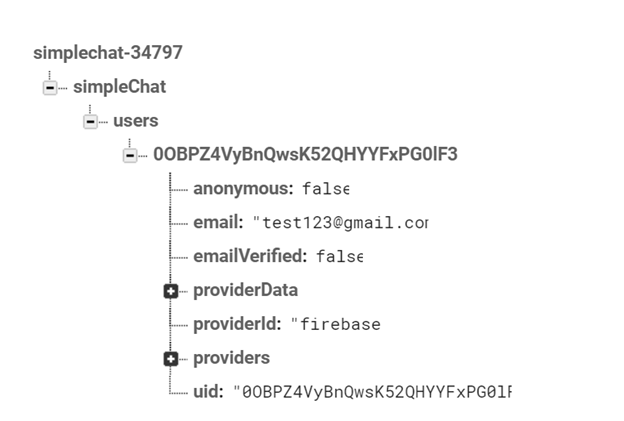
Under user, we have added the user to their user_id created by firebase so that the data will not be overwritten and each and every user will be created uniquely. Now if we create another user then the data of new user will be pushed down using the new user user_id like this:
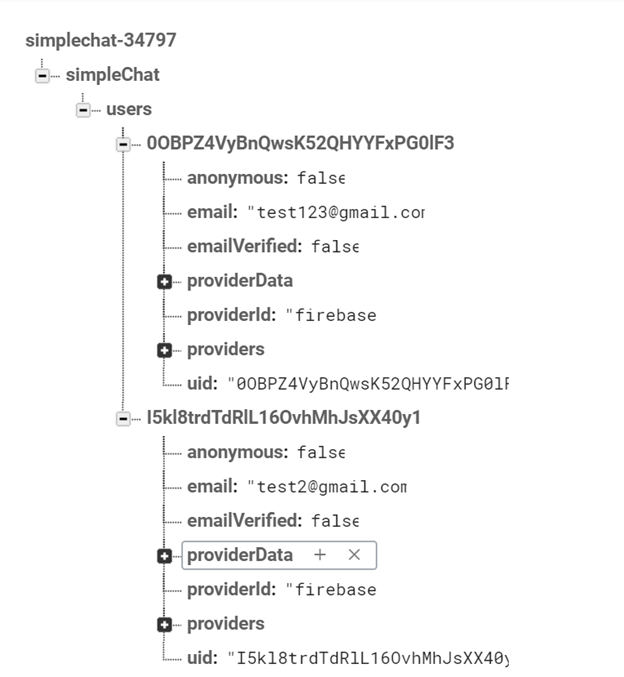
In this way, we have successfully added firebase in our project. We learned to signup our new user and we also learned to add the data of the user in firebase database. We learned about authentication and database and in next section, we will learn how to upload user image to firebase database using firebase storage.
All above codes are available in my Github. Click here to download.
Posted on Utopian.io - Rewarding Open Source Contributors
Thank you for the contribution. It has been approved.
You can contact us on Discord.
[utopian-moderator]
Downvoting a post can decrease pending rewards and make it less visible. Common reasons:
Submit
Hey @programminghub I am @utopian-io. I have just upvoted you!
Achievements
Community-Driven Witness!
I am the first and only Steem Community-Driven Witness. Participate on Discord. Lets GROW TOGETHER!
Up-vote this comment to grow my power and help Open Source contributions like this one. Want to chat? Join me on Discord https://discord.gg/Pc8HG9x
Downvoting a post can decrease pending rewards and make it less visible. Common reasons:
Submit